Monday, June 30, 2025

BEE HAPPY SO CUTE LAYOUT | with Brianna

Hey friends! Brianna here today and I'm so happy to share another layout using the so adorable, Bee Happy collection. Here's my page: 

Before I started this page, I was brainstorming and thought.. let's add a bunch of patterns to this layout! And that's just what I did. I ended up choosing the Bee Happy paper as my base and then trimmed out a 10x12 piece from the Sweet As Honey paper and layered it right on top. I wanted a pop of solid color so I trimmed down a piece of the Swimming Pool cardstock and layered it right under the Sweet As Honey paper so only a little strip of it was peeking out. Next, I adhered those papers down.

I took a look at the foundation of my page and thought it could use a bit more pattern, so I trimmed down a piece of the B side of the Bee Happy paper and centered and adhered it down. I also added in the cardstock scrap I had leftover to serve as a grounding piece for my photos and I love how it turned out!! I'm so happy that I captured this moment between my daughter and son. Even with the massive age gap, they're still so very close!

Now that all of my paper layers were complete, I got to work on embellishing the rest of my page. I built my title using a couple of phrases from the All The Things pack and made sure to pop it up on foam tape for more interest.  I then selected a few other pieces that would sandwich my photo clusters and couldn't resist adding that adorable bee right next to my title. 

I added a fun little phrase sticker from the 12x12 Icons sticker sheet at the top of my photos and then adhered a few more embellishments around it. The white heart stickers are from the My Honey Doodle-Pop that I had leftover from my previous layout. They look so cute surrounding that bee!

For some final touches, I sprinkled in some smaller Puffy Icons stickers and that completed my page! Here's one last look: 

Thanks so much for stopping by today, I hope that I've inspired you in some way! I'll see you in my next post friends!


BLOG INSTAGRAM | YOUTUBE

DOODLEBUG PRODUCTS USED

Bee Happy Collection
12x12 Bee Happy Solid Assortment Cardstock

Saturday, June 28, 2025

BEE HAPPY YOU'RE SO SWEET LAYOUT | with Tarrah

The Bee Happy collection is bursting with sunshine, honey, and the cutest little bees and bears you’ve ever seen! It was the perfect match for a cherished photo of my mum and me — a memory I wanted to document in a cheerful, lighthearted way! 

I started by layering multiple colored cardstock, deciding on a bold black base to ground the layout, I then added teal and yellow borders to make everything pop and give it that classic Doodlebug vibrancy. I machine stitched a border on the white cardstock, I love the hand-sewn touch added to my layouts.


To create that fun circular focal point, I used the Shadow Box Insert Kit as a guide and started layering stickers and die cuts from the stickers and sprinkles packs provided in the kit. I filled the circle with bees, flowers, honey pots, bears, clouds, and even a hive on a branch. The mix of dimension using foam adhesive, color, and whimsy really brings this cluster to life — it looks like the bees are buzzing right off the page. 


I printed my photo 3' x 4' and backed it with a darker patterned paper to help it stand out against the colorful background. I added the “Sweet Memories” label sticker across the bottom corner of the photo and layered a floral die cut over the photo to disguise the background in the photo.

Below the circle, I added the phrase “You’re So Sweet” from the Chit Chat pack, paired with a green scallop border strip from the This and That sticker sheet to anchor it visually. And of course, I added the stamped date under the photo.


This layout makes me smile every time I look at it — it’s such a happy reminder of a sweet day and was so fun to make. The Bee Happy collection is seriously perfect for spring, summer, or anytime you want to add a little buzz of joy to your projectsHappy crafting!

DOODLEBUG PRODUCTS USED

Bee Happy collection
Bee Happy Coordinating Cardstock
Bee Happy Shadow Box Insert Kit

OTHER

Vellum
Date stamp
Black ink

Friday, June 27, 2025

BEE HAPPY SWEET SUNSHINE MINI ALBUM | with Niella

 Buzz right on in crafty crew, so happy to see you today! With only a few days left in June, let's get into it! I am so happy to show you my first Bee Happy project with the sweetest bee mini collection to date! This 6x4 mini album is chunky! There is so many pages I want to show you and point out, so instead of more than a dozen photos; just check out the video showcase at the end, yay! Videos are a perfect way to show you projects! 


The cover is Bee-utiful! And so cute with the Bee Happy Doodle-pop! She's the queen bee and her busy workers are working hard to bring the pollen into harvest.  How sweet is the mushrooms and word stickers cluster! 


If you're like me and ADORE yellow, greens and mint blues together, you are gonna love this collection. I love the pops of black and white! Super charming!  These first two pages feature a fun mix of the All the Things ephemera and This & That stickers!


I love to add machine stitching to my album pages. It adds extra texture and helps to add areas of interest.  Look how cute the collection's Honeycomb acetate looks with the cut-apart tag and honey-pie ephemera piece. Adding acetate and vellum pages add so much interest!


Skipping ahead comes to the last couple pages in my mini album.  How cute is that bee couple? A couple of cuties right there! The vellum holds the Busy Bee shaker pieces! Can you spot how I've cut around the honeycomb to give a fun edge for my tag tuck spot? Cute idea!


This last page measures nearly 6x4 and it's so sweet with scalloped vellum tuck spot! CUTE!  The sprinkles and stickers add that final touch.  I love making little charm pieces with the Shaker pieces.  If you'd like too see all the pages, I've added the video showcase below for you, yay!


Thank you again for visiting crafty crew! I hope you've found inspiration today! Please remember to tag us in our your Socials when you create with Doodlebug so we can all admire your creativity! We love seeing your creations. Until next time; doodle day!


DOODLEBUG PRODUCTS USED

Bee Happy Collection
Bee Happy Coordinating Cardstock


OTHER

Liquid adhesive
Foam squares/dots
Vellum
Machine Stitching
Decorative scissors
Discs
Disc punch

Thursday, June 26, 2025

BEE HAPPY CUTE CARDS | with Karen

Sometimes I sit down at my crafty table and I just can't bee-lieve my luck. I mean, how many people get a chance to regularly work with the cutest products on the market? The new Bee Happy mini collection from Doodlebug is un-bee-lieaveably adorable. And if you are lucky like me and a get a chance to craft with it, you will bee smiling from ear to ear the whole time!

Okay, enough with the puns - let's get serious! :) For my first project, I decided to whip up some cards. Using some Doodlebug Cards and Envelopes for the base, I grabbed some of my favourite patterns from the 6x8 patterned paper to form a little frame.

Then I chose some adorable die cuts from the All the Things pack for the focal point on each. I couldn't resist featuring bees on each of these cards, but there are so many designs that you could try a number of different themes (but let's bee real - if you don't loves the bees as much as I do, we cannot be friends).

I also added a little sentiment from the same die cut pack. There a bunch of different ones to work with for a variety of occasions. A couple of mini paper clips and some coordinating sprinkles and these cards are ready for their debut.

I mean, come on - how cute is that face? Don't bee afraid to play with layers here. Some well placed foam adhesive and a little bend on the wings can really make the dies cute pop off of the card!

And that's it! A set of cards that can bee the reason someone smiles today - if you're willing to give them away, that is (I won't judge). Now I really am done with the puns! Thanks for stopping by! Hugs,


BLOG | INSTAGRAM

DOODLEBUG PRODUCTS USED

Bee Happy Collection
Cards and Envelopes
Mini Paper Clips

Wednesday, June 25, 2025

BEE HAPPY BEE PENCILS | with Miguel

Once again, the Busy Bee Doodle Cuts were my favorite product from this Bee Happy collection, and the bee design is absolutely gorgeous.  I decided to cut them out and assemble them to hang them on some pencils that were the perfect design for this collection.


I created two designs, cutting each piece from the Bee Happy Coordinating Cardstock. I love the array of colors that are available.


I cut several layers of foam to give height to my pieces.

Decorating and bringing pieces to life is something I really enjoy doing because it allows me to let my imagination run wild and create unique pieces. Here are some of my favorite products, such as Odds and Puffy Icons.

I particularly liked this idea as a nice, unique, and very original gift. The pieces are hung with a chain so they can be used later on another object. 


Have a great day!


FACEBOOK | INSTAGRAM

DOODLEBUG PRODUCTS USED

Bee Happy Collection
Bee Happy Coordinating Cardstock
Busy Bee Doodle Cuts

Tuesday, June 24, 2025

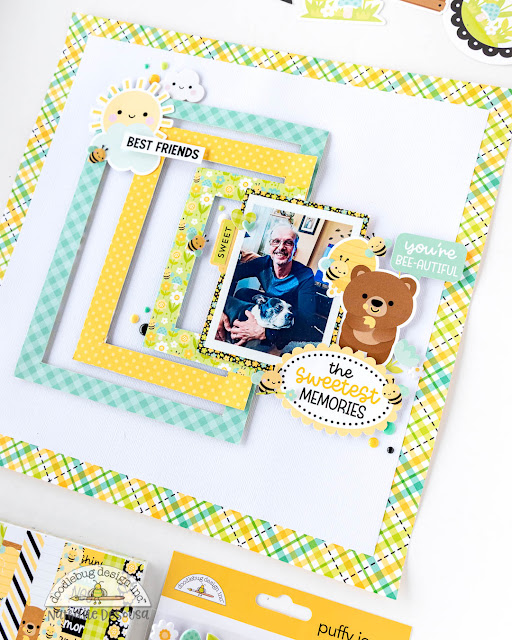
BEE HAPPY THE SWEETEST MEMORIES PAGE | with Nathalie

IT is time for us to show you a fun filled ideas featuring the new Bee Happy collection.   I think that the theme, colors, and designs in this collection make it so easy to document your Summer and simply your daily activities with style.


I wanted a combination of colors and structure for this page, so the idea of creating the frames from the papers in the 6x8 paper pad just popped on my mind.


I used a crafty knife to trim the frames out from different patterns from the 6x8 paper pad.  I made sure to reduce the size of the frames so that they create the graduated look on the page.  I attached to the base with foam adhesive, but decided to set them so that the left edge of all the frames stacked together.


I used pieces of the 6x8 papers to back the photo, and placed it to the right of the frames.  I then combined pieces from the stickers, ephemera pack, and puffy stickers to create a large cluster and title to the right of the photo.   These pieces help to balance the page.


I added a smaller cluster of embellishments to the top left corner of the frames.   I just loved all the icons in this collection, and wanted to used them to bring the page together.   


I added a few Sprinkles and little bees all around the page to make sure that there are extra pops of color. I just love how this turned out, and I hope that  inspire you to check the new Bee Happy collection,  You are going to love it! XO

DOODLEBUG PRODUCTS USED

Bee Happy Collection
Bee Happy Cardstock
 Sprinkles

Monday, June 23, 2025

BEE HAPPY BUSY BEE DOODLECUTS BOXCARD | with Kathy

I'm pretty sure I've said this before (and probably will again...) but the Bee Happy is one of my all-time favorite Doodlebug collections!  I adore the color palette, and the little bees are just the cutest!  I immediately fell in love with the Busy Bee Doodle Cuts and decided to create a fun box card with them.  Take a peek....


How cute are those bees??!!  To create my card, I started by cutting two of the bee hive pieces from papers from the 6x8 pad using the Busy Bee Doodle Cuts.  I also traced the same die on some Bumblebee Gingham Linen Petite prints and cut them out to back the die cut pieces.  This gave the sides of my card more stability.


I die cut some bees and flowers, all from the Busy Bee Doodle Cuts.  Using some heavyweight acetate I created a flying bee and also made the speech bubble from the This and That sheet look like it was floating.


I finished the front of the card with some die cut flowers & a mushroom.  I added some coordinating sprinkles to the flower centers and some grass clumps from the All the Things pack.


Even better, this fun little card folds flat and fits in a standard A2 envelope for mailing!  I created a quick video tutorial showing how I put this card together on my YouTube Channel here.


If you make one, be sure to tag me, and Doodlebug Design on socials, we always love to see your creations!  That's it for me today, thank you for stopping by to peek!


DOODLEBUG PRODUCTS USED

Bee Happy Collection
Busy Bee Doodle Cuts
Bee Happy Coordinating Textured Cardstock
Bumblebee Gingham Linen Petite Prints
Pistachio Candy Stripe Sprinkles Petite Prints
Heavyweight Clear Acetate

OTHER

Sizzix Big Shot
Pop Dots
Adhesive


Saturday, June 21, 2025

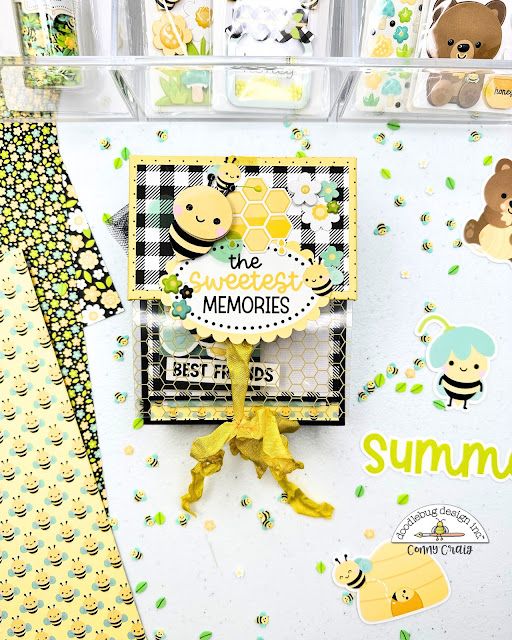
BEE HAPPY THE SWEETEST MEMORIES MINI ALBUM | with Conny

Hello Crafty Friends!! It’s Conny here today, and I’m so excited to share this adorable 4” x 5” mini album using the Bee Happy Collection.  This little album is packed with interactive flip pages, photo spots, and room for all kinds of embellishments! I also have a process video available for you to watch, however before you hit play, grab your cutting guide below and follow along!
Here are some assembly Instructions:  First, I started by wrapping the Chipboard.  I centered the chipboard pieces onto the back of the Sewing Bee paper, leaving about 3/4” around the edges and 1/8” between the spine and cover pieces. I love using my cover guide tool for perfect spacing. I mitered the corners and added double-sided tape along the edges. Next I folded and wrapped the paper inwards to cover the chipboard. I added the acetate before adding the inside cover, and adhered the 3” x 4” acetate piece to the bottom half of the front cover.

Next I covered the inside using a second piece of  Sewing Bee paper (4” x 9 5/8”) to neatly cover the inside of the chipboard.

To create the pages, I used the following: 
• Front Page: Black cardstock 10” x 4”, scored at 4” and 5”
• Back Pages (2): Black cardstock 10 1/2” x 4”, scored at 5” and 5 1/2”

I added  double-sided tape to the spines of the pages and adhered each one into the mini album, starting 1/4” from the inside edge of the cover, stacking them to create a cascading effect. This will leave 1/4” on both the top and bottom of the spine area.

To matte the pages I cut
•  Patterned paper cut to 3 3/4” x 4 1/4”
• Patterned paper cut to 3 3/4” x 4 3/4”
 Here’s the fun part: make it your own! Add photo mats in a variety of sizes based on your pictures, or add your photos directly to the pages. Then go wild with embellishments like: Puffy Stickers, Ephemera, Cardstock Stickers, Die Cuts, and more! TIP: Don’t be afraid to layer and create interactive elements like flips and pockets, it’s what makes these minis so fun!
I hope you love creating this sweet little album as much as I did. Make sure to tag me if you share your project, I’d love to see your take on it! Happy Crafting,Xo, Conny!


DOODLEBUG PRODUCTS USED

Bee Happy Collection 
Honeycomb Heavyweight Acetate 
Bee Happy Coordinating Cardstock

OTHER

Chipboard
Ribbon
Pin It button on image hover