Monday, October 31, 2022

MONSTER MADNESS POP UP CARD | with Kathy

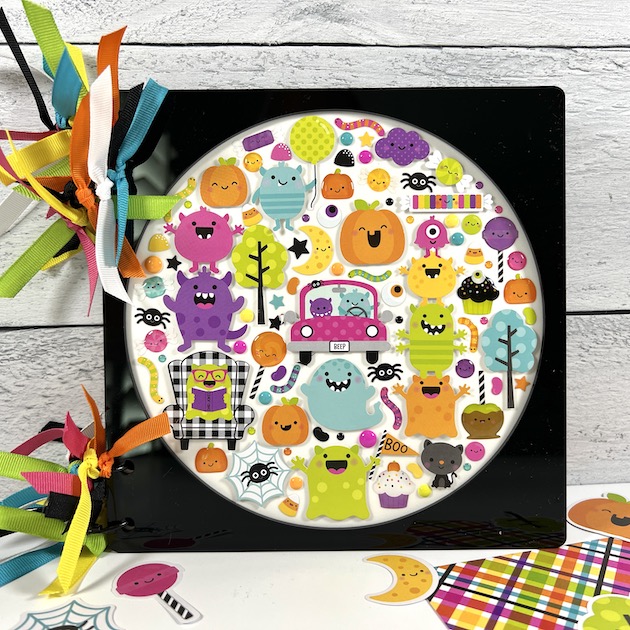
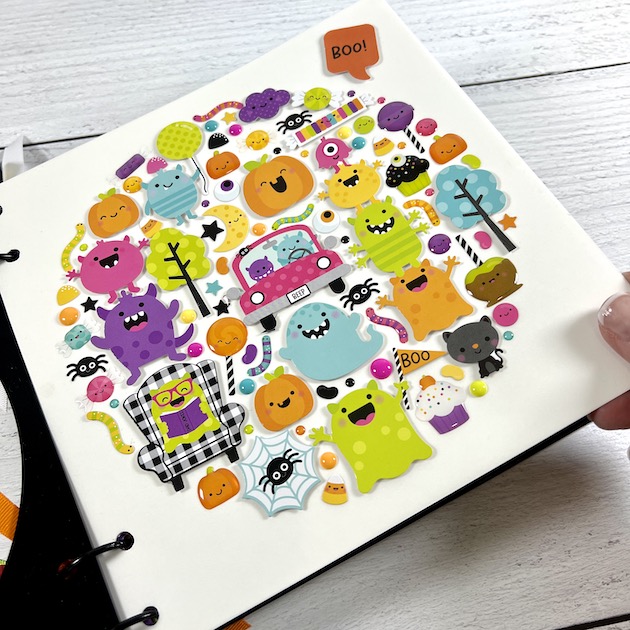
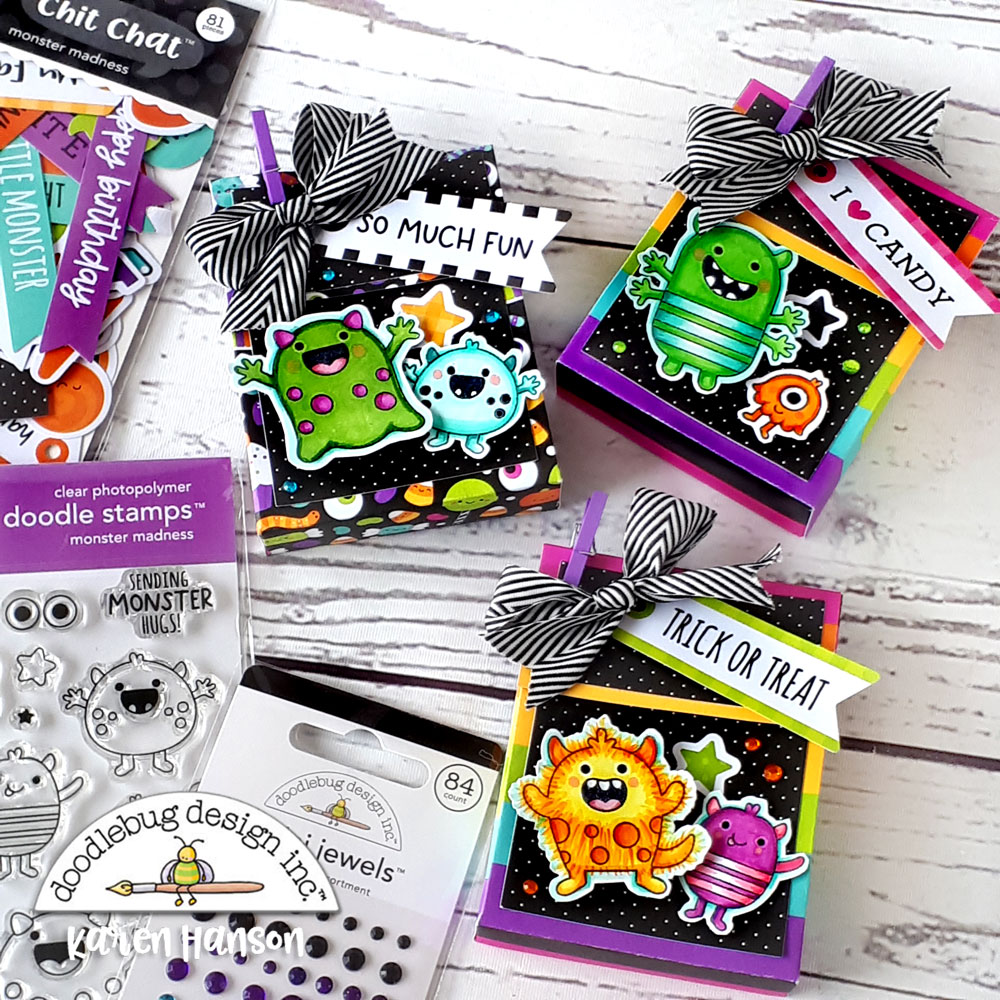
Happy Halloween!  Have you been creating with the Monster Madness collection?  I just can't get enough of the adorable little monsters!  I made some more using the new Sweet Tooth and Party Animal Doodle Cuts sets, and decided to use them in a birthday pop up card... take a peek...


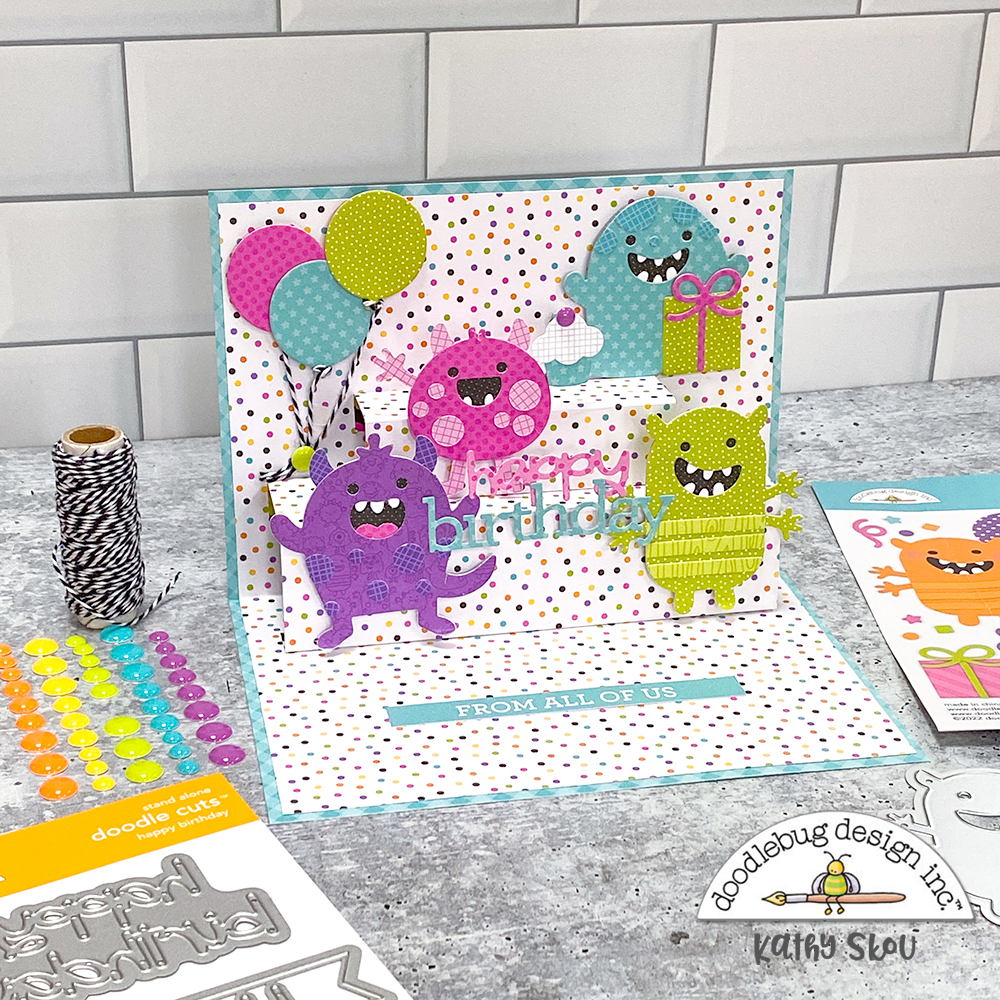
I just love these little guys... and the fun balloons, cupcakes and presents are too cute!


For my sentiment I pulled out my Doodle Cuts Happy Birthday Dies.  I cut the words and glued them together, then to the monsters to  make it look like they are holding the words like a banner.  The "from all of us" sentiment is from the Spooky Fun Cardstock.


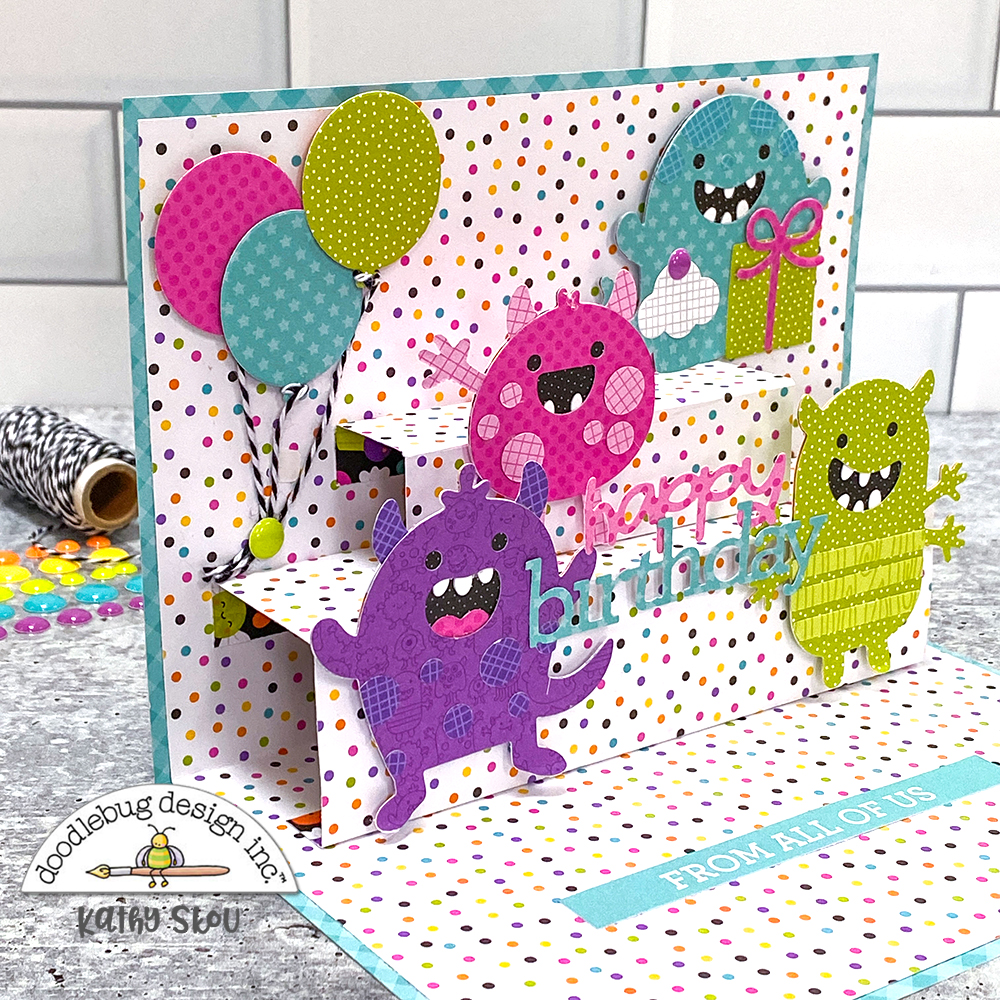
I love how the pop up gives so much dimension to my little scene. And of course we can't forget the front of the card... I used one of the cut-aparts on the Spooky Fun double sided cardstock, and added a little balloon from the doodle cuts.


The pop up card was really easy to make.  I've put together a little tutorial below.


1.  I started by cutting my card base and an insert.  The base is 10"x7", folded in half.  The insert is 9.75" x 6.75" also folded in half.  I then glued the insert into the card base.

2.  Next I added my bottom pop out.  This pop out piece is 6" x 4".  I scored it at .5", 2" and 3.5".  I then added double sided tape to the two .5" tabs.  I centered the piece in my card base, making sure that the center score line was aligned with the card base fold.  I then took off the tape cover strip, and while holding the piece in place, folded the ends under and secured.

3.  This is what the card looks like when finished.

4.  I then added the second pop out piece.  This piece is 3.75" x 3".  I scored it at .5", 1.5" and 2.5". I opened up my card,  then aligned the center score line on this piece with the top of the first pop out piece.  I held it in place, removed the adhesive cover and tucked them under like I did with the previous piece.  

5.  This is what the card looks like when the two pop ups are done.

All that was left was to add all of my monsters, balloons, presents etc!   


That's it for me today, thanks for stopping by to peek!


DOODLEBUG PRODUCTS USED

Monster Madness Collection
Sweet Tooth Doodle Cuts
Party Animals Doodle Cuts
Happy Birthday Doodle Cuts
Petite Prints
Doodle Twine

OTHER

Sizzix Big Shot

Thursday, October 27, 2022

MONSTER MADNESS MINI ALBUM | with Traci

Hey everyone! Traci here and I have a really cute Halloween project to share with you today. It's a little scrapbook filled with bright colors, silly faces, and tons of amazing stickers. I love stickers! It's so much fun to make and ... it's the perfect place to save your holiday photos. Check it out ...

I started by using one of my black 8x8 square window acrylic albums and the fun Monster Madness Shadow Box kit. Have you had a chance to use one of these Insert Kits yet? All the Doodlebug collections have them and they are so much fun!! 


http://schema.org/Product">The kit comes with a circle template, card stock, vellum and tons of colorful stickers. This one has pumpkins, candy, worms, and such goofy monsters. You place the stickers on the vellum with the help of a template behind it and when you remove the template ... voila! Halloween cuteness!
 

Inside, I used almost every one of the 12x12 prints and added die cuts from the Odds & Ends, Chit Chat and Bits & Pieces. I also used the 12x12 sticker sheet and the tiny enamel shape sprinkles!! My favorite part.😉
 

Above, I chose the gorgeous purple colored print for the background and a journaling card from the Stroke of Midnight paper for notes. Isn't the rainbow plaid around the edge so pretty?!
 

Ok my friends ... is there any wonder why I love the enamel shape sprinkles so much?! Look how fabulous and cute and shiny and fun they are!! 
 

On this page, I cut out 3 tags from the Tricky Treat 12x12 paper and added some chunky twine in Beetle Black. I think they look so interesting lined up like this and they're perfect against the pretty polka dots.
 

This rainbow stripe (called Spooky Fun) looks great with the super cool purple car. And check out the enamel dots on the tires! The die cut is from the Odds & Ends which, by the way has 146 cute pieces to choose from.


I've added a pocket filled with journaling cards so you can write about your fun moments, things that scared you, parties you attended, and all the great friends you did it with. You can also add tickets, greeting cards, or extra photos. Do you see the extra enamel stars I added?
 

Above is one of my fold-out pages. The right side with the circles opens up. It's decorated with pieces from the Chit Chat and more stars from the shape sprinkles called Midnight Magic.

I love this Monster Madness Collection. It's so fun to play with. Literally, with colors and shapes this cute ... it's feels like playing! 

If you'd like to create this scrapbook, the acrylic album & instructions will be available in my shop tomorrow. Thanks so much for stopping by & I hope you have fun creating your own Monster Madness!

 BLOG | FACEBOOK | INSTAGRAM | PINTEREST
 
DOODLEBUG PRODUCTS USED  

Monster Madness Collection
Monster Madness Shadowbox Insert Kit

Wednesday, October 26, 2022

MONSTER MADNESS MINI | with Erica

Hey friends! Erica here with you today to share a sweet mini album using the Doodlebug Design Monster Madness collection and the Cards & Envelopes Halloween Assortment pack!

All of my base pages are made using the Cards & Envelopes Halloween pack and I punched holes in them using my We R Memory Keepers Cinch! I love my Cinch machine and use it often to make mini albums! Once I had all of the cards and envelopes punched I put them in the order that I liked. I love creating mini albums with different sized pages, flip flaps and lots of color!

I used a black coil from We R Memory Keepers to bind them all together and then used 6x6 and 12x12 papers from the Monster Madness collection to cover the bases and create photo mats.

Some of the cards in the Halloween Assortment pack have decorative edges which adds extra details to the pages.

Once I had added fun pattern papers to the base pages I created fun pockets on some of the pages. I used Monster Madness chit chat pieces and odds & ends to embellish some of the pages.

It is super easy to create flaps using the envelopes as base pages and then it also works as a pocket where you can add tags and more photos!

This Monster Madness mini album was so fun to put together and it is ready to be filled with lots of fun memories!

Thanks so much for stopping by the Doodlebug blog today! I hope you enjoyed my mini album and I hope you are inspired to create one of your own! Check out my YouTube channel for a walk through of all the pages and details! Have a great day!

Doodlebug Products Used

Monster Madness Collection

Cards & Envelopes Halloween Assortment Pack

Other

We R Memory Keepers Cinch

Tuesday, October 25, 2022

MONSTER MADNESS FOLDOVER TREAT HOLDERS | with Karen

I am not exactly sure why, but it has been awhile since I had my colouring tools out on my crafty table. But when Doodlebug sent the new Monster Madness collection my way and I caught a glance of the new stamp collection, I knew what was in my near future. And let's just say that these stamps made me miss colouring!

Treat-2-All-1

Because, come on! It doesn't get cuter than these stamps. I mean, look at those cute faces! I decided to team them up with some of the 12x12 papers to create some little fold over treat containers.

Treat-2-Closeup-1

I stamped each monster and then coloured them up. I then fussy cute each one (the coordinating die cuts would also work but because I added some texture to one of the monsters, I just cut them by hand) and then used some foam adhesive to attach them at some different heights.

Treat-2-closeup-2

I used some mini clothes pins to hold the treat containers closed and embellished with some sentiments from the Chit Chat set and a few mini jewels. Oh, and can I just say that the striped paper that I used for the base has to be one of my favourite Doodlebug papers of all time! I had to flip it over to show you in this picture because the colours are jaw dropping!

Treat-2-All-2

Finally, I added a little bow and my little containers, with the most adorable monsters EVER, were all set to go (minus the treats). I think I will actually slide a monster cookie inside each one a little closer to Halloween, making a cute lunch treat for the family next week. Thanks for stopping by! Hugs,


BLOG | INSTAGRAM

DOODLEBUG PRODUCTS USED

Monster Madness collection
Mini clothes pins
Mini jewels

OTHER

Adhesive
Ribbon

Monday, October 24, 2022

MONSTER MADNESS CANDY BAR WRAPS | with Wanda

Hey Doodlebug Friends! One week until Halloween! It's Wanda here with another project I made with the Monster Madness Collection! Isn't this collection just the cutest and most perfect thing for Halloween?? I'm sharing some more treat ideas for Halloween! These were a big hit at my job. It's really nice to share a bit of candy and a bit of cheer - even if you're a grown up! I decorated some candy bar wrappers and made a little notecard to share with you today. I smile every time I reach for these cute supplies and those adorable monsters.

A

I used the 12x12 Monster Madness papers to make the base of the candy bar wrappers. Then I used mini doilies for a pop (more pop) of color, and then used the embellishments from the collection to create little Halloween scenes!

A

Here's my mini notecard! I decorated it with the embellishments from Monster Madness and one little puffy sticker pumpkin too!

A

 Here's a close up of the wrapper. One Hershey's bar fits inside for a little taste of sweetness!

6


A

I like to use a white gel pen to add accents to all the die cut pieces. And I sprinkled on some of those pretty enamel stars too! So much fun to mix and match all of these elements. Sure to bring a grin! 

D

That's it for today! I can't wait to make and share some projects with the new Farmer's Market Collection. It's on my desk ready to go! Take care and have a Happy Halloween!

ABLOG | INSTAGRAM 

DOODLEBUG SUPPLIES USED

Monster Madness Collection
Mini Doilies
Mini Jewels

OTHER

Candy Bar Wrapper Die
Adhesives


Friday, October 21, 2022

MONSTER MADNESS OUR LITTLE MONSTERS LAYOUT | with Nathalie

We are getting closer and closer to Halloween!  My littles are so excited about going trick-or-treating around their neighbourhood  and all that candy!!  But before we take all the photos, walk all the sidewalks, and of course eat all the candy, let's first document the memories from last year's Halloween night.   

It all started with the leftover pieces from my previous project.  I am not one to waste paper, and when thinking of a new design, I thought about playing with the paper, and this is the result.

It all started with the Good Spirits paper, all those little ghosts are the perfect background for the page.  Then It was all about using the paper leftovers ( these are the inside of the frames from the previous layout).  It just created the perfect spot for the photos.

I used Bits and Pieces to add the embellishments to the page.   I wanted to bring the idea of home, and the door just worked perfectly for this,  I added more elements to the side of the photos, making sure that they centered the photos.

Finally it was all about adding a title to the page.  I pulled pieces from the Chit Chat package and set it under the pictures.  A few more embellishments complete the page.

I love how this turned out, and better yet that I got to use all that glorious patterned paper for this spread.  Be sure to check the Monster Madness collection! You are going to love it!  XO


DOODLEBUG SUPPLIES USED

Monster Madness collection

Thursday, October 20, 2022

MONSTER MADNESS - MONSTER MADNESS LAYOUT | with Lisa

Hi, I'm back with another layout using Monster Madness. Last week, I created a layout with ghosts, this time I used the main feature of the collection, monsters. 


Of all of the different monsters in the collection, the one I like the most, is this puffy fluffy little candy floss monster. That's what I call it... :) So I decided to draw him and create three of them, using different patterned papers for their bodies, socks, hands and horns. 


At first, I drew tiny dots as their eyes, to copy the illustrations of the collection... but when I went through the die cuts later, I chose these googly eyes die cuts instead. Heheee... I think it gives them such a cute look, even more with two different sized eyes.

So, when the monsters where finished, I prepared my background. I wanted to have this fluffy candy floss texture on the background, so I used my Distress Oxides and daubers to create cloud-like shapes of different colors. Then I also used the Oxides, mixed with water to splatter color over the whole page with a small brush.


When the cardstock was dry, I placed my monsters on it to see where I wanted them to go and where I could add my photo. I matted the photo with different papers from the 6x6 paper pad and then placed it on the layout. When I was happy with the design, I adhered everything using liquid glue and foam squares.


To embellish, I went through the die cuts, enamel stickers, jewels, Doodle Pops and cardstock stickers and added, worm stickers, coming out of the monster's bodies, a spider, jewels, star die cuts and a lollipop and candy sticker. I also added the title which is composed of a Chit Chat die cut and some Sunshine alpha stickers. 


Are you already full swing into scrapping Halloween photos? I always love Halloween-scrapping, it makes the whole "Summer-is-over" sadness a lot better, hahahaaa... and these cute faces do too :)

Thank you so much for stopping by and see you soon!


DOODLEBUG PRODUCTS USED


Monster Madness Collection

Sunshine alpha stickers


OTHER


Distress Oxides

Pin It button on image hover