Tuesday, October 31, 2023

SWEET & SPOOKY GIFT CARD HOLDERS | with Karen

Happy Halloween everyone! Today is a day for tricks and treats - but not just for the kiddos. Us big kiddos needs some treats too, so I thought I would put together a little project that might work for the older folks in your life too!

   Gift-Card-holders 

And while chocolate and candy can definitely work, so can a fun gift card for a favourite place - coffee shop, craft store - anything you want! No judgement! So, with a little bit of paper from both the Sweet and Spooky 12x12 and 6x6 packs, some embellishments and adhesive, you can create some fun little gift card holders in no time!

  Gift-card-holder-open1 

I created these by simply cutting a 6x8" piece of paper and then folding it twice. I then trimmed off the one section about the gift card slot, using the left over piece to create a little pocket for the card.

  Gift-card-holder-open 

This left a little card-like side attached on the right. I embellished the top with some adorable die cuts from the Odds and Ends pack and a little sentiment from the Chit Chat pack. Now I have a little spot for a message or note.

Closeup 

Once it was all folded up again, I had some more fun placing some die cut characters from the Odds and Ends pack, a few Sprinkles, and then secured the whole thing with a couple of mini clothes pins. The part that took the longest was picking up the gift cards to put inside. I think I might slip a couple of these off to my daughters' teachers...heaven knows they might need a little something after dealing with the kiddos on Halloween! Thanks for stopping by! Hugs!

DOODLEBUG PRODUCTS USED
Sweet & Spooky collection
 
OTHER
Adhesive

Monday, October 30, 2023

SWEET & SPOOKY PUMPKIN FUN LAYOUT | with Brianna

Hey friends! Brianna Lepper here today and Happy Halloween Eve! I’ve got a fun layout to share using the Sweet & Spooky collection and I hope that you like it!


To start, I took a piece of textured white cardstock and trimmed it down to an 11x11 size. I wanted some solid colors on the sides so I trimmed down strips of the 12x12 Taffy Stripe patterned paper and adhered them to both the left and right side. Next, I wanted to add a pop of black by matting the whole thing to the 12x12 Trick or Treat paper. I love how it turned it out!


I decided to use two photos on this page and wanted them to be front and center. The photo is of my two boys being silly in a cute pumpkin photo prop. It was perfect for the collection since there are so many cute pumpkin elements. I wanted a few layers under my photos so I pulled out a few pieces from the Bits & Pieces pack and layered them right under each photo. For the tags, I tied some twine in Beetle Black, Lilac and Cupcake and love the texture and extra pops of color each one gave.


Going with the pumpkin theme, I chose the “pumpkin” phrase from the Chit Chat pack as my title, and popped it up on foam tape. I added onto it using the Alphabet Soup Puffy Stickers in Beetle Black. I strategically added a circle embellishment under my title so that it could pop off of the page and not get lost.


Like I mentioned earlier, there are so many cute pumpkin elements in this collection and I had so much fun selecting different ones that would go well on this page. The Pumpkin Pals Doodle Pop was a definite must and so were the Pretty Pumpkins Shape Sprinkles. I even tucked in a few of the tiny pumpkins from the Puffy Icons stickers here and there. So adorable!


I created a few different embellishment clusters and made sure I had cute little pumpkins in each one.


For some finishing touches, I added in some Sweet & Spooky Mini Jewels and also included a few bits of tangled thread in coordinating colors.


Thank you so much for stopping by today, I hope that I’ve inspired you in some way! Have a safe and Happy Halloween tomorrow!


DOODLEBUG PRODUCTS USED

Sweet & Spooky Collection
Doodlebug Twine
Alphabet Soup Puffy Stickers


OTHER
White Cardstock
Sewing Thread


Saturday, October 28, 2023

SWEET & SPOOKY BOO CREW LAYOUT | with Tarrah

Halloween is my favorite holiday to document! There is just something about the super cute costumes and trick-or-treating that is super fun! The Sweet & Spooky collection is perfect for documenting those perfect Halloween moments!


I started with the Moonlight Magic 12' x 12' patterned paper choosing this as my bottom layer background, I then took the Halloween Night 12' x 12' patterned paper and trimmed it down and adhered it to the Moonlight Magic paper. Next was the Sweet and Spooky 12' x 12' patterned paper, I trimmed this piece down and added a little bit of water to it and scrunched it up, once it was dry, I adhered it to the Halloween Night paper. I cut up the black and white scalloped border strip sticker from the This and That Cardstock stickers and added it around the edge of the page.


I added my photo and lots of embellishments in the bottom right of the layout and then added a cluster of embellishments in the top left corner to balance out the layout. I took 2 of the tags from the Bits and Pieces pack and layered them under the photo and I added some Gray Doodle Twine through the holes in the tops of the tags. My title is made up of the super cute 'Boo Crew' title from the Chit Chat pack, I adhered the title at the bottom of the photo using craft foam.


I absolutely love the pink haunted house in the Odds and Ends pack, I placed this piece on the right of the photo. I also added some of the gorgeous pumpkins on the left hand side of the photo too. I tucked in one the acetate trees here as well. To add some more of the acetate elements, I added the spider web on the right and added a puffy spider to the centre of the web. I also added a puffy face to the middle of the 'O' in the 'Boo' word.


The Bits and Pieces pack is full of awesome words and elements, I layered the Spooky Fun circle on top of the green scalloped circle and adhered it in the top left corner of the layout. I added some more of the smaller puffy stickers here too including stars and sparkles. I also added one of the super cute owl puffy stickers to the top of the circle.


The bat stickers from the Halloween Icons pack are gorgeous too so I just had to add 2 of them to help with the flow of the layout. I adhered the heads down and then bent up the wings to add some dimension. Lastly I stamped the date stamp and sprinkled some white mist around the layout.


Thanks so much for stopping by today! I hope I have inspired you to pull out your Sweet & Spooky collection and create some super cute projects with it! Happy creating!


DOODLEBUG PRODUCTS USED

Sweet & Spooky collection
Doodle Twine - Gray

OTHER

Water Spray
White Mist
Date stamp
Black Ink

Friday, October 27, 2023

SWEET & SPOOKY TRICK OR TREAT MINI ALBUM | with Niella

EEEK, there's only a couple days until Halloween when the spook-fest begins with the howling beasts and where creepy crawlies gather to play! Happy haunting crafty ghoulies! But before you scrabble to get your last minute tricks and treats ready; take a look at what I've put together using the new Home Sweet Home album with the adorable Sweet & Spooky collection!

There is so much cuteness to be in love with! Sweet & Spooky has all the cuteness you'll ever need for this Halloween and more to come ghoulfriends! Each character has it's own personality and the color scheme is everything pastel-o-ween!

This inside cover is where the candy money shots can be put in! Or how about a sweet treat list of what candy was a hit and what was a total miss!


This page holds an area for hidden journaling or a creepy photo surprise! I've reached into the odds & ends ephemera to grab the candy pieces for the accents. Can you see how I've used the Lil' Charmers on the bits & pieces tab ephemera? I've secured each to a Mini Paperclip :-) Gotta love that mini pumpkin!


And I love this page with it's removal page insert! It's basically a template that tucks in so you can either use it or remove and put a photo there or use both! Why not! This page features the Sprinkle enamel dots, odds & ends ephemera and the This & That stickers! FANG-tastic!


These pages are delightfully BOO-tiful with more tuck spot journaling and hidden photo spots. Endless ideas with the sweetest zombie boy and mummy! Cute BOO crew!


How much haul will you haul on a hallowed night? Say that ten times! Heehee! This page has two hidden spots...can you spot where? If not, don't worry - I have a quick flip through down the bottom of my post, SPOOK-ilicous!


Did someone say interactive? Well this album I've created certainly is! I've used the adorable odds & ends ephemera and patterned papers to make these pages with the white cardstock pieces removal or inclusive. I love albums that give multi options.

Check out the video below showing the whole album!


Thank you my sweet pumpkins for popping by today! I have loved playing with this Sweet & Spooky collection, it's been so fun! Remember to tag us in your Socials with all your Doodlebug Design creations, we love seeing what you create! Until hex time crafty boo crew, doodle BOO!


DOODLEBUG PRODUCTS USED

Sweet & Spooky Collection
Home Sweet Home Chipboard Album
Lil' Charmers
Mini paperclips

OTHER

binder rings

Thursday, October 26, 2023

SWEET & SPOOKY OCTOBER 31ST LAYOUT | with Lisa

Are you like me and love to visit haunted mansions in amusement parks? I always love the high walls full of old pictures in frames... :) So for this layout, I chose to create such a wall, using the Sweet & Spooky collection.


For my background I started by choosing this teal sheet of card stock. I framed it with four strips of the striped purple patterned paper, called Bitty Boos. With a small dauber, I smooshed around some white gesso, to create this smokey, spooky vibe in the background, Then I took the 6x6 paper pad and cut out random sized rectangles and squares.


I took all of my shapes, adhered them to another patterned paper using foam tape and the I cut those out, leaving a 5mm border all around. I distressed the edges and drew a scribbly border, that made the squares and rectangles look like frames.


For my photo, I used one I took at Disneyland Paris. I also matted it with patterned paper an drew a frame around it. I then placed all of my pieces on the layout, creating this wall-full-of-frames kind of look. To embellish each frame, I chose stickers, enamel dots and shapes, Shaker- and Doodle-Pops. I tried to have a totally different look in each frame.


To fill the blank spaces in between and next to the frames, I used enamel dots and jewels. I love those so much... I used up all of them on my four Halloween projects! I also added three pieces from the Chit Chat die cuts. Two stamps and a banner for my title.  See you soon and happy Halloween 


DOODLEBUG PRODUCTS USED

Sweet & Spooky collection
Textured Cardstock

OTHER

Gesso
Black pen

Wednesday, October 25, 2023

SWEET & SPOOKY HALLOWEEN TREAT CAULDRON | with Miguel

I have another fun Halloween project for you today, and it has candy!  I created a little box with cardstock and my scoring board and decorated with the Sweet & Spooky collection.

I added a small plastic cauldron in the center to hold sweets ... some fun caramel popcorn!

I decorated my box with Odds & Ends from the same collection.  I just love the acetate spider web!

Thank you for stopping by and I invite you to make incredible projects with Doodlebug's Sweet & Spooky collection!


DOODLEBUG PRODUCTS USED

Sweet & Spooky Collection

OTHER

Plastic Cauldrom

Tuesday, October 24, 2023

SWEET & SPOOKY HALLOWEEN COSTUME LAYOUT | with Nathalie

We are so close to celebrating Halloween once again! I am sure that many of you are getting your costumes ready for the day, just like my cousin's doggie! Though, we bought the costume here in Canada, it had to travel all the way to Ecuador. As soon as I got the pictures of the fitting, I had this idea for a new project featuring the beautiful Sweet & Spooky collection.

The starting point for this page was the Taffy Stripe paper. I just saw the stripes as a fun way to create a banner for my page.

I cut 2 strips of 1.5in, then cut each color section out - the little pieces looked like small squares-. I then, used a pair of scissors to round one of the edges. Using a thin chopstick, I curled the straight edge of each paper, then using liquid glue attached the rolled edge to Beetle Chunky Doodle Twine. I alternated the a and b sides in the formation of the banner.

I glued the banners to the top lilac textured cardstock, making sure they draped from the top of the page. This paper was then framed with Candy Sticks paper.

I used stickers and Doodle Pops to add a bit of interest to the banners that were of a solid color. Once the banners were set on place, I added a few sprinkles for pops of shine throughout the banner.

I cut a few pieces of paper to create side banners at the bottom of the page. This was a perfect way to anchor my photos to the layout, plus provided space for my title work. and extra embellishments. I just love combining stickers, Doodle Pops, and Chit Chat for this.

A few extra stickers and gems complete the page. I hope this inspires you to get your Halloween memories documented with the Sweet & Spooky Collection, XO

DOODLEBUG PRODUCTS USED

Sweet & Spooky collection
Chunky Doodle Twine
Textured Cardstock

Monday, October 23, 2023

SWEET & SPOOKY DOODLE STAMPS DIORAMA CARD | with Kathy

I love an interactive card!  Especially when it is made with the Sweet & Spooky Collection!  For this card, I started with the Sweet & Spooky Doodle Stamps & Doodle Cuts. I colored all of the cute little icons using my Copic markers, then set to putting together my card!  


The diorama card was created using dies from my stash.  This card folds flat, then... pull the tabs and a little scene pops up!


I just love the Moonlight Magic paper... the little stars are so colorful and fun!  To make my tree, I stamped onto acetate using archival ink.  It's such a fun way to make your own acetate pieces!  The sentiment is from the Chit Chat pieces.


Here's a little clip of the card in action!


Have you made any projects using the Sweet & Spooky Collection & Doodle Stamps?  Make sure to tag Doodlebug Design on socials, we love to see your projects!  That's it for me today, thanks for stopping by to peek!


DOODLEBUG PRODUCTS USED

Sweet & Spooky Collection

OTHER

Diorama Dies
Copic Markers
Acetate
Archival Ink


Sunday, October 22, 2023

SWEET & SPOOKY EXPLOSION BOX | with Tya

Halloween is creeping up on us, and what better way to celebrate the spookiest season of the year than with a fun and creative paper craft project? If you’re a fan of Halloween and enjoy crafting, then I've got a fantastic project to share with you! So I have made a Halloween-themed explosion box with Doodlebug Design’s Sweet and Spooky collection, spiced up with the magic of Lori Whitlock’s Matchbox Drawer Explosion Box cut file. The fun part about this project is a little surprise in each of the boxes! I can't wait to share with you how easy it is to level up a simple matchbox drawer with the perfect touch for Halloween! Let's jump right in!

Step 1: Gather Your Supplies

Before you begin, make sure you have all your supplies ready. The Sweet and Spooky collection from Doodlebug Design is a bewitching choice for your Halloween project, featuring lively, cute Halloween-themed patterns and embellishments. I chose pattern papers from the 12x12 paper pack and cardstock from the Textured Cardstock Assortment pack. You will need some strong adhesive to make sure the box stays together like double-sided tape. You will need some of your favorite die cuts from the Odds and Ends, Chit Chat, and Bits and Pieces. I also used the This and That sticker sheet, the Puffy Stickers, the Sweet and Spooky shape sprinkles, and some little treats to fill the matchboxes.

Step 2: Download and Assemble the Cut File

After choosing my papers I downloaded the cut file and then cut all the pieces out. The cut file can be found here. Matchbox Drawer Explosion Box. An assembly tutorial can be found here.

Step 3: Decorate the Inside of the Box:

The cut file design from Lori 
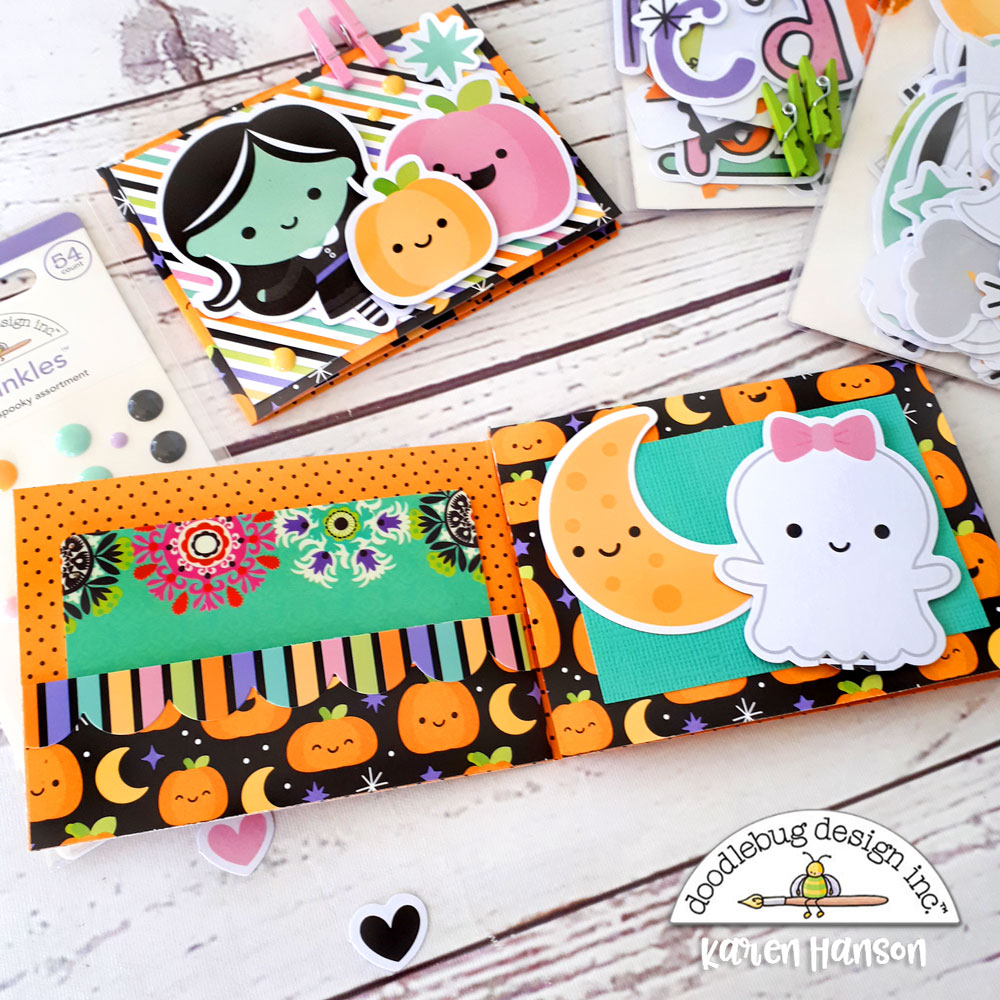
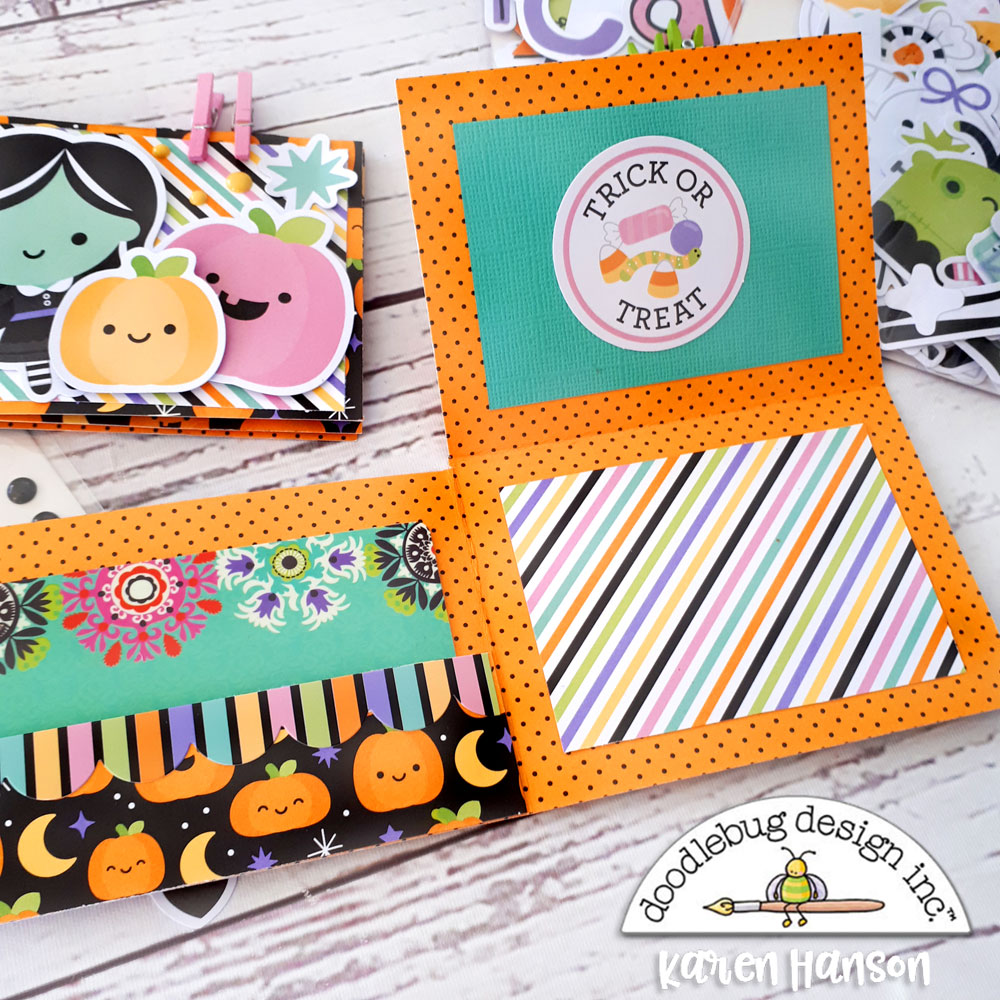
Whitlock allows for numerous interior layers, and this is where I got to have fun with all the products! I added some tags to 2 of the boxes topped with an enamel dot. On the other 2 layers, I added a pocket cut from cardstock to make little pockets to tuck a photo in. I added the scallop border sticker from the This and That sticker sheet to the top of the pockets as well as a little sentiment sticker to the top of the photo spots.

In the center of the explosion box, I added the scalloped circle "The Sweet Life" sticker from the This and That sticker sheet. This is where the magic of the explosion box comes to life as the recipient opens the layers to reveal the surprises within.

Step 4: Decorate the Lid

I wanted a fun topper for my lid so I turned to the Odds and Ends and picked one of the Haunted Houses, 3 trees, some Puffy Stickers, and a "Happy Halloween" banner from the Chit Chat. To make the layered look I simply die cut a 4-inch stitched circle from a metal die and then scored the circle at 1 3/4 " and 2 1/4 " to make a little valley with 2 half circles that fold up. I added a small piece of black cardstock and scored the 2 ends and glued them to the center of the circles to hold it together. I layered the house, puffy stickers, and banner to the house and glued them to the front circle. I added the 3 trees and various stars and sparkles to the trees to the back circle. I did add a thin strip of some lightweight chipboard to the bottom of the folded-up circles for some added stability. Glue this to the center of the lid.

Step 5: Decorate the inside of the Matchbox Drawers- the little"surprise" I was telling you about!

I wanted to jazz up the inside of the drawers a little bit so I added some 2 1/2 x 3 1/2 inch pieces of the diagonal stripe side of the Tafffy Stripe paper. I then picked 4 of my favorite little monsters from the Odds and Ends, cut small strips of the Stardust Acetate, and folded the strip at the bottom about 1/4 inch. I glued this into the front of the drawer. I then glued my little monster to the acetate. The fun part about doing this is when the recipient opens the little drawer- BOO! The little monster pops out for a fun surprise!

And there you have it – your own Halloween-themed explosion box masterpiece! The combination of Doodlebug Design’s Sweet and Spooky collection and Lori Whitlock’s Matchbox Drawer Explosion Box cut file creates a one-of-a-kind project that’s perfect for gifting or displaying your spooky memories. I had so much fun creating this and hope to have inspired you to try one of these super cute boxes for yourself! Have a faboolous Halloween and Happy Crafting!


DOODLEBUG PRODUCTS USED

Sweet and Spooky Collection
Sweet and Spooky Textured Cardstock
Sweet and Spooky Stardust 12 x12 Acetate

OTHER

Silhouette Cameo
Matchbox Drawer Explosion Box Cut File
4 inch Black Cardstock circle cut from a Stitched Circle Die
Small Black cardstock strip to hold the scored circle together
Lightweight chipboard to support the Haunted House scene on the lid
Candy to fill boxes

Pin It button on image hover