Showing posts with label Kathy Skou. Show all posts

Monday, September 8, 2025

FARMERS MARKET TRUCK BOX CARD | with Kathy

I will miss summertime, but I really believe that Fall is the best season!  The colors, the cooler temps, the apple cider donuts.... it is my favorite time of year!  And Farmers Market is one of my all time favorite collections!  I decided I wanted to play with the So Thankful Doodle Cuts and turn them into a 3D box card.   Take a peek...


How cute is that little truck??  I pieced the truck "sides" together using papers from the 6x6 pad, the coordinating textured cardstock pack and some petite prints.  I created a second, mirror image of the truck side by cutting the die pieces from the opposite side of my patterned papers.  I added some Fall assortment sprinkles to my tires for a little dimension and shine.

To attach the sides of my truck together to form my box, I cut two pieces of paper, each 1 1/4" w x 3/4"h.  (one from the bon bon cardstock, one from the orange plaid paper from the 6x6 pad)  I scored each paper at 1/8" and 1 1/8" along the long side.  I glued the tabs to each end of the truck, approximately 3 1/16" apart. (see below).  I then added the other side of the truck to complete my "box."

To add my puppy and veggies to the inside of the truck, I created an insert strip using our heavyweight clear acetate.  It measured 3 9/16" w x 3/4"h.  I scored each end 1/4" in, and glued it to my front and back truck sides, centered inside the box.  I added  stickers from the Farmers Market and Veggie Garden Puffy stickers to create my little "scene." Here are some close ups...


A hint when working with stickers... I use a powder tool to "de-stick" my stickers first.  I add adhesive where needed and insert them into my card.  This prevents the card from sticking together when folding into an envelope.  I finished my card by hand cutting a little speech bubble, and stamping the HELLO sentiment from the It's Fall Y'all Doodle Stamps.

If you're using Farmers Market to scrap your fall memories, be sure to tag @doodlebugdesign on socials.  We love to see your creations.  That's it for me, thanks for stopping by to peek!


DOODLEBUG PRODUCTS USED

7796 fall assortment sprinkles
7813 so thankful doodle cuts
7820 farmers market 6x6 paper pad
7837 farmers market textured cardstock assortment pack
7842 farmers market puffy icons stickers
7869 veggie garden puffy icons stickers
7470 it's fall y'all doodle stamps
5061 lemon swiss dots petite prints
5442 kraft gingham-linen petite prints
8090 stone gray candy stripe - sprinkles petite prints
5429 mandarin gingham-linen petite prints
8378 Acetate Paper - Clear

OTHER

Foam Dots
Sizzix Big Shot
Black Ink
powder tool

Monday, August 25, 2025

SUMMER FUN - UNDER THE SEA SNOW GLOBE | with Kathy

I've been waiting for the perfect collection to create my DIY Snow Globe, and  Summer Fun was the one!  I knew that all of the cute sea critters swimming around would make the cutest globe!  Take a peek...


I had so many ideas, I decided to add elements outside of the Snow Globe too!  To start my project, I cut some Kraft Candy Stripe/Sprinkles Petite Prints to cover the base of the globe.  I added a few sand mounds and plants that I cut using the Adora-bowl Doodle Cuts.  I then decorated my ocean bottom with the cute little crab and blue fish from the Icon Stickers along with a few Puffy Icon shells.


For the inside of my globe, I cut a couple of layers of the waves paper (b-side of the water babies paper)  I also added some of the Kraft Petite Prints for more sand.  I popped the layers with a few strips of foam tape to give it more dimension. I used the Aloha! Doodle Cuts to cut some larger plants.


The jelly fish, seahorse and all of the fishies are from the Icon Sticker Sheet.  I added some foam dots behind many of them to make them seem like they were floating.  I also used some summer splash and sweet shells shaped sprinkles.


Finally I filled the bottom of my snow globe with some swimming pool and bitty bubbles shakers. Here's one more photo to show you the layers and dimension.


I love it when completed projects look like what you imagined!  That's it for me today, thank you for stopping by to peek!


BLOG | INSTAGRAM | YOUTUBE

DOODLEBUG PRODUCTS USED

8397 diy snow globe kit
8412 swimming pool balls shakers
8904 bitty bubbles shakers
8893 sweet shells shape sprinkles
8895 summer splash shape sprinkles
8907 summer fun puffy icons stickers
8918 aloha! doodle cuts
8919 so adora-bowl doodle cuts
8926 summer fun icons stickers
8932 water babies double-sided cardstock
8943 summer fun textured cardstock assortment pack
8087 kraft candy stripe-sprinkles petite prints

OTHER

Sizzix Big Shot
Circle Dies
Stitched Wavy Border Die
Foam Tape
Foam Dots

Monday, August 11, 2025

SUMMER FUN DOODLE CUTS CARDS | with Kathy

I cannot get enough of the Summer Fun Collection, especially all of the cute Doodle Cuts Sets!  I decided to put them to use again for some level-up box cards.  Take a peek...


I love how bright and fun this collection is!  For the base of my cards I used some Outside the Box Level Up Dies from my stash.  I then pulled out all 3 doodle cuts sets...  Aloha!, Adora-Bowl and Best Fishes,  and got to work!


How cute are these little sea critters?!  I decorated the base of my card with the water side of the water babies patterned paper.  I cut the critters from the Summer Fun coordinating textured cardstock pack.  I love how the colors in these packs are just perfect!  I also cut a couple of sea plants and a pile of sand using the plants from the Adora-Bowl doodle cuts and added a starfish from the sweet shells shaped sprinkles and water bubbles from the summer splash sprinkles.  My sentiment is from the chit chat pack.

For my second card I used the cute little chameleon from the Adora-Bowl doodle cuts and lots of flowers from the Aloha! set.  I envisioned the cute critter hiding among the tropical flowers with his sweet little smile.

He's just too cute!  Again, I cut the pieces from the coordinating cardstock pack.  I covered my card base with the let's luau patterned paper.  My sentiment is from the Chit chat pack.

If you've used the Summer Fun Collection for a project, be sure to tag @doodlebugdesign on socials, we always love to see your creations.  That's it for me today, thank you for stopping by to peek!


DOODLEBUG PRODUCTS USED

8339 an eye for an eye shape sprinkles
8893 sweet shells shape sprinkles
8895 summer splash shape sprinkles
8918 aloha! doodle cuts
8920 best fishes doodle cuts
8919 so adora-bowl doodle cuts
8922 summer fun chit chat
8925 summer fun 6x8 paper pad
8934 let's luau double-sided cardstock
8932 water babies double-sided cardstock
8943 summer fun textured cardstock assortment pack


OTHER

Outside the Box Level Up Dies
Outside the Box Waves Dies


Monday, July 28, 2025

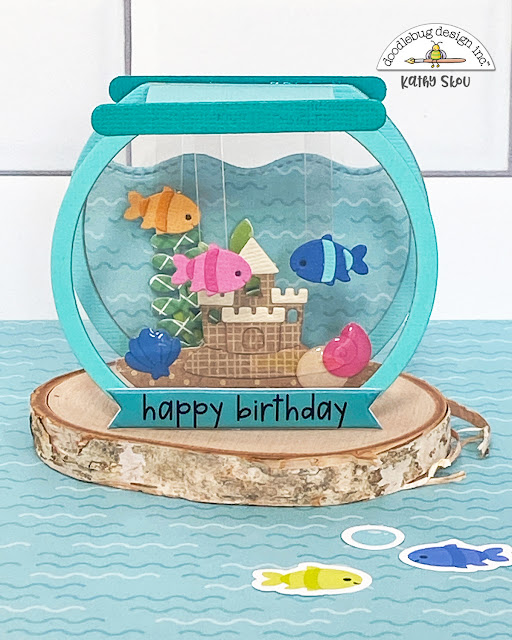
SUMMER FUN ADORA-BOWL BOX CARDS | with Kathy

Doodle Cuts are some of my most favorite Doodlebug products, and the Adora-bowl Doodle Cuts from the Summer Fun Collection are just the cutest!  I combined them with my love of everything 3D to come up with these fun cards... take a peek...


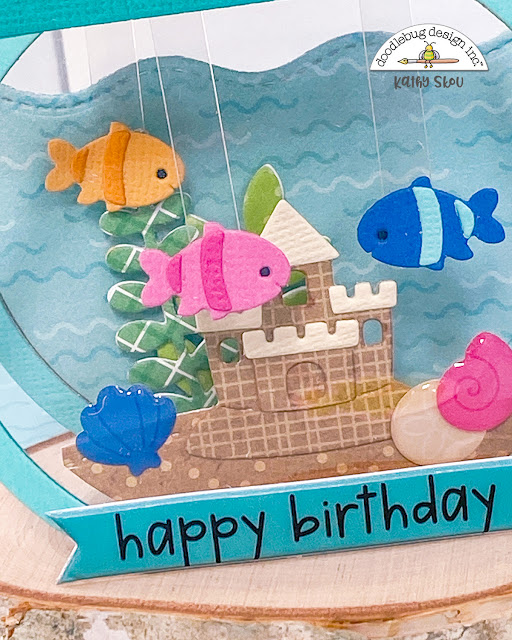
For my first card I created a fish bowl, complete with castle and floating fishies!  To build my fish bowl, I cut the shaker bowl outlines from some thin chipboard, then covered them with Swimming Pool cardstock from the Summer Fun Coordinating textured cardstock pack.  I used some heavyweight acetate for the "glass" part. On one bowl I added a piece of water paper (water babies b-side) from the 6x8 pad to look like water in the bowl.


I created a top and bottom to my bowls by cutting a piece of paper (1 1/2" x 1 5/8') and score it on the long ends 1/8" on each side.  I glued these to the top and bottom of the fish bowls.  On the bottom of the bowl I cut a piece of kraft candy stripe sprinkles paper to look like sand.  I propped it up using a folded strip of paper, then added the die cut castle and shells from the sweet shells shaped sprinkles.


To make my fish look like they are swimming, I cut thin strips of heavyweight acetate.  I glued the fish to one end, created a folded tab on the other end which I glued to the top of the fish bowl.  To complete my card I added the happy birthday from the puffy word stickers.


I featured the cute little chameleon for my next card.  Again I created the bowl, without the water backdrop.  The tops and bottoms were done in the same manner as the fishbowl.  I cut the rocks, plants and chameleon from the doodle cuts and propped them up with a paper tab on the bottom.  I finished my card with the scripty hello from the Chit Chat pieces.


Isn't he the cutest??? The nice part of these cards is they do fold flat so that I can mail them to friends!  Have you made any projects featuring the Summer Fun Collection?  Be sure to tag @doodlebugdesign so we can see what you made!  That's it for me today, thank you for stopping by to peek!


DOODLEBUG PRODUCTS USED

8339 an eye for an eye shape sprinkles
8893 sweet shells shape sprinkles
8908 summer fun puffy words stickers
8919 so adora-bowl doodle cuts
8922 summer fun chit chat
8925 summer fun 6x8 paper pad
8943 summer fun textured cardstock assortment pack
8079 limeade candy stripe sprinkles petite prints
8087 kraft candy stripe sprinkles petite prints
5442 kraft gingham linen petite prints
8378 clear heavyweight acetate

OTHER

Sizzix Big Shot
Silhouette chipboard
Stitched hillside dies
Stitched wavy dies
white jelly pen

Monday, July 7, 2025

BEE HAPPY CASCADE MINI ALBUM | with Kathy

I love a mini album.  I love making them, filling them, gifting them....  As I was flipping though the Bee Happy goodies, I just knew they would make the cutest mini!  Take a peek...


For the base of my album, I used a cut file that I've linked below.  It creates a cascade card/album, that is interactive and fun.  I used some lily white cardstock from the coordinating cardstock pack for the base, and covered it with papers from the 6x8 pad.  I love the smaller prints in the pad, they work so well on smaller projects.


I made little scenes on each flip up page using pieces from the "all the things" pack.  I used some words from the this & that stickers and lots of fun shaped sprinkles.  I also included photo spots.  Here's a look at the pages as they flip up...


As a finishing touch, I added some doodle twine in lemon, citrus and swimming pool on my tag.  This little mini is perfect to hold photos of friends, littles... the special folks in your life!  I thought it would make a good gift for a sweet friend.

I put together a quick video short showing the album in action, because that is always more fun!!


That's it for me today, thanks for stopping by to peek!


DOODLEBUG PRODUCTS USED

8855 bee happy textured cardstock assortment pack
8826 bee happy assortment sprinkles
8827 honey bees shape sprinkles
8828 nature's honey shape sprinkles
8842 bee happy all the things

8843 bee happy 6x8 paper pad
8845 bee happy this & that stickers
doodle twine in citrus, swimming pool and lemon

OTHER

Cascade Card Cut File
Silhouette Cameo
adhesive


Monday, June 23, 2025

BEE HAPPY BUSY BEE DOODLECUTS BOXCARD | with Kathy

I'm pretty sure I've said this before (and probably will again...) but the Bee Happy is one of my all-time favorite Doodlebug collections!  I adore the color palette, and the little bees are just the cutest!  I immediately fell in love with the Busy Bee Doodle Cuts and decided to create a fun box card with them.  Take a peek....


How cute are those bees??!!  To create my card, I started by cutting two of the bee hive pieces from papers from the 6x8 pad using the Busy Bee Doodle Cuts.  I also traced the same die on some Bumblebee Gingham Linen Petite prints and cut them out to back the die cut pieces.  This gave the sides of my card more stability.


I die cut some bees and flowers, all from the Busy Bee Doodle Cuts.  Using some heavyweight acetate I created a flying bee and also made the speech bubble from the This and That sheet look like it was floating.


I finished the front of the card with some die cut flowers & a mushroom.  I added some coordinating sprinkles to the flower centers and some grass clumps from the All the Things pack.


Even better, this fun little card folds flat and fits in a standard A2 envelope for mailing!  I created a quick video tutorial showing how I put this card together on my YouTube Channel here.


If you make one, be sure to tag me, and Doodlebug Design on socials, we always love to see your creations!  That's it for me today, thank you for stopping by to peek!


DOODLEBUG PRODUCTS USED

Bee Happy Collection
Busy Bee Doodle Cuts
Bee Happy Coordinating Textured Cardstock
Bumblebee Gingham Linen Petite Prints
Pistachio Candy Stripe Sprinkles Petite Prints
Heavyweight Clear Acetate

OTHER

Sizzix Big Shot
Pop Dots
Adhesive


Monday, June 9, 2025

BERRY SWEET BOX CARDS | with Kathy

As soon as I saw the adorable little mice in the Berry Sweet collection, I knew I wanted to make some cards featuring them.  And, of course I needed to make them 3D cards, because that is so much fun!  Take a peek...

How cute are those mousies???!!!  I just pictured them sitting among the strawberries and flowers holding onto their treasures!

For both cards, I started with some Outside the Box Card dies from my stash for the bases which I cut from some lily white cardstock.   For my first card, I covered my back panel with one of the bonus papers that is available in the 6x8 pad.  The grass was also cut from another bonus paper.  I then cut lots of flowers using the Berry Sweet Treats Doodle Cuts.  I added sprinkles to the flower centers for a little dimension.  The sentiment is from the All the things pack.  I love the scripty font!  As a finishing touch I added a few Berry Blossoms shaped sprinkles.


My next card features more of the dies from the Berry Sweet Treats Doodle Cuts.  My background paper is the 6x8 version of the Strawberry Fields paper.  I wanted my mouse to look like he was standing in the middle of the strawberry field, so I created strawberry plants using the doodle cuts and a lily of the valley die I had in my stash for the stems.  The flowers are from the Berry Blossoms shaped sprinkles. I finished my card with a sentiment strip from the All the Things pack.


This collection just makes me so happy!  Have you created any projects using Berry Sweet?  Be sure to tag Doodlebug Design on socials, we love to see what you create.  That's it for me today, thank you for stopping by to peek!


DOODLEBUG PRODUCTS USED

Berry Sweet Collection
Berry Sweet Coordinating Textured Cardstock
Berry Sweet Treats Doodle Cuts
Sprinkles

OTHER

Outside the Box Level Up Dies
Grass Border Die
Lily of the Valley Die

Monday, May 26, 2025

BERRY SWEET BIRTHDAY BOX CARD | with Kathy

Have you seen the new Berry Sweet Treats Doodle Cuts?  I fell in love with them as soon as I saw them!  I knew exactly what I wanted to make as soon as I got my hands on them!  Take a peek....


I think that 3D cards are so fun to receive and they look so cute on display.  My box card was created using the dies in the set, along with the 6x8 Pad, some coordinating cardstock and petite prints.  I added a sentiment from the "All the Things" pack as a finishing touch.


I created some dimension by adding strawberries on both the front piece and the insert.  How cute is that mouse??!! 


I just love how he peeks out over the pile of berries!  This card was really easy to make, and it fits into a standard A2 envelope.  If you'd like to make your own, I created a quick tutorial video.


If you make one, please be sure to tag me (@kathy_skou) and @doodlebugdesign!  We love to see your creations.  That's it for me today, thank you for stopping by to peek.


DOODLEBUG PRODUCTS USED

Berry Sweet Collection
Berry Sweet Treats Doodle Cuts
Berry Sweet Coordinating Textured Cardstock
Petite Prints

OTHER

Sizzix Big Shot

Monday, May 5, 2025

BUTTERFLY KISSES MOTHER'S DAY CARDS | with Kathy

Mother's Day is right around the corner, and Butterfly Kisses is the perfect collection to create some fun cards!  I used the collection to create some pop up cards, take a peek...


I love all the fun florals and of course those butterflies!  For my first card I combined some Odds & Ends and Bits & Pieces to create a fun little garden scene.  The birdie is from the Mini Icons.  I love how all of Doodlebug's collections have a variety of image sizes, it helps when making little scenes!


I made my own sentiment strips to match the collection by printing Happy Mother's Day in Extraordinary font, and cutting the strip to be 1/2" x 3 1/2".  I then cut some notches in the end to make it look like a Chit Chat piece.  I also made the butterfly "float" by adding a piece of clear heavyweight acetate and attaching the butterfly to it.  For a final touch I added some flower garden sprinkles to the front of the card.


For my next card, I wanted it to look like the butterflies were flitting in a flower garden.  I used  Odds & Ends flowers and butterflies to create my scene.  Again I used some clear heavyweight acetate to make it look like my butterflies are actually flying.


I finished my card with another sentiment strip and the cute little lady bug from the Bitty Bugs Shaped Sprinkles as well as some Flower garden and Butterfly Kisses Sprinkles.


The bases of the cards were created with Platform Pop Up Dies from my stash.  They even fold flat and fit int an envelope!  That's it for me today, thank you for stopping by to peek.


BLOG | INSTAGRAM | YOUTUBE

DOODLEBUG PRODUCTS USED

Butterfly Kisses Collection
Clear Heavyweight Acetate

OTHER

Platform Pop Up Dies
White Cardstock
Extraordinary Font 
Pin It button on image hover