Sunday, January 31, 2016

Sweet Things Collection: Love You Layout by Melinda

Can you believe it's February already and Valentine's Day is just around the corner? It's Melinda with you today and although I'm not really into celebrating the day of love on Feb 14, I do still love to use a collection that boasts lots of hearts and flowers.
And to make the 'Sweet Things' collection even sweeter, Cynthea has added mint green to the already gorgeous colour combination. I can never pass up an opportunity to use the colour mint.
To put my layout together I marked out a heart shape onto the background and added journaling using Doodlebug sentiment rub-ons. I then filled in the gaps with hand stitching over little clusters of embellishments.
TIP: Whenever I hand sew into sticky-back embellishments I dip my needle into baby powder every few stitches so it doesn't get all gooey from the adhesive.
The main cluster of flowers underneath the photos are made from the pre-cut 'Valentine Flowers' craft kit which contains over 35 reversible mix & match floral pieces. So you can flip them over to find the best combination for your project.
So, how is everyone going with their Valentine's plans? I have to finish a sneaky card for The Farmer and then I'm done. Thanks for stopping by - Melinda


Saturday, January 30, 2016

Sweet Things Collection: Love This Face Layout by Kathy

Hi Everyone,  it's Kathy today with a fun layout featuring the adorable new Sweet Things Collection.  I love Valentine collections, and this is one of my all time favorites!  Take a peek...
I might as well confess, I am a crazy cat lady.  This is our kitten Jax.  He's really cute, which is good, because he's a bit of a troublemaker.  He just has the sweetest face... or maybe it's one only a cat mom could love... I'll let you decide! 
I loved the typewritten pattern of the Love letters paper!  It makes a great background!  And all the fun hearts in the Paper Hearts Paper... such great colors!  I wanted it to be a big focus of my layout.  I then set out to embellishing... Sweet Things has the best embellishments!  My favorites were the Sweet Hearts Shape Sprinkles and the word stickers from the This and That Sticker Sheet!  Here are some more close-ups...

 I completed the layout with some Ladybug Chippers and some Teensy Type letters for my title.  That's it for me today!  I hope you've enjoyed all of the Sweet Things inspiration these past couple of weeks!  Have a great day!

Friday, January 29, 2016

Sweet Things Collection: Love You Layout by Mendi

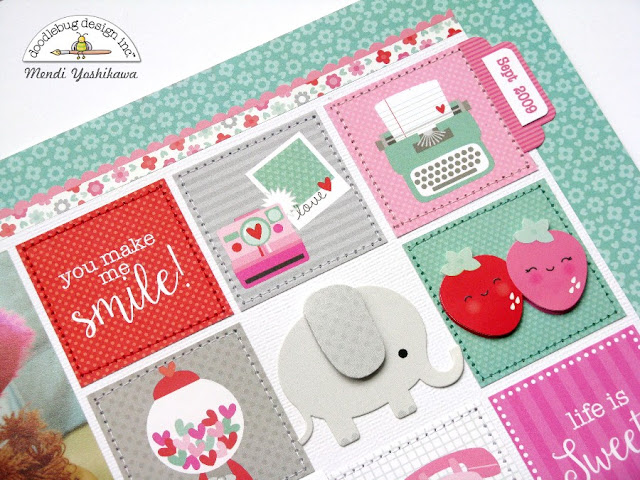
Hello Doodlebugs!  It's Mendi here today with a layout using the adorable new Sweet Things collection!   I have been waiting for the perfect collection with both hot pink and red to match these photos for six years now so I was thrilled to finally find the perfect papers to use them with!
Doodlebug Sweet Things Valentine's Day Scrapbook Layout by Mendi Yoshikawa
I am so in love with all of the darling images in this collection so I wanted to find a way to showcase as many of them as possible and a grid layout seemed like the perfect solution!  I cut each square from the tiny valentine's paper down to 1-7/8" x 1-7/8", lined them up on my 10-1/8" square piece of white cardstock and stitched around them in coordinating colors of thread.
Doodlebug Sweet Things Valentine's Day Scrapbook Layout by Mendi Yoshikawa
For a couple of the squares, I layered the coordinating icon stickers over the top with foam tape to create the look of a doodle pop.  I also removed a couple of the squares in my grid and filled the space with actual doodle pops from the collection for a little variety.  
Doodlebug Sweet Things Valentine's Day Scrapbook Layout by Mendi Yoshikawa
I hope I've inspired you to document a special memory of your own using this fun collection! 

Thursday, January 28, 2016

Sweet Things Collection: Valentine's Day Gift Set by Corri

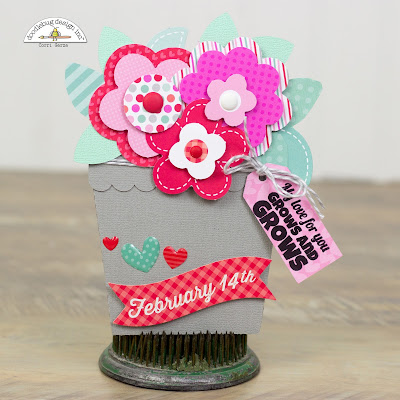
Hi everyone!  Corri here today sharing a fun Valentine's Day gift set using Sweet Things.   I love everything about this collection.  The colors are perfection and the little images are all so cute. I was super excited to try out the Valentine Flower Craft Kit.  I loved building these dimensional flowers...so many possibilities!
I used a flower pot card from the Silhouette Store and replaced the flowers with the ones provided in the card kit.  I used foam dots to pop up the different layers of the flowers. 
I embellished the flower pot with a sticker from the This & That Stickers sheet and some Shape Sprinkles.  I also added some Matte Sprinkles to the center of each flower. 
For my matching treat bag, I used a this pretty heart paper from the collection and added a couple of mini DoodlePops.  
I love the way this turned out!   A perfect gift for your sweetheart...just added some candy or a small gift! . 

Wednesday, January 27, 2016

Sweet Things Collection: All of Me Album by Traci Penrod

Happy Wednesday everyone!  Traci here, back to share my Doodlebug "Sweet Things" project with you.  If I had to pick my favorite all-time color combo, it would probably be red, turquoise, black and white.  So when I saw this adorable new collection, I couldn't wait to play with it!!  
I was excited to see that a Simple Stories turquoise Sn@p album matched the collection perfectly.  For the cover, I created a title card from a piece in the 6x6 paper pad.  I also used a bright red flower from the Valentine flowers Craft kit, along with a white boutique button and some beetle black twine.

Here are a few of the inside pages of my album:
The sentiment phrase strips are a fun new addition to this collection.  They are on a 12x12 sheet of cards, and you can cut them apart individually, or use them together like I did on the page above.
Fancy Frills border stickers  are also a favorite of mine.  Since they are 12" long, I was able to cut the zig zag in half to line the top and bottom of my 4x6 card .... cute!!  And here's another tip for Fancy Frills ... buy two!  That way you can put a border across a full two-page 12x12 layout!
For the page above, I added a ladybug red envelope from one of my Create-a-Card sets.  Since it's Doodlebug, the red matches perfectly and gives me a fun spot to tuck in journaling or extra pictures!
That's my mini album for this time ... I hope I've inspired you to create something amazing with this colorful, fun collection!  Stop by my Artsy Albums blog to see a few more pictures, and until next time, happy crafting!!

Tuesday, January 26, 2016

Sweet Things Collection: Peek-a-boo Valentine Cards by Christine

How would you like to add a special touch to your Valentines this year?  I used the Sweet Things Collection to make some "lift the flap" style cards that will be perfect for loved ones of all ages!  All it takes is a little patience with your craft knife and the right Doodlebug supplies!
For this first card I used my craft knife to cut up a part of some of the scallops on the paper.  I then tucked a small foam adhesive piece underneatht o make them stand up better.  I inked the curves on them lightly with some white ink to soften the edges a bit.  I also added Lily White Glitter Sprinkles to those scallops. For the flap I cut all but the top curves of the heart.

I added the two little love bug stickers inside my flap along with a heart sticker.

So happy together was very cute on it's own but I wanted to personalize it a little more.  I decided to stick with the gray and red color scheme because I liked that it made it a little more masculine. I used the Sweet Things Fancy Frills to add a gray border as well as some Lily White Sprinkles for dimension.  I added xoxo stickers from the Ladybug Red Teensy Type Alphabet Stickers.

The flap was created once again with my craft knife and as you can see I cut nearly all of the oval open.  How sweet are these little elephants!?! And of course I had to hook their trunks together with a heart!

My last card today didn't have a sentiment on the front but instead has some cute Doodlebug flowers!  I added some dimension to those flowers by using the Sweet Things Matte Sprinkles layered on top of each other for the center of each flower.  I also outlined the oval on this one with Gray Doodle Twine and added some coordinating heart stickers.

Since there was no sentiment on the front it had to go inside the flap where I used some of the  cardstock stickers to create it.

I had so much fun making these and can't wait to share them with some of my Valentines this year!  Make sure to check back more this week for tons of inspiration using the Sweet Things Collection!


Monday, January 25, 2016

Sweet Things: Love Bug by Jennifer Beason

Hello Doodlebug fans!  Today I have a Valentines project to share using the "oh so fabulous" Sweet Things collection.  This piece uses a mixture of materials including paper mache, felt, wood and wire.  But what brings the whole thing together are the adorable patterned papers and fun embellishments from the collection.
As you can see, I couldn't resist creating a little love bug of my own.  She's all ready to deliver her Valentine's Day cards and messages.

The head and body of the bug are made from paper mache ornaments. A round ornament for the head and bulb shaped one for the body.  The wheels are a wooden spool with large buttons on each end.  To hold the bug together and attach it to the base, a wood dowel was threaded though all the pieces and glued in place.  Sprinkles vellum was then used for the wings and black wire for the arms and antennae.
Red and white felt were used to cover the front of the face, then a black hat was made to cover the rest of the head. More felt was used to cover the top half of the body, while paint and glitter were used on the bottom section.
Here's a close up of the love bug's outfit. Border stickers were used for the shoulder straps along with twine and matte sprinkles. Patterned paper from the 6x6 pad was used to create the pocket.  Then heart sprinkles and stickers were used to embellish.
The "you will forever" sign was cut out from the 6x6 pad and mounted to cardboard. A mini envelope was attached along with heart sprinkles. Then a white pixie stick was attached to the back of the sign for the bug to hold.
The base of the project is a small paper mache box (without the lid). The side of the box was covered with paper then heart stickers, border stickers and sequins were added.
The top of the box was also covered with patterned paper, then some twine was glued around the seam.  A black mini doily was added to the center along with sprinkles and another mini envelope and note. Have a crafty day! Jennifer :)

Friday, January 22, 2016

Polar Pals Collection: Winter Mini Album by Traci Penrod

Happy New Year Doodlebug friends! It's Traci, and I'm so excited to be back with Doodlebug for another year! My first project for 2016 is a mini using the super cute and colorful Polar Pals collection.
 
For this album, I used a 4x6 binder from Simple Stories and papers from Polar Pals and the new Petite Print Swiss dots!
For the cover, I used a Silhouette cut for the snow globe, some papers from the 6x6 paper pad, and lots of chunky twine. How cute are those little critter stickers?!


My inside pages are a combination of white card stock and the page protectors that come in the album. I love to mix-and-match page sizes, pockets, and divided photo sleeves to make my mini albums more interesting.

Oh my goodness, that baby walrus is the cutest!!

I love that Doodlebug includes sheets of 2x2 and 4x4 cards in their collections. They're the perfect size for mini albums!

I hope you've enjoyed checking out my chilly little album. It's available as a DIY kit in my Artsy Albums shop if you'll like to make one for yourself! Thanks for stopping by the blog today and leaving a comment!

Thursday, January 21, 2016

Polar Pals Collection: Winter Layout by Melinda Spinks

Hello to everyone, it's Melinda here today and I know you are going to say "didn't you retire from scrapbooking"? Well to answer that question, yes, I did! However, I never realised how much I would miss the creativity and also the beautiful people at Doodlebug. So with a great deal of shuffling, contemplating, re-organising and pre-planning... I'm back!

Now, you wouldn't believe that I'm sitting here at my desk with an ice cold drink of water, wearing shorts and a T-shirt and contemplating flicking the air conditioner switch as it's getting unbearably hot. All this while trying to conjure up the words for my 'Winter' themed post. That's the joy of living South of the Equator with opposite climates to the current scrapbooking trend.

Fortunately I had family who managed to visit the snow this past winter so I asked if I could scrap their gorgeous photo. And, I'm very happy they wore colour co-ordinating outfits to the Polar Pals collection... it's always a bonus!

In the past when I have created a collage on a layout I would adhere everything directly onto the background cardstock. But this time I was aiming for a slightly different look to my collage... more of a donut, than a circle. I started by cutting a 9.5" circle from white card.

Then I cut a 4" whole in the middle of the larger circle to create my donut.
As with any collage, I always place the largest pieces on first for a balanced look. However, this time I allowed the pieces to overhang the edges as I wanted to trim the excess away which would give the more defined look that I was aiming for.

And finally, I filled in all the gaps with Glitter Sprinkles, Polar Pals Icon Stickers, Winter Snowflake Sprinkles, and Doodle Pops.

Thank you for stopping by today. It's nice to be back! Melinda


Pin It button on image hover