Wednesday, November 30, 2016

Christmas Gifts: Hostess Gift with Kathy

Hi Everyone, it's Kathy today with a fun idea for a Hostess/Neighbor Gift.  The holidays are full of fun and festivities, I'm thankful for our friends and family who open their homes to us, and want to make sure they know how much I appreciate them!  One friend in particular hosts our neighborhood holiday party every year, she's wonderful.  She also loves her daily French vanilla coffee, so I decided to make a gift featuring her favorite /drink...


I created this fun tree using K-Cup coffee pods as the base. You could use the Tea K-Cups or Cocoa K-Cups as well.   This would be a fun gift for a coworker or teacher, anywhere there is a Keurig Machine!  Here's how I put it all together...

I started with 21 K-Cups, 21 paper circles (I cut these from the Here Comes Santa Claus 6 x 6 pad, and the Gingham Linen Petite Prints 6x6 Pad.) and a backing for the cups cut from a sheet of Grasshopper Gingham Linen Petite Prints.  I designed this backing in my silhouette and am happy to share the file with you here!


Using removable glue dots, I attached a paper circle to each of the K-Cups. 


Next, using foam squares, I attached each K-Cup to the tree backing starting on the top.


Once the K-cups were all attached, I set to decorating my "tree." I used the Christmas Assortment Matte Sprinkles, Candy Cane and Holly Berry Shaped Sprinkles, and stickers from the Icons Sheet and some Odds and Ends.  I also added some of the new Here Come's Santa Cut Files available in the Silhouette Store and the Lori Whitlock SVG Shop


I can't wait to give it to her!  She will be so happy.  That's it for me today, thanks for stopping by to peek!

Tuesday, November 29, 2016

NEW Fun in the Sun Cut Files: 3D Tropical Santa by Jennifer Beason

There are some fabulous new FUN IN THE SUN Cut files
released today in the Silhouette Store and the Lori Whitlock SVG Shop
We've included links to both types of files below! Then keep scrolling to 
see this amazing project by Jennifer Beason....

SVG Cut File
Silhouette Cut File

SVG Cut File
Silhouette Cut File


SVG Cut File
Silhouette Cut File

SVG Cut File
Silhouette Cut File
SVG Cut File
Silhouette Cut File

SVG Cut File
Silhouette Cut File

SVG Cut File
Silhouette Cut File

SVG Cut File
Silhouette Cut File
SVG Cut File
Silhouette Cut File - coming soon


SVG Cut File
Silhouette Cut File - coming soon


Hello, Doodlebug fans! Aren't you just loving these new "Fun in the Sun" cutting files. Today I have a project to share that uses some of these new releases, along with files from other collections too. Since I live in Florida, I thought it would be kind of fun to create a Christmas project with a tropical feel.
I didn't do a tutorial for this one, but here are a few pictures of the piece being built.
  1. Both the scooter and the mini trailer were made from chipboard and foam board. Using my Silhouette,  I cut my base pieces out of thin chipboard. Then I mounted them to two layers of  foam board and hand cut them out with a sharp craft knife. I wanted the trailer to be a little thicker, so I sandwiched some wood discs in-between some thick chipboard for some added depth. Some thin chipboard was glued around the edges to hide the space.
  2. Here you can see layers of chipboard being added to the scooter.
  3. I cut pieces for the back and the front sides of the trailer and scooter.
  4. While covering the trailer with patterned paper, I decided to turn the luggage into a stack of presents.
 Here are some close-ups of the files I used from today's release.
The pieces for Santa's Tiki drink, (non alcoholic, of course) were cut on the Silhouette, pieced together, then mounted to chipboard.
The fan leaves were cut in two colors, then hot glued onto some thin wire, to create a lei. The sunglasses were also cut then mounted to chipboard. I applied some cyrstal lacquer to them to give them a glossy finish.
As I mentioned before, the suitcases were transformed into a stack of presents.
Here's another small gift I made for the scooter.
 To keep with the tropical theme, a small Christmas tree was decorated with flamingo sprinkles.
I also added an Odds and Ends umbrella, to protect Rudolph from the sun.
As this is a free standing piece, I finished the back as well. Thanks for joining me today! :) Jennifer Doodlebug Files Used: Fun in the Sun - Tiki Drink, Sunglasses, Suitcases, Fan Leaf, Flamingo, Here Comes Santa Claus - Santa on Scooter, Reindeer. Flea Market - Trailer 1 Remember Doodlebug files are also available as SVG files at Lori Whitlock's online store.

Gift Giving Challenge: Desktop Calendar by Monique

Hi everyone! It's Monique here and I'm so happy to start off the "Christmas Gift Giving" week here at Doodlebug. For my "Gift" I chose to create this happy & colorful Doodlebug desk calendar for 2017! Because what can be more fun than sitting behind your desk at your office (while you'd much rather be at home crafting!) and look up from your work and see this colorful piece standing on top of your desk?!

The calendar consists of six double-sided cards which all fit into one sheer cd case and when the cd case is folded open it doubles as a standard for the calendar! Super simple! 

Here's a photo of the first six months and where January stands in the open cd case.


And here's a photo of the other months, only December is hidden behind November:


And this is the closed cd case with all the months inside. I used the Flea Market collection and the Teensy Type alphabet stickers.


Let me tell you quickly what I did: I cut 6 pieces of white cardstock (12x14 cm). Then I cut the months of the year from one of the 6"x 6" Petite Prints paper pad using my Silhouette Cameo and these two cut files from Lori Whitlock: #36959 and #36960 and I printed this free printable calendar and chose the one with 6 months on one page. 


I adhered the colored months on the white cardstock pieces and then the printed calendars on top. I took care not to adhere the month cards too low on the cardstock, because that part of the card would have to fit in the narrow cd sleeve, together with five other cards!  


Next I gathered my leftover stickers from random collections (can even be much older collections):


And now the fun could begin: embellishing the twelve months! Again, I took care to not over-embellish as I wanted the six cards to fit into the cd sleeve! 

Here's a photo of the front of the cards: January - June 2017


And a photo of the back of the cards: July - December 2017


I only needed a few stickers to make the cards fun! 

This was so much fun to make and also so very easy and inexpensive (which is rather nice in such an expensive month as December!) that I think I'll make another one, but then for myself to take into the office (this one is for my sis). 

Here are four of the months up close. If you want to see all of them then please hop over to my blog!  


Thank you so much for stopping by our blog today and letting me share my "Christmas Gift Giving" project with you. If you have any questions just let me know and I'll get back to you! 


Wishing you a crafty day! 
Monique

Friday, November 25, 2016

A Black Layout for Black Friday by Melinda Spinks

So the big question... Who's going to brave the Black Friday sales?
To be perfectly honest, the last thing I need is more craft supplies and tools gathering dust at the back of a cupboard. Recently I went looking for some thread and found a whole box full of punches that hadn't been touched in such a long time that I felt quite guilty. So I decided it was time to start making the most of what I already have before adding anything new.


I chose several different size flower punches and found an itty bitty leaf punch that I used to create the floral effect across my page. Mind you, I didn't realise how long it would take to hand stitch all those stems. Note to self, be a bit more conservative next time!


I also added a little hand stitching across the bottom of the photos to help draw the eye down the layout and to soften the join in colours.


I'm absolutely smitten by the new Petite Prints range of gingham and linen. I decided to do this entire layout using only the linen side as the smaller pattern worked perfectly with the tiny punches.


White rub-ons are a staple in my stash as they work beautifully on dark backgrounds as I've never found a white pen that will match the quality.


So, to all those who are braving the sales today, happy shopping, but don't forget to look at what you've already got hidden away that may have been forgotten... Melinda

Thursday, November 24, 2016

Happy Thanksiving + Fall Decor Lanters by Monique Liedtke

Hello Doodlebug friends! It's Monique on the blog today and I'm so happy I get to share my Thanksgiving project with you.

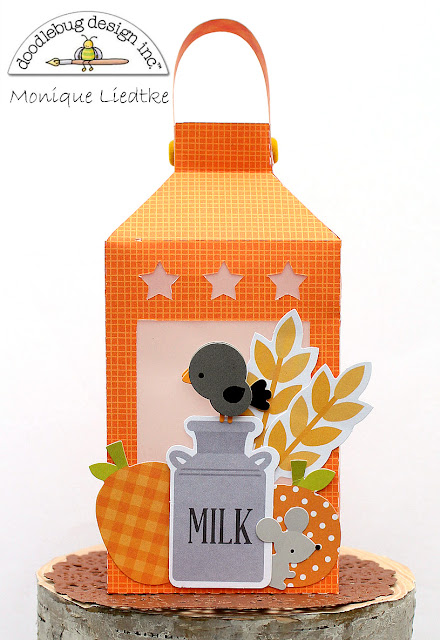
I love spending time with my family and especially when it comes to having breakfast or dinner together. I love decorating the table for times like these, so I decided to create a little something for our Thanksgiving dinner. I chose a lantern cut file from the Silhouette shop and Doodlebug's Flea Market collection and got started. I cut three lanterns from my Petite Prints papers in three different colors and decorated these with die-cuts, (mini) doodle-pops, stickers and also one of Doodlebug's new cut files: the little fox. 


I love Doodlebug's new cut files and just needed to make this little fox with the fox cut file (you can find a Studio file in the Silhouette store here and the SVG file in Lori Whitlock's store here): 


Isn't he adorable?! I just love that the new cut files give me the opportunity to decide how large I want this fox! What I would also like to try is to create one in totally different colors, like maybe a blue or a green fox ... just for fun. 


And here are the lanterns one by one. I adhered some vellum behind the windows in two of the lanterns and left the other lantern "open". I love the brighter light of the (fake) candle in the open lantern, but I also love the soft glow caused by the vellum. 


The Doodle-Pops, like this night owl, are just perfect for projects like these as they offer just that bit of extra dimension.


Here the little black country crow is a mini Doodle-Pop, the mouse is a sticker from the sheet of Icons Stickers and the other elements are die-cuts from the Odds & Ends package: 


I really love how these turned out and can't wait to use them on my table! 

Here's just one more photo:


Thank you so much for stopping by our blog today and taking a peek at my project. Wishing you a wonderful day! 

Monique

Pin It button on image hover