Sunday, September 30, 2018

Petite Prints Halloween Layout + Process Video| with Caroli

Halloween is an important holiday in our family. Every year my daughter chooses her costume with a lot of anticipation and I work hard to put it together according to her wishes.
After being a single child for 8 years, last year it was the first time my little girl went trick or treating with her brother, and they had a blast! Of course I had to document that special occasion!

I love the new Petite Prints papers, especially the floral-graph pattern so decided to use the mandarin colored graph paper for the base of my layout.
I created a cut file for the word Halloween to use in my title and the main decorative element of my page which you can view in my video below.


I backed the letters with some more Petite Prints and also with some papers of the 6x6 paper pad of Boo Ville collection.  

The 6x6 pads are a great idea when you want to back cut files that are not too big, because patterns are smaller and don't get lost when you cut the paper.
I embellished my layout with a combination of Doodle Pops and Shape Sprinkles. I love the volume of Doodle Pops, I think hey make a great embellishment not only for cards but also for pages.
These little spiders are really to die for, my fave halloween embellishment so far  
I wrote the title of the page using Love Letters cardstock alphabet in black color, I love this typography and it goes perfectly with the theme of this layout.I completed my design by writing my journaling of course! You know I love to write a lot in my pages and this is no exception. This time I handwrite about how happy I was about my two kids trick or treating together, such a happy memory to document indeed.I hope you liked this idea and use the offset trick to create something pretty. If you have any question  just leave a comment, thank you for watching today!
BLOG  |  YOUTUBE  |  INSTAGRAM

Petite Prints Autumn Layout | with Virginia

Inspired by cozy Autumn colours, I used the Petite Prints papers to create various sized pinwheels (from 1 to 1.5 inches ) and showered them across the page to make a bold statement. I used a Daily Doodle for the page base with a simple white background to make the pinwheels pop. Nothing says 'let's celebrate' than pinwheels!


I emphasized the the letter 'M' here by cutting out the letter 4x and glued them together, it's a great way to used card stock to make a thin chipboard-like embellishments.

Saturday, September 29, 2018

Petite Prints Christmas Ornaments Tutorial | with Jennifer

Hello Doodlebug friends. I know it seems like a long way off, but before you know it Christmas will have sneaked up on us!!! I've always thought it would be fun to trim a tree in DB ornaments. So today I will be sharing how I made this set of fun penguins.
The ornaments were made using a penguin cutting file, twine, some felt, wire, Doodlebug Petite Prints patterned papers and cardstock.
  1.  Using your digital cutter, begin by cutting the base of the penguin out of chipboard or cardstock. Use this as your stencil to trace the outline onto 1/8" thick wood. Cut the penguin out using a scroll saw. Sand the edges and drill a small hole to add string later.
  2. Using the colors want, cut out the body, feet, tummy, head, beak and small circles for the cheeks. Glue the body and feet to the wood base.  Paint the sides of the wood.
  3. Stitch around the penguin's head using some embroidery floss.
  4. Glue the head in place, then glue on the beak and cheeks. 
  5. Next stitch around the tummy and glue in place. Use a sealer like mod podge to protect each ornament. Allow to dry.
  6. Next, cut strips of felt to create scarfs for each penguin. Tie them in place. Use some thin wire and pom poms to make the ear muffs. (I used twine to make my pom poms, but you can use pre-made ones) Use hot glue to secure in place. Add some twine for hanging on tree.
    Here are a few more pictures of them all finished.
    Remember with so many cute Doodlebug cutting files, the theme possibilities are endless. 
    Have fun!

    So Much Pun Cut Files Cards | with Kathy

    I was so excited to see the So Much Pun Cut Files!  This has to be one of the cutest, most versatile collections I've ever seen... so many fun icons, it was hard to narrow my selections to just a few for this post!  I did however and here are a few cards I created using this ADORABLE collection!
    As you can see I was a little bit all over the place with themes... that's the beauty of this collection, there are SO MANY uses!  My first card used the So Much Pun Stove and Cinnamon Roll files along with some new Dot-Stripe Petite Prints.  I altered the stove a bit so that the oven door opened and inside was a the bun!  I thought this would be so cute for a newly expectant mom!  Here are some close-ups...

    For finishing touches I added one of the Chit Chat Pieces for my sentiment and some Cupcake Glitter Sprinkles for the cheeks!
    My next card uses the Thyme plant from the So Much Plant 1 cut file and more Dot Stripe and Floral Graph Petite Prints from the 6x6 pads. I added some extra leaves to the plant to give it some dimension and the Thyme to Celebrate sentiment is from the Chit Chat Pieces.  The Happy Birthday sticker is from the Multicolor Happy Birthday Doodles Cardstock Stickers.
    My third card is indeed a Christmas themed card.  It went against my normal stance on holiday decorations before their time...but I couldn't resist.  I got the idea from the So Much Pun Double Sided Cardstock which lists out all of the hilarious puns for each of the icons.  Take a peek...
    First of all... how stinking cute is that llama cut file??  I used an embossing folder from Sizzix to give him a more fluffy look and added the wreath from the Milk and Cookies Window Wreath cut file.  I created the printed sentiment using one of the Bubble Sayings Bubbles from the Booville Cut Files.  He's put together using more new Petite Prints and the wreath is decorated with some Glitter Sprinkles.  I think he's just fabulous!
    We'd love to see your creations using the new So Much Pun Cut Files!  Be sure to tag us on social media so we are sure to see your creations!  That's it for me today, thanks for stopping by to peek!
    You can purchase the cut files in the Lori Whitlock Store and the Silhouette Store.


    Friday, September 28, 2018

    Petite Prints Pumpkin Treat Bags | with Karen

    Well, there is no denying it. Between the cooler temperatures and first snowfalls, and the not so subtle hints on the calendar it is time to face the music - fall has arrived. Now, I have to admit that while I love summer, I am also quite the fan of fall. And while you may be thinking, "Karen, fan or not, don't you think it's a little early for the pumpkin-themed projects?" I have news for you! Thanksgiving and all it's glory is just around the corner! No really, it is...at least it is for those of us up in Canada! So while I love posting Thanksgiving-themed projects this time of the year because it makes me look like I am ahead or the game, the truth is that I am just squeaking in under the wire as usual!   
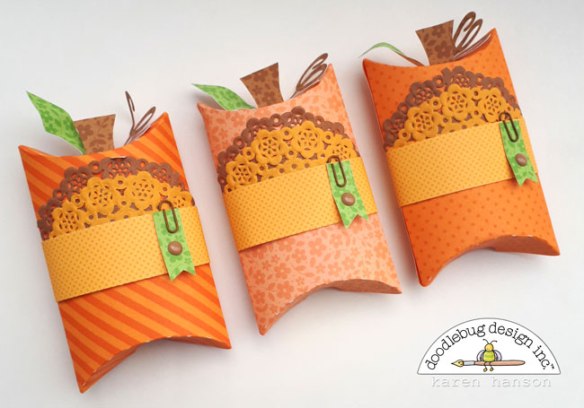
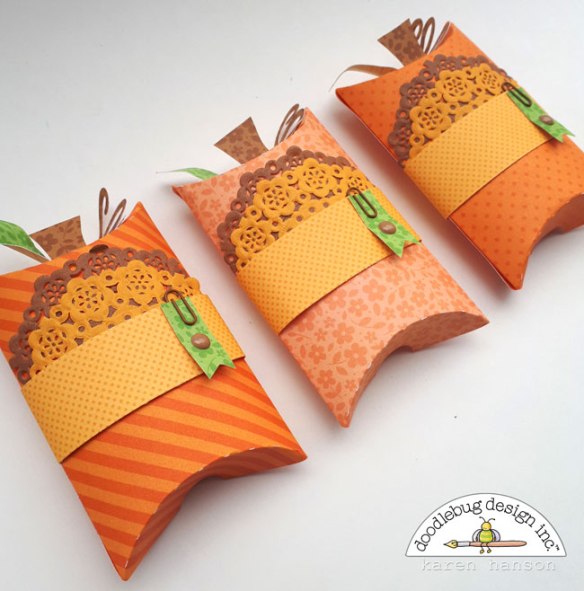
It's a good thing I have Doodlebug products to help me out! These little pumpkin treat containers are actually going to make an appearance on the Thanksgiving table. Add an initial or a little sentiments and you can personalize each one for your guest list. I love that these scream fall and thanksgiving without needing any actual fall themed product. Choose the colours for the season and you are all set! I used a combination of oranges from both the Floral-Graph; and Dot-Stripe; collections int he 12x12 size for the main part of the containers. I also embellished with some cute mini doilies, a mini paper clip from the fall set and a yummy Bon Bon Sprinkle...I am true believer in the power of a Doodlebug Sprinkle to just finish off any project.


    I also decided to add a band of the 6x6 Petite Prints. I love that the prints are smaller and daintier in the 6x6 versions. You can use exactly the same print for a really cute coordinated look that still provides contrast.

    So there you have it - a little taste of fall. It wasn't so bad now, was it?
    Thanks for stopping by! Hugs,

    Thursday, September 27, 2018

    Petite Prints Home Decor Project | with Jennifer

    Hello everyone. Fall has finally arrived and what better way to show off Doodlebug's newest Petite Prints, than with a colorful home decor piece.


    I paired the Dot / Stripe Petite Prints with a few papers from the Flea Market collection. 12 x12 sheets were used for the body and for the smaller areas like the beak and snood (the thingy under his beak) Petite Prints from the 6x6 pad were used.


    One of my favorite ways to add texture to a project is to add a some twine and stitching, which I did throughout the piece.

    Small flowers and leaves were added to the banner along with some die-cuts.

    Doodle-pop leaves, round sprinkles and more stitching were added to the wing.


    For his legs, I wrapped some of the 6x6 striped paper around wooden dowels.


    Wednesday, September 26, 2018

    Fall Planner Pages using Petite Prints | with Anabelle

      Fall is just about here and I'm getting ready for it in my planner! This week, we are focusing on the new Petite Prints papers. They are so versatile. I used them a couple of different ways on my spread. I also pulled out some sweet stickers from the Forest Friends line. The papers go perfectly with them and made pulling this spread together so easy!
    To start with, I created a dashboard. I used a 12 by 12 piece of the striped paper as my base and added the yellow polka dot borders. It made the perfect backdrop for my stickers and banner. 
    I created the banner by adding foam adhesive to the banner pieces. I adhered the twine with hot glue and then added the cute little clothespins. This is a bulkier embellishment but it works since it's the dashboard of my planner.
    I love decorating my pockets. This one has several journaling cards and stickers added to it. I trimmed a couple of pieces of the Petite Prints paper and added washi to the ends. Then I tucked them into the flaps to give some added color to the spread.
    To make the journaling cards, I trimmed the 6 by 6 Petite Papers to 3 by 4. Then, I selected some stickers to embellish them. I love having extra cards on hand to pull out and write notes on as needed.
    Me weekly spread used lots of stickers, too! I love how it turned out. One thing that I love adding to my spreads is washi tape. I decided to create some faux washi using the Petite Prints on here and it turned out great. I simply trimmed the paper to 1/2" strips. Then, I adhered it using a glue stick. It makes perfect washi! I added some border stickers to the top and bottom strips, as well.
    The Petite Prints papers are really the perfect complement for any Doodlebug collection. I hope you got some ideas about how you might use them on your planner spreads. Thanks for stopping by!

    Tuesday, September 25, 2018

    Petite Prints Fall Layout | with Nicole

    Hey there Doodlebug fans! Nicole here today to share a fall inspired using some Doodlebug Designs Petite Prints!
    Doodlebug has so many great Petite Prints patterns available and the Gingham-Linen patterns are SO perfect for fall.
    I chose to the Gingham-Linen Petite Prints in colors such as Ruby, Maple, Limeade, Grasshopper, Coral, Mandarin and Bumblebee and cut them into small leaf shapes, using a Doodlebug Designs Silhouette cut file.
    Once all the leaves were in place, I added a bit of Doodlebug Designs Chunky Sugar Coating Glitter  to some of the leaves with some wet glue to add just a touch of sparkle and texture to my page.
    I hope you can find a way to add some of the Doodlebug Designs Petite Prints to your next project!

    Monday, September 24, 2018

    Petite Prints Card Trio | with Brigit

    I'd have to say shaped cards are my all time favorite projects to make and Doodlebug's cut files make the most cutest ones ever! The So Much Pun cut files came out recently, you can get these at Lori Whitlock's shop now or the Silhouette Design Store when they are released.
    I'm such a big fan of the petite prints and I'm so happy Doodlebug came out with more patterns, I really love the two-tone color prints.

    This card was super simple to put together, I used the fries cut file some lemon dot-stripe, bumblebee linen-gingham and cherry dot-stripe petite prints, strawberry, and lily white textured cardstock. I added some chunky glitter on the front fries to give it a sprinkle of salt.

    This candy bar cut file is totally adorable such a sweet card. Here I used swimming pool floral-graph, stone gray dot-stripe, kraft dot-stripe, and lily white swiss dots petite prints, some chocolate chiplily white and beetle black textured cardstock. the sprinkles are from the so much pun assortment pack.

    To make this shaped card I used the gumball machine cut file, this file would also make a cute shaker card. I used the cherry floral-graph, cherry dot-stripe, lemon dot-stripe, tangerine dot-stripe, swimming pool dot-stripe, blue jean dot-stripe, bubblegum dot-stripe, stone gray dot-stripelily white swiss dots petite prints, lily white and slate gray textured cardstock.

    All the speech bubbles are from the so much pun chit chat pack. You can also get all the files in one big collection here.

    Thanks for stopping by and have a wonderful day!
    Pin It button on image hover