Tuesday, February 28, 2023

OVER THE RAINBOW HAPPY TOGETHER LAYOUT | with Nathalie

It is time for a new dose of rainbow! The new Over the Rainbow collection is just glorious, and perfect for all sorts of documenting. I am just so excited to share my first project with it!

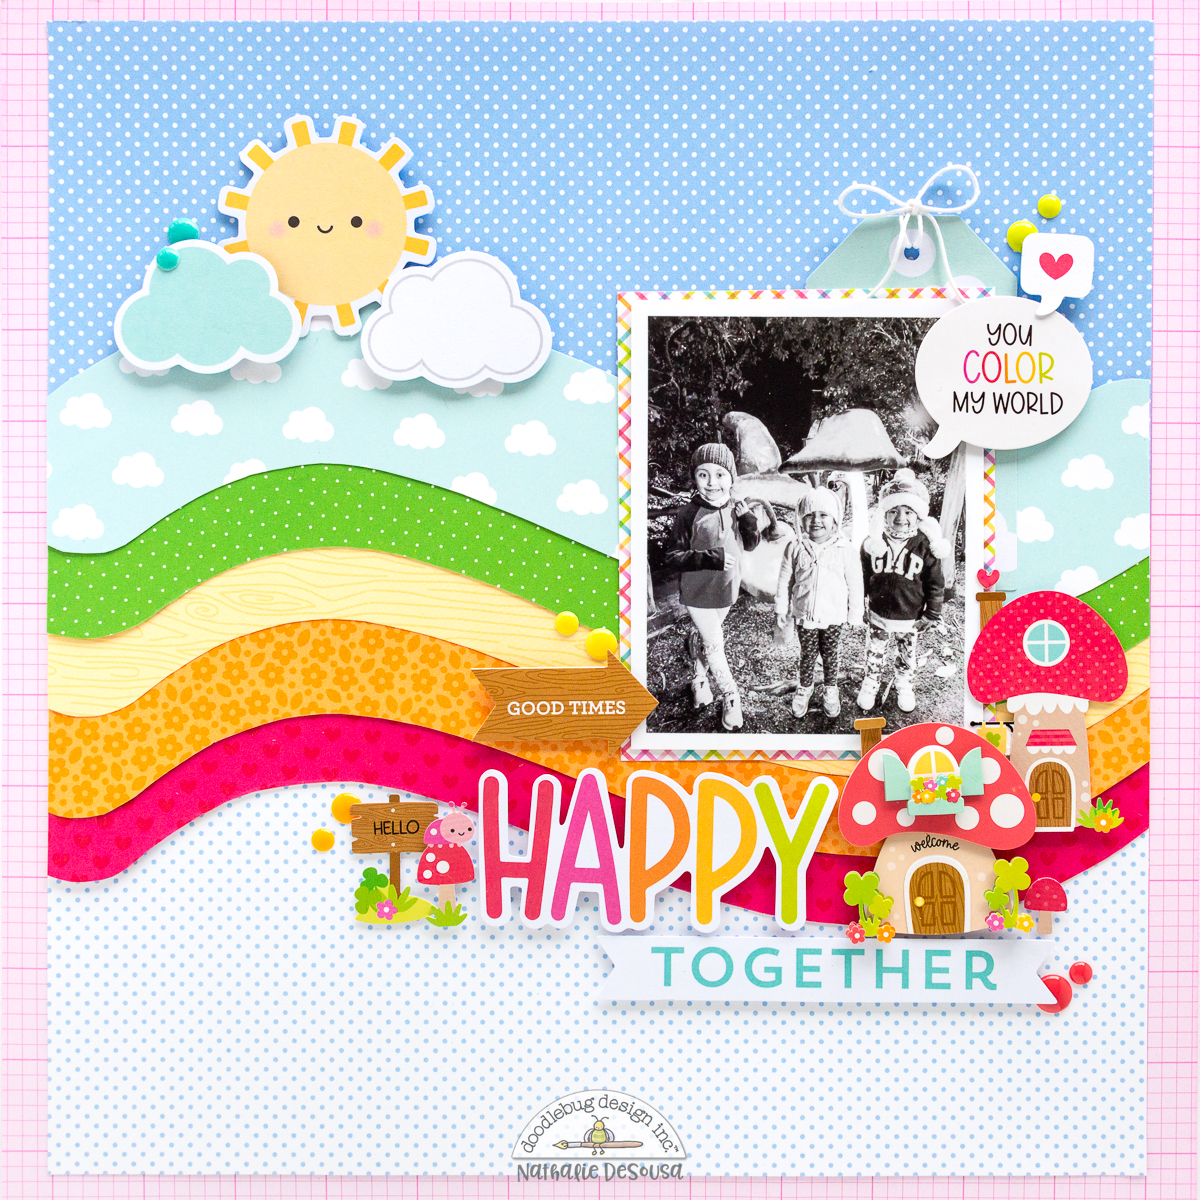
I wanted to showcase a rainbow on my page and to showcase some of the cute mushrooms of the collection that match the ones in the photo of my little cousins.

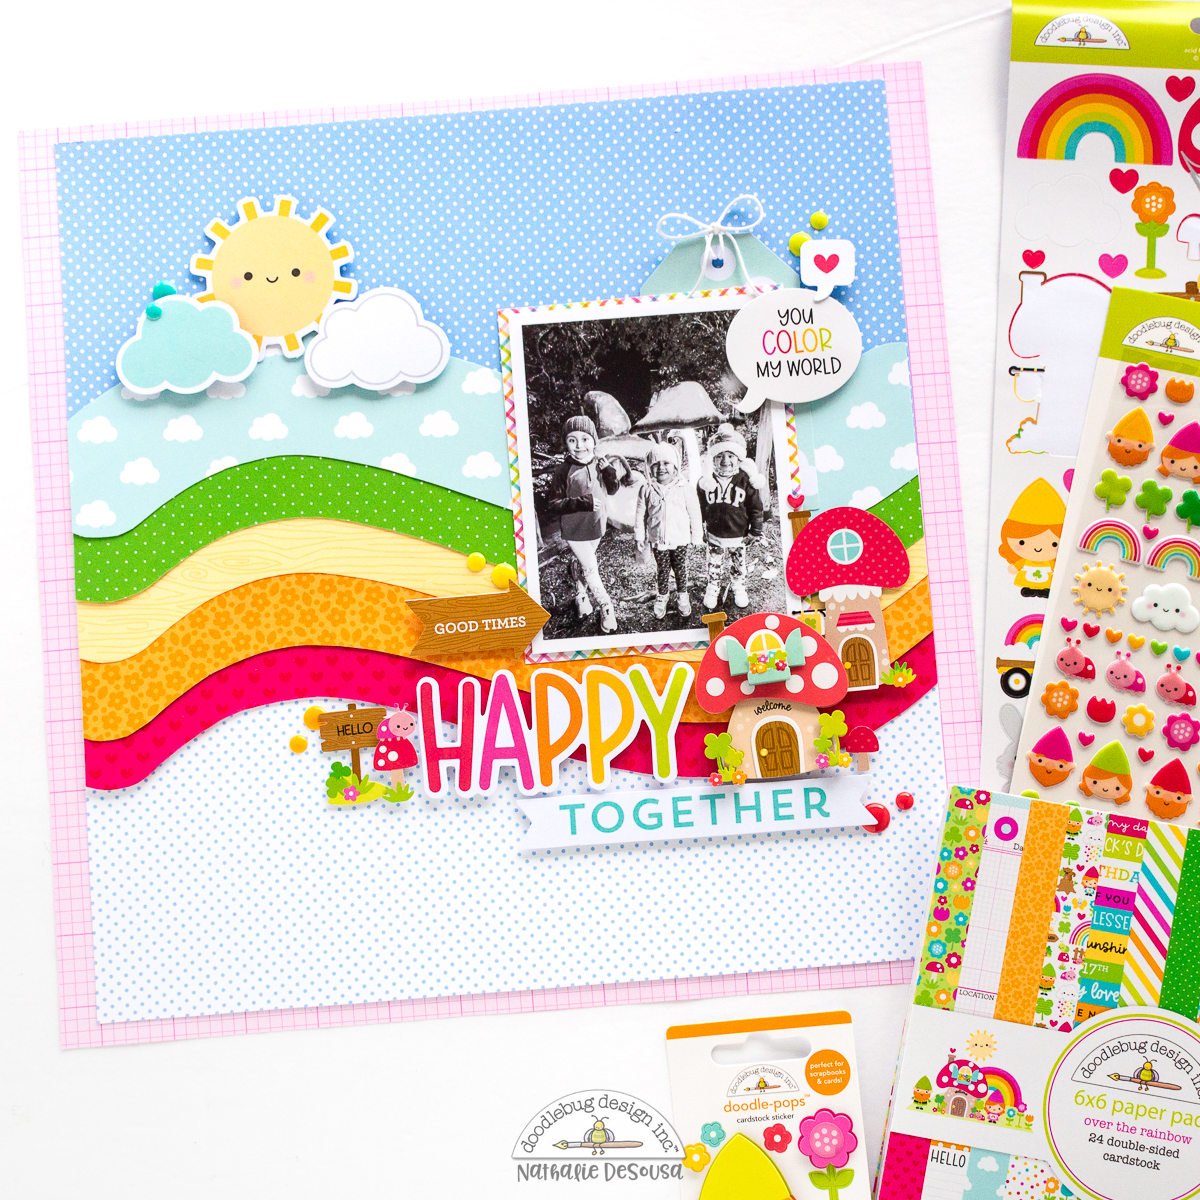
I started my page by creating my background from a piece of Petite Print paper ( just trimmed it in half, and flipped one side). Then, I used a curve ruler to cut patterned paper strips from the Over The Rainbow papers, and added a Buffalo Check/Woodgrain Petite Print to complete the rainbow look. I attached them to the center of the background in a layered look.

I backed my picture with papers from the 6x6 paper pad and Bits and Pieces. I set it in the valley that the rainbow curved paper strips created on the page. I added a few Chit Chat Pieces & a sticker from the This & That Stickers for my title.

The embellishments in the Over The Rainbow collection are so cute, and the mushrooms were just the perfect complement for this picture. That mushroom Doodle Pop fit just right on the page. I added a few pieces from the Chit Chats to complete my spread.

I love how this page turned out! The new Over The Rainbow collection is sure to make you bring happiness to your memories. Be sure to check it out!  XO

DOODLEBUG PRODUCTS USED

Over The Rainbow collection
Sprinkles
Petite Prints
Doodle Twine


Monday, February 27, 2023

OVER THE RAINBOW EXPLOSION TREAT BOX | with Kathy

St. Patrick's Day will be here soon, and since I come from a long line of Kelley's, Barrett's, McDonough's and Doyle's, well you know I have to celebrate!   The Over the Rainbow Collection is perfect for the holiday with all of those cute gnomes and clovers!  I decided to make a fun explosion box with a little surprise inside... take a peek...


I used this file from Lori Whitlock for the box part of my explosion box.  I decorated the outside of the box with some colorful Doodle-Bugs and flowers from the Odds & End Collection.  For the top I added a rainbow and sun also from the Odds & Ends.


Remove the cover and surprise!  There's a pot of Gold at the end of the rainbow... and a cute little leprechaun of course!  


How cute is that Leprechaun??  I used the Gnomies Doodle Cuts to piece him together with the shamrock paper from the 6x6 pad.  To make my pot of gold, I cut two of the  Pot of Gold-Pot of Gold SVG file, then glued them to either side of a little box (sized about 1.5" cubed).  

All that was left was to decorate the box flaps.  I used a combination of Odds & Ends, Lots O' Luck, Little Lady and Spring Garden Shaped Sprinkles, A Chit Chat sentiment, Limeade Doily and the Bits & Pieces.


And of course... I filled the pot with some gold covered chocolates!  This would make a fun gift for a friend or your sweetie!  Have you created any fun projects with the Over the Rainbow collection?  Make sure that you tag Doodlebug Design on Facebook & Instagram.  We love to see what you make!  That's it for me today, thanks for stopping by to peek!


DOODLEBUG PRODUCTS USED

Over the Rainbow Collection
Gnomies Doodle Cuts
Gingham Linen Petite Prints (Beetle Black, Gray, Limeade, Coral)
Dot Stripe Petite Prints (Gray)
Mini Paper Doily (Limeade)
Pot of Gold-Pot of Gold SVG

OTHER
Explosion Box SVG
Cameo 4
Sizzix Big Shot

Friday, February 24, 2023

OVER THE RAINBOW MINI ALBUM | with Conny

Hello Crafty Friends! It's Conny here sharing a 5"x 5" mini album using the Over the Rainbow Collection. This collection is so beautiful and colorful- I immediately wanted to create a mini-album, displaying all those pieces from the collection. Let’s get started!


You will start by cutting three chipboard pieces;  two measuring 5" x 5"  for the covers and one 5"x 2" for the spine.


I used some Textured Cardstock to wrap the chipboard pieces- I chose the colors bubblegum and limeade. Those pieces measured 7" x7"  for the covers. After wrapping those pieces you will need a piece of 6" x 5" cardstock to put the spine and the covers together. Score at 2" and 4", added double-sided tape between 2- 4 adhering that to the chipboard spine. You should have two inches of paper left on both sides to glue your cover pages. Make sure to leave 1/8 space when gluing for better movement/flow of the album.


Next, Make the hinges for the pages - You need three splits measuring 5" x 4" - score at 11/4" and 2 3/4". A 5"x 3" scored at 1" & 2" and 5"x2" piece scored at 3/4" and 1 1/4". Cut diagonally from the base to the top. That makes the pages/ pockets you create fit in a little easier. For the pages, you need six 9 1/2" by 4 3/4" scored at 4 3/4" adding double-sided adhesive just the edges leaving the middle for pockets.


Cover page, the 6"x6" paper pad was perfect for Matting inside and out the album. Then I saw the cardstock sticker "you make me happy when the skies are grey". I wanted to bring that cloud out - so I used a shaker pop, rainbow bright for that 3D effect, a few enamel sprinkle stickers, and enamel dots. Thank you for stopping by we can’t want to see what you create using Over the Rainbow Collection!


DOODLEBUG SUPPLIES USED

Over the Rainbow Collection

OTHER

Three Chipboard Pieces (2) 5"x5" (1) 5"x2"

Thursday, February 23, 2023

OVER THE RAINBOW YOU COLOR MY WORLD LAYOUT | With Traci

Hey everyone! Today, I'm sharing a colorful 12x12 layout that's perfect for spring! I was inspired by an older Doodlebug scrapbook page designed by Tonya Prawitt. Scrolling through Pinterest, I saw her layout and knew I had to scraplift the idea of these little Polaroid photos. So cute and you know me, I love a grid and straight lines! 

For this project, I chose lots of colorful papers and embellishments from the Over the Rainbow collection. I started by layering two 12x12 prints - Shine Bright (stripes) and Gnome Sweet Gnome (hearts).

Next, I cut 18 rectangles out of white card stock that were 2" x 2.5" to create the Polaroids. I picked out 4 photos that I wanted to use but, you could choose as many as you'd like. I trimmed the photos and lots of pretty pattern papers to 1.75" x 1.75" and adhered them to the white mats.

Now for the really fun part ... embellishing! I used so many goodies from the icon AND mini icon stickers, puffy stickers, sprinkles (rainbow assortment dots and spring garden flowers), and the This & That stickers.  

I just love all the details the different stickers add to the page. I layered them using enamel shapes and other pieces. I added foam tape behind some to give them dimension. The butterfly above looks like she's flying!

The flower title originally said Thinking of you. I changed it by covering the words with a green scallop sticker from the this and that sheet, and the You Color My World piece from chit chat. Love how those flower sprinkles shine! 

12x12 Dog Scrapbook Layout with Polaroid pictures, stars, & pawprints

Here's Tonya's cute dog themed layout that inspired me. I hope you have fun with this page and enjoy using all the cuteness in the Over the Rainbow Collection!


DOODLEBUG PRODUCTS USED
Over The Rainbow Collection

Wednesday, February 22, 2023

OVER THE RAINBOW THIS MAKES ME HAPPY LAYOUT | with Erica

Hello friends! Erica here with you today and I am super excited to be sharing my first layout with the Over the Rainbow collection.

This collection is full of color and I could not wait to dive in and create! The beautiful Over the Rainbow 12x12 pattern paper is a favorite so that is the first paper I grabbed when I started to create!

I knew I wanted to use a large title cut file and back it with this colorful paper! I used my Silhouette cameo to cut out both the cut file and the backer piece. I made sure to set it up so it would cut the backer in the center of the pattern paper so I could use the rest of the paper to mat my white cardstock.

The white cardstock I used is trimmed down to 11x11 and matted onto the leftover piece of the Over the Rainbow 12x12 paper. I wanted to add some stitching to the layout so I ran it through my sewing machine. I went with a blue thread to match the collection and I love the color and texture it adds to the layout.

Next I added foam adhesive all over the back of the backed cut file and adhered down to the layout base! I matted my four photos of Liam using the Over the Rainbow 6x6 paper pad and some 6x6 petite prints.

I kept the embellishments simple but knew I wanted to add one of the cute rainbow die cuts and one of the adorable gnomes! I just love how this layout turned out and it just shows how much Liam loves his shamrock glasses! This age is so fun and he can't wait to try and catch a leprechaun!

Thanks so much for stopping by today and I hope you are inspired to create using the Over the Rainbow collection!

DOODLEBUG PRODUCTS USED

Over the Rainbow Collection

Tuesday, February 21, 2023

OVER THE RAINBOW GNOME SWEET GNOME CARDS | with Karen

Sometimes, a paper collection comes along that makes you want to squeal because of all the cuteness. Let's just say that when the new Over the Rainbow collection arrived at my home, you could probably hear me squealing all the way in the US! This new collection is absolutely delightful. And I couldn't wait to get started making projects.


The first thing I decided to do was make some cards so I could share the delightfulness! Out came the Gnome Sweet Gnome stamps and the coordinating Cards & Envelopes and I got to work.


This stamp set is amazing because you can create all sorts of scenes with the characters. I did a little bit of masking here to experiment with the gnome character holding the flower and having the cloud and second flower appear to be behind other shapes.


And because this little gnome was as cute as she could be, I did some more masking here to add the rainbow and flowers with her.


But as you can see, switch up the additional shapes and you have a completely different scene. This is the same gnome from the first card, just placed with other objects. Oh, and because Doodlebug includes some cute eye/mouth stamps in the set, you can turn any of the objects into Doodlebug characters of their own. This is the same cloud stamp from the other two cards - just with a little personality of his own!


This collection is as versatile as they come. Put that together with the overall cuteness factor and you have a collection here that you will be wanting to craft with all year. Let's just say that it hasn't left my crafty table since it arrived! What does that mean? More cuteness to come! Thanks for stopping by! Hugs,


BLOG | INSTAGRAM

DOODLEBUG PRODUCTS USED

Over the Rainbow Collection
Over the Rainbow - Bits & Pieces
Cards & Envelopes
Gnome Sweet Gnome stamps

OTHER

Adhesive

Monday, February 20, 2023

OVER THE RAINBOW MAGICAL SPRING LAYOUT | with Brianna

Hey friends! Brianna Lepper here today and I'm so thrilled to share my first layout using the Over The Rainbow collection. This collection is so bright and fun and I really enjoyed creating with it. I decided to document a photo of my youngest son helping out with the flowerbeds last Spring. Here's my page!


This collection is absolutely stunning and I immediately was inspired to create a rainbow mixed media background. I thought it would compliment both the patterned paper and embellishments. I sprayed some Shimmerz Paints sprays from my stash onto a piece of thick white cardstock and blended and splattered each color. I went in rainbow order so that the colors wouldn't get muddy. It was super simple and I loved the final look!


I then took a couple of the 12x12 patterned papers and tore pieces from them. I wanted some pattern to sit on top of the mixed media and it also created a base for my photos. I adhered both pieces down, matted my photo using the 6x6 paper pad and then layered a few pieces from the Bits & Pieces pack behind my photo. The more layers the better, in my opinion!


For my title, I used two phrase pieces from the Chit Chat pack and adhered it to the top left of my layout.


Next, I went through the Odds & Ends pack and pulled some floral pieces, butterflies and a few other bits to embellish with.


Since my photo is of my son doing some gardening, I thought the Gnome Sweet Gnome Doodle Pop would be a perfect addition right between my photos. It's so cute!!!!!


For some finishing touches, I added a few Puffy Icons stickers, Spring Garden Shape Sprinkles and some tangled thread for more color and texture.


Here's one last look at this happy and bright page:


Thank you so much for stopping by today, I hope that I've inspired you in some way! See you next time friends!


DOODLEBUG PRODUCTS USED

Over The Rainbow Collection
Lily White Doodle Twine

OTHER

Shimmerz Sprays
Sewing Thread
White Cardstock
Pin It button on image hover