Showing posts with label 12 x 12 Layout. Show all posts

Thursday, February 23, 2023

OVER THE RAINBOW YOU COLOR MY WORLD LAYOUT | With Traci

Hey everyone! Today, I'm sharing a colorful 12x12 layout that's perfect for spring! I was inspired by an older Doodlebug scrapbook page designed by Tonya Prawitt. Scrolling through Pinterest, I saw her layout and knew I had to scraplift the idea of these little Polaroid photos. So cute and you know me, I love a grid and straight lines! 

For this project, I chose lots of colorful papers and embellishments from the Over the Rainbow collection. I started by layering two 12x12 prints - Shine Bright (stripes) and Gnome Sweet Gnome (hearts).

Next, I cut 18 rectangles out of white card stock that were 2" x 2.5" to create the Polaroids. I picked out 4 photos that I wanted to use but, you could choose as many as you'd like. I trimmed the photos and lots of pretty pattern papers to 1.75" x 1.75" and adhered them to the white mats.

Now for the really fun part ... embellishing! I used so many goodies from the icon AND mini icon stickers, puffy stickers, sprinkles (rainbow assortment dots and spring garden flowers), and the This & That stickers.  

I just love all the details the different stickers add to the page. I layered them using enamel shapes and other pieces. I added foam tape behind some to give them dimension. The butterfly above looks like she's flying!

The flower title originally said Thinking of you. I changed it by covering the words with a green scallop sticker from the this and that sheet, and the You Color My World piece from chit chat. Love how those flower sprinkles shine! 

12x12 Dog Scrapbook Layout with Polaroid pictures, stars, & pawprints

Here's Tonya's cute dog themed layout that inspired me. I hope you have fun with this page and enjoy using all the cuteness in the Over the Rainbow Collection!


DOODLEBUG PRODUCTS USED
Over The Rainbow Collection

Tuesday, September 20, 2022

PUMPKIN SPICE HAPPY FALL DAY LAYOUT | with Nathalie

Fall is here! and I am so happy to finally enjoy the best time of the year.  One of the best things about Fall are the leaves and getting to play with them.  So, I pulled the beautiful Pumpkin Spice collection to document a memory of my  nephew playing with the leaves.

I wanted a way to showcase all the colors and patterns of the collection.  So, I decided to find a simple way to  showcase them all in a way!

I chose to cut strips of the patterned papers, and layered them on the page.  I added a few scalloped sticker  between the layers to soften the lines of the strips.

To bring interest to the photo, I cut it into a circle, and set it at almost the bottom  of the strips.    This just created the perfect  an intersecting point for the location of the embellishments.

It was so fun to mix-and-match embellishments to create clusters at the top of the paper strips.  All the textures in the embellishments just add extra interest to the page.

I am using the horizontal line to add my title (love the Chit Chat pieces in this collection).  I used a die to cut a few leaves from the 6x6 paper pad, and scattered them throughout the title work.

Cannot wait to continue documenting all my Fall memories with the beautiful Pumpkin Spice collection.  XO

.

INSTAGRAM | BLOG | YOUTUBE


DOODLEBUG PRODUCTS USED

Pumpkin Spice Collection
Petite Prints

Wednesday, February 16, 2022

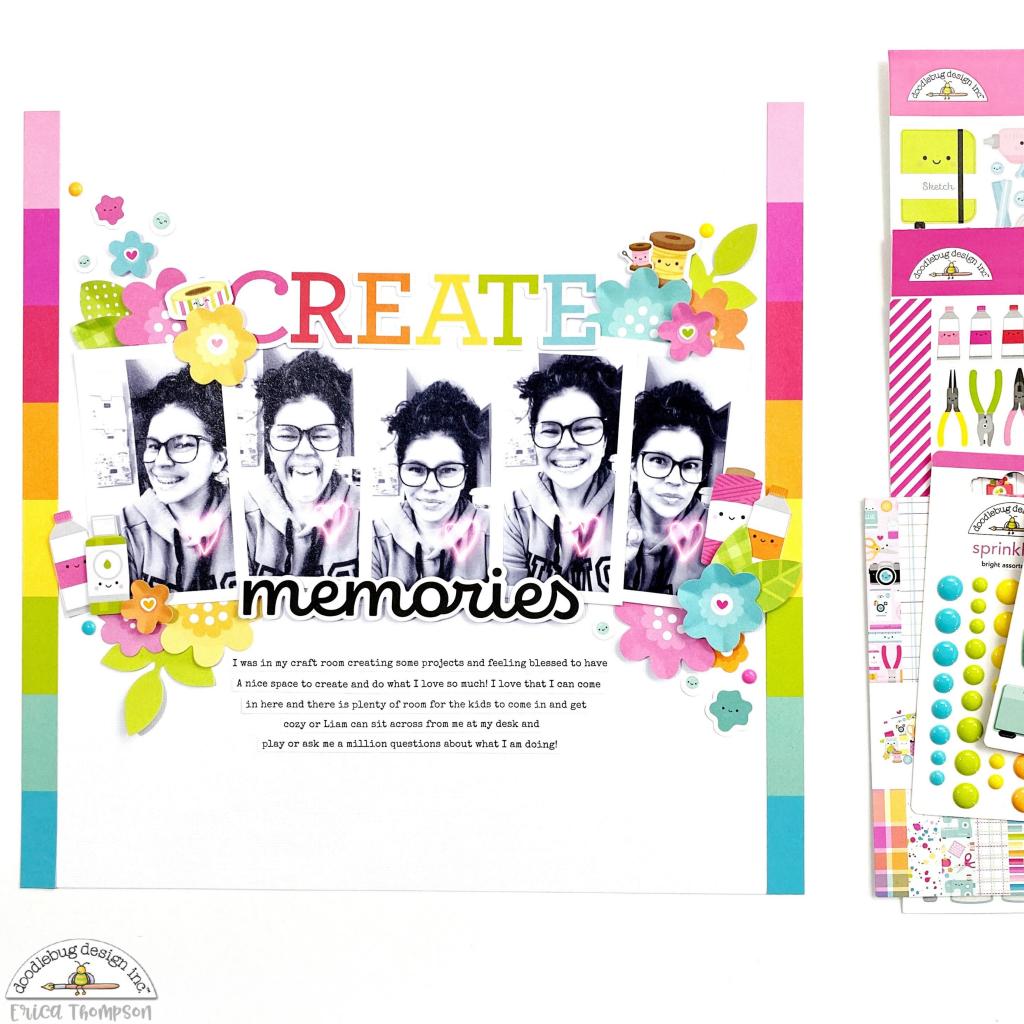
CUTE & CRAFTY CREATE MEMORIES LAYOUT | with Erica

Do you like to create layouts using 3 or more photos? Today I am sharing a 12x12 scrapbook layout using 5 photos and the Cute and Crafty collection.

I took some selfies on Valentine's Day using a snapchat filter and wanted to document them! I was crafting in my craft room and feeling grateful to have a nice space to craft! I love that there is plenty of room for my kids to come in and get cozy on the love seat and chat or sit across from me at my desk!

For my design I started by laying out my photos on a piece of white textured cardstock. I ended up going with a horizontal design. I trimmed off two strips from the Craft in Color 12x12 pattern paper and glued down to the left and right of the page. Next I adhered my photos to the page staggering them just a bit.

I pulled out two title pieces from the Cute and Crafty chit chat pieces and placed one at the top of my photos and one at the bottom. I used bits and pieces die cut flowers to embellish around the four corners of my photos popping some of them up on foam adhesive.

I pulled out the odds & ends and the mini icon stickers to add some of the cute icons around the page! To finish off my page I added some sprinkles from the bright assortment pack and then added my typed out journaling!

Thanks so much for stopping by the Doodlebug Blog today! I hope you enjoyed my layout and are inspired to create with 3 or more photos! You can check out my process video HERE on my YouTube channel! Have a great day!


YouTube | Instagram | Facebook | Blog

Doodlebug Products Used

Cute and Crafty Collection

Friday, July 16, 2021

CUTE & CRAFTY CREATE WITH FRIENDS LAYOUT | with Lisa

The crafty collection that you've been waiting for, is finally here!!!  When I got the new Cute & Crafty collection, I couldn't wait to create something with it... I even took a photo of me and two friends, when we were scrapping, to make sure to have my photo ready to go.  Here's my first layout created with the new super adorable Cute & Crafty collection.


For this first layout, I wanted to make sure to use as many of the cute little stickers, as I could. An easy way to do that, is to have something on your layout, that you can fill with stickers and embellishments.  Since it's a crafty collection and I love to have my layouts super colorful, I decided to go with splashes of color, that I could fill with tons of embellishments. 
I started by choosing the patterned papers and cardstock and then cut out random, wonky shapes for the splatters. As a background, I used the Colorful Canvas paper filled with little splatters of color. I just LOVE that paper and was so pleased to see it in the collection! :)


When I had my big splatters cut out, I inked the edges using my Distress Oxides and then distressed the edges with my scissors. I adhered them to the background, just putting a bit of glue in the middle of each splatter, so that the edges would bent up and give a lot of dimension. 

I went through the cardstock stickers and started adhering them to each splatter, using matching colors.  I also used enamel hearts and dots and jewels in each of the colors to fill smaller holes. I loved using some of the buttons and threaded some embroidery thread through them, with a little knot. 


I matted my photo on some layers of patterned paper, adhered it to the layout and then went on with my title. When it was time to create the title, I noticed that the background would be a bit crowded and that the title would probably have a hard time standing out... So I used white paint and a baby wipe to create some lighter areas around the photo. I wasn't sure how to make the title. At first I thought I wanted to make each letter with a different color. I tried that, but with all the color going on, it wasn't working. So I decided to go with a cursive font and the color black. 


I liked that a lot better and that way the title was really standing out and balanced the black in the photo. I added the words "with friends" to my hand-cut word "create", using alpha stickers in black.   I used two Doodle Pops around the photo and then also used some black enamel hearts and splattered some black ink, to add more black around the page. 


For a final touch, I ripped a bit of the background page from the upper right and bottom left and backed the missing pieces with the striped rainbow paper from the collection. 


I hope you like the layout and are excited to try the new collection!  Thanks for stopping by,


Facebook
 Instagram YouTube


Doodlebug Products Used:
Cute & Crafty Collection
Doodle Twine
Colored cardstock

Other products used:
Black pen
Distress Oxides
Black enamel hearts


Wednesday, December 16, 2020

NIGHT BEFORE CHRISTMAS MOST WONDERFUL TIME LAYOUT | with Erica

Do you have a favorite page design that you love to do over and over again? I have a couple designs that are perfect with just about any collection that I just love! Today I want to share one of them with you and if you have been following me for awhile then you have probably seen this design before.  
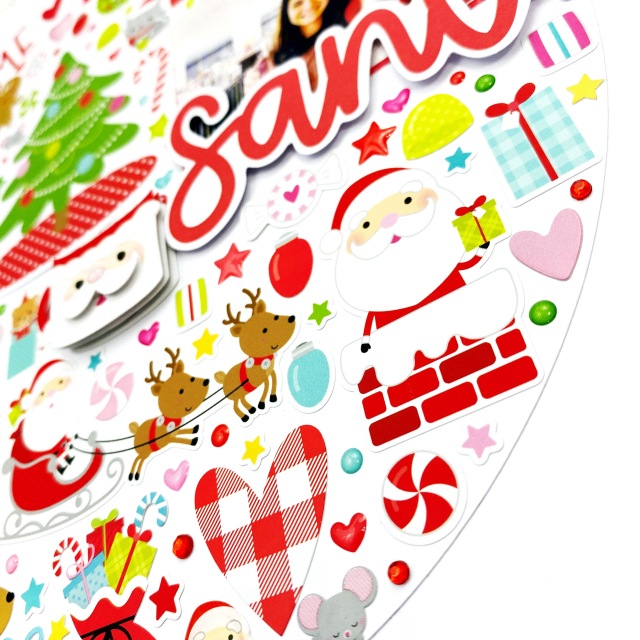
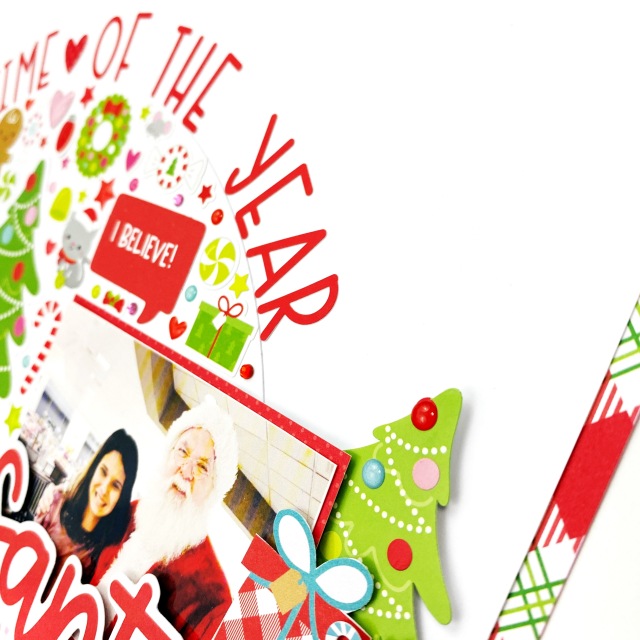
I start by cutting a large circle with my Silhouette Cameo. You can also use a circle cutter or trace the bottom of a large bowl and cut it out. Another way to get this look is to just trace a circle lightly in pencil on your background paper or eyeball it! For me I like to have my circle cut out on some cardstock and add all my pieces to the cut out circle. Once my circle is cut out I add my photo to the circle. I pulled out all the embellishments from the Night Before Christmas collection. To fill the circle I start with the largest embellishments first and then work my way down to the smaller ones. Once the circle is pretty full of different embellishments I go in with tiny gems to fill in any tiny open spots. I added one of the Night Before Christmas chit chat title pieces to the bottom of my photo to bring a little something to the photo. I also tucked in a few embellishments to the right of my photo. I trimmed down a piece of white cardstock to 11.5x11.5 and matted it on the Santa Stocking Paper. I love how the red really pops on this layout.  
To finish my layout I added a fun title to go around the embellishment filled circle. I used the Sunshine Alphas in Ladybug for another pop of red to the page. Thank you so much for stopping by today! I hope you enjoyed my layout and would love to see your take on this design! Have a wonderful day!

 
Doodlebug Design Products Used 
 Night Before Christmas Collection  
Sunshine Alphas

Friday, December 11, 2020

NIGHT BEFORE CHRISTMAS VISITING SANTA LAYOUT | with Tya

Hey there! I'm so happy to be able to share with you my latest scrapbook layout on the blog today! I am simply enamored with the adorable 'Night Before Christmas" collection! It has so many different icons that make for some great scrapbook layouts. This time around I decided to document a couple of photos of my kiddos when they were younger visiting Santa! These are some of my very favorite photos! 

I stumbled across the super cute "HoHoHo" background cut file I found over on this website. I cut it out on my Silhouette with some white card stock and then backed the "o's" with various pattern papers from the collection. I loved the bright colors against my white cardstock background. I always like to mount the cut files with some foam tape for dimension so they really pop! 

Here are a few close-ups of some of my decorations. I turned to the smaller Icon Stickers this time around because the scale was just perfect next to the HoHoHo cut file. Here I layered Santa and his reindeer over the "We Believe" banner from the Odds and Ends.


This cute little gal in her Christmas Pj's looked great next to this fun polka dot pattern paper. All the stickers are added to the layout with foam tape. As you can also see, I added some star Shape Sprinkles to the layout along with some Sea Breeze Nuvo drops for some added color and interest.


No Santa layout would be complete without his bag full of toys. This cute sticker, as well as the present, is also from the Icon Sticker sheet.

For my title, I decided to put a little one in the bottom right corner by using the "Santa" word from the Odds and Ends. The "Visit" banner is also from the Odds and Ends. I originally said "Visiting Santa" but I didn't need the Santa word so I just trimmed it off. I added a simple date stamp above the title and called this layout done!


 This layout was super fun to put together and I  loved that I got to play with lots of different products from the "Night Before Christmas" line! I hope I have inspired you to grab some Santa photos of your own and make a layout using these fun products! Thank you so much for stopping by the blog today! I hope you all have a very happy and safe holiday season! 

BLOG INSTAGRAM YOUTUBE *

DOODLEBUG DESIGN PRODUCT USED:

Night Before Christmas Papers in "Cozy Quilt"
Night Before Christmas 6x6 paper pad
Night Before Christmas "Christmas Wishes" Shape Sprinkles
Night Before Christmas Icon Stickers 
Lily White Textured Cardstock
Sweetheart Textured Cardstock

OTHER PRODUCTS USED:

HoHoHo Cut file from JustNick 
Silhouette Cameo
Foam Tape
Sea Breeze Nuvo Drops

Tuesday, December 8, 2020

NIGHT BEFORE CHRISTMAS UGLY CHRISTMAS SWEATERS LAYOUT | with Tegan

I absolutely love the Christmas season and everything that goes along with it - including ugly Christmas sweaters! And so I had fun using the adorable new Night Before Christmas collection to document this years Christmas fashion! Of course Doodlebug knocked it out of the park with another amazing Christmas collection filled with fun colors and adorable icons! I started this layout by creating a colorful background using 3" strips of the tone-on-tone patterned papers from this collection.


I then layered up some of my favorite Night Before Christmas patterned papers to create a spot for a photo of my niece and I in our ugly Christmas sweaters. I can't decide which is my top favorite paper... do you love the red and green plaid or the polka dots more?!  I then embellished around my photo with Odds & Ends Ephemera pieces and epoxy star and dot Shape Sprinkles Stickers. 


Eeeek! Just how adorable are the tree and Santa Odds & Ends die cut pieces here?! I used the Shape Sprinkles and Mini Icons Stickers to embellish the tree scene here. Isn't that little Christmas dog and those little bones just the absolute cutest?!? 


To create the title, I used a Chit Chat die cut piece and the super cute Sunshine Alphabet Stickers in Cupcake. I really love how this layout turned out and all of the colors. The only thing better than Christmas layout is a colorful Christmas layout, right?! I hope you like it as much as I do!
 

Thanks for stopping in today! I hope I have inspired you to grab some of the darling Night Before Christmas collection for your next project! 

Doodlebug Design Products Used:
Night Before Christmas Collection
Sunshine Alphabet Stickers: Ladybug, Cupcake
Here Comes Santa Claus Labels & Tags
Doodle Twine in Ladybug 
Candy Stripe Washi Tape

Tuesday, November 24, 2020

NIGHT BEFORE CHRISTMAS LAYOUT | with Tegan

I love all things Christmas and so I am swooning over the brand new Night Before Christmas collection! It just radiates Christmas cheer and is perfect for documenting all of your holiday memories. And I am in love with all of the patterns and images in this collection!


I started by using the Christmas tree from the Doodlebug Santa in Car Cut File and Doodlebug Cardstock to create a fun background design. I then backed this design with the Tinsel Time patterned paper. I used the Boughs of Holly Washi Tape to create a border around the page. I embellished the photos here with Chit Chat and Odds & Ends Ephemera pieces! How cute is that little Santa pooch?!


Here I layered the adorable Tinsel Time Doodlepop over more Chit Chat and Odds & Ends pieces. I love the dimension that the Doodlepops add to all different kinds of projects!


I used the Goody Goody Gumdrops Doodlepop to embellish the bottom of the page. Isn't he just so stinkin' cute?!? I added the Teensy Type number stickers to the lightbulb ephmera piece to create the year. I love the Doodlebug pinks and teals mixed in with the traditional red and green! 


I had so much fun creating this layout! I hope you enjoy it as much as I do! What is your favorite part of the adorable Night Before Christmas collection?!


Doodlebug Design Products Used:
Night Before Christmas Collection
Blush Textured Cardstock
Teensy Type Alphabet Stickers: Bon Bon, Ladybug, Lily White, Limeade

Pin It button on image hover