Showing posts with label Nathalie DeSousa. Show all posts

Tuesday, August 26, 2025

SUMMER FUN - ENJOY SUNNY DAYS LAYOUT | with Nathalie

Summer is coming to an end! Thankfully we have all the memories of sunny days and adventures, and the beautiful Summer Fun collection to create the right keepsakes with these memories. All the colors and designs in the collection are just perfect for this.  Let me show you what I have created:


Lots of color and texture to bring the feel of a day in the pool for this layout.    The waves in the pool in the picture were the inspiration for my page.


I am using Petite Prints for the base of my page;  this was trimmed by 1/2"and all sides and framed with the Beach Towel paper.  I added  the scalloped strips from the Cardstock Stickers to the top and bottom of  the base, then tore strips from the Water Babies paper -to create waves- and adhere them  in an overlapping pattern on the base.


The space between the "waves"-paper strips- was the right spot to bring embellishment and fun to the page.   I added pieces from the Odds & Ends, Mini Icon Stickers, Puffy stickers on the outer edges of the strips, then decided to attach my photo.


I backed the photo with papers from the 6x8 paper pad before placing it on the layout.  I added a few pieces of Chit Chat, cardstock stickers, and one of the Doodle-pop cameras to the top right corner of the photo.


To finish my page, I combined pieces from Chit Chat, Word Puffy Stickers, and Odds & Ends to create the title at the bottom of the photo; then added a few Sprinkles through the clusters on the page.

I love how this turned out, and I hope it inspires you to get your Summer memories documented.   Make sure you share with us what you create with the beautiful Summer Fun collection  XO

DOODLEBUG PRODUCTS USED

8942 Summer Fun Petite Prints
8939 Summer Fun Beach Towel Paper
8932 Summer Fun- Water Babies paper
8925 Summer Fun - 6x8 Paper pad
8906 Summer Fun - Mini Icon stickers
8907 Summer Fun - Puffy Stickers Icons
8908 Summer Fun - Puffy Stickers Words
8922 Summer Fun - Chit Chat
8921 Summer Fun - Odds & Ends
8926 Summer Fun - Icon stickers
8897 Summer Fun - Doodle pops - Photo Op
8927 Summer Fun - This & That cardstock stickers
8891 Summer Fun - Sprinkles -Summer Assortment
8895 Summer Fun - Sprinkles - Summer Splash

Tuesday, August 12, 2025

SUMMER FUN SPLISH SPLASH LAYOUT | with Nathalie

It is the season of sunshine, beach, and fun!  And I am so glad that the beautiful Summer Fun collection is here to help me document all those fun and colorful memories with it.  I think all the fun designs and vibrant colors are just the perfect complement to our sun filled memories. Let me show you what I created: 


I  wanted a design that would bring your eyes to the photo but at the same time showcase the fun look of this collection. So, I set to construct a sunburst design for my page using different patterns from the collection.


I started by gluing half of the Water Babies paper to the bottom of the white cardstock from the Texture Cardstock Assortment, then selected a center point for the photo.  Once I marked the spot, then I pulled my 6x8 paper pad and started cutting some of the papers into triangular strips to fit on   the page.


I laid them on the page so that the triangular pieces start at the designed point on the page and cover the top part of the paper.   I made sure that the triangles fan out of the center point marked, lay flat on the page, and then trimmed the excess outside of the layout.


Once the sunburst design was complete, I set the photo onto  a piece of the Let's Luau paper and set it atop of the joining point of the papers.   Next, I mixed pieces from Chit Chat, This & That stickers, mini sticker icons, and icon stickers to create clusters at the top left and bottom right corners of the photo.


Once the title was set on place, I then needed to balance the page by adding a smaller cluster at the bottom of the page.  This time, I pulled some of the This & That stickers and added a few icon stickers to complete the page.

I love how this turned out, and I hope it inspires you to pull your Summer Fun collection to document your fun filled memories. XO

DOODLEBUG PRODUCTS USED

8943 Summer Fun Texture Cardstock Assortment
8932 Summer Fun- Water Babies paper
8934 Summer Fun - Let's Luau paper
8925 Summer Fun - 6x8 Paper pad
8906 Summer Fun - Mini Icon stickers
8922 Summer Fun - Chit Chat
8926 Summer Fun - Icon stickers
8927 Summer Fun - This & That cardstock stickers

Tuesday, July 29, 2025

SUMMER FUN - SUMMER TIME LAYOUT | with Nathalie

The new Summer Fun collection is here, and I am so excited to get all those fun memories documented with this fun, colorful, and cute collection.  This collection is so easy to work with it pretty much made it so easy to put this layout together.


I wanted a design that will showcase that would showcase the patterned papers in this collection, and decided to use them to create my background.


I started with one of the coordinating cardstock for the background of this spread.  Then used a combination of papers from the 6x8 Paper pad to build the triangles at the base of the page, then I cut pieces from Gull Friends and Let's Luau to create the top triangles on the layout.  I also added one of the scalloped edges to the top edges of the bottom triangles.


To make the photos showcase on the layout, I used patterned paper from the 6x8 paper pad to create frames behind them.  I set them atop the bottom triangles using foam adhesive. A mix of Bits and Pieces, Chit Chat and stickers help  to create clusters at the corners of the photos.


To finish my layout, I used Chit Chat to create my title and tie the two sides of the layout together.  A few pops of color using Sprinkles just brings it all together.

I love how this turned out, and I hope  it inspires you to document your memories using the new Summer Fun collection,  XO.

DOODLEBUG PRODUCTS USED

8943 summer fun textured cardstock assortment pack
8925 summer fun 6x8 paper pad
8927 summer fun this & that
8921 summer fun odds & ends
8922 summer fun chit chat
8891 summer assortment sprinkles
8895 summer splash shape sprinkles

Tuesday, July 8, 2025

BEE HAPPY THE SWEET LIFE LAYOUT | with Nathalie

We are so loving the new Bee Happy collection! It is just the best combination of color and cute designs which are perfect to document your all your memories especially those sweet Summer filled ones.   Let me show you what I have created for today.


I wanted to take advantage of the designs and colors in the papers to bring the story forward.   That led me to using strips of a few papers to build my page.


I started by trimming a circle out of white cardstock, then trimmed papers from the 6x8 paper pad into 1" strips.  These were layered at the lower half of the circle  in a random patterned - just making sure that all the colors and patterns balanced- then trimmed at the edges to keep the shape of the circle in place.


I decided to glue the circle to one of coordinating solid cardstock pages.  Once in place, I set the picture on the right side of upper half of the circle.  I added a small embellishment cluster at the top right corner of the picture, and also below the bottom edge of the photo.   I kept the clusters simple as there is a lot of interest already showcased in the paper layers.


I mixed pieces of the ephemera and some stickers to create the title to the left of the photo. I wanted something large that will not hide the shape of  background.  Once those were in place, then it was all about adding extra movement to the page, so I pulled a few of the puffy stickers, Doodle-pops, and Sprinkles- all of those cute bees- and scattered them through the page.  I used a white marker to add the dotted lines to the page.


I decided to frame the layout with the small floral patterned than added a few enamel dots throughout the page. I love how it turned out, and I hope it inspires you to get creating with the beautiful Bee Happy collection!! XO

DOODLEBUG PRODUCTS USED

Bee Happy Collection
Bee Happy Cardstock
 Sprinkles
Doodle-pop

Tuesday, June 24, 2025

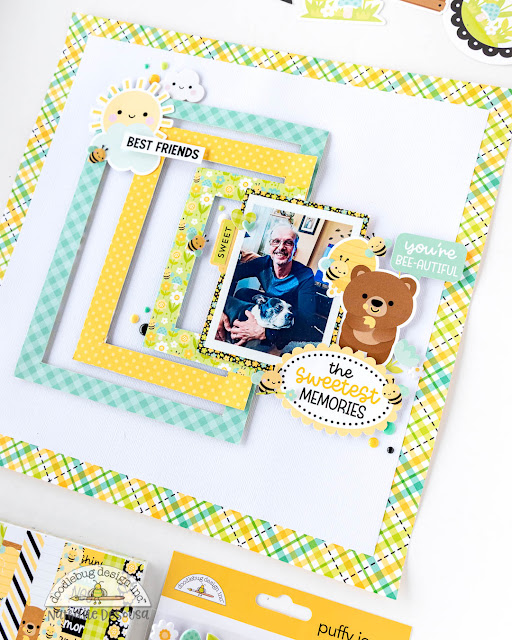
BEE HAPPY THE SWEETEST MEMORIES PAGE | with Nathalie

IT is time for us to show you a fun filled ideas featuring the new Bee Happy collection.   I think that the theme, colors, and designs in this collection make it so easy to document your Summer and simply your daily activities with style.


I wanted a combination of colors and structure for this page, so the idea of creating the frames from the papers in the 6x8 paper pad just popped on my mind.


I used a crafty knife to trim the frames out from different patterns from the 6x8 paper pad.  I made sure to reduce the size of the frames so that they create the graduated look on the page.  I attached to the base with foam adhesive, but decided to set them so that the left edge of all the frames stacked together.


I used pieces of the 6x8 papers to back the photo, and placed it to the right of the frames.  I then combined pieces from the stickers, ephemera pack, and puffy stickers to create a large cluster and title to the right of the photo.   These pieces help to balance the page.


I added a smaller cluster of embellishments to the top left corner of the frames.   I just loved all the icons in this collection, and wanted to used them to bring the page together.   


I added a few Sprinkles and little bees all around the page to make sure that there are extra pops of color. I just love how this turned out, and I hope that  inspire you to check the new Bee Happy collection,  You are going to love it! XO

DOODLEBUG PRODUCTS USED

Bee Happy Collection
Bee Happy Cardstock
 Sprinkles

Tuesday, June 10, 2025

BERRY SWEET LIFE IS SWEET LAYOUT | with Nathalie

I am sure you are all loving all the sweet inspiration from the beautiful Berry Sweet collection. It truly is such a cute and versatile collection that it is easy to use it to document your memories.  Here is my latest layout featuring the collection.


I just love the color palette and designs in this collection, and I wanted to showcase them in a sweet way that reminded me of freshness and summer.


The design in the Strawberry Stripe paper reminded me of lace strips, so what better way to bring a home feel than to weave them into my spread. I trimmed the stripes, and then carefully cut slits on the cardstock to create the woven effect on the background.  Then, I trimmed the page and framed it with the Berry Sweet paper.


I backed my photo with papers from the 6x8 paper pad, and set it on the center of the page. I added just a few extra embellishments to diagonal corners of the photo making sure that elements repeated while keeping  clean and simple so that the background wouldn't get lost.


To finish my page, I mixed pieces to create the title at the bottom of the page. I used the cute little birds as a way to tie all the pieces on the page together.   A few scattering of sprinkles complete the page.

I just love how it turned out, and I hope it inspires you to pull your Berry Sweet collection and create a cute little project.  XO

DOODLEBUG PRODUCTS USED

Berry Sweet Collection
Berry Sweet Cardstock
 Sprinkles

Tuesday, May 27, 2025

BERRY SWEET - SWEET GIRL LAYOUT | with Nathalie

We are all so in love with the new Berry Sweet collection from Doodlebug. It is such a perfect and small collection for all those lovely memories.    The sweet details and all the things berry gave the perfect vessel to document my daughter's Pastry Chef journey. Let me show you what I have created:


I wanted to create a fun design for the page, and decided on creating a focal point for the layout using patterned paper and a jaunty angle.


I started by cutting the red with white polka dots side of the berry sweet paper from the 6x8 paper pad into two triangles.   Then decided to add a layer under them using the Strawberry Stripe paper.  These were glued to opposite corners of the base, providing the perfect spot for the photo and embellishments.


I backed the photos with a paper from the 6x8 paper pad, and added a piece of the scalloped border below the photos before gluing it to the base.  I created a cluster of embellishments at the top right corner of the photos.  The berry theme made it easy to put together pieces into a cluster.


I took advantage of the angle the papers created to add my title to the page.  I also added extra embellishments to bulk up the title cluster.   To finish the spread, I added a few Sprinkles throughout the clusters to bring it all together.

I love how this turned out, and I hope you give the new Berry Sweet collection a try, you are going to love it!

XO

DOODLEBUG PRODUCTS USED

Berry Sweet Collection
Berry Sweet Cardstock
 Sprinkles

Tuesday, May 6, 2025

BUTTERFLY KISSES HAPPY MEMORIES LAYOUT | with Nathalie

I think we are all crushing over the beautiful Butterfly Kisses collection!  It is such a beautiful combination of color, design, sentiments, and all those lovely butterflies.  It is so perfect to document all sorts of memories; so, today I am using it to create this layout:


I had an idea on how I wanted this page to look, and pretty much it came as I had dreamed it.   A selection of papers -with a twist-, a large photo, butterflies and color.


I started by cutting strips of papers from the 6x8 paper pad, and also the 12x12 papers.  I made sure that I had a combination of pattern and solid in all of them.  Then using a thin straw, I started rolling the ends of the strips -the look is that of papers unrolling from the left to right of the page.   I then attached them to the coordinating cardstock so that they overlapped on the page.


I backed my photo with a paper from the 6x8 paper pad, and adhere it to the left of the paper strips (the unrolled end of them).   I decided to create clusters on the page so that the flow of the layout follows the paper rolls, that meant adding a flowers cluster at the top right corner of  the photo, and at the bottom of the paper rolls.


To finish my layout, I added a combination of stickers, Chit Chat, Odds & Ends, and Puffy Word stickers to create my title.  I had to bring texture and extra movement to the page, so I added some butterflies and hand stitched trails around them to make sure that they pop, too.

I just love how this turned out, and I hope it inspires you to create with the beautiful Butterfly Kisses collection.  XO


DOODLEBUG PRODUCTS USED

Butterfly Kisses Collection
Butterfly Kisses Cardstock
 Sprinkles

Tuesday, April 22, 2025

BUTTERFLY KISSES HELLO PRECIOUS GIRL LAYOUT | with Nathalie

The new Butterfly Kisses collection just landed at my doorstep, and I am so excited to use to document some of my most favorite memories.   This collection is bright, fun, and just gorgeous!  Let me show you what I created with it!


I love how this layout came together, it was so easy to mix and match pieces to bring the design to life with a touch of whimsy.


I had this idea of creating a sort of flap for the page.  So, I started by trimming the Rainbow Skies paper by about an inch, then I trimmed a corner of the Garden Gingham paper;  I scored about 1/4" from the long edge to form the triangular flap. I secured the back of the flap to the back of the paper before adhering it to the teal cardstock.


The small scalloped border under the flap helps to soften the edges.  I love the tags in the back of the Happy Thoughts paper, so I am using one of them to house my picture.  I made sure to punch a hole at the corner of the flap so thar I could tie the tag and flap together in place.


I chose to add two floral clusters to the left and right of the top of the tag.  My idea was to have similar elements so that they balance the page.   I also added a few sprinkles and butterfly stickers as if they were creating the bow on the tag.


To finish my page, I combined pieces of Chit Chat with the new Puffy Words to create my title at the bottom of the page.  I added a few stickers to bring the floral cluster look at at smaller scale to this end of the page. 

I hope this inspires you to get creative with the new Butterfly Kisses collection!! XO

DOODLEBUG PRODUCTS USED

Butterfly Kisses Collection
Butterfly Kisses Coordinating Cardstock
Doodle Twine - Cupcake

Pin It button on image hover