Friday, December 30, 2016

Introducing 2017 Design Team Member Anita Bownds

We are excited to introduce the new 2017 Design Team to you and today we're excited to feature Anita Bownds. 


Hi! there....

My name is Anita I'm 37 and a lover of all things paper. If I’m not in my craft studio creating something, I’m usually playing with my camera and working on my photography skills or just enjoying some quality family time.


I absolutely love the creative process of creating a scrapbook layout  and playing with pretty papers. and i love the bright and colorful patterns and the totally cute, embellishments.

I've been a big fan of  Doodlebug products for a while now and I've always loved how lovely and super cute the collections are with perfect pops of bold colors. I live in a small town called Mayborough with my partner and 3 girls on 12 acres surrounded by cane fields and cow farms.

Here are some of the projects we loved from Anita featuring Doodlebug Design products:


Visit Anita Bownds  on the following: 


Thursday, December 29, 2016

Introducing 2017 Design Team Member Karen Hanson

karen 1 We are excited to introduce the new 2017 Design Team to you and today we're excited to feature Karen Hanson. 


Hi everyone! I'm Karen from ScrappyCanuck Studios and I have a confession to make. I am a paper crafter who loves cute, color and glitter - yes, even glitter! In fact, the other day, as I was driving with my husband and two daughters to a Christmas market up here in my home town of Calgary, Alberta, my husband noticed that I had glitter all over my face. "Can I help you get that off," he asked? "Nah," I responded with a smile, "Nothing I can do about it now. Once you're glittered, you're glittered!" For me, the remnants of glitter were also a little reminder about the time I had spent that afternoon scrapping a Christmas memory I had of my youngest daughter. I had been using the delightful "Home for the Holidays" paper from Doodlebug, and color, cute and glitter had been all over my kitchen table! I was like a pig in mud - well, pretty, colorful, sparkly mud anyway!

 Paper-Princess-Full 

The layout I created that glittery afternoon - featuring Home For the Holidays and other great embellishments including Doodlebug's Mini Pearls! For more details about this project, and to see it's hidden fun, click here!

It was at this point that I decided I need to take a risk, and apply for the Doodlebug design team. Doodlebug products have been a part of so many of my crafting projects, and it really is a company that has given me the crafting courage to say - "Bring on the colour, cute and the glitter!" Doodlebug's style has been such an inspiration to me, and maybe, just maybe, my Doodlebug projects could be an inspiration to someone else! So I grabbed some supplies and got crafty: 
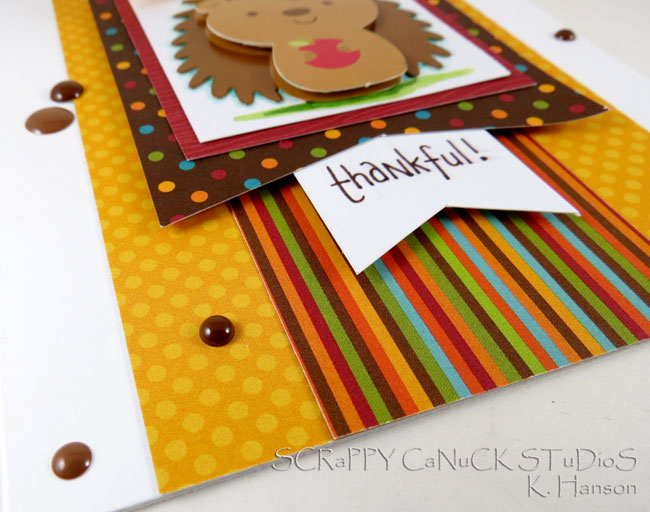
First up, a project with Happy Harvest!
 
Thankful-full
Now tell me, isn't this cute Doodle-pop sticker called "Happy Hedgehog" enough to make you, well...happy?
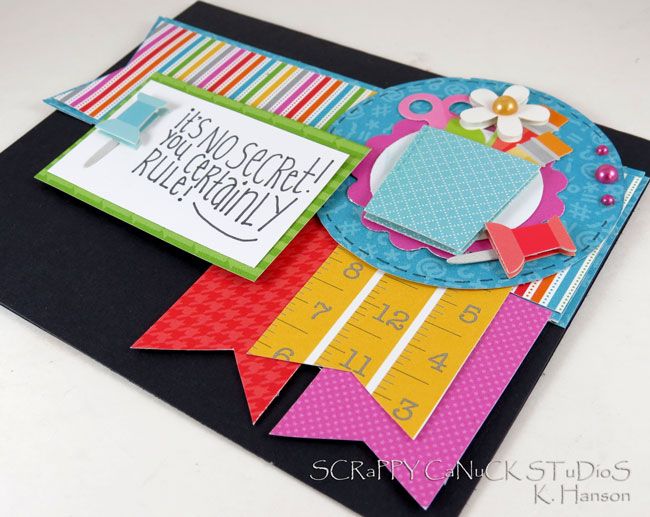
Thankful-pearls

And these "Bon Bon Sprinkles" - I kind of just want to eat them!

Then I grabbed "Take Note" - a bit of an older stack, but perfect for students, teachers or folks like me who love stationary - yup, I can never have too many pens, mechanical pencils and paper clips!
Rule-dimension

This is one of the collections that really shows off the clean, crisp patterns in amazing colours that Doodlebug is really famous for (and the part that always make me "oooo" and "ahhhh" when I see their booths at CHA)!
Rule-full 

I think the "Push Pin Doodlepops" are my favourite, but those "Spring Mini Pearls" are a pretty close second!! ;)

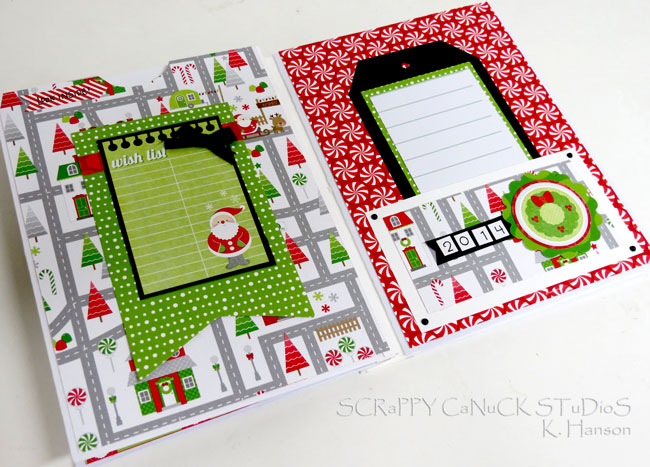
Last, but not least, I finished off a project for my oldest daughter. She is 4, and has just started writing letters to Santa. I thought it would be great to put together a little mini album to collect the letters she writes to Santa over the next few years, and to feature some of her favourite memories of the season. Created by sealing, cutting and then embellishing envelopes, this album is so much easier than it looks (hmmm - I think this calls for a tutorial).
Album-cover
Each page is actually a pocket that we can use to store the letters that my daughter writes to Santa. There is also a tag on each page that I can use to write a special moment or funny thing that she might have said that Christmas.
Album-1-and-2
I thought the pocket would also be a great place to store a little photo from the season - or perhaps even one from a visit with Santa! 
Album-3-and-4 
On this album, I also used some of the cute "Lily White Teensy Type Alphabet" stickers for the cover of the album, and to add the year to each page. These tiny stickers were the perfect size for the album! 
  Album-closeup-wreath
So there you have it - a few projects that I hope will inspire you to get your cute, colour and glitter on! There is no question that Doodlebug has inspired me to get crafty, and I can not tell you how excited I am to help them inspire you to do the same! Until my next post, come on over to ScrappyCanuck Studios and explore some other projects and tutorials I have created with Doodlebug product.

And if you're a fan of Twitter, Pinterest or Facebook, I would love to connect with you there too! Wait - is that glitter on your face? ;) See you soon!
Album-closeup-cover

Wednesday, December 28, 2016

Introducing 2017 Design Team Member Brigit Mann


We are excited to introduce the new 2017 Design Team to you and today we're excited to feature Brigit Mann. 

A little bit from Brigit, "I live in New York with my husband Al; we've raised four boys who are all grown now.  I'm so excited to say I've just became a grandma for the first time and I'm totally loving every minute of it.  Besides crafting I love hanging out with my family and two adorable dachshunds.  During the warmer months we all hang out on our pontoon, swimming, tubing and grilling!  Working full time for a school district in the Technology Department keeps me very busy so I enjoy coming home retreating to my craft room to relax and unwind.

I love creating cards, treat bags and boxes, 3D projects, home decor items like banners and frames.  I have so much fun discovering new techniques and working with new products.

I've been a fan of Doodlebug Designs for a couple of years now.  Your adorable collections with their vibrant colors and cute characters just draw you completely in. I always know a doodlebug project when I see one online!"


Here are some of the projects we loved from Brigit featuring Doodlebug Design products. 


Visit Brigit Mann on the following: 

Tuesday, December 27, 2016

Introducing 2017 Design Team Member Virginia Nebel

We are excited to introduce the new 2017 Design Team to you and today we're excited to feature Virginia Nebel. 

Virginia shared, "I love to create beautiful things with papers, scissors and a little glue! My scrapbooking style is clean, simple with little touches of whimsy added here and there. 
 

My favourite products to play with are pattern papers, die cuts, stickers, ephemera, doo-dads and anything shiny!  

I am tickled pink and honoured to be designing for Doodlebug!"


Here are some of the projects we loved from Virginia featuring Doodlebug Design products. 

So Blessed Layout 


Love This One Typewriter Layout 


Visit Virginia Nebel on the following: 


Friday, December 23, 2016

Meme/Quote Challenge: Bas-Cat layout by Melinda

meme
noun
  1. 1.
    an image, video, piece of text, etc., typically humorous in nature, that is copied and spread rapidly by Internet users, often with slight variations.

I'll be honest, when we were first given this task I had absolutely no idea what a Meme was. So, I had to ask my teenager daughter who gave me the typical "Mum, seriously?".


Now, this was definitely not a challenge to be taken lightly, I literally spent way too much time browsing Pinterest for Meme's and believe me, my daughter was truly shaking her head by the end of my search because I kept showing her all the funny 'Memes' I stumbled across. This particular meme caught my eye as I suddenly realised I had a photo of our 'Mr Wilson' sitting in a basket... perfect!


Dumb idea #1... to think it would be fun to hand stitch the outline of a cat onto my layout background. I didn't give this enough thought as it took far more time than I'd anticipated. Question... why is gold so hard to photograph?


The perfect way to soften a page is to add vellum so I decided I'd punch some leaves to nestle behind the flowers using the swiss dots vellum. It definitely gave a more subtle look to the cluster of flowers.


Don't forget your journaling. I find this such an important part to a layout after I recently sat down and browsed through layouts from past years. The kids were asking me questions about the photos and I seriously couldn't answer half their questions because I'd concentrated more on the design of the page than the content. So, my New Years resolution is to journal the important stuff... I'm just getting in practice before January 1.


Can you believe their is only one more sleep until Santa is due to fly over our houses spreading Christmas cheer. My children have loved their chocolate advent calendars and have been counting and munching their way through each day. Tomorrow is the very last chocolate and then it is Christmas. So, Merry Christmas to everyone and please have a safe New Year - Melinda x


Thursday, December 22, 2016

Meme / Quote Challenge: Be a Unicorn by Kathy

Hi Everyone, it's Kathy today with my take on the Meme Challenge!  Can I just say Unicorns, Rainbows and Glitter?  Here is the meme that inspired my layout, I've always loved this saying!!!


A couple of months ago, I met up with a scrappy friend for some shopping and lunch.  We happened upon some Unicorn party hats, and well, only a true friend will stand in the middle of a mall parking lot with you and take a selfie wearing unicorn horns! 


Unicorns and rainbows, what could be better!  I used some Gingham Linen Petite Prints for my papers.  The title is written in letters from the Teensy Type Alpha Sheets.


Of course if we are talking unicorns and rainbows, there needs to be some sparkle, so I added some Doodlebug Sequins and some Glitter Sprinkles.


I finished things up with some word and heart stickers from a variety of different Doodlebug collections.  That is the beauty of Doodlebug... you can always find an embellishment to match!  That's it for me today, I hope you've enjoyed all of the Meme inspiration from the Design team! I hope that you all have a very Merry Christmas!


Wednesday, December 21, 2016

Meme / Quote Challenge: All of Me Layout by Monique

Hello Doodlebug friends! It's Monique here today sharing my layout for the "meme/quote" challenge. This was such a fun (and time consuming!) challenge! I spent hours on Pinterest going from one meme and/or quote to the next, before settling on one that was literally right in front of me:

source: Pinterest

Do you recognise it? From one of Doodlebug's collections?? It's from the "Sweet Things" collection and once I realized that, I knew what I was going to do: a layout of my hubby and me! The photos are from 4 months ago, taken by my daughter when we were in Greece. 


Of course I started my project with the paper with the quote on it "Baby Bouquet" and cut off the strip of white paper on both the right and left side and adhered it on the right side of my page. Next I selected two other patterned papers: "Sweetheart Scallop" and "Honey Bees" and adhered a strip of both on the left side of my layout. Next I matted my two 8 cm x 8 cm photos and adhered those. All the other embellishments came next, like these flowers from the "Valentine Flowers Craft Kit", the berries sticker from the sheet of "Icons Stickers" and the grey border sticker from the "Fancy Frills" sticker sheet. The arrow with the xoxox was cut from the sheet of paper called "Sweet Nothings".


The elephants also came from the Icons Sticker sheet. The heart sticker came from the "This & That" sticker sheet. 


How I love the globe sticker (again from the Icons sticker sheet) and the enamel heart (Shape Sprinkles): 


And here's my favorite quote again especially as it's so true! 


Well, this is my page for the meme/quote challenge. Hope you like it! Do you have a favorite quote? If you do and decide to scrap it, I would love to see it! 

Thank you so much for stopping by our blog! Wishing you a wonderful day! 

Monique

Tuesday, December 20, 2016

NEW Puppy Love Collection Cut Files Released with Gift Sack Project by Christine Meyer

There are some fabulous new PUPPY LOVE Cut files
released today in the Silhouette Store and the Lori Whitlock SVG Shop
We've included links to both types of files below! Then keep scrolling to 
see the wonderful project by Christine Meyer... 

SVG Cut File
Silhouette Cut File
SVG Cut File
Silhouette Cut File
SVG Cut File
Silhouette Cut File
SVG Cut File
Silhouette Cut File
SVG Cut File
Silhouette Cut File
SVG Cut File
Silhouette Cut File
SVG Cut File
Silhouette Cut File
SVG Cut File
Silhouette Cut File
SVG Cut File
Silhouette Cut File
(See Sample Page in Box Below)
SVG Cut File
Silhouette Cut File
Entire Puppy Love CollectionAvailable at Lori Whitlock Only

Whether it's for Christmas, Birthdays, or another special occasion; pretty gift wrap is always a treat.  Have you considered digging into your crafting supplies to tackle your wrapping?  Christine joining you today with a simple idea for adding something special to your gift wrapping.

This was easy to make with the help of the Puppy Love Cut Files available from the Silhouette Store and Lori Whitlock.  The cut file I used was called: Orange Dog Puppy Love.  I used several additional supplies in addition to the cut file - I punched snowflakes from the Swiss Dots Petite Prints and also tore the sheet to make a little snowy hill.  I added sequins and jewels from Doodlebug to mimic snow.  Fancy Frills was my last non-cutfile touch using it as a border piece up top! Now let's get back to the cutfile!

Because this puppy had a shape that reminded of the the little Scotty dog from Lady and the Tramp, I decided I'd got that direction with him and run with the winter theme.  I cut him in Petite Prints to get the coloring just right.  

I also traced his body and created a little sweater for him.   I thought that added to his festive feel! For a finishing touch I added a little red bow to his tail and then added a Chunky Brad for his tag.

Once i had cut out all the pieces I only needed about 10 minutes to assemble this bag.  Quick, easy, and sure to make the receiver smile! 


Pin It button on image hover