Sunday, December 30, 2018

Hello 2019 Travelers Notebook Layout | with Tya

I have a confession- the Hello collection is hands down my favorite Doodlebug collection of this year! I wanted to make a Travelers Notebook spread to start out the new year and I knew that I had to use this beautiful collection as my first spread. I mean look at those colors !

 I used a few of my favorite pattern papers and lots of different embellishments to make my layout. Here on this page, I used some of the Odds and Ends and Chit Chat Ephemera. I used some of the  Gold Abigail Font stickers for the 2019. I also loved the gold Sprinkles too and so I added a small splatter of these up on the top. I journaled on the computer and mounted my word strips on some Cupcake Gingham Petite Print papers.
I love layering my pattern papers underneath my photos. Here I used the navy stripe paper from the 6x6 paper pad. The yellow grid paper is a journaling card found on the 12x12 Navy Stripe paper. The arrow and hearts are Ephemera and I added a pink doily for some texture. I also added my favorite Doodlepop - the Pink Poppy Doodlepop is the perfect finishing touch. More gold Sprinkles were added to the bottom corner as well.

 Here are a few close-ups:

Thanks a bunch for stopping by! I hope your new year is a wonderful one and grab one of our adorable Travelers Notebook and make some pages for your new year to celebrate! Happy Crafting!


PRODUCTS USED:


Saturday, December 29, 2018

Using Christmas Town for Birthdays | with Karen


Every year at about this time, I go into Christmas withdrawal. There is so much anticipation for the season, so many fun family events, so may crafting projects and then all of a sudden, it is over. And it seems that I am never quite ready for it. Sometimes, I deal with it by making a few more Christmas cards that get carefully put away for next year. After all, with adorable collections like Christmas Town on the crafty table, I am not quick to want to move on.  
And some years, I give myself a challenge - how can I keep using my Christmas collection in non-Christmas ways? While Valentine's project often emerge from this challenge (there are usually a lot of reds and pinks in Christmas collections), this year I decided to try to work with a birthday theme! 
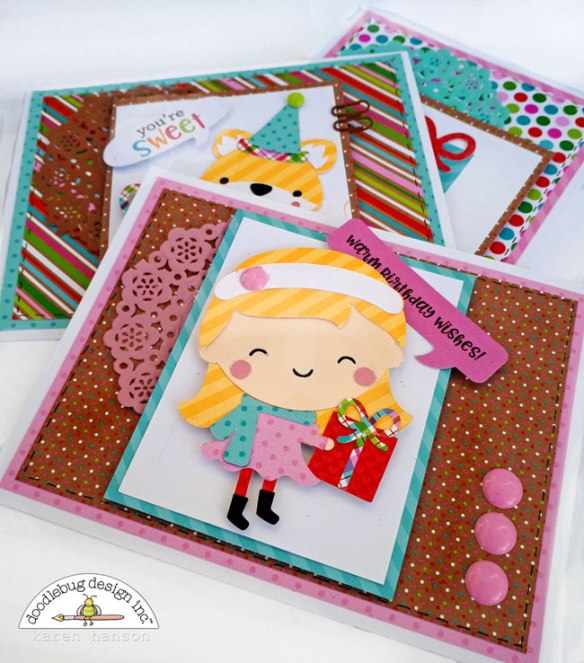
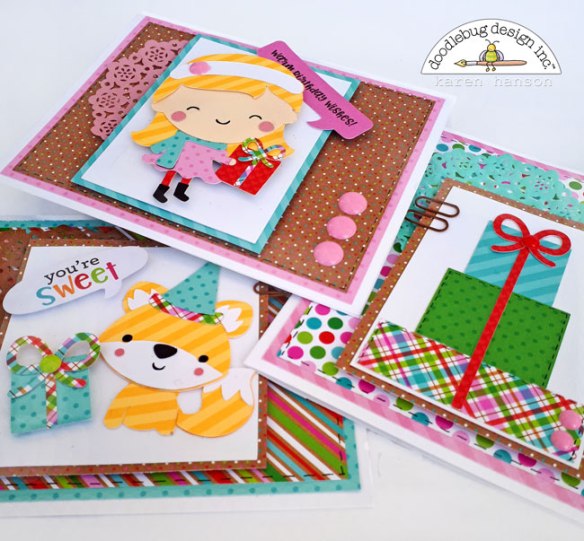
So this little mini collection of cards was born! Using a combination of the Christmas Cookies, Merry & Bright and Snow Much Fun patterned papers together with some adorable Petite Prints, the base of my cards were ready for some birthday embellishments in no time! So I decided to try my hand on using the Christmas Town cut files For my little characters (Silhouette Store/ Lori Whitlock). The cut files are great because you can make small "tweeks" to them - like turning a Santa hat into a head band... or even into a party hat like I did for this cute little fox.  
For some of the cut files, all that is required for a seasonal shift is a choice of paper... ...and a few amazing embellishments like these favourites of mine - mini paperclips, mini doilies and Sprinkles!; So, if you are like me and are eager to hold onto the season (or at least the adorable crafting product you have from it), give yourself a little challenge to see if you can hold on just a little bit longer! You never know what treasures you will find and create when you look at your product through a different set of eyes!

Thanks for stopping by!
;

Friday, December 28, 2018

Daily Doodles Calendar Pages | with Traci

Wow, can you believe it's almost 2019?!  Before each new year, I create a wall calendar for my studio.  I use lots of scraps and left-over pieces and have fun designing twelve 12x12 pages. I loved the Daily Doodles calendar sheets last year, so I'm using them again.  Here are some of the pages I've completed so far. 
I have 4 clipart boards near my desk and I hang up four months at a time and then rotate them out with new pages as the year goes on.  At the end of the year, I put them in a scrapbook album!
I try to give each month a colorful theme using sprinkles, stickers, and odds & ends from lots of different collections.
I could really use up a ton of number stickers and rub-ons, so I don't add them to every square.  I like the look of just a few dates scattered around the page.
For the month titles, I used the daily doodles lily white month stickers.  I need to get more of these because they're also great for everyday scrapbook pages.
Once I finish up the rest of the months, I'll post them over on my Artsy Albums blog.  Until then, I hope I've given you some ideas for a fun project for 2019.  Happy New Year everyone!

Thursday, December 27, 2018

A Year In Review Layout | with Virginia

I hope you had a wonderful Holiday season spending it with your loved ones.  2018 year is a wrap! I thought it would be fun to create a Year-in-review page from my puppy's perspective (she just turned 2 a week ago). I created a four-season page design with horizontal bands representing each season.  The horizontal bands are cut from the pretty petite prints dot/stripe papers as the backdrop.  A small scalloped border was added for extra detail and separation between the seasons.


This is a great time to dig into your stash and use up all those cute ephemera bits and pieces that you have been saving!  For my page, cute little elements from the Spring Things, Sweet Summer, Pumpkin Party and Christmas Town were used. 


I love that fun shape sprinkles are included with each Doodlebug collection and I'm so addicted to them.  Whee! on this layout I used them across all the seasonal bands!


On this single page, I was able to fit 10 photos, if you are a double-pager scrapbooker, this horizontal design would totally work on a 24x12 footprint. Placing the embellishment clusters and journaling in a staggered pattern encourages your eye to move across and down the page, a wonderful way to stroll down memory lane!

Wednesday, December 26, 2018

Christmas Town - Documenting the Memories | with Nathalie

Hello Doodlebug fans! I hope your Christmas was wonderful and I hope you took lots of photos because now it is time to document the memories. To inspire you, I am here today to share a new pocket page spread I created with the Christmas Town collection
 I think the smaller scale of the patterns in the 6x6 paper pad are the best to create cards for pocket pages. I selected three different ones to make my 4x6 cards. I went heavy on the kraft in my selection not only for unity but also because it is my favorite!
 I also cut a 3x4 card (above) from the 12x12 Christmas jammies paper and added Sprinkles enamel dots in various colors. It is a festive eye-catcher that quickly gives the timeframe of my spread. For the rest of my pockets, I added die-cuts from both the Chit Chat and the Odds & Ends packs, stickers from the This & That sticker page and a piece of blue ("linen") paper from the Petite Prints collection. It was selected to match the die-cut on the opposite page.
My journaling was typed on light pink graph paper also from the Petite Prints collection. I added machine stitching here and there for texture and, as a final touch, placed a Santa Jelly clip at the top edge of my page. He is so cute!

I urge you to get your photos printed, grab your Christmas Town supplies and record those happy moments while they are fresh in your mind. You will find that this collection is perfect no matter what support or format you use. Happy crafting and Happy New Year!

Tuesday, December 25, 2018

Christmas Town Layout | with Anita

Hey Doodlebug peeps,
Merry Christmas and happy holidays I hope everyone is enjoying being with family 
And all the kiddos are have lots of fun on holidays ... it’s been a bit warm here in Queensland Australia and my little kitty loves laying in front of the fan chilling out and he always looks so cute.


I started my layout using pretty snowflakes layering over it with my white cardstock 
Machine stitching around the edges then next using a pretty blue patterned paper and and my cameo to cut out the 
Stars from the silhouette store design id 236947
After it was cut out I added the star design to the left hand side and machine stitched a line down the middle to hold it in place 


Next I added layers of patterned paper behind my photo from the petite prints dots and stripes 6x6 and the Christmas Town 6x6 and a Lily white doily 


Then using the diecuts from the odds and ends and chit chat pack I added part of my title and a few snowflakes 
Around my photo along with a sticker from the this and that sticker sheet 


Using a bit of patterned paper from the 6x6 Christmas Town and some twine I created a tag to tuck underneath my photo layers 


I then added a cute little Christmas tree doodle pop to the side of my photo just overlapping the photo and snowflake diecut. I wanted to add the cute little hearts from the icons sticker sheet 
And to finish off my layout I added my title underneath my photo 


this is my last project for Doodlebug, I’ve had an amazing time playing with all the beautiful bright and fun products and I hope you have enjoyed all my creative inspiration.

Here are the products I’ve used on my layout.


Monday, December 24, 2018

Christmas Town Place Cards | with Kathy

Happy Christmas Eve everyone!  Hopefully all of your shopping is done and you're just putting the final touches on Christmas!  I decided last minute that I wanted to add place cards to my Christmas table, so of course I pulled out some Christmas Town and got to work!  These little place card treat boxes were put together using the Christmas Town 6x6 Pad and the Icons Sticker Sheet!


Each box holds a sweet treat inside!


The boxes were pretty simple to make.  I used this thin metal die and my Sizzix to make the boxes using papers from the 6x6 Pad.  Then I added the cute little Icon Stickers to the top...


For each place card, I created a box and chose a sticker from the Icons sheet.  I punched 2 circles using a 1/2" circle punch.  I also created name banners using the print and cut feature of my Silhouette, but you could easily hand write the names on a little hand cut banner.
To create the "stand" for each sticker, I folded each of the circles in half, then glued them together as shown in the second picture.
I used my powder tool on the back of each sticker to make it "un-sticky"  You could also use regular baby powder or corn starch as well. This is so it doesn't stick to everything once it's on the box.
Finally, I added some adhesive to the bottom of my sticker and stuck it to the stand I created.  This can then be glued to the top of your box.
Here are some close-ups of the individual place card boxes...


I can't wait to put them on my table!  That's it for me today...I wish you all a very Merry Christmas and a Happy and Healthy New Year!


Sunday, December 23, 2018

Christmas Town - Wish List Journal | with Jomelle

Christmas Wish List

Dear Santa, Merry Christmas! I have been good this year so here are my wish list.

I've created a fun way to keep my kid's wish list that I can keep and treasure every year. I originally wanted to create a junk journal, but then I thought "Hey why not create a wish list for Christmas" This way I can keep all my kid's wish lists every year.

I cut different 12x12 papers from the Christmas Town collection to the size of the Daily Doodles Insert ( which is a Standard size) so that I can keep in it my planner. I also cut smaller size paper and punch the edges to give it more layered look.
 This is my 10 year old son Jaden's wish list for Christmas. I love seeing my kids handwriting and compare how they progress as they grow older. I decided to use the Petite Papers and used my Tag die cut for listing all their wish for Christmas.
 You can see the different pages I have created. This can also be used as a mini album and I can add pictures later on.
 Do you still believe in Santa? I do!
 I decided to laminate the odds & ends pieces I used as tabs since I know I'm going to be using it a lot to flip the pages. This way they can last longer.
 Of course I had to create my own list to give to Santa.

 I added the clear pocket adhesive I got from Target to hold all the "wish list" and I've added them to the pages.
 Are you on the naughty or the nice list this year? Here are the tags and ornament shape I cut for my kids to write on. I added the twine to the tag to complete the look.
I like all the layering I've created. I just love staring at it. I can't wait to add my kid's list each year that I can look back on and reminisce with them someday.
Have you been good this year? Thank you for stopping by and I hope you enjoy my fun "wish list" inserts/mini album I created to add to my Daily Doodles. Happy Holidays!
Pin It button on image hover