
I have a confession to make - I just don't know where November and half of December went! How can we possibly be so close to Christmas?! Even with this cute December calendar I created with the new; Christmas Town collection, it still seem to have snuck up on me. Perhaps I should have outfitted it with a warning siren! Or perhaps I should have spent a bit more time prepping for the season and a little less time crafting for it - ahahahahahahaha!
 Well, prepared or not, Christmas will be here in no time, and I sure have been enjoying working with this new collection. This little home decor piece was created with a variety of products from the collection - everything from 12x12 pieces of patterned papers to chunky brads to mini clothespins!

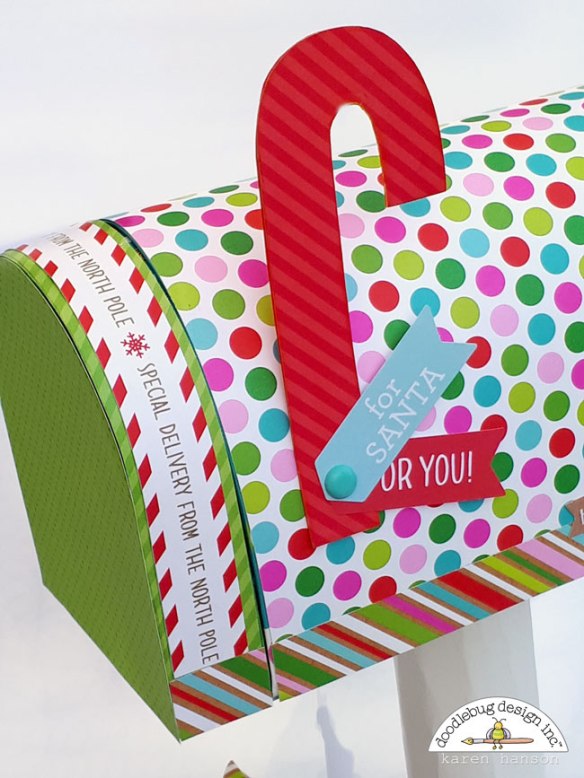
And while it is a cute piece that I can use to decorate my space, complete with a working notification flag/candy cane...
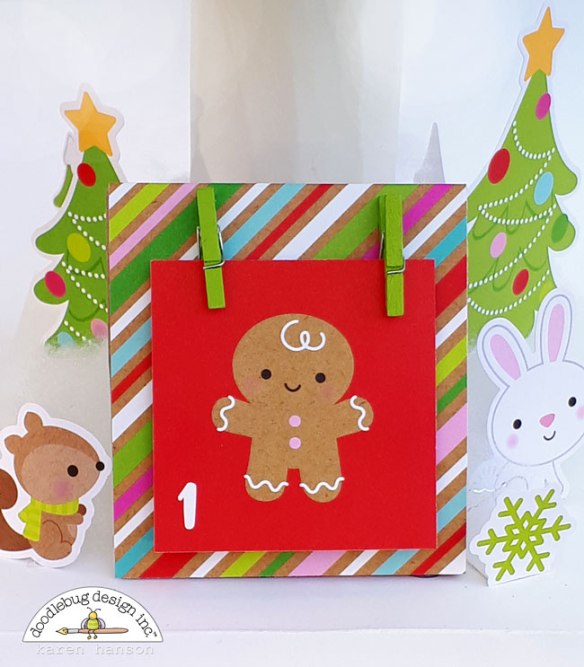
...it is also a little calendar that my daughters can change the date on each day! The Festive Flurry sheet is a perfect fit for creating a calendar without a lot of fuss - just cut and go - and the mini clothespins are a perfect way to keep them attached! A little bit of hot glue attached to a sturdy triangular base did the trick!

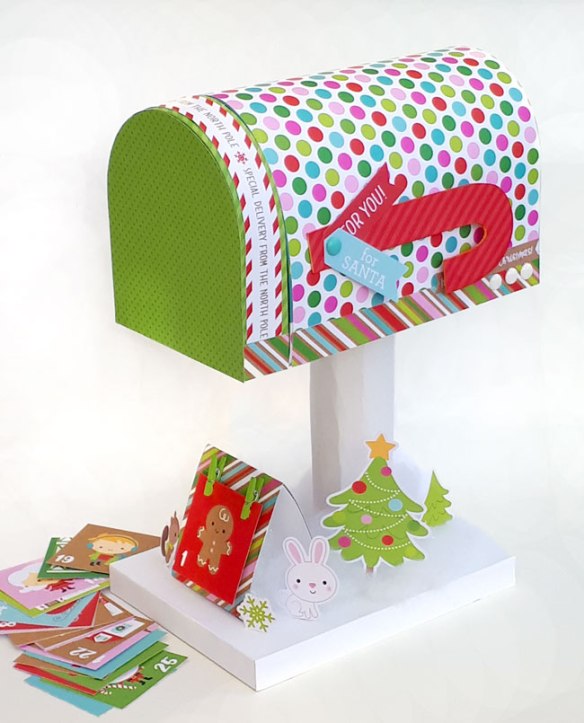
And the mailbox itself creates a cute little place to store all of the dates!
 Believe it of not, it was actually the Berry Christmas cardstock sheet that actually inspired the project! There was a little strip on the paper that read "Special Delivery from the North Pole" that made me think of all the fun times my girls have writing letters to Santa. A mailbox seemed like a good fit, and so the project was born!

Believe it of not, it was actually the Berry Christmas cardstock sheet that actually inspired the project! There was a little strip on the paper that read "Special Delivery from the North Pole" that made me think of all the fun times my girls have writing letters to Santa. A mailbox seemed like a good fit, and so the project was born!
With pieces like these adorable characters from the Odds and Ends pack...
And adorable Chunky Brads and sentiments from the Chit Chat pack...
 ...embellishing this little mailbox was a breeze! In fact, once construction was complete, adding all the details that make this mailbox tell a little story took under an hour! And while the mailbox has been filled this year with everything from letters to Santa to an Elf on a Shelf that decided it was a good hiding place, a pretty package of cards and envelopes from the assortment package fits the bill as well!
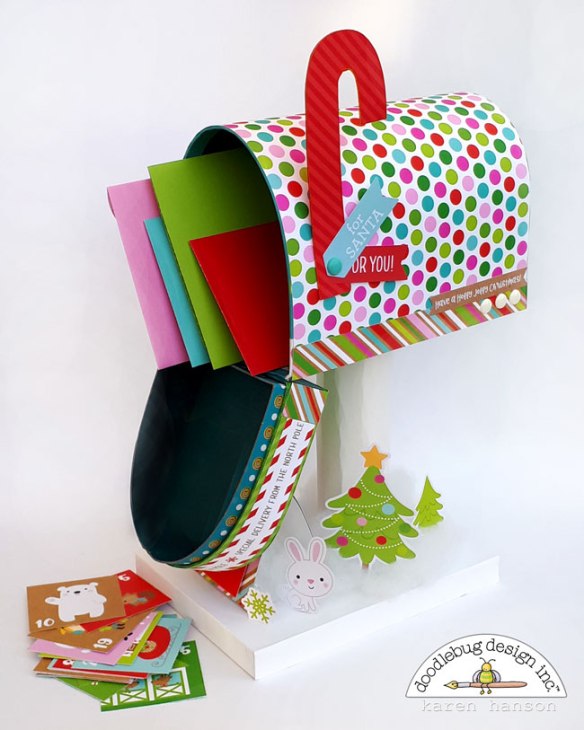
...embellishing this little mailbox was a breeze! In fact, once construction was complete, adding all the details that make this mailbox tell a little story took under an hour! And while the mailbox has been filled this year with everything from letters to Santa to an Elf on a Shelf that decided it was a good hiding place, a pretty package of cards and envelopes from the assortment package fits the bill as well!
If you are anything like me and have found that the season has snuck up on you - fear not! With a cute collection like this one on your crafty table, you will either be creating beautiful things for Christmas in no time or, like me, just be pro-craftinating your way right to the last minute! Either way, you'll be having some Doodlebug fun!
Wishing you all the best for a wonderful holiday season! Big hugs to you and yours,


This is the cutest!!!
ReplyDeleteThanks Kathy! You are the best!
DeleteAnother crazy talented artist from Doodlebug!!! You guys ROCK❤️😊👍🏻🎄
ReplyDeleteKim, thank-you so much!! That is extremely kind. I appreciate you taking the time to comment!
DeleteIs there a tutorial to make this? It's so adorable!!
ReplyDeleteYooperMom, I am sorry, but there isn't/ Here's what I can tell you about my process. I actually purchased a mailbox from the dollar store and covered it with Doodlebug paper. I need the stability of the base, and since I was covering it, it didn't matter what it looked like. I then used some recycled cardboard for the pole. I originally was going to cover it, but I liked the when I made the cylinder, the wrinkles made it look like wood. I then glued the pole onto the mailbox and onto a piece of wood for the base that I covered in white paper. I cut out a candy cane shape and covered in in Petite Prints paper, attaching it to the mailbox with a chunky brad. I then used more recycled paper to create a tent-like shape that was about 3x3". I covered it in white and then glued 2 mini clothes pin at the top. I then cut out all the date squares and attached the first one. When I was sure I was happy with the size, I glued the tent to the white base as well. Then I grabbed some white fluff and used it to cover seams. the last part was to use the Odds and Ends to add the characters around the base. A little piece of paper glued to the back folded into an "L" shape and glued to the base did the trick. Hope that helps!
DeleteSo cute. What a clever idea. 💗💗💗
ReplyDeleteThis is so beautiful and creative! I would love to make one to put on display. May I ask what is the finished size?
ReplyDelete