Tuesday, November 30, 2021

GREAT OUTDOORS CUT APART JOURNAL | with Ashley

Hi All! Today I am sharing another Great Outdoors project. I created a little journal using  the Cabin Fever 12 x 12 cut apart sheets. 

I really like using these sheets for note taking/ journaling. I started by adding some stitching details to each of the cut outs. 

I also wanted to layer the pieces together and have some interactive elements. I decided to use some of the cute stars and leaves washi tape that comes with the collection to attach some of the smaller cut-aparts to the larger ones. 

From there, I embellished using the Odds & Ends and Chit Chat packs (popping some elements up using foam tape) and the Icon sheet. I used one of the moon Cute Clips to bind everything together. 

I hope you liked seeing details of this little journaling insert. Happy Crafting! 

Doodlebug Products Used

Great Outdoors Collection
Great Outdoors 12 x 12 Paper Pack
Great Outdoors Odds & Ends
Great Outdoors Washi Tape
Cute Clips: Stars & Moons

Monday, November 29, 2021

GREAT OUTDOORS POP DOT CARDS TUTORIAL | with Kathy

I have always loved creating projects with lots of dimension... whether it be a 3d project, layout or card! I also love making little "scenes" with all of the adorable Doodlebug icons.  I decided to combine all of my loves using the Great Outdoors Collection along with the Great Outdoors Doodle Stamps to create some fun pop dot cards!  Take a peek...


I started with the adorable bear and fishy from the Great Outdoors Doodle Stamps.  I find coloring so relaxing!!!!  I layered on some of the pine trees and a night sky using papers from the 6x6 pad for my grass, sky and water.  To finish, I added the Happy Bear-thday sentiment from the Chit Chat pieces.


When you look closely, you can see all of the dimension in the card.


Next I made a sweet little card using the Moose and bunny stamps.  I added some mountains in the background, along with more of the pine trees.


And here is a close up of the card's layers...


Would you like to make some pop dot cards of your own?  I have a quick tutorial showing how I pieced them together.  To start, I created some cut files for the base of the cards.  You can get them on my blog here.  If you don't have a cutter, you can still make them.  The dimensions of the base pieces are as follows...

White Cardstock - (cut 3) 4.25" x 5.5" rectangle - with a 3.25" circle cut from the center.
White Cardstock - Card Base 8.5" x 5.5" - Fold in half
Patterned Cardstock - 4" x 5.25 rectangle - with a 3.5" circle cut from the center


On the left are the white pieces that make up the card base.  For each layer I cut some of the Great Outdoors 6x6 papers to create waves and grassy hills.  I also added a piece of the stars paper to the card base.  It will show through the holes in the layers.  I added my stamped pieces to each layer.  On the right you can see how I attached the patterned papers to the backs.  A good way to see where you want to add all of your images is to stack the layers before you assemble your card so you can see how everything lines up.


Next you want to start adding your layers to create your scene.  I started with the back-most piece with the trees and grass.  I added pop dots (you can use foam tape, or nothing if you prefer)  I centered this piece on my main card base and attached.


I then added the 2nd layer directly on top of the first, making sure everything was lined up.  There are pop dots between these layers.  To end, I added the 3rd layer, also with pop dots.  To finish I added the chit chat sentiment to the card front.

This cards can be mailed, but you will need a slightly larger envelope to mail if you've added pop dots.  If you have a cut file for an A2 Envelope I would size it up slightly to accommodate the layers, or you could use a 5x7 envelope.

The best part is that you can use any of your Doodlebug Doodle Stamps or even the Icon and Mini Icon Stickers to create fun little scenes with these bases!  If you do use the files along with your Doodlebug collections, be sure to tag us on Facebook & Instagram.  We love to see your creations.  That's it for me today, thank you for stopping by to peek!


DOODLEBUG PRODUCTS USED
Great Outdoors Collection
Great Outdoors Doodle Stamps and Doodle Cuts

OTHER
Pop Dot Card Base Cut File
Silhouette
Copic Markers
Pop Dots (or foam tape)


Thursday, November 25, 2021

GREAT OUTDOORS MEMORIES LAYOUT | with Erica

I am super excited to share my layout with you today! I had so much fun creating this layout using the Great Outdoors collection! Sometimes you just need to play with just the papers in the collection to create a layout that really stands out!

I knew I wanted to use a bunch of the pattern papers so I pulled out the 6x6 paper pad and the Autumn Leaf die set from The Stamp Market and die cut a lot of leaves!

Once I had all my leaves die cut I arranged them in the center of a piece of white cardstock that I had trimmed down and matted onto another piece of white cardstock. To frame these pieces I used the My Favorite Flannel 12x12 paper.

I arranged the photos in the center of the page and layered them up. I added foam adhesive under some of the leaves to help pop them up to add some dimension. I knew I wanted my photo to go in the center of all the leaves so I decided to punch it out with my large circle punch and matted it onto a larger white circle.

The colors in this collection are gorgeous and I just love how all the die cut leaves turned it! It just shows you do not need a lot of embellishments to create a great page! To finish off my layout I added some white and gold splatters and some shape sprinkles!

I just love how this layout turned out! I think it is one I will hang up in my office in the fall using my Doodlebug Clipboard! Thank you so much for stopping by today and I hope you all have a Happy Thanksgiving!

Doodlebug Products Used

Great Outdoors Collection

Other Products Used

The Stamp Market Autumn Leaves Dies

Wednesday, November 24, 2021

GREAT OUTDOORS STAMPED CARDS | with Karen

Okay, give me a Doodlebug furry friend any day. No, really. Any day! I cannot resist them. Because if there is one thing that Doodlebug characters make me do, it is smile. And we all need more smiles!


So, as you can imagine, the new Great Outdoors collection has me squealing with delight. There are so many cute characters in this collection that I actually didn't know where to begin...


...well, for long anyway. Because how cute is this Sasquatch?!


And this buffalo?! I mean come on. I have not had this much fun colouring in a while.

And with this stamp set, not only are there cute characters, there are all sorts of fun shapes that you can use to create little scenes. I put them all together with some little sentiments and tags that are in the 6x6" paper pad.

So get your colouring tools everyone! You are going to want to create cards with these cuties for all the people you love.  Thanks for stopping by!  Hugs,


BLOG | INSTAGRAM

Doodlebug Design Product:
Great Outdoors Collection
Great Outdoors Doodle Stamps and Doodle Cuts
Great Outdoors Cards & Envelopes

Other Products:
Adhesive
White Cardstock

Tuesday, November 23, 2021

GREAT OUTDOORS MONTHLY POCKET PAGES | with Traci

Hello everyone! Today, I'm sharing some fun new layouts I made for my granddaughter's 8x8 Storybook Album. I used the new Great Outdoors collection and it was just perfect for my November pages. Each month, I create 4 new layouts to save our fun memories and I love the way these turned out.


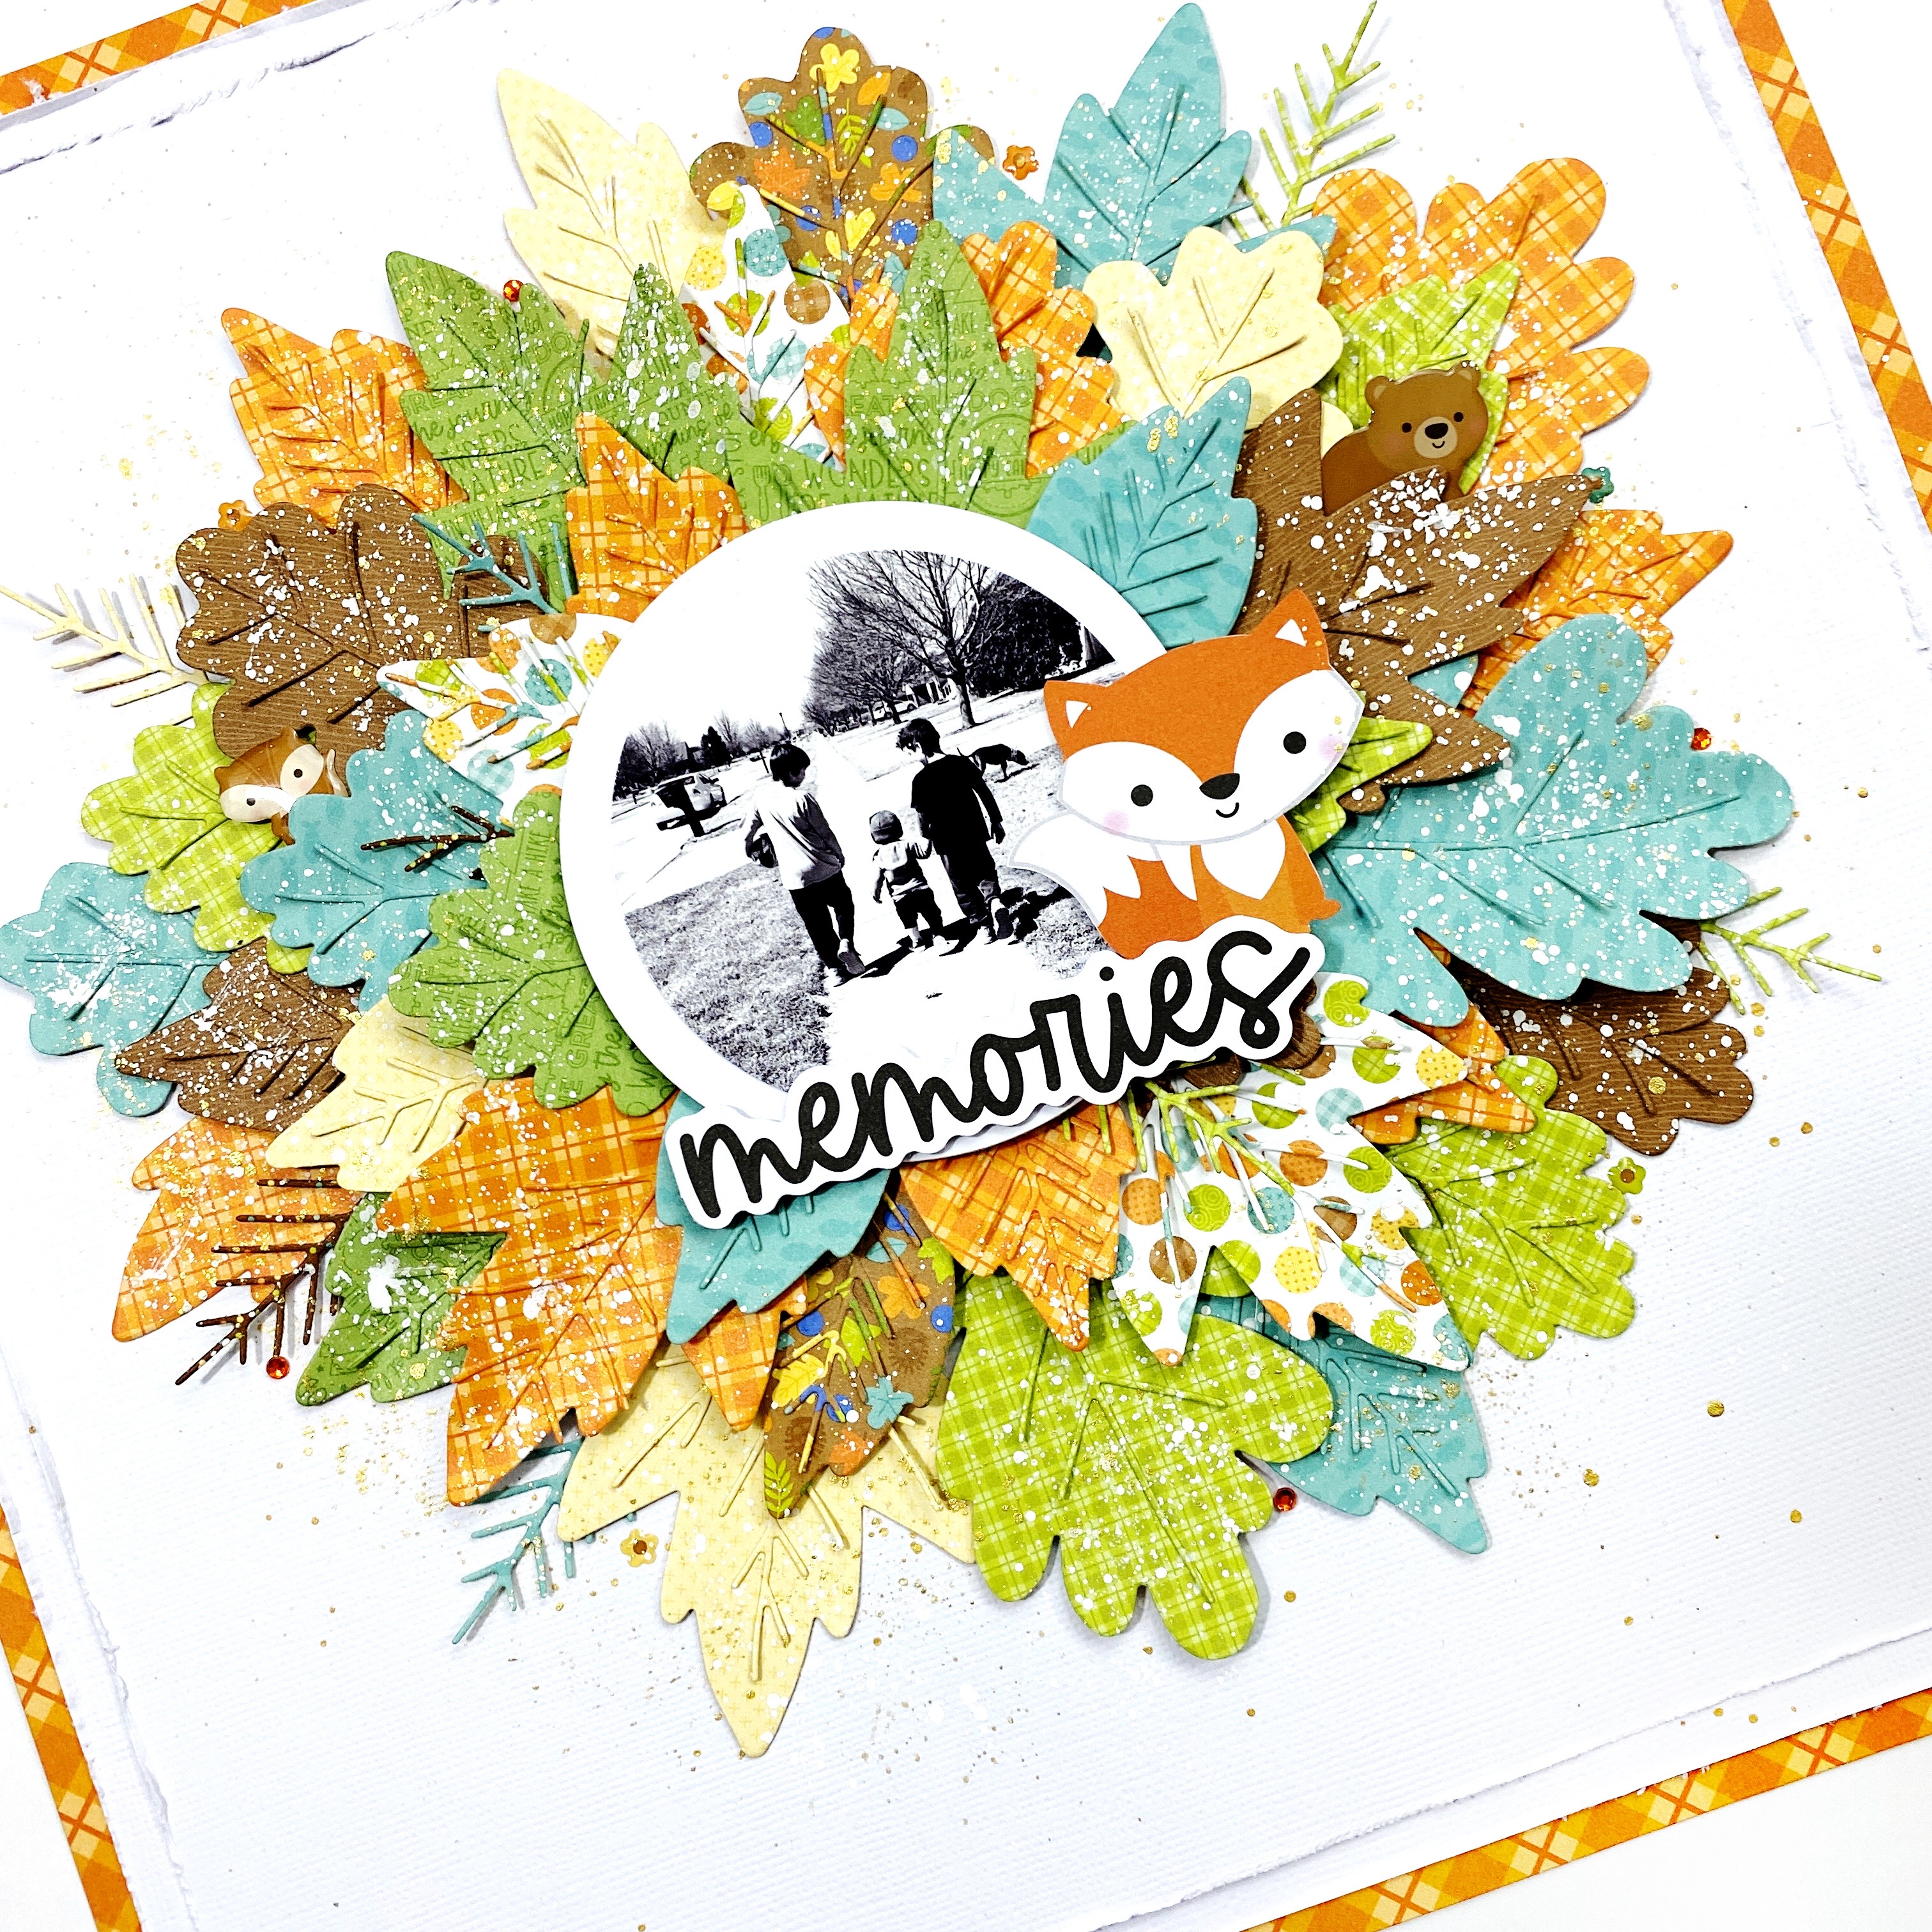
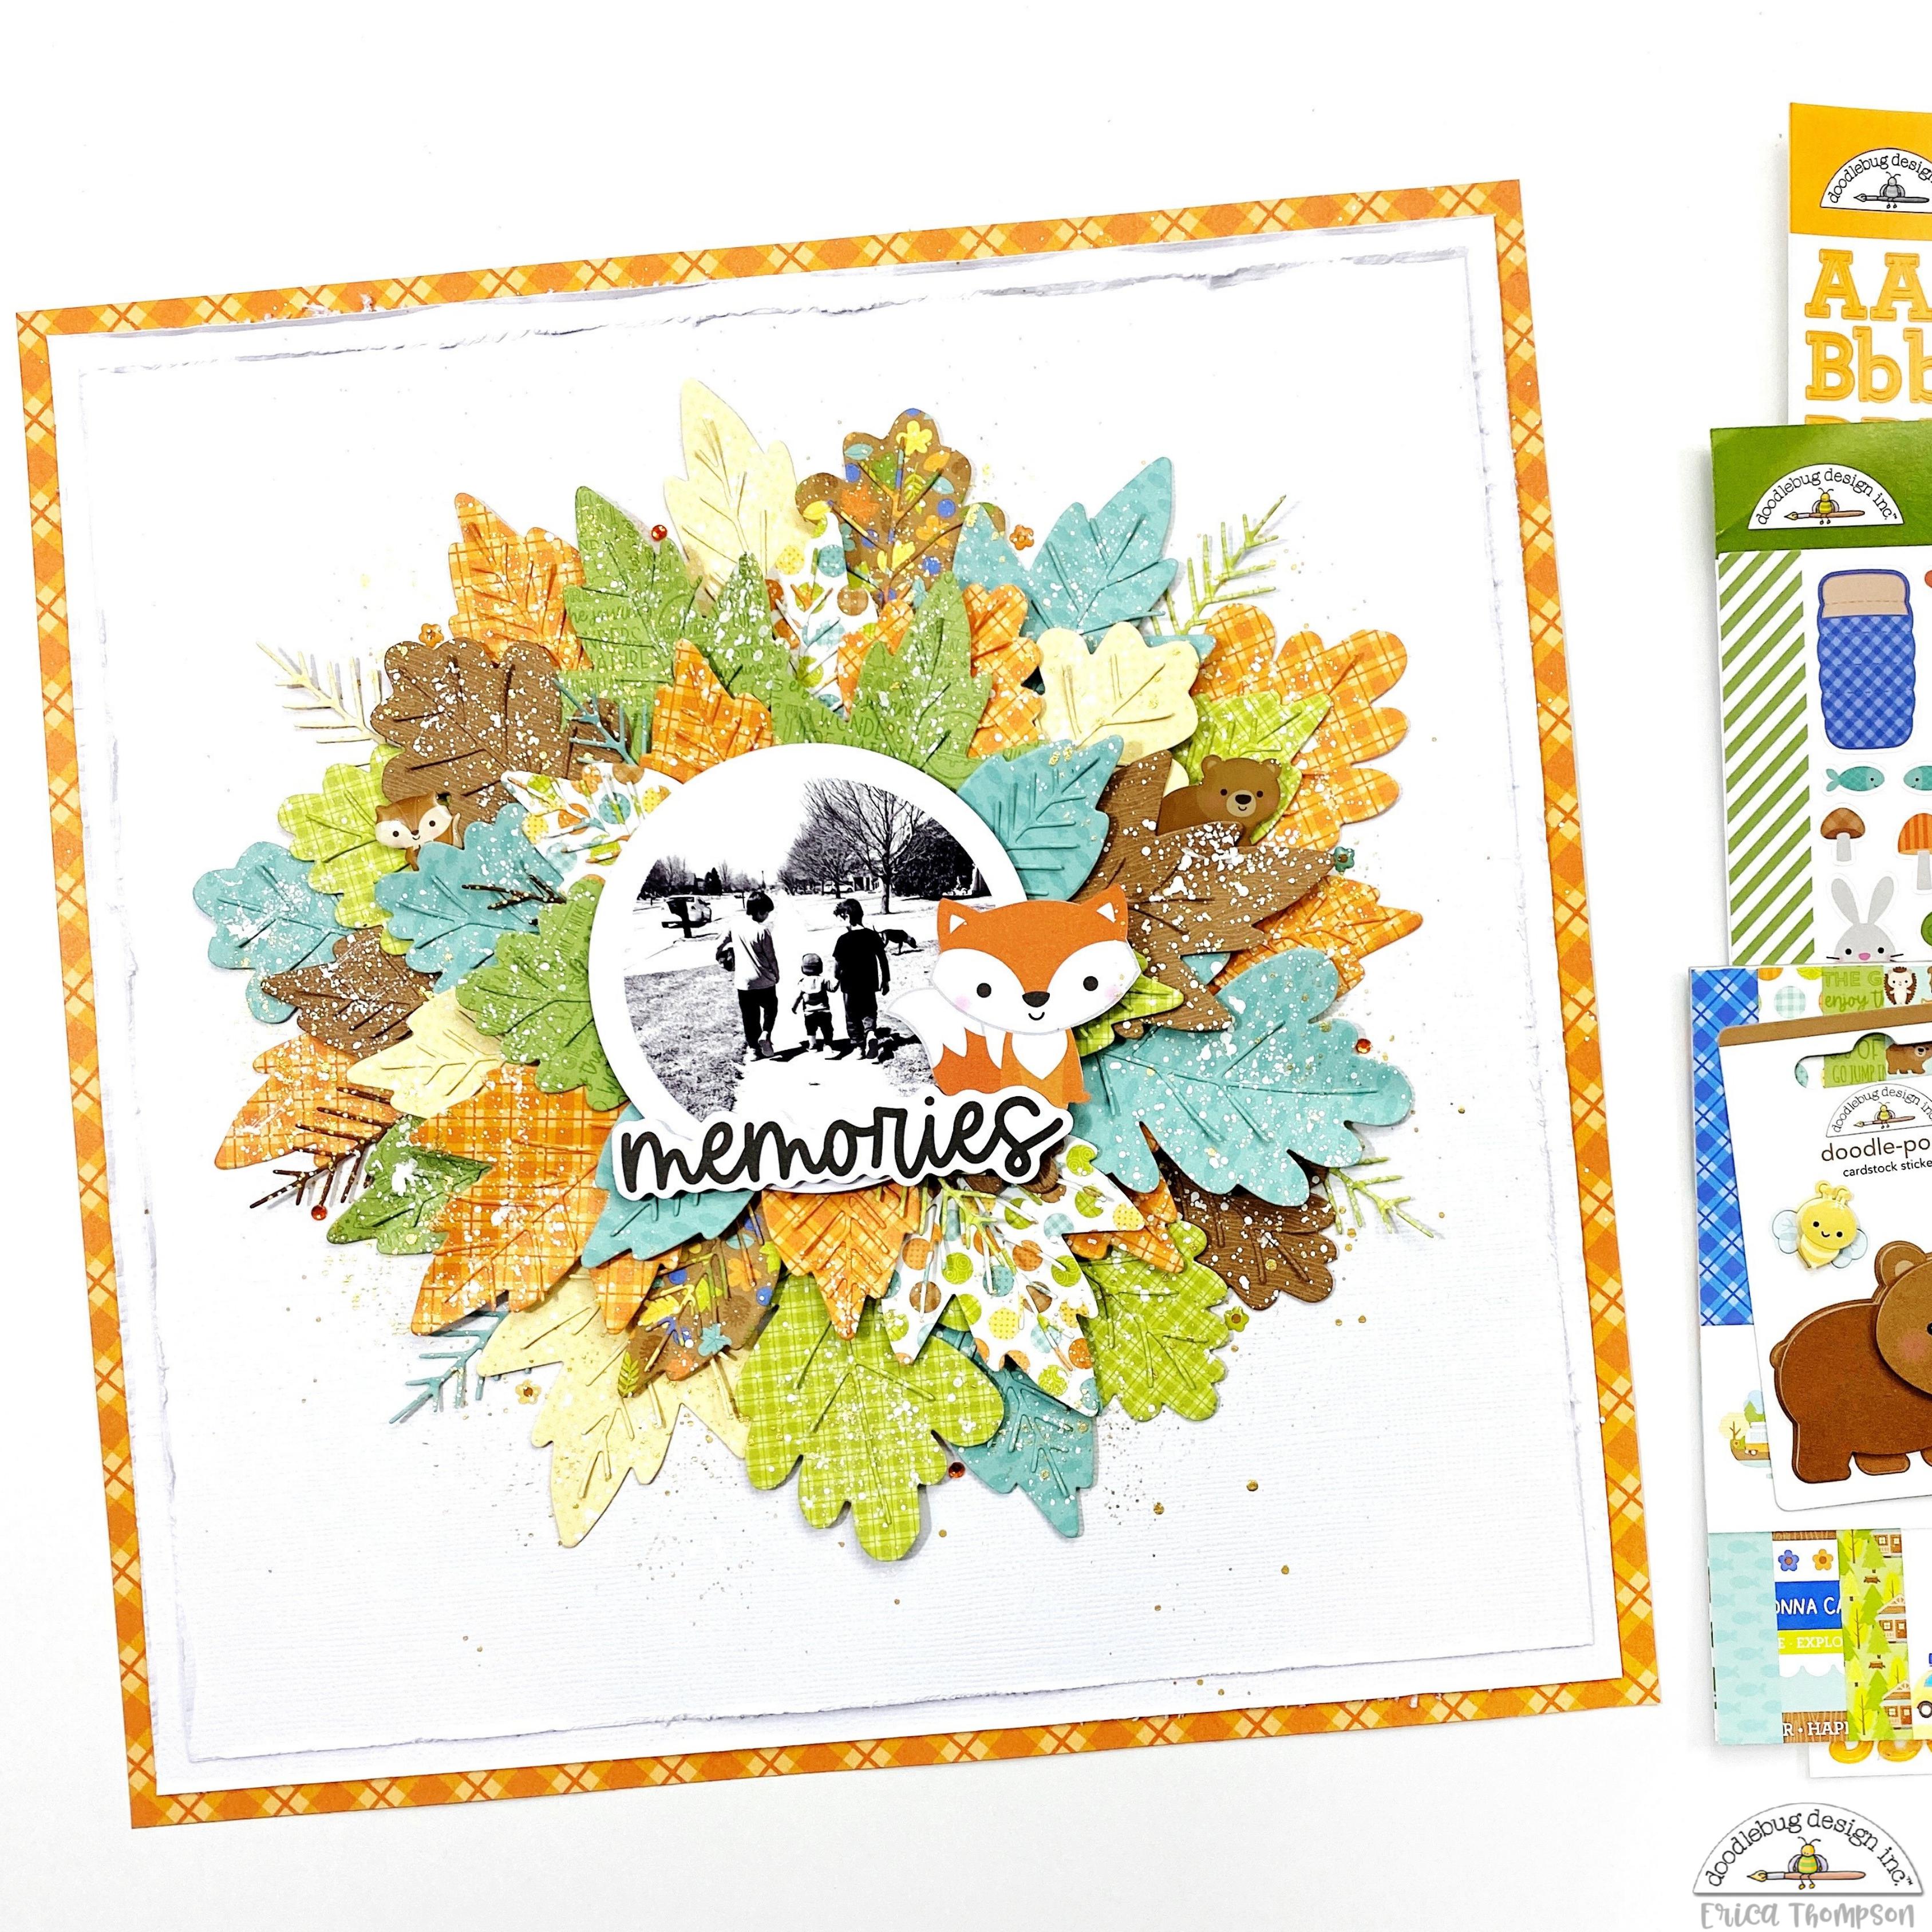
Here is a great example of the light, bright and happy colors in this fall collection. I love the contrast with the brown from the November title and the adorable Bruce (the Moose, lol). I love him. 
 

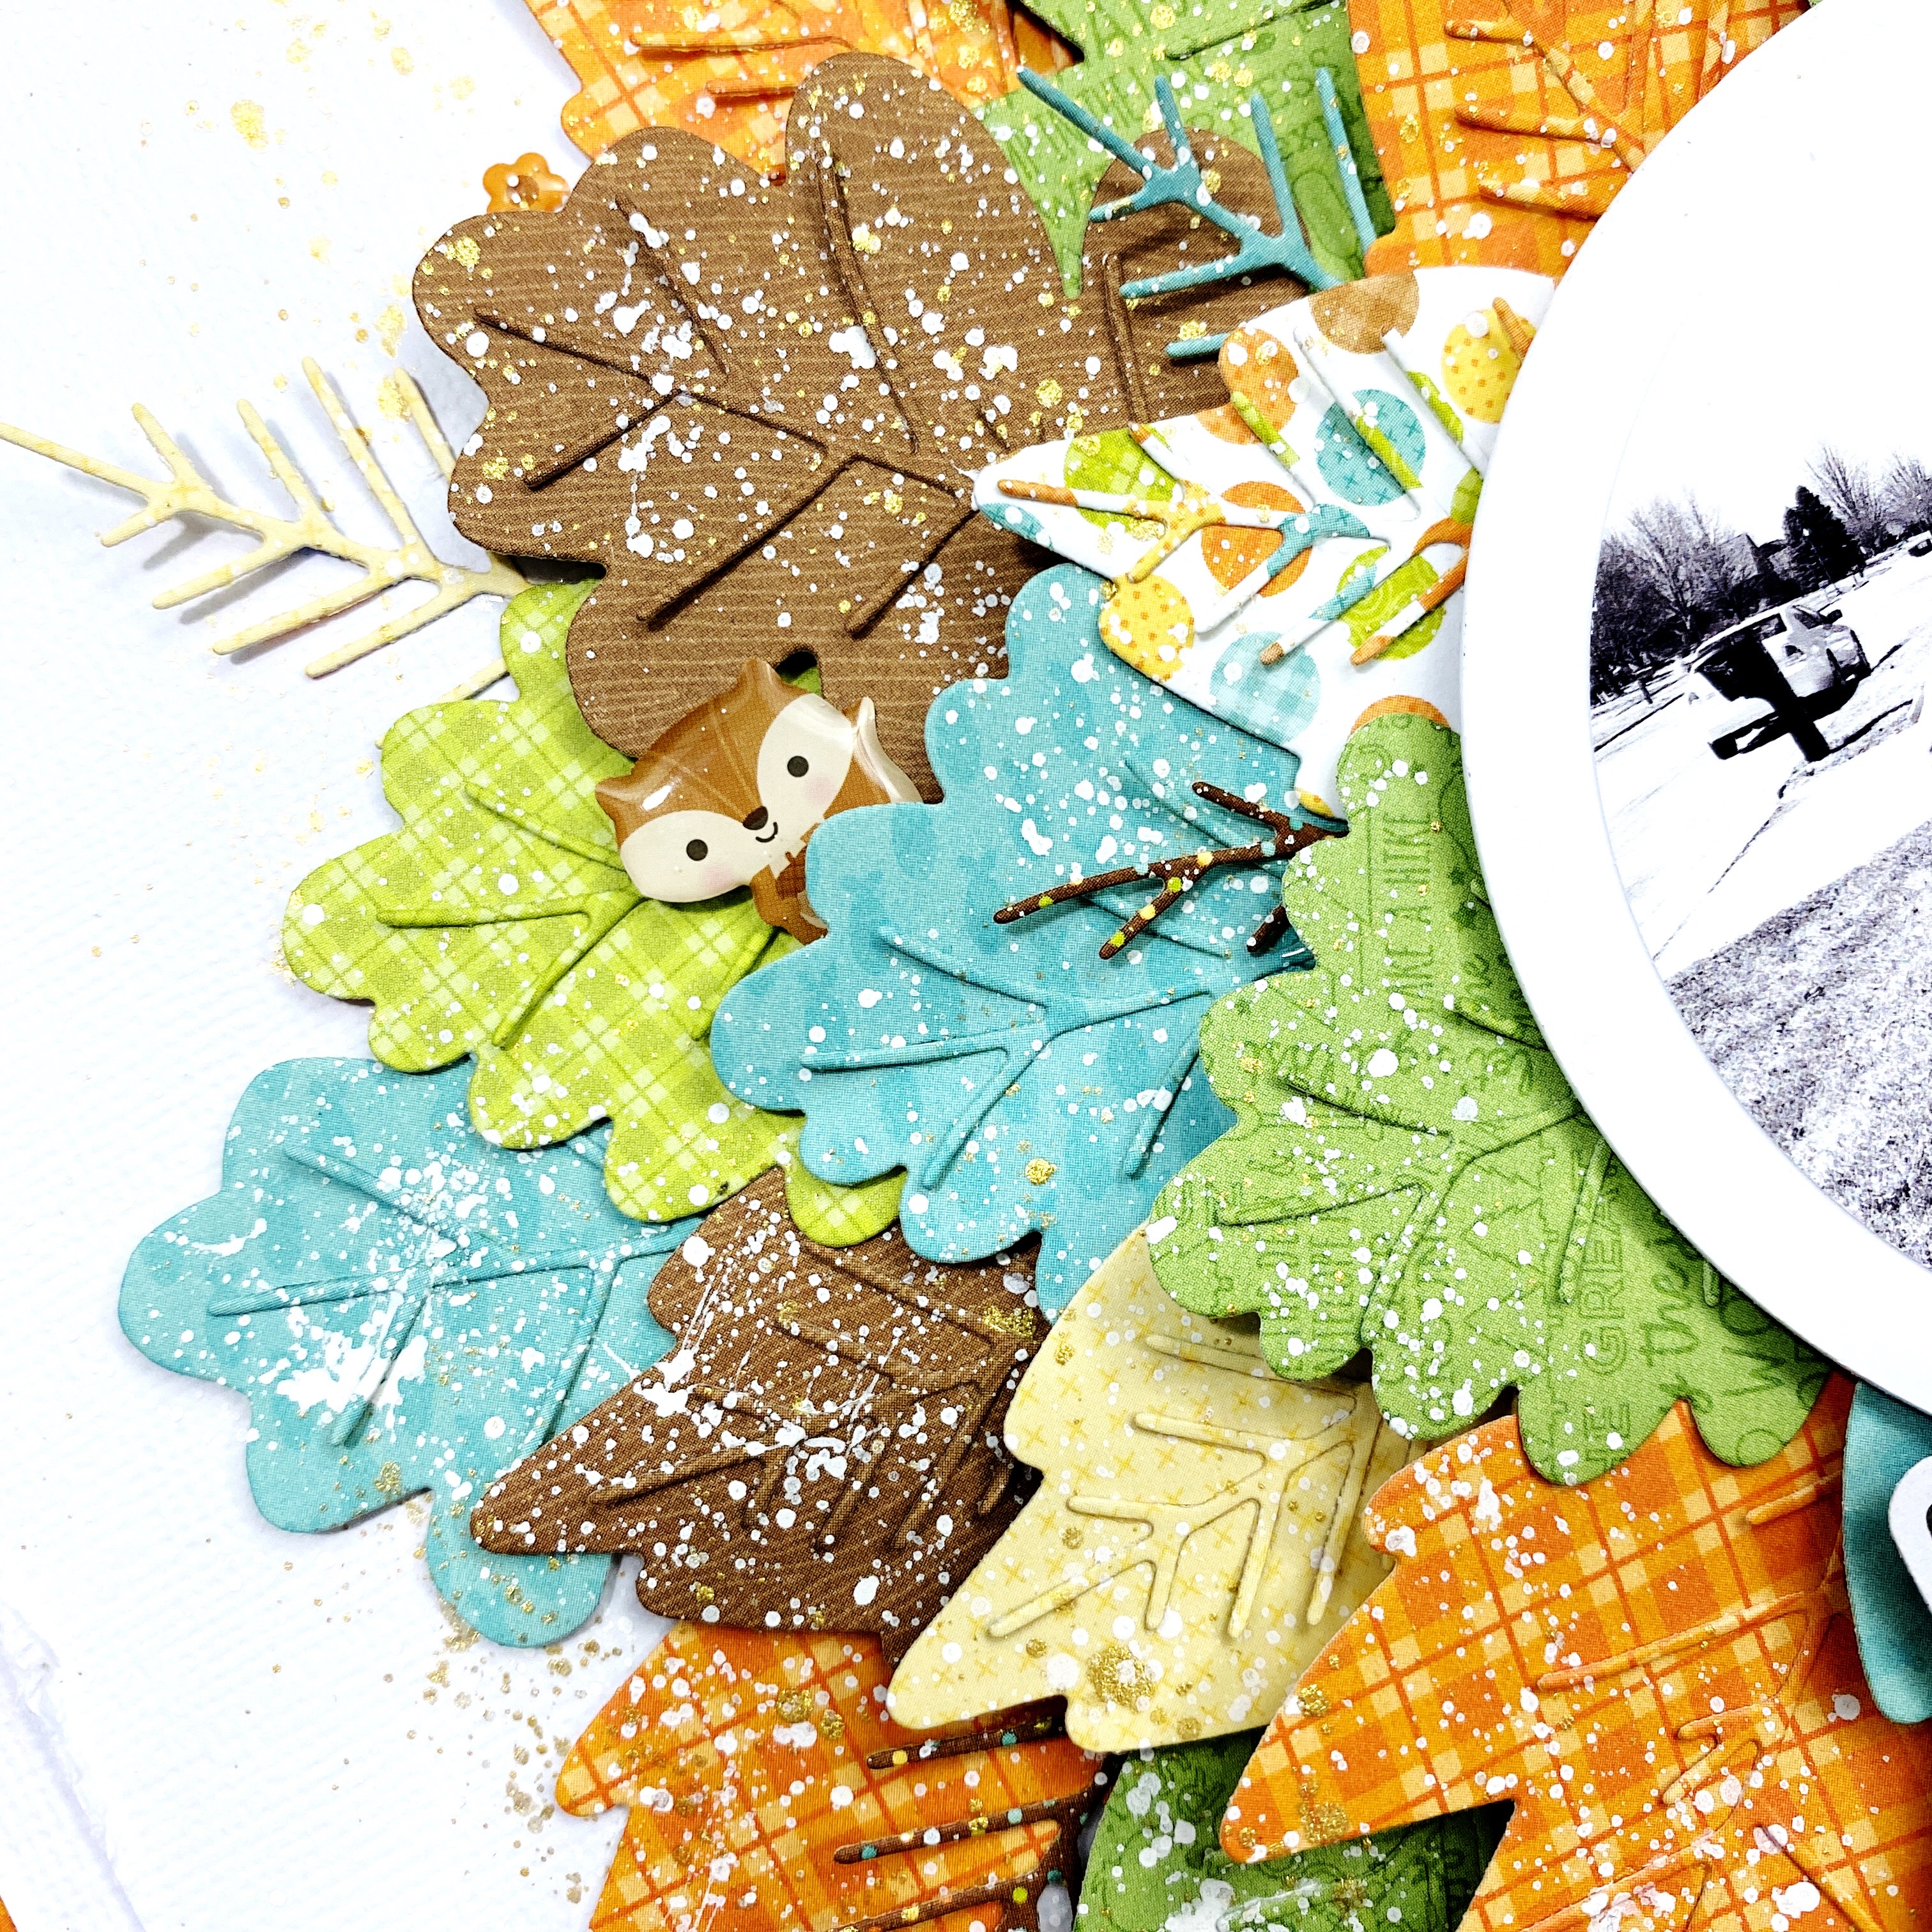
I added lots of fall colored trees from the Odds and Ends and embellished them with some pretty jewels. Every girl needs a little sparkle!


More fun 12x12 patterned papers with the lovely Wild Flowers print. Flowers on one side and the pretty plaid on the reverse! 


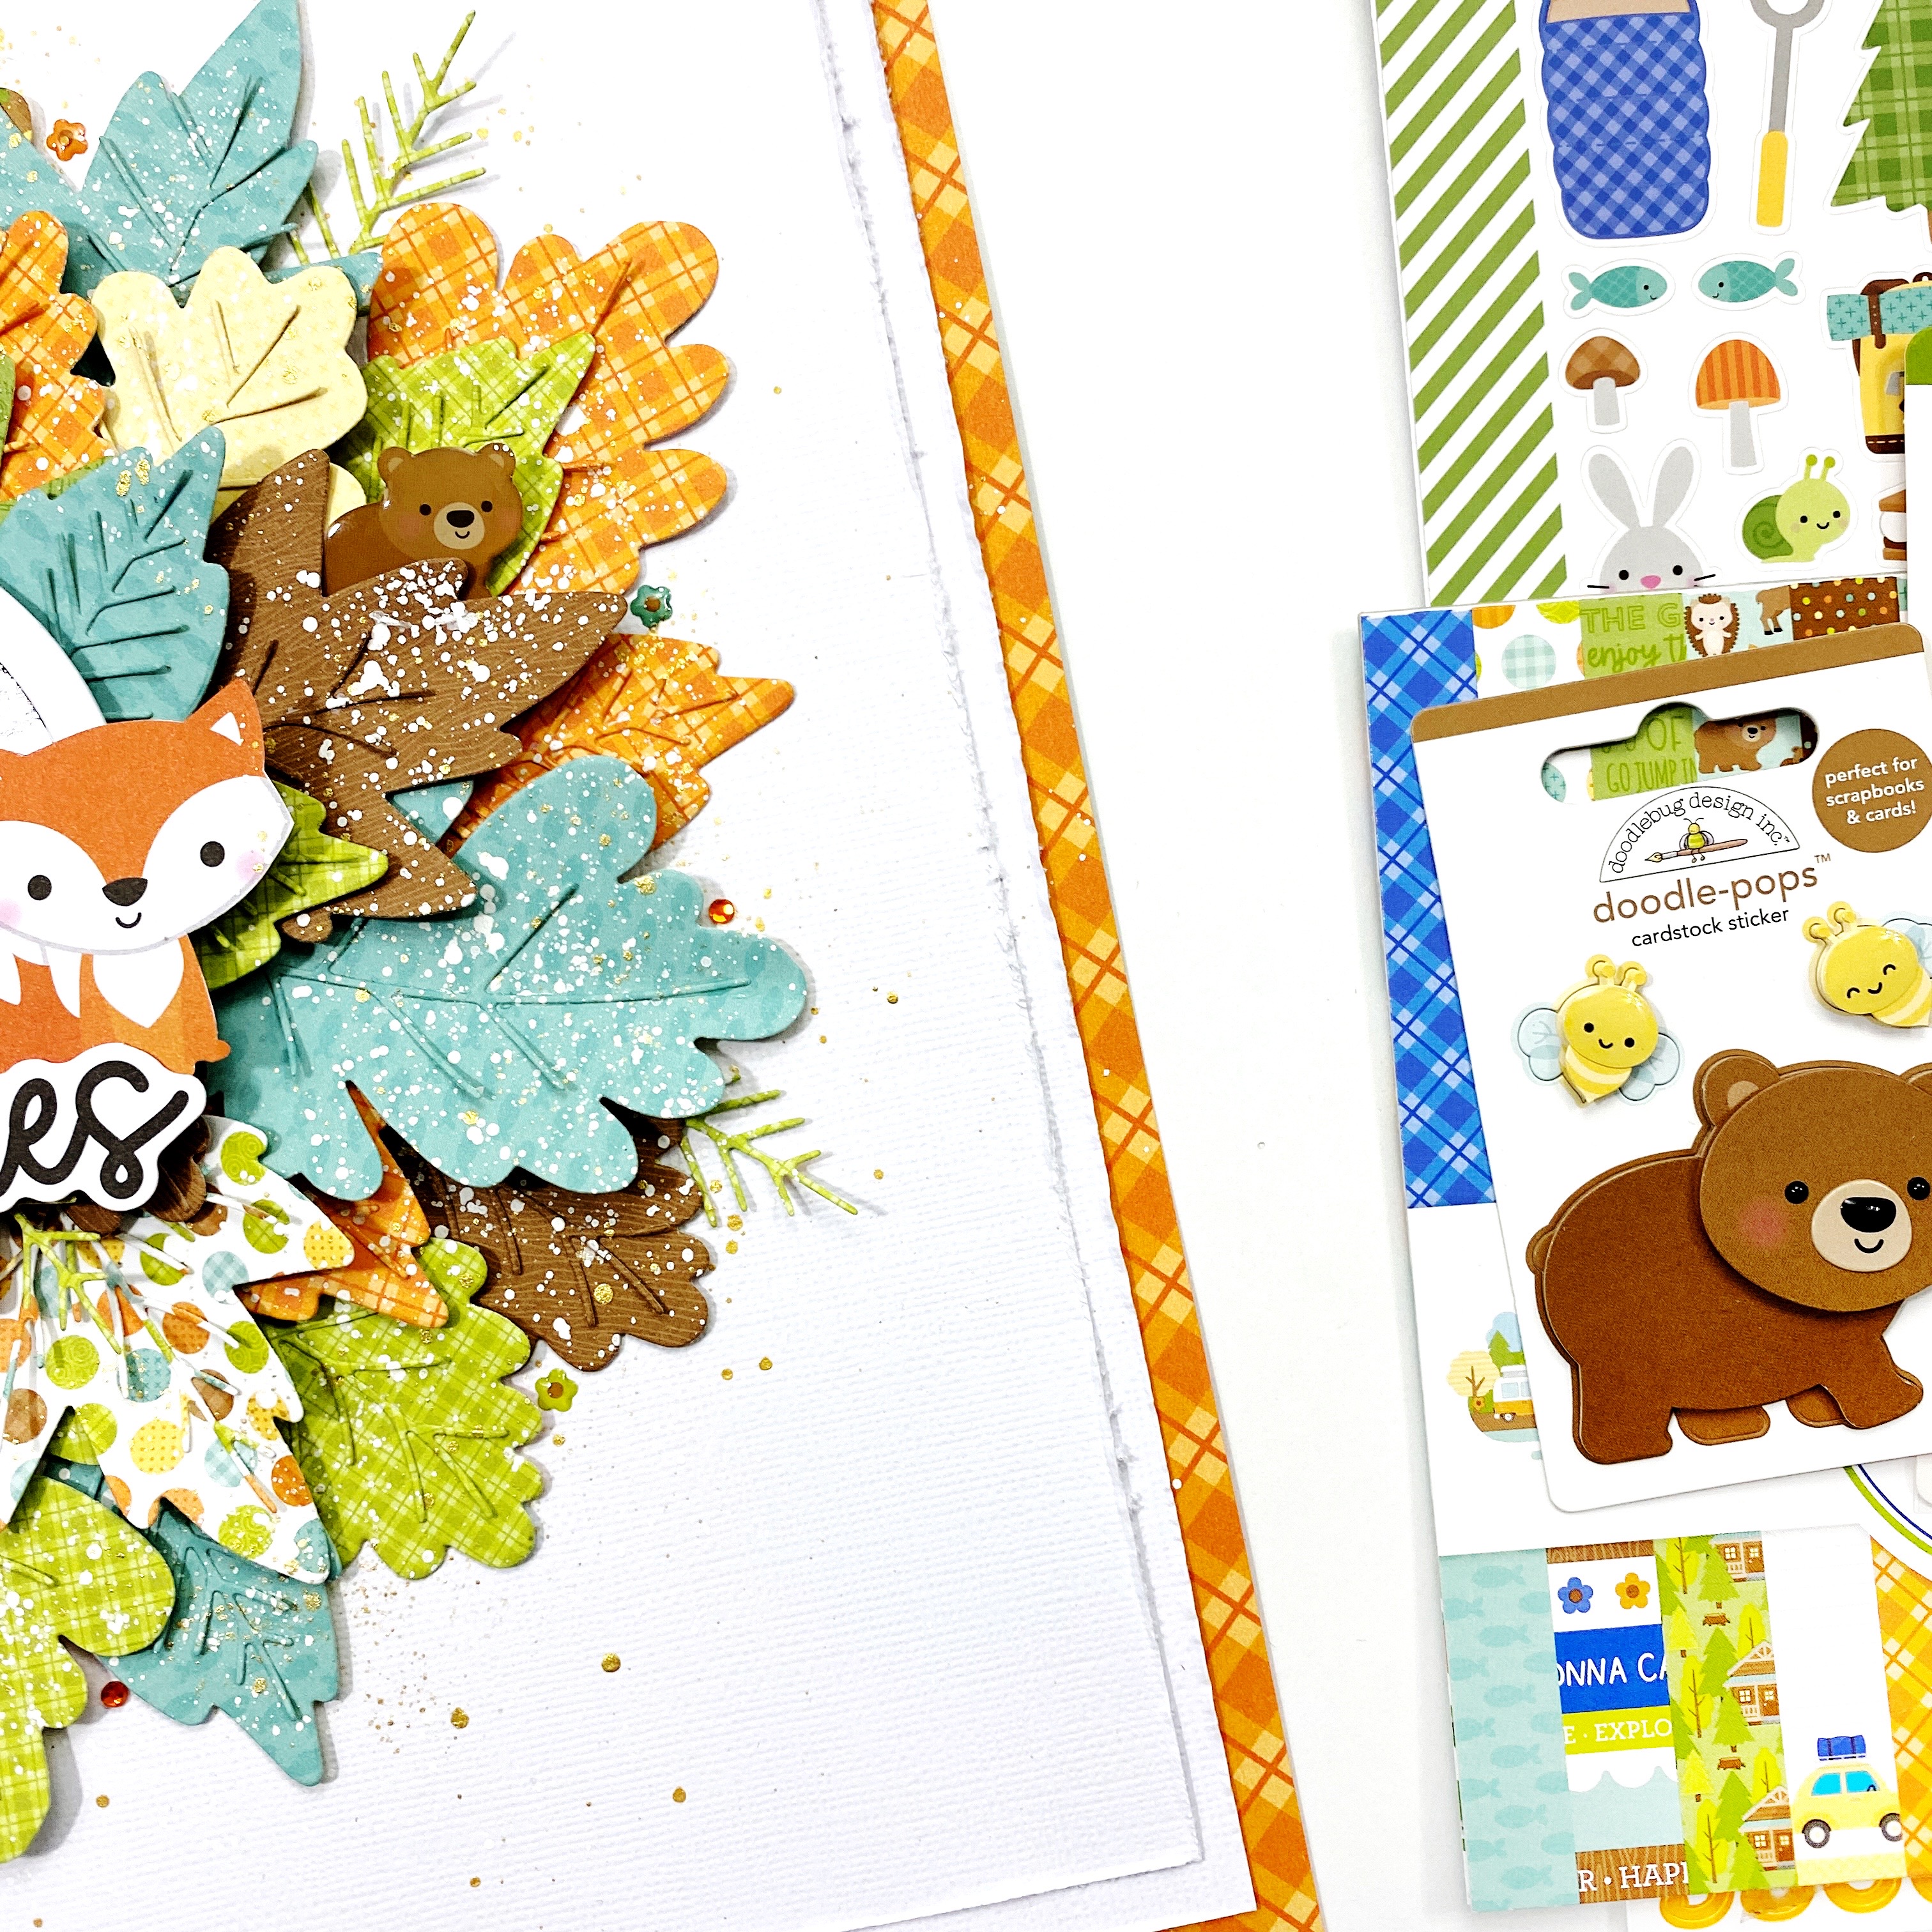
I admit ... I can be a bit of a Doodle-pops hoarder but I couldn't wait to add a few to Rylee's sweet pages. Here I chose the adorable beaver called Nutty Buddy and a few smiling bees from Honey Bear. 


This page was fun! I made a grid with the Campfire Plaid washi tape and filled in some of the spaces with a colorful dot paper. Then embellished with die cut pieces from the Chit Chat, This and That and Odds and Ends. So many goodies to play with! 


Speaking of goodies ... Wouldn't you love to know how Cynthea comes up with the clever names for her products? Like this adorable polka dot print called Camping Spots. Lol, so funny! 
 

For this last page, I used the Petite Prints Dot and Stripe in Swimming Pool for the background. It's probably my favorite Doodlebug color and I love it with this fall collection.  

Did you see I added a few of my favorite, cutie patootie shape sprinkles here and there? Oh, how I love them! The teeny tiny frog sitting with the bear on page 3 and this wee little owl. Precious!

Thanks for stopping by! If you'd like to see the other months in this album, all using Doodlebug collections visit: January, February, March, April, May, June, July, August.


DOODLEBUG PRODUCTS USED:
8x8 Cupcake Storybook Album
8x8 Storybook Refill Pages
Great Outdoors 12x12 pattern papers
Odd and Ends
Chit Chat
This and This Sticker Sheet
My Type Alphabet Stickers
Jewels Outdoors Assortment
Doodle-pops Nutty Buddy & Honey Bear
Campground Critter Shape Sprinkles
Campfire Plaid Washi Tape
Petite Prints Dot & Stripe in Swimming Pool

Monday, November 22, 2021

GREAT OUTDOORS FALL WALL HANGING | with Wanda

Hi Doodlebug Friends! Happy Thanksgiving Week! I hope you and your family have a wonderful holiday together! Today I'm sharing a Fall themed project made with the awesome Great Outdoors Collection! Fall is my favorite season and I try to make it last as long as possible. We decorate for Christmas the day after Thanksgiving. Until then, it's Fall at my house! Today's project is a wall hanging I made as a décor piece for the house. I modeled it after a 12x12 Scrapbook page and it would make a great scrapbook page too! Just add a few photos!

I started the project by gluing a sheet of yellow buffalo check paper to a piece of chipboard. I used the Great Outdoors 6x6 paper pad to punch out a bunch of 2" circles. I adore all the fall colors and patterns in this paper pad. The circles were hand folded into the shapes for the finished project. I used a cardstock square to fold the circles up. 

1

Once the circles were all folded, I centered them onto the middle of the large paper and glued them down using clear liquid glue. After all the circles were attached I splashed on some white paint for visual interest. My focal point is that adorable little squirrel! I die cut a white piece of cardstock and then used the Bon Bon Abigail Stickers to write Happy Fall. A few leaves add more accents. I also used a few Bon Bon mini doilies.

1

 I attached pretty Doodlebug Buttons and hears and other embellishments to some of the circles. I really like that pop of teal blue with all those warm colors.

1


1

My work in progress! Circles punched out and folded - so easy - but such an impact visually.

1


1


1

Happy Fall! 


1

Take care until I see you right back here - and happy crafting! 


1MY BLOG | MY INSTAGRAM

 DOODLEBUG SUPPLIES:

Great Outdoors Collection
Buffalo Check 12x12
Dot, Grid, Daisy 6x6
Doodlebug Buttons and Twines
Bon Bon Mini Doilies and Sequins
Bon Bon Abigail Alphabet Stickers
Nutty Buddy Doodle Pop

OTHER SUPPLIES:

Clear Glue
2" Circle Punch
White Cardstock
White Paint


Friday, November 19, 2021

GREAT OUTDOORS MY LITTLE NATURE ESCAPE LAYOUT | by Lisa

New collection cuteness is coming up... After Halloween and before Winter and Christmas, it is always fun to scrap some more Fall photos. I had a fun photo left to scrap that I took a few years ago when taking a walk in the forest, and wanted to use a lot of die cut trees from the new collection, called The Great Outdoors.  Here's what I came up with...


So as I said, I wanted to use all the trees from one of the Odds & Ends die cut packs, the colors were sooooo gorgeous!! I started by placing them on a white cardstock sheet, checking how I would use them and how many I could fit. Then I stitched trough all of the tree trunks using brown embroidery thread and I distressed the edges with my scissors after cutting off a bit of the white borders.


To have a base to place my trees on, I ripped pieces of three different patterned papers and layered them one on top of the other, starting with the lightest one. On top of that, I adhered one of the green scalloped Paper Frills, which reminds me a bit of grass.  After placing and adhering all of my trees, I stitched a few zig-zag and straight lines from left to right to add some detail to the bottom. 


For my background, I wanted to add some matching color behind the trees. So I used my watercolors and added a lot of water and then the same colors as the trees. I let it dry for a few hours.  I matted my photo with some patterned and tissue paper and added it to my layout, placing it behind one of the trees. Behind the photo, I added a cloud and sun die cut. 


Then came the embellishing part. I added Jewels, Cute Clips in the shapes of flowers and stars, Odds & Ends die cut flowers, enamel ants and two super cute animal die cuts, an eagle and a bear.  For my title I used one of the Chit Chat word die cuts, saying "Nature" and I backed it with some yellow patterned paper. I also used Alpha stickers to write the rest of the title. 


I really love the colored trees in this layout and how they stand out so much and make the layout so vibrant and alive.  By adding stitched and distressed details, the layout has so much dimension, I LOVE it!


Thank you so much for stopping by and see you very soon,


Facebook
 Instagram YouTube


Doodlebug Products Used

Great Outdoors Collection

Sunshine Alpahs

My Type Alphas


Other Products Used

Brown embroidery thread

White cardstock

Watercolors  

Pin It button on image hover