Showing posts with label Doodle Cuts. Show all posts

Monday, September 8, 2025

FARMERS MARKET TRUCK BOX CARD | with Kathy

I will miss summertime, but I really believe that Fall is the best season!  The colors, the cooler temps, the apple cider donuts.... it is my favorite time of year!  And Farmers Market is one of my all time favorite collections!  I decided I wanted to play with the So Thankful Doodle Cuts and turn them into a 3D box card.   Take a peek...


How cute is that little truck??  I pieced the truck "sides" together using papers from the 6x6 pad, the coordinating textured cardstock pack and some petite prints.  I created a second, mirror image of the truck side by cutting the die pieces from the opposite side of my patterned papers.  I added some Fall assortment sprinkles to my tires for a little dimension and shine.

To attach the sides of my truck together to form my box, I cut two pieces of paper, each 1 1/4" w x 3/4"h.  (one from the bon bon cardstock, one from the orange plaid paper from the 6x6 pad)  I scored each paper at 1/8" and 1 1/8" along the long side.  I glued the tabs to each end of the truck, approximately 3 1/16" apart. (see below).  I then added the other side of the truck to complete my "box."

To add my puppy and veggies to the inside of the truck, I created an insert strip using our heavyweight clear acetate.  It measured 3 9/16" w x 3/4"h.  I scored each end 1/4" in, and glued it to my front and back truck sides, centered inside the box.  I added  stickers from the Farmers Market and Veggie Garden Puffy stickers to create my little "scene." Here are some close ups...


A hint when working with stickers... I use a powder tool to "de-stick" my stickers first.  I add adhesive where needed and insert them into my card.  This prevents the card from sticking together when folding into an envelope.  I finished my card by hand cutting a little speech bubble, and stamping the HELLO sentiment from the It's Fall Y'all Doodle Stamps.

If you're using Farmers Market to scrap your fall memories, be sure to tag @doodlebugdesign on socials.  We love to see your creations.  That's it for me, thanks for stopping by to peek!


DOODLEBUG PRODUCTS USED

7796 fall assortment sprinkles
7813 so thankful doodle cuts
7820 farmers market 6x6 paper pad
7837 farmers market textured cardstock assortment pack
7842 farmers market puffy icons stickers
7869 veggie garden puffy icons stickers
7470 it's fall y'all doodle stamps
5061 lemon swiss dots petite prints
5442 kraft gingham-linen petite prints
8090 stone gray candy stripe - sprinkles petite prints
5429 mandarin gingham-linen petite prints
8378 Acetate Paper - Clear

OTHER

Foam Dots
Sizzix Big Shot
Black Ink
powder tool

Monday, August 25, 2025

SUMMER FUN - UNDER THE SEA SNOW GLOBE | with Kathy

I've been waiting for the perfect collection to create my DIY Snow Globe, and  Summer Fun was the one!  I knew that all of the cute sea critters swimming around would make the cutest globe!  Take a peek...


I had so many ideas, I decided to add elements outside of the Snow Globe too!  To start my project, I cut some Kraft Candy Stripe/Sprinkles Petite Prints to cover the base of the globe.  I added a few sand mounds and plants that I cut using the Adora-bowl Doodle Cuts.  I then decorated my ocean bottom with the cute little crab and blue fish from the Icon Stickers along with a few Puffy Icon shells.


For the inside of my globe, I cut a couple of layers of the waves paper (b-side of the water babies paper)  I also added some of the Kraft Petite Prints for more sand.  I popped the layers with a few strips of foam tape to give it more dimension. I used the Aloha! Doodle Cuts to cut some larger plants.


The jelly fish, seahorse and all of the fishies are from the Icon Sticker Sheet.  I added some foam dots behind many of them to make them seem like they were floating.  I also used some summer splash and sweet shells shaped sprinkles.


Finally I filled the bottom of my snow globe with some swimming pool and bitty bubbles shakers. Here's one more photo to show you the layers and dimension.


I love it when completed projects look like what you imagined!  That's it for me today, thank you for stopping by to peek!


BLOG | INSTAGRAM | YOUTUBE

DOODLEBUG PRODUCTS USED

8397 diy snow globe kit
8412 swimming pool balls shakers
8904 bitty bubbles shakers
8893 sweet shells shape sprinkles
8895 summer splash shape sprinkles
8907 summer fun puffy icons stickers
8918 aloha! doodle cuts
8919 so adora-bowl doodle cuts
8926 summer fun icons stickers
8932 water babies double-sided cardstock
8943 summer fun textured cardstock assortment pack
8087 kraft candy stripe-sprinkles petite prints

OTHER

Sizzix Big Shot
Circle Dies
Stitched Wavy Border Die
Foam Tape
Foam Dots

Monday, August 11, 2025

SUMMER FUN DOODLE CUTS CARDS | with Kathy

I cannot get enough of the Summer Fun Collection, especially all of the cute Doodle Cuts Sets!  I decided to put them to use again for some level-up box cards.  Take a peek...


I love how bright and fun this collection is!  For the base of my cards I used some Outside the Box Level Up Dies from my stash.  I then pulled out all 3 doodle cuts sets...  Aloha!, Adora-Bowl and Best Fishes,  and got to work!


How cute are these little sea critters?!  I decorated the base of my card with the water side of the water babies patterned paper.  I cut the critters from the Summer Fun coordinating textured cardstock pack.  I love how the colors in these packs are just perfect!  I also cut a couple of sea plants and a pile of sand using the plants from the Adora-Bowl doodle cuts and added a starfish from the sweet shells shaped sprinkles and water bubbles from the summer splash sprinkles.  My sentiment is from the chit chat pack.

For my second card I used the cute little chameleon from the Adora-Bowl doodle cuts and lots of flowers from the Aloha! set.  I envisioned the cute critter hiding among the tropical flowers with his sweet little smile.

He's just too cute!  Again, I cut the pieces from the coordinating cardstock pack.  I covered my card base with the let's luau patterned paper.  My sentiment is from the Chit chat pack.

If you've used the Summer Fun Collection for a project, be sure to tag @doodlebugdesign on socials, we always love to see your creations.  That's it for me today, thank you for stopping by to peek!


DOODLEBUG PRODUCTS USED

8339 an eye for an eye shape sprinkles
8893 sweet shells shape sprinkles
8895 summer splash shape sprinkles
8918 aloha! doodle cuts
8920 best fishes doodle cuts
8919 so adora-bowl doodle cuts
8922 summer fun chit chat
8925 summer fun 6x8 paper pad
8934 let's luau double-sided cardstock
8932 water babies double-sided cardstock
8943 summer fun textured cardstock assortment pack


OTHER

Outside the Box Level Up Dies
Outside the Box Waves Dies


Monday, July 28, 2025

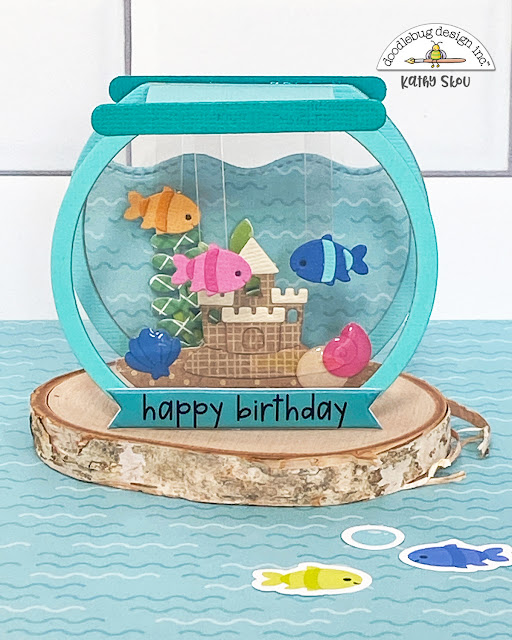
SUMMER FUN ADORA-BOWL BOX CARDS | with Kathy

Doodle Cuts are some of my most favorite Doodlebug products, and the Adora-bowl Doodle Cuts from the Summer Fun Collection are just the cutest!  I combined them with my love of everything 3D to come up with these fun cards... take a peek...


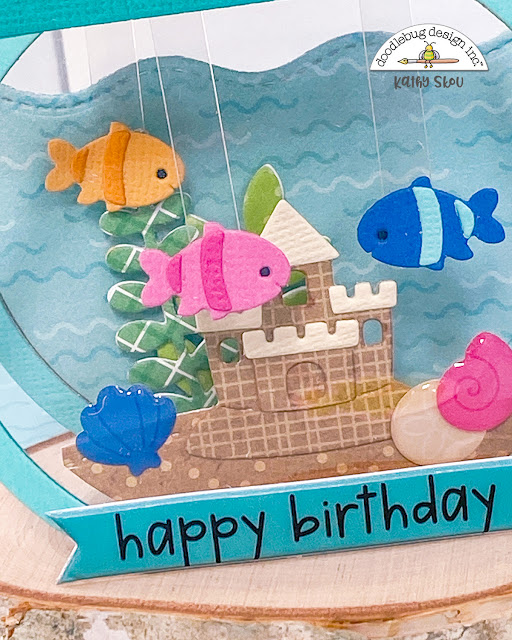
For my first card I created a fish bowl, complete with castle and floating fishies!  To build my fish bowl, I cut the shaker bowl outlines from some thin chipboard, then covered them with Swimming Pool cardstock from the Summer Fun Coordinating textured cardstock pack.  I used some heavyweight acetate for the "glass" part. On one bowl I added a piece of water paper (water babies b-side) from the 6x8 pad to look like water in the bowl.


I created a top and bottom to my bowls by cutting a piece of paper (1 1/2" x 1 5/8') and score it on the long ends 1/8" on each side.  I glued these to the top and bottom of the fish bowls.  On the bottom of the bowl I cut a piece of kraft candy stripe sprinkles paper to look like sand.  I propped it up using a folded strip of paper, then added the die cut castle and shells from the sweet shells shaped sprinkles.


To make my fish look like they are swimming, I cut thin strips of heavyweight acetate.  I glued the fish to one end, created a folded tab on the other end which I glued to the top of the fish bowl.  To complete my card I added the happy birthday from the puffy word stickers.


I featured the cute little chameleon for my next card.  Again I created the bowl, without the water backdrop.  The tops and bottoms were done in the same manner as the fishbowl.  I cut the rocks, plants and chameleon from the doodle cuts and propped them up with a paper tab on the bottom.  I finished my card with the scripty hello from the Chit Chat pieces.


Isn't he the cutest??? The nice part of these cards is they do fold flat so that I can mail them to friends!  Have you made any projects featuring the Summer Fun Collection?  Be sure to tag @doodlebugdesign so we can see what you made!  That's it for me today, thank you for stopping by to peek!


DOODLEBUG PRODUCTS USED

8339 an eye for an eye shape sprinkles
8893 sweet shells shape sprinkles
8908 summer fun puffy words stickers
8919 so adora-bowl doodle cuts
8922 summer fun chit chat
8925 summer fun 6x8 paper pad
8943 summer fun textured cardstock assortment pack
8079 limeade candy stripe sprinkles petite prints
8087 kraft candy stripe sprinkles petite prints
5442 kraft gingham linen petite prints
8378 clear heavyweight acetate

OTHER

Sizzix Big Shot
Silhouette chipboard
Stitched hillside dies
Stitched wavy dies
white jelly pen

Friday, July 18, 2025

SUMMER FUN SNEAK PEEKS DAY 4 | with Cynthea

We have one last sneak peek of our brand new Summer Fun Collection today.  Check out this adorable card by Cynthea.


Cynthea used the new So Adora-bowl Doodle Cuts and the Summer Fun Coordinating cardstock to create her shaker card.  This does indeed make us smile!  We just love that little lizard! The Doodle Cuts set comes with the dies needed to create a fun shaker.

Summer Fun is shipping to stores now, so be sure to order yours soon!  Our design team will begin showing their projects next week so be sure to come back to see!  Have a great day.


DOODLEBUG PRODUCTS USED

8919 so adora-bowl doodle cuts
8931 pink paradise double-sided cardstock
8943 summer fun textured cardstock assortment pack
8922 summer fun chit chat
8405 bubblegum balls shakers
8408 tangerine balls shakers
8409 bumblebee balls shakers
8410 limeade balls shakers
8412 swimming pool balls shakers
8378 clear heavyweight acetate

Thursday, July 17, 2025

SUMMER FUN SNEAK PEEKS DAY 3 | with Cynthea

Summer Fun has so many fun icons, it really is the perfect collection for all of your summer crafting needs!  The collection has three brand new sets of Doodle Cuts Dies including the Aloha! Doodle Cuts.  Cynthea used these dies along with other goodies from the collection to create this gorgeous card!

Just look at all of those layered flowers and tropical leaves!  Just beautiful!  The Summer Fun Coordinating Cardstock pack is perfect for die cutting, no guessing on what colors to use to match!

We will be back again tomorrow with another fun project peek.  Summer Fun is shipping to stores now!

Have a great day!


DOODLEBUG PRODUCTS USED

8918 aloha! doodle cuts
8934 let's luau double-sided cardstock
8931 pink paradise double-sided cardstock
8943 summer fun textured cardstock assortment pack
8891 summer assortment sprinkles

Wednesday, May 28, 2025

BERRY SWEET EMBELLISHMENTS | with Miguel

I love working with Doodlebug's beautiful products! And this time, I let my imagination run wild, die-cutting and embellishing these embellishments with materials from the Berry Sweet collection.

To create these embellishments, I used Doodle Cuts among other dies, and I started by layering cardstock and foam to add dimension. I really like doing this to give the pieces more strength. This mouse is truly beautiful!


To decorate, I'll mention the materials I used, which I mixed together: all the things, shaped
sprinkles, and shakers.


In this piece, I used Berry Patch shakers, which are more than perfect for this cute shaker cup.
The important thing is to mix the various Doodlebug materials to create beautiful pieces.


I hope this idea works for you, and I'm more than ready to see where I can place them to make them look even better than they already do. See you soon!


DOODLEBUG PRODUCTS USED

Berry Sweet Treat Doodle Cuts
Berry Sweet Collection
Berry Sweet Coordinating Cardstock
Shakers
Heavyweight Acetate

OTHER

Tea Cup Die

Monday, May 26, 2025

BERRY SWEET BIRTHDAY BOX CARD | with Kathy

Have you seen the new Berry Sweet Treats Doodle Cuts?  I fell in love with them as soon as I saw them!  I knew exactly what I wanted to make as soon as I got my hands on them!  Take a peek....


I think that 3D cards are so fun to receive and they look so cute on display.  My box card was created using the dies in the set, along with the 6x8 Pad, some coordinating cardstock and petite prints.  I added a sentiment from the "All the Things" pack as a finishing touch.


I created some dimension by adding strawberries on both the front piece and the insert.  How cute is that mouse??!! 


I just love how he peeks out over the pile of berries!  This card was really easy to make, and it fits into a standard A2 envelope.  If you'd like to make your own, I created a quick tutorial video.


If you make one, please be sure to tag me (@kathy_skou) and @doodlebugdesign!  We love to see your creations.  That's it for me today, thank you for stopping by to peek.


DOODLEBUG PRODUCTS USED

Berry Sweet Collection
Berry Sweet Treats Doodle Cuts
Berry Sweet Coordinating Textured Cardstock
Petite Prints

OTHER

Sizzix Big Shot

Monday, April 28, 2025

BUTTERFLY KISSES LOVE YOU LAYOUT | with Brianna

Hey friends! Brianna here today and I'm sharing another layout using the adorable Butterfly Kisses collection. This collection is beautiful and after looking through it, I knew I wanted to create a fun scene design along with a shaker using Hello Sunshine Doodle Cut along with the new Butterfly Kisses Shakers. Here's my page: 

To start, I created my shaker first. I took out the Hello Sunshine Doodle Cut pack and die cut the single cloud to use for my shaker. I also die cut a few of the solid clouds using the other cloud dies as well as a piece of the white cardstock from the Coordinating Cardstock pack. To create my shaker, I first adhered a piece of acetate to the backside of it and then added some narrow foam tape right on top of the acetate. This created a little reservoir for my Shakers to go in. I carefully poured in the cute little butterflies and then sealed the shaker using a piece of vellum. I turned it over and my shaker was done. Easy peasy!


I then went through the 12x12 Patterned Papers and selected the Rainbow Skies paper as my base. To build my little scene, I trimmed out a small trip of Garden Party for my grass and then tore into the Bitty Blossoms paper for the flowers. I also grabbed my fringe scissors and cut into that Garden Party paper so that it resembled grass a bit more. So fun!


I embellished my little scene by pulling in a few Odds & Ends, Puffy Stickers as well as a few flowers from the Bits & Pieces pack. I love how cute it ended up being!


I ended up printing and trimming down my photo into a different shape and adhered it up in the "sky" portion of my layout. I layered my cloud shaker right on top of it and then layered the rest of my die cut clouds around it. I used a couple of phrases from the Puffy Stickers Words set and adhered them right on top of my photo.


I added in a few more smaller bits using more Puffy Stickers as well as the Bitty Bug and Garden Shape Sprinkles stickers. This page is so fun and whimsical. 


Here's one last look:


Thank you so much for stopping by today, I hope that I've inspired you in some way! I'll see you in my next post friends! 


BLOG INSTAGRAM | YOUTUBE

DOODLEBUG PRODUCTS USED
Butterfly Kisses Collection
12x12 Coordinating Cardstock
Butterfly Kisses Shakers
Hello Sunshine Doodle Cuts

OTHER
White Gel Pen
Acetate
Vellum


Thursday, March 13, 2025

BUTTERFLY KISSES PREVIEW WEEK DAY 3 - HELLO CARD | with Tonya

We have another fabulous Butterfly Kisses card from our designer Tonya today!  Tonya combined the new Flutterbies and Flower Garden Doodle Cuts to create this sweet card.


Aren't those butterflies just the cutest?? And the addition of some beetle black sprinkles give them the perfect amount of shine!

We will be back tomorrow with one more peek, so be sure to stop by!


DOODLEBUG PRODUCTS USED

Butterfly Kisses Collection
Butterfly Kisses Coordinating Textured Cardstock
Butterfly Kisses Coordinating Petite Prints
Flutterbies Doodle Cuts
Flower Garden Doodle Cuts
Hello Sunshine Doodle Cuts
Nesting Scallops Doodle Cuts
Beetle Black Sprinkles


Wednesday, March 12, 2025

BUTTERFLY KISSES PREVIEW WEEK DAY 2 - HELLO SUNSHINE CARD | with Tonya

We are back with another fun preview project using the new Butterfly Kisses collection!  Tonya used the new Hello Sunshine Doodle Cuts collection to create this darling shaker card!


Tonya combined papers from the collection along with some coordinating textured cardstock and petite prints to make her card.  She filled her shaker with some Lily White Shakers and topped her shaker off with some clear Heavy Weight Acetate! This sweet card is perfect to send to a friend, "just because!"

Be sure to check back all this week for more sneak peek projects!


DOODLEBUG PRODUCTS USED

Butterfly Kisses Collection
Hello Sunshine Doodle Cuts
Butterfly Kisses Coordinating Textured Cardstock
Butterfly Kisses Coordinating Petite Prints
Lily White Shakers
Heavyweight Acetate


Wednesday, December 4, 2024

TINSEL TIME GIFT BOX | with Jen

This time of year we always need a simple gift for a neighbor or friend. Today I have for you a fun gift box using the new Tinsel Time collection!

The finished box measures 5 1/2" x 5 1/2" and is 6" tall. Once you learn how to make this it's very easy to resize for almost any gift!


Around the base I used the swag pieces from the Tinsel Time Bits and Pieces. I matted everything with papers from the 6x6 paper pad.

On the top I used the Merry and Bright Doodle Cuts Die to make the little snow globe into a shaker. Rather than cut out the Santa that comes with the die set I used Mini Icons to build my scene. They're the perfect size for the inside of the snow globe!


Want to make your own gift box? A full tutorial is available on my YouTube channel and is also below.


Have a great day!


YOUTUBE | FACEBOOK | INSTAGRAM

DOODLEBUG PRODUCTS USED

Tinsel Time Collection
Merry and Bright Doodle Cuts
Happy Holidays Shakers
Tinsel Time Heavyweight Acetate

OTHER

Lightweight Chipboard
White Cardstock
Foam Tape

Pin It button on image hover