Showing posts with label Jen Palmer. Show all posts

Friday, September 5, 2025

FARMERS MARKET FRESH FROM THE GARDEN MINI ALBUM |with Jen

I am so excited to get to play with the Farmers Market collection! This is in my top five favorite Doodlebug Collections. The little veggie elements, the fall colors, it's perfection! For my project today I decided to do a simple 5x7 mini album. This album has six pages and will hold about 50 4x6 photos.

On the front I created a little farm stand shaker. When this collection first came out I made a large folio with a farm stand on the cover and it was so fun to reimagine it on a smaller scale for this album. I used lightweight chipboard to build the "stand" and matted it with Buffalo Check Wood Grain 6x6 Petite Prints. For the "shelves" I used one of the border stickers from the This and That sticker sheet mounted on narrow foam tape. I used the Veggie Garden Puffy Icons for all my veggies. I added a couple of bees and a lady bug from the Farmers Market Puffy Icons. Inside the shaker I used Lily White, Ladybug, Bumblebee, Tangerine, and Limeade Shakers.

Inside there are six pages done on a stacked hinge. Each page has a front flap and a back pocket. The pockets each have a 4x6 photo mat. I decorated the inside with various elements from the Farmers Market Odds and Ends, Chit Chat, Bits and Pieces, and This and That Sticker Sheet. 


I have a full video flip through and free tutorial on my YouTube Channel!

Have a great day!


YOUTUBE | FACEBOOK | INSTAGRAM


DOODLEBUG PRODUCTS USED

7835 Farmers Market 12x12 Collection Kit
7837 Famers Market Solids Assortment
7842 Farmers Market Puffy Icons
7869 Veggie Garden Puffy Icons
7817 Farmers Market Chit Chat
7818 Farmers Market Bits and Pieces
7815 Farmers Market Odds and Ends
8415 Lily White Shakers
8406 Ladybug Shakers
8408 Tangerine Shakers
8410 Limeade Shakers
8409 Bumblebee Shakers


Friday, August 22, 2025

SUMMER FUN JUNK JOURNAL | with Jen

I love junk journals. I've done lots with old Little Golden Books and other things, they're so freeing. You can do whatever you want and whatever feels right in the moment. So for this week's project I decided to decided to push myself and do a different kind of junk journal with my scraps and leftover ephemera. 

I made my cover from some leftover Summer Fun Acetate. I cut it to 7" x 12" and scored it at 5 1/2" and 6 1/2". I punched holes on the top and bottom and added elastic cord. On the front I used stickers from the This and That sticker sheet. At the top I used my Tiny Attacher to add some pieces from the Odds and Ends and Bits and Pieces. I also added a traveler's notebook style closure with some more of the elastic cord. 

Inside are two signatures. For the base of each signature I used leftover papers (Let's Luau and Paradise Palms). Inside I used the Summer Card and Envelope pack to make the pages of each signature. The envelopes work great as pockets. Most of the envelopes I fold in half so half the envelope is on one side and half is on the other. 


As a small, but fun, decoration on some of the envelopes I used the new Flamazing Doodle Stamps, as well as Sea Life and Seaside Summer Doodle Stamps in places. I just thought it was a fun way to use those stamp sets. 


To finish things, I distressed and inked papers to create pockets and other elements. I used a couple of leftover Doodle Pops and and lots of extra Odds and Ends.


I have a video walkthrough and a short process video of how I put my base and signatures together below. 


Have a great day!


YOUTUBE | FACEBOOK | INSTAGRAM

DOODLEBUG PRODUCTS USED

8925 Summer Fun 6x8 Paper Pad
8921 Summer Fun Odds and Ends
8922 Summer Fun Chit Chat
8923 Summer Fun Bits and Pieces
8928 Summer Fun Heavy Weight Acetate
8941 Summer Fun 12x12 Collection Kit
8927 Summer Fun This and That Sticker Sheet
8926 Summer Fun Icon Stickers
8924 Summer Cards and Envelopes
8916 Flamazing Doodle Stamps
7761 Sea Life Doodle Stamps
7759 Seaside Summer Doodle Stamps
5891 Paradise Washi Tape
7743 Sea Friends Washi Tape
7999 Pastel Plaid Washi Tape
8900 Palm Beach Doodle Pop
8902 Donnie Dolphin
8906 Summer Fun Mini Icons
4805 Bubblegum Chunky Twine
4809 Limeade Chunky Twine
4812 Blue Jean Chunky Twine
8891 Summer Assortment Sprinkles
8893 Sweet Shells Shape Sprinkles

OTHER

Ink (Blue, Pink, Green)
Crop-o-Dile Punch
Foam Squares
Elastic Cord
Tiny Attacher
Small Shipping Tags

Friday, August 8, 2025

SUMMER FUN - SUMMER FUN MINI FOLIO | with Jen

I absolutely the adore the 6x8 paper pads from Doodlebug. You get 24 papers for a reasonable price and they are adorable. They are perfect for cards and smaller non-card projects and that's what I have for you!

Today I have a simple folio using one 6x8 Summer Fun paper pad. I had quite a bit left over and will probably use if for more photo mats. This goes together super quick and of course there is a tutorial!

One the cover I took some of the large stickers from the This and That sticker sheet, matted them on white cardstock and fussy cut them. I took one of the sentiment stickers from the same sheet and added it as a sentiment. I finished it, with a border sticker and the Diggin' Summer sandcastle Doodle-pop. 

Inside I used the title page from the 6x8 pad and added some of the Tropical Trio Doodle-pops to decorate it. On the opposite side I added a 4x6 photo mat and used some Icon Stickers and Puffy Words to add a title to the page. I finished it with the little toucan from the Tropical Trio Doodle-pop set.

On the left side, under the top flap I added a pocket that I matted with one of the 4x6 cut-aparts from the Summer Fun 6x8 paper pad. I also used the border sheet and the journaling cut-aparts. I added the last animal from the Tropical Trio Doodle Pop set and a couple of the flowers from the Puffy Words stickers. 


On another left side flap I added another 4x6 photo mat with a title from the Puffy Words stickers and decorated with Icon Stickers. 


On the right side of the folio I added belly bands and pockets.  I decorated these pages with Puffy Words, Sam and Sally Seahorse Doodle-pops, and Icon stickers. It was so fun to use the Puffy Words in a different way!

And of course there is full video walkthrough and tutorial!


Have a great day!


YOUTUBE | FACEBOOK | INSTAGRAM


DOODLEBUG PRODUCTS USED

8925 Summer Fun 6x8 Paper Pad
8927 Summer Fun This and That Sticker Sheet
8926 Summer Fun Icon Stickers
8908 Summer Fun Puffy Words|
8899 Tropical Trio Doodle Pop
8901 Sam and Sally Seahorse Doodle Pop
8903 Diggin' Summer Doodle Pop
8079 Limeade Candy Strip Sprinkle Petite Prints
5437 Swimming Pool Gingham Linen Petite Prints
8098 Mandarin Plaid Polka Dot Petite Prints

OTHER

Chipboard
White Cardstock
Magnets

Friday, July 25, 2025

SUMMER FUN - SUMMER TIME SHAKER MINI ALBUM | with Jen

There is so much to love about the new Summer Fun collection! The cute wave patterned acetate, the Bitty Bubbles and Fishies shakers, literally every piece in the Odds and Ends, Chit Chat, and Bits and Pieces - I used them all! Today I have a shaker cover mini album using the Summer Fun collection. 

The finished album measures 8" x 8" with a 2" spine. I used my Glowforge to cut the Summer Fun title into the spine and backed it with the Gull Friends paper. For the shaker on the front cover I used a mix of the Bitty Bubble and the Fishies shakers. Through the shaker you can see a photo mat inside the pocket on the front inside cover.

Inside we have three packed pages with lots of flaps for all your pictures. One of my favorite elements is the Polaroid-style cut-aparts on the Flamazing paper.  Here I've used it as the focal on the first page. 


I used the various Odds and Ends and Bits and Pieces to build ephemera clusters. On this page I used the flowers from the Bits and Pieces to build a floral cluster on the bottom corner of my flap. 


On the back page I used some leftover Summer Fun acetate for a photo mat. The mat is used to keep the flaps closed. I added Chit Chat and Odds and Ends on top of the small belly bands and under where my acetate photo mat sits. 


Underneath the flaps are two more held closed with a 4x6 photo mat. 


They open to a layout page with lots of photo mats. I used an assortment of Odds and Ends and Chit Chat to add finishing touches.


To see the full video walkthrough and video tutorial click below. 


YOUTUBE | FACEBOOK | INSTAGRAM

DOODLEBUG PRODUCTS USED

8904 Bitty Bubbles Shakers
8905 Fishies Shakers
8921 Summer Fun Odds and Ends
8922 Summer Fun Chit Chat
8923 Summer Fun Bits and Pieces
8928 Summer Fun Heavy Weight Acetate
8941 Summer Fun 12x12 Collection Kit
3395 Blue Jean Textured Cardstock
3387 Limeade Textured Cardstock
3373 Bubblegum Textured Cardstock

OTHER

Chipboard
Kraft Cardstock
White Cardstock
Clear Acetate
Ribbon
Magnets

Friday, July 4, 2025

BEE HAPPY IT'S A BEE-AUTIFUL DAY MINI ALBUM | with Jen

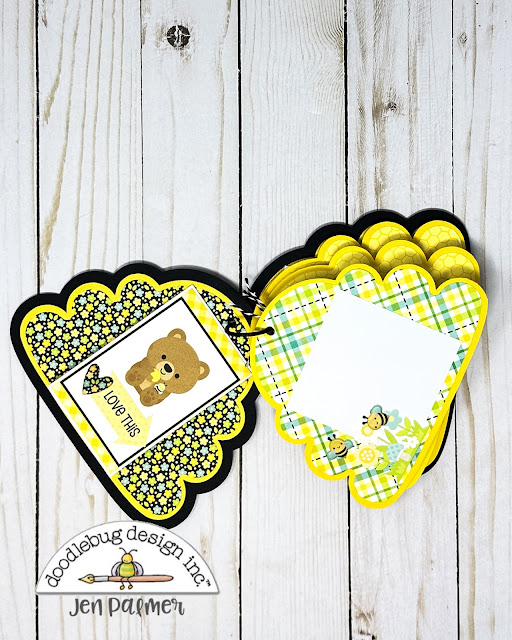
For my second Bee Happy project I wanted to do something a little different. I've wanted to do a shaped tag album for a while and this collection is perfect!  I used the Beehive SVG from Farmhouse (I didn't realize the Bee Happy SVG files were live on Lori Whitlock's site!)  and sized it up in Cricut Design Space. I added an offset layer for my cover and a negative offset to mat my tags. 

On the front I added the extra bee I had cut with the Busy Bee Doodle Cuts die and some more of his bee friends from the Icon sticker sheet. I used the sentiment from the This and That sticker sheet. 

Inside I've added 3x3 photo mats and various stickers from the This and That sticker sheet, Icon stickers, and Puffy Icons.

I used one of the journaling cut-aparts from the collection kit and folded it to make it fit on one of my tags. I tied it closed with some Beetle Black Doodle Twine. 

I also took some of the tag cut-aparts and folded them in half to make little flaps. 

You can grab the SVG file I used here, or you can  grab the new Bee Happy files here.  Have a great day!


YOUTUBE | FACEBOOK | INSTAGRAM

DOODLEBUG PRODUCTS USED

Busy Bee Doodle Cuts Stand Alone Dies
Bee Happy This and That Sticker Sheet
Bee Happy Coordinating Cardstock Pack
Bee Happy 12x12 Collection Kit
Bee Happy Puffy Icons
Beetle Black Doodle Twine


Friday, June 20, 2025

BEE HAPPY SNOW GLOBE | with Jen

The Bee Happy mini collection is fun! Lots of bees doing bee things and the sweetest color palette! As soon as I got my hands on this collection I knew I wanted to play with the Doodle Cuts Busy Bee dies first. 

I made a fun little decor piece using the dies and one of the Doodlebug DIY Snow Globes. I had a vision of building a little scene of bees out doing their job and the dies were perfect for it!

I added the green and white pattern from the 12x12 Bee-utiful paper for my background. I hand cut some hills with the green cardstock in the coordinating Bee Happy cardstock pack and inked them with some dark green ink to give them some dimension.

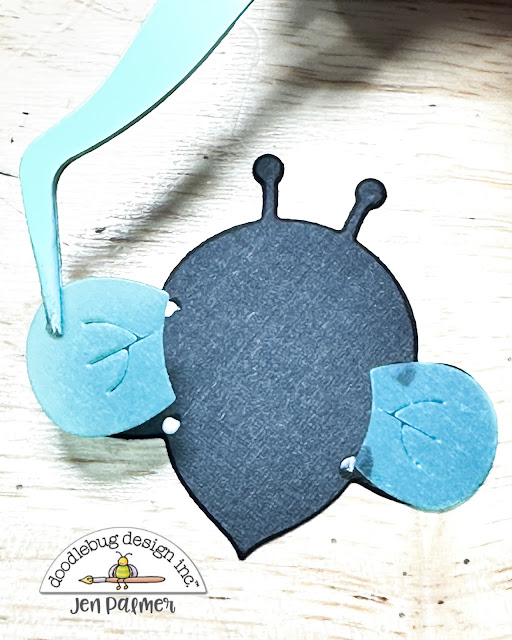
Just a tip for when you are cutting and assembling your bees: Adhere the wings first. I used some light blue vellum from my stash for the wings. Add a tiny dot of glue to your base at the top and bottom corner of where the wing will attach. This glue will be hidden by the head and larger stripe on your bee when fully assembled.  


I popped up all of my elements at different heights and added an action wobble on my big bee. I added some of the Busy Bees Shakers and closed it up. 

On the front added some Puffy Icons and a sentiment from the This and That sticker sheet. I finished it off with some Beetle Black and Bumblebee Doodle Twine. 

Have a great day!


DOODLEBUG PRODUCTS USED

Busy Bee Doodle Cuts 
Bee Happy Collection
Bee Happy Coordinating Cardstock Pack
DIY Snow Globe
Busy Bee Shakers
Beetle Black Doodle Twine
Bumblebee Doodle Twine

OTHER

Action Wobble
Foam Squares

Friday, June 6, 2025

BERRY SWEET - SWEET SUMMER FUN LAYOUT | with Jen

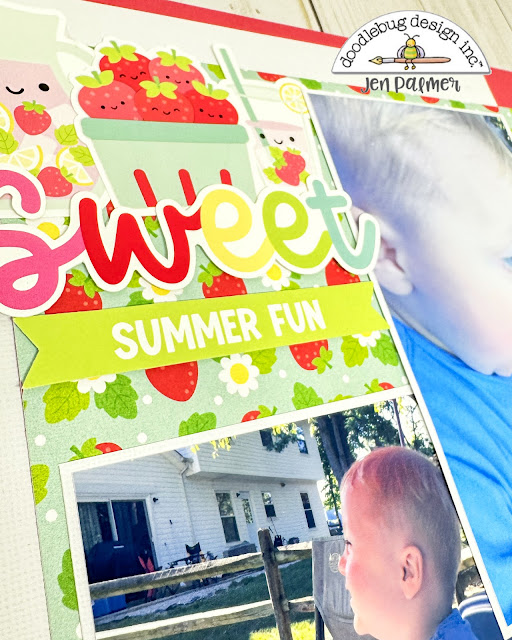
I'm not usually a 12x12 layout girly but every once in a while I'll see a paper collection and remember a picture or event and I just have to do it! Today's project I used the adorable Berry Sweet collection to document a summer barbecue and my son's refusal to eat strawberries! 

I used one of the coordinating solids as my base and added an 8x8 piece of white cardstock layered with an 8x10 piece of the Berry Sweet paper. I trimmed one of the journaling cut-aparts down and added a small piece of one of the border strips for my journaling. I finished it off with the Berry Sweet Shaker Pop. 

I used the Berry Basket Doodle Pop and added two of the mice stickers from the Icons sticker sheet. 

Finally I used the All the Things pack to add my title and layered it with the fun strawberry lemonade and another berry basket. 


Have a great day!


YOUTUBE | FACEBOOK | INSTAGRAM

DOODLEBUG PRODUCTS USED

Berry Sweet Collection
Berry Sweet Coordinating Textured Cardstock

Monday, May 19, 2025

BERRY SWEET GARDEN PLANNER | with Jen

Who knew strawberries could be so cute? The new Berry Sweet Mini Collection from Doodlebug is so much fun and perfect for a mini project!

I have made a super easy Garden Planner for you today. I used the coordinating solids for the collection to build my base. I added a small notebook to make notes or lists of plants. On the other side is a flap with stacked pockets to hold receipts or other notes.


When you open the flap we have a spot for a picture. I added a 4x4 cut apart from the 12x12 collection kit. 


Finally, I have some simple accordion pockets. These pockets expand to hold even more things you want to hang on to like seed packets or pictures of your progress!

I have a full tutorial video if you want to make your own here: 


YOUTUBE | FACEBOOK | INSTAGRAM


DOODLEBUG PRODUCTS USED

Berry Sweet Collection
Berry Sweet Coordinating Textured Cardstock
Pistachio Plaid Polka Dot Petite Print

OTHER

Chipboard
Small Notebook (mine is 5 1/2 x 8 1/4)

Pin It button on image hover