Showing posts with label Family Scrapbooking. Show all posts

Monday, June 30, 2025

BEE HAPPY SO CUTE LAYOUT | with Brianna

Hey friends! Brianna here today and I'm so happy to share another layout using the so adorable, Bee Happy collection. Here's my page: 

Before I started this page, I was brainstorming and thought.. let's add a bunch of patterns to this layout! And that's just what I did. I ended up choosing the Bee Happy paper as my base and then trimmed out a 10x12 piece from the Sweet As Honey paper and layered it right on top. I wanted a pop of solid color so I trimmed down a piece of the Swimming Pool cardstock and layered it right under the Sweet As Honey paper so only a little strip of it was peeking out. Next, I adhered those papers down.

I took a look at the foundation of my page and thought it could use a bit more pattern, so I trimmed down a piece of the B side of the Bee Happy paper and centered and adhered it down. I also added in the cardstock scrap I had leftover to serve as a grounding piece for my photos and I love how it turned out!! I'm so happy that I captured this moment between my daughter and son. Even with the massive age gap, they're still so very close!

Now that all of my paper layers were complete, I got to work on embellishing the rest of my page. I built my title using a couple of phrases from the All The Things pack and made sure to pop it up on foam tape for more interest.  I then selected a few other pieces that would sandwich my photo clusters and couldn't resist adding that adorable bee right next to my title. 

I added a fun little phrase sticker from the 12x12 Icons sticker sheet at the top of my photos and then adhered a few more embellishments around it. The white heart stickers are from the My Honey Doodle-Pop that I had leftover from my previous layout. They look so cute surrounding that bee!

For some final touches, I sprinkled in some smaller Puffy Icons stickers and that completed my page! Here's one last look: 

Thanks so much for stopping by today, I hope that I've inspired you in some way! I'll see you in my next post friends!


BLOG INSTAGRAM | YOUTUBE

DOODLEBUG PRODUCTS USED

Bee Happy Collection
12x12 Bee Happy Solid Assortment Cardstock

Monday, April 28, 2025

BUTTERFLY KISSES LOVE YOU LAYOUT | with Brianna

Hey friends! Brianna here today and I'm sharing another layout using the adorable Butterfly Kisses collection. This collection is beautiful and after looking through it, I knew I wanted to create a fun scene design along with a shaker using Hello Sunshine Doodle Cut along with the new Butterfly Kisses Shakers. Here's my page: 

To start, I created my shaker first. I took out the Hello Sunshine Doodle Cut pack and die cut the single cloud to use for my shaker. I also die cut a few of the solid clouds using the other cloud dies as well as a piece of the white cardstock from the Coordinating Cardstock pack. To create my shaker, I first adhered a piece of acetate to the backside of it and then added some narrow foam tape right on top of the acetate. This created a little reservoir for my Shakers to go in. I carefully poured in the cute little butterflies and then sealed the shaker using a piece of vellum. I turned it over and my shaker was done. Easy peasy!


I then went through the 12x12 Patterned Papers and selected the Rainbow Skies paper as my base. To build my little scene, I trimmed out a small trip of Garden Party for my grass and then tore into the Bitty Blossoms paper for the flowers. I also grabbed my fringe scissors and cut into that Garden Party paper so that it resembled grass a bit more. So fun!


I embellished my little scene by pulling in a few Odds & Ends, Puffy Stickers as well as a few flowers from the Bits & Pieces pack. I love how cute it ended up being!


I ended up printing and trimming down my photo into a different shape and adhered it up in the "sky" portion of my layout. I layered my cloud shaker right on top of it and then layered the rest of my die cut clouds around it. I used a couple of phrases from the Puffy Stickers Words set and adhered them right on top of my photo.


I added in a few more smaller bits using more Puffy Stickers as well as the Bitty Bug and Garden Shape Sprinkles stickers. This page is so fun and whimsical. 


Here's one last look:


Thank you so much for stopping by today, I hope that I've inspired you in some way! I'll see you in my next post friends! 


BLOG INSTAGRAM | YOUTUBE

DOODLEBUG PRODUCTS USED
Butterfly Kisses Collection
12x12 Coordinating Cardstock
Butterfly Kisses Shakers
Hello Sunshine Doodle Cuts

OTHER
White Gel Pen
Acetate
Vellum


Monday, December 30, 2024

6 X 8 MINI ALBUMS - OUR HAPPY FAMILY ALBUM | with Brianna

Have you seen our new 6"x8" albums?  These petite albums are available in 14 colors and each album has 5 chipboard tab dividers, 4 colored inserts, 4 pocket pages,  and 10 assorted page protectors!  To kick off the new year, we challenged our Design team to each create a mini album using these fun new books.  Every couple of weeks, you'll see inspiration and new designs as each designer builds their album! Some of the books will be centered around a certain theme, some around everyday memory keeping!  All albums will be full of fun ideas and inspiration for you! We are kicking off our 6"x8" album inspiration with Brianna!

Hey friends! Brianna here today and I couldn't wait to share the cover of my 6x8 album with y'all today! I'm so excited that I will be able to share this album with y'all in steps. There's a lot of love going into creating this album, so it will be nice to highlight the process as well as the pages with you all. So for today, here's the cover. Make sure to stay tuned for my next post where I'll be sharing a few completed pages!

I was so lucky to be able to choose the album color I wanted to work with and I selected Mint. If you know me, I love mint and this album is gorgeous! First, I decided to add a large bow on the left side of it using some wide white ribbon with gold on the edges. It couldn't have been more perfect for my cover. I purchased it at Target over the Christmas season a few years ago. I did feel like it needed a little something extra, so I added a couple of adorable Little Charmers to it! I chose the Mini Maple and Country Pumpkin charms and tied them to a piece of thread. I then simply tied the thread to my ribbon and I love the cuteness factor that it adds to my bow!


Next, I worked on my embellishment cluster that I wanted to add in bottom right corner. I wanted somewhat of a base for all of my embellishments to kind of sit on, so I pulled out a few circle punches and punched out circles from papers in the 6x6 Paper Pad. I added some faux stitching using a black gel pen around the edges and then adhered them down. I love how the faux stitching turned out. It gave them a nice finished, cohesive look.

I then pulled a few die cuts from the Odds and Ends pack as well as the Bits & Pieces pack and created a cute little scene. I even added a few of the Mini Icons stickers since they were the perfect size to add right on top of the house piece. So adorable!!

For the title of my album, I selected the 'Our Happy Family' banner from the Chit Chat pack since I plan on filling this album with a bunch of photos of my family. The black stitching around the banner matched my stitching on the circles and I love how it all went together! Lastly, I added a few floral Puffy Icons stickers and that was it! I love how my cover turned out, here's one last look:

Thank you so much for stopping by today! Do you enjoy making album covers? I do!! I can't wait to show you a few pages from the inside of this album! See you next time friends!


BLOG INSTAGRAM | YOUTUBE

DOODLEBUG PRODUCTS USED

Farmhouse Collection
6x8 Album in Mint
Little Charmers

OTHER

White Ribbon

Saturday, November 9, 2024

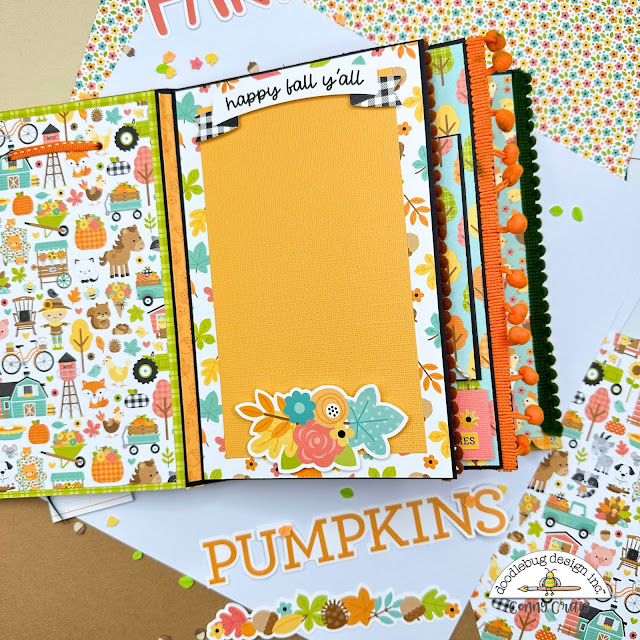
FARMHOUSE FAMILY TRADITION MINI ALBUM | with Conny

Hello, Crafty Friends! It's Conny from The Daily Life of Creativity with my project using the Farmhouse Collection. This stunning album, made from chipboard, is not just a project but a delightful journey of creativity. The beauty of this collection has truly captivated me, and I can't wait to share this joy with you! I had a wonderful time putting together this mini-album, and I'm sure you'll enjoy it too. You'll find the cutting guide and written instructions in this blog post. For a more detailed guide, check out my YouTube channel (link below), where you can watch a step-by-step video primarily focusing on assembling the base.
Cutting Guide:

1. Chipboard 5.5" x 8",   5" x 8" and 2" x 8".
2. Cut three (3) papers 3 3/4" x 9 1/2",  6 1/2" x 9 1/2" and 7 x 9 1/2" (to wrapped the chipboards covers and spine)
3.  (1) Black Cardstock for the spine 8" x 6"
4. (1) Fall bouquet Cardstock for front cover 4 3/4" x 7 3/4"
5. (1) Country Calico Cardstock for back cover 5 1/4" x 7 3/4"(1),  Country Calico Cardstock for spine    1 7/8" x 7 3/4".
6. (2) Farmhouse Cardstock 7 7/8" x 5 3/8" for the back cover and 7 7/8" x 4 7/8" front covers (these are for inside to cover the chipboard)
7. (2) Black Cardstock, 7 7/8" x 11" score at 5" and 6" (for the first page) and 7 7/8" x 11" score at 5" and 5.5" ( second Page).(1) Black Cardstock, 5 1/4" x 7 7/8" score at 1/2".
8. (1) Black Cardstock, 7 1/2" x 5 1/2" score at 5"
9. (1) Black Cardstock, 5" x 4 1/2" score at 4 1/2". For the pages, prepare mats at 7 3/4" x 4 7/8" .

Instructions:
First,  I started with the chipboard covers, which measure 5.5" x 8", 5" x 8", and 2" x 8". For the cardstock pieces, I used the following dimensions: 3/4" x 9 1/2", 6 1/2" x 9 1/2", and 7" x 9 1/2". I wrapped these cardstock pieces around the chipboard covers and spine. I recommend using a book cover guide tool to ensure that you leave about 3/4" around the edges of the chipboard. I trimmed the corners at an angle, leaving about 1/8" at each corner so that when wrapping the chipboard, it is perfectly covered.
Next, I joined the chipboard covers together. I used one piece of black Cardstock for the spine, measuring 8" x 6". I placed  the chipboard spine between the 3" and 6" marks on the Cardstock and scored on both sides of the spine to create flaps for the covers. I applied adhesive  to the two flaps, then adhered the larger cover to the back and the smaller cover to the front. I matted the album with (1) Fall bouquet Cardstock for the front cover, 4 3/4" x 7 3/4", (1) Country Calico Cardstock for the back cover, 5 1/4" x 7 3/4", and (1) Country Calico Cardstock for the spine 1 7/8" x 7 3/4".
Next, I started preparing the pages for the album using two pieces of black Cardstock, each measuring 7 7/8" x 11". For the first page, I scored at 5" and 6". For the second page, I scored at 5" and 5.5". I adhered the pages to the spine of the album, leaving about 1/4" of space between the beginning of the spine and the pages. For the pages, I prepared mats at 7 3/4" x 4 7/8" .  After matting the papers with patterned paper, I added flip pages to a few sections.

Here are the measurements for the flip pages:
1. For the first flip page, use black Cardstock measuring 5 1/4" x 7 7/8" and score at 1/2".
2. For the second flip page, use black Cardstock measuring 7 1/2" x 5 1/2" and score at 5".
3. For the third flip page, use black Cardstock measuring 5" x 4 1/2" and score at 4 1/2".


I also made sure to cover the inside of the chipboard piece. I used two pieces of farmhouse cardstock: one measuring 7 7/8" x 5 3/8" for the back cover and another measuring 7 7/8" x 4 7/8" for the front cover.
I added pom-pom trim, baker's twine, and embellishments from the collection to create little clusters on every page. Just in case you're interested, a few of the photo mats measure 4 1/4" x 6 1/2", 4 1/4" x 7", or 3 1/4" x 4 1/4". These are options, as we all like to include different sizes of photos in our albums.

Thank you so much for stopping by! I love sharing with you all my creative ways of making projects. Here is a link to a tutorial for my album.  Xo Conny!


DOODLEBUG PRODUCTS USED

Farmhouse Collection
Beetle Black Cardstock
Doodle Twine

OTHER

Foam Adhesive
Chipboard
Book cover guide tool
Score/ Cutting Board
Sewing Machine

Thursday, July 25, 2024

FUN AT THE PARK DIAMOND PAGE | with Traci

Hi crafters! Today, I'm sharing a 12x12 scrapbook page that I made with the wonderful Fun at the Park Collection. I've used this line in so many fun projects, most of which had a Disney theme. But, this layout is a little more generic and could be used for photos of summer, a road trip, or ... the "best day ever"! 

To make it, I started with the 12x12 You Are Here paper as the base and layered white cardstock on top. 


Next, I cut out 19 diamond shapes using different 12x12 pattern papers. The diamonds are approx. 2" wide by 3" tall so this was a great way to use up some of my scraps. Once I arranged them on the page how I wanted them, I adhered them to the white cardstock.  

I love folding elements on a scrapbook page that allow for more photo space, so ... I created a flippie card out of white cardstock. I covered it in the 12x12 Mini Dot paper and embellished it with a cloud, palm tree, and car from the Odds & Ends. The cute little sunshine is a mini icon sticker. 

Inside the flippie, there is space for two 3.5"x 5.5" photos. I added pictures of the kiddos at Disney World but really, this page could be used for any fun photo!

And last but not least, I added a few more die cut pieces across the layout. I used 3 word bubble pieces from the Chit Chat and a seagull, sunglasses, and heart from the Odds & Ends.

I hope this 12x12 scrapbook page inspires you to create your next project. With its colorful and vibrant prints, the Fun at the Park Collection was the perfect choice for all those diamonds and I love the cute embellishments. Have a great day and happy crafting!


BLOG | SHOP | FACEBOOK | INSTAGRAM | PINTEREST

DOODLEBUG PRODUCTS USED

Fun At The Park Collection

Saturday, March 2, 2024

MADE WITH LOVE BAKED WITH LOVE LAYOUT | with Conny

Hello there, Crafty Friends! It's Conny, and I'm excited to share with you a 12" x 12" layout that I recently created using the lovely Made with Love collection. Originally, I had planned to put together an album, but unfortunately, I didn't have enough photos to make it happen. However, I did have a few adorable photos of my daughter Savanna cooking and having a blast, so I decided to use them to create this layout instead.


Let me walk you through the process. To start, I used the Made with Love Shadow Box Insert Kit, which comes with vellum, cardstock stickers, and shape sprinkles. I layered all the shapes on the vellum in a circle, following the example given in the kit.


Next, I placed the vellum on the Dab of Butter 12x12 cardstock, trimming it about 1/2" inch all around. Then, I placed the blush textured cardstock in the background, created a frame, and stitched all around using my sewing machine.

To add some extra flair, I added some standard eyelets at the top of the layout, placing them between the vellum at 3" and 5 1/2", and tied a bow with tulle. I then embellished the layout with Odds and Ends, Doodle-Pops, and leftover sprinkles to add a little more fun and personality.


For the photos, I decided to print them in black and white to ensure they wouldn't clash with the embellishments. Doing so also enabled them to stand out and be the focal point of the layout.


I'm thrilled with the final result of this layout, and I hope it motivates you to create your cards, a mini-album for your recipes, or a 12"X12" layout using the Made with Love collection.

Please let me know what you think about this layout, and feel free to share your creations with me. Additionally, this layout can be beautifully displayed in a shadow box for everyone to appreciate. Thanks for reading, and I'll see you all soon!


DOODLEBUG PRODUCTS USED

Made with Love Collection
Made with Love Solid Textured Cardstock
Made with Love Shadow Box Insert Kit

OTHER

Tulle
Standard Eyelets
Sewing Machine

Friday, March 1, 2024

MADE WITH LOVE CHOCOLATE CAKE LAYOUT | with Jen

I don't do many layouts. But as soon as I flipped through the paper in the Made With Love collection, I knew I wanted to make a layout and I knew just the pictures!

I started with the Dab of Butter paper for my base and topped it with Bake Me Happy. I used two of the borders from the Flour and Sugar border page.

I then layered up a bunch of pieces from the Odds and Ends pack.

For my title I took the Cupcake Chit Chat piece and cut cup off the front and paired it with the Chocolate title. And in case you're wondering, that move of stuffing the cake in his mouth? That's genetic.


Have a great day!


YOUTUBE | FACEBOOK | INSTAGRAM


DOODLEBUG PRODUCTS USED

Made with Love Collection

Pin It button on image hover