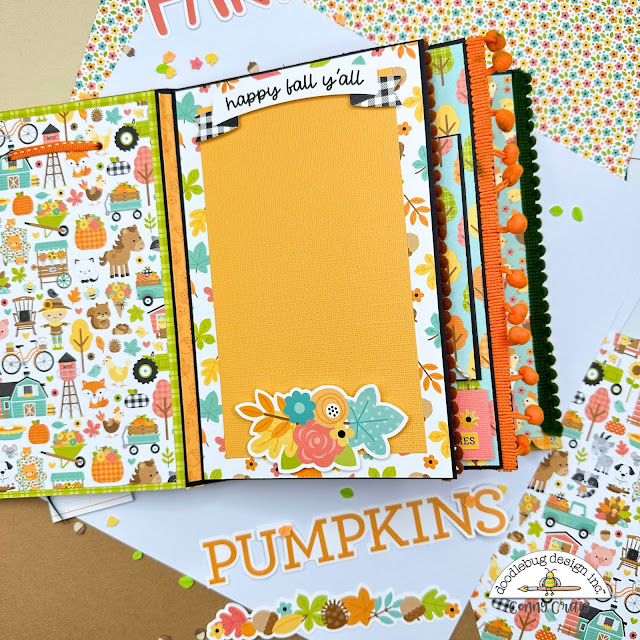
Hello, Crafty Friends! It's Conny from The Daily Life of Creativity with my project using the Farmhouse Collection. This stunning album, made from chipboard, is not just a project but a delightful journey of creativity. The beauty of this collection has truly captivated me, and I can't wait to share this joy with you! I had a wonderful time putting together this mini-album, and I'm sure you'll enjoy it too. You'll find the cutting guide and written instructions in this blog post. For a more detailed guide, check out my YouTube channel (link below), where you can watch a step-by-step video primarily focusing on assembling the base.

Cutting Guide:
1. Chipboard 5.5" x 8", 5" x 8" and 2" x 8".
2. Cut three (3) papers 3 3/4" x 9 1/2", 6 1/2" x 9 1/2" and 7 x 9 1/2" (to wrapped the chipboards covers and spine)
3. (1) Black Cardstock for the spine 8" x 6"
4. (1) Fall bouquet Cardstock for front cover 4 3/4" x 7 3/4"
5. (1) Country Calico Cardstock for back cover 5 1/4" x 7 3/4"(1), Country Calico Cardstock for spine 1 7/8" x 7 3/4".
6. (2) Farmhouse Cardstock 7 7/8" x 5 3/8" for the back cover and 7 7/8" x 4 7/8" front covers (these are for inside to cover the chipboard)
7. (2) Black Cardstock, 7 7/8" x 11" score at 5" and 6" (for the first page) and 7 7/8" x 11" score at 5" and 5.5" ( second Page).(1) Black Cardstock, 5 1/4" x 7 7/8" score at 1/2".
8. (1) Black Cardstock, 7 1/2" x 5 1/2" score at 5"
9. (1) Black Cardstock, 5" x 4 1/2" score at 4 1/2". For the pages, prepare mats at 7 3/4" x 4 7/8" .
 Instructions:
First, I started with the chipboard covers, which measure 5.5" x 8", 5" x 8", and 2" x 8". For the cardstock pieces, I used the following dimensions: 3/4" x 9 1/2", 6 1/2" x 9 1/2", and 7" x 9 1/2". I wrapped these cardstock pieces around the chipboard covers and spine. I recommend using a book cover guide tool to ensure that you leave about 3/4" around the edges of the chipboard. I trimmed the corners at an angle, leaving about 1/8" at each corner so that when wrapping the chipboard, it is perfectly covered.Next, I joined the chipboard covers together. I used one piece of black Cardstock for the spine, measuring 8" x 6". I placed the chipboard spine between the 3" and 6" marks on the Cardstock and scored on both sides of the spine to create flaps for the covers. I applied adhesive to the two flaps, then adhered the larger cover to the back and the smaller cover to the front. I matted the album with (1) Fall bouquet Cardstock for the front cover, 4 3/4" x 7 3/4", (1) Country Calico Cardstock for the back cover, 5 1/4" x 7 3/4", and (1) Country Calico Cardstock for the spine 1 7/8" x 7 3/4".

Next, I started preparing the pages for the album using two pieces of black Cardstock, each measuring 7 7/8" x 11". For the first page, I scored at 5" and 6". For the second page, I scored at 5" and 5.5". I adhered the pages to the spine of the album, leaving about 1/4" of space between the beginning of the spine and the pages. For the pages, I prepared mats at 7 3/4" x 4 7/8" . After matting the papers with patterned paper, I added flip pages to a few sections.
Here are the measurements for the flip pages:
1. For the first flip page, use black Cardstock measuring 5 1/4" x 7 7/8" and score at 1/2".
2. For the second flip page, use black Cardstock measuring 7 1/2" x 5 1/2" and score at 5".
3. For the third flip page, use black Cardstock measuring 5" x 4 1/2" and score at 4 1/2".

I also made sure to cover the inside of the chipboard piece. I used two pieces of farmhouse cardstock: one measuring 7 7/8" x 5 3/8" for the back cover and another measuring 7 7/8" x 4 7/8" for the front cover.
I added pom-pom trim, baker's twine, and embellishments from the collection to create little clusters on every page. Just in case you're interested, a few of the photo mats measure 4 1/4" x 6 1/2", 4 1/4" x 7", or 3 1/4" x 4 1/4". These are options, as we all like to include different sizes of photos in our albums.
Thank you so much for stopping by! I love sharing with you all my creative ways of making projects. Here is a link to a tutorial for my album. Xo Conny!
DOODLEBUG PRODUCTS USED
Farmhouse Collection
Beetle Black Cardstock
Doodle Twine
Beetle Black Cardstock
Doodle Twine
OTHER
Foam Adhesive
Chipboard
Book cover guide tool
Score/ Cutting Board
Sewing Machine


No comments:
Post a Comment