

There are some fabulous new CREAM & SUGAR Cut files
released today in the Silhouette Store and the Lori Whitlock SVG Shop!
We've included links to both types of files below! Then keep scrolling to
released today in the Silhouette Store and the Lori Whitlock SVG Shop!
We've included links to both types of files below! Then keep scrolling to
see the wonderful project by Traci Penrod


Hi everyone! It's Traci, from Artsy Albums to share a Cream & Sugar cut file project with you. This candy jar makes a great little gift for friends, teachers, or co-workers! I'll also show you how to make the layered title piece using Silhouette software so let's get started.


Layered Title Tutorial
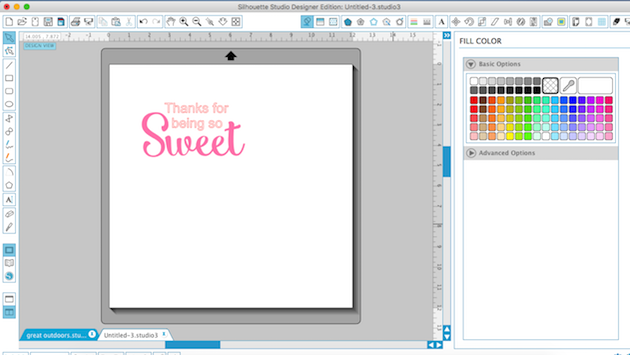
Step 1: Use the text tool to type "Thanks for" and "being so" above the SWEET cut file. If you type them on separate lines, you can move them around to fit the way you want.
 Step 2: Position the CANDY SVG file from Lori Whitlock's SVG Shop next to the title. You can rotate the shape slightly if needed by highlighting the shape and using the green circle cursor.
Step 3: Group all of the pieces together.

Step 4: Now create an offset. This will be the white base that you layer all of the pieces on.
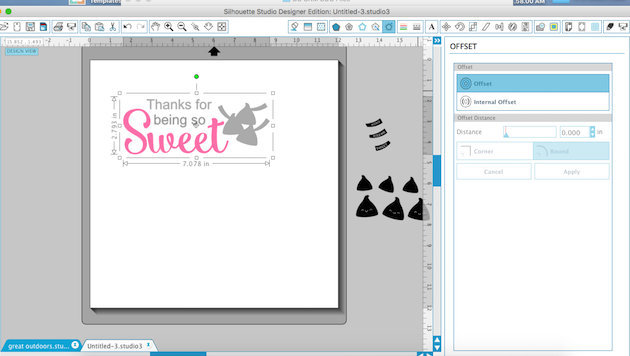
Step 5: Once you create the offset shape, move it off to another area of the mat and right-click to hit 'release compound path'. This will separate all of those tiny pieces in the center of the shape so that you can delete them.

Step 6: Move the outer shape away from the tiny pieces. Highlight the little bits and delete them.

Step 7: Create another offset shape of the white background so that you can cut the bottom layer out of grey card stock.
 |
| Step 8: Now that you have your base white background layer, go back to the title, ungroup it, and move the SWEET and CANDY off to the side. Make sure the "Thanks for being so" is set to NO CUT and position your white background layer over them. Use the Silhouette software to do a Print & Cut of the shape. You will also want to Print & Cut the little tags for the candy. (Make sure the words on the tags are also set to NO CUT) |

Once you cut all of the piece out, you should have a base grey layer, a white layer, the SWEET title, the CANDY shape, the tags for the candy and the layers for the candy.
For the jar lid, I used the AWNING cut file and resized the pieces to make the strips approximately 4.5" in length. I cut several of the strips out of white card stock and cut a bunch of the little layering pieces out of Cream & Sugar 6x6 paper. I adhered them around the sides of the lid and then topped the lid with a simple scallop circle punch (I didn't use the round metal top in the lid, only the side piece). Finally I adhered Doodlebug pixie sticks to the back of the title piece and poked holes in my scallop top to hold the title in place.


Here is a list of all of the Doodlebug goodies I used for these projects: Cream & Sugar 6x6 Paper Pad Grey and White card stock Chunky Twine Sprinkles Pixie Sticks Cut Files: Candy Awning Heart Polaroid Love You Thank you so much for checking out this project today! Be sure to check out all of the cute Cream and Sugar cut files available in the Silhouette Online Store and in Lori Whitlock's SVG shop.


These are so sweet Traci! Love them!
ReplyDeleteHi Traci! What fonto did you use for the text title? Thanks so much! It's all so adorable!
ReplyDeleteI love these Traci!! Such a sweet idea!
ReplyDelete