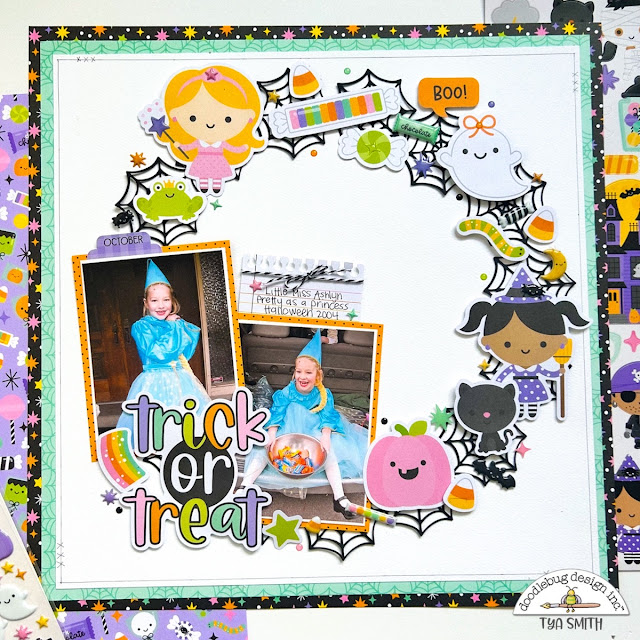
Some of my fondest memories of Halloween were the ones spent choosing the perfect Halloween costume for the big night! And then to be able to parade around in that costume all night Trick or Treating was the greatest thing ever! Imagine how giddy I was when I saw all the costumed cuties in the new "Sweet and Spooky" collection! I knew I just had to add some to a layout!
Sunday, September 24, 2023
SWEET & SPOOKY TRICK OR TREAT LAYOUT | with Tya
Saturday, September 23, 2023
SWEET & SPOOKY INTERACTIVE MINI ALBUM | with Conny
Let’s get started! To make the base of the album you will need (2) 7” X 5” chipboard pieces for the front and back covers and (1) 7” X 2” piece for the spine. I also used cardstock in white and black to cover the chipboard. I put the spine and covers together leaving about 1/8” of an inch gap between the covers and the spine. This prevents the album from breaking/ tearing when opening and closing!
Next, let's make the hinges, You will need a piece of cardstock measuring 6 7/8” X 12” in either white or black. Score this piece at 2”, 2 1/2”, 3”, 3 1/4”, 3 3/4”, 4 1/4”, 4 1/2”, 5”, 5 1/2”, 5 3/4” 6 1/4”, 6 3/4”, 7”, 7 1/2”, 8”, 8 1/4”, 8 3/4”, 9 1/4”. Add double-sided tape to every half inch segment on one side and adhere leaving the 1/4” of an inch in between every hinge! Add double-sided tape or liquid and glue to the hinge and adhere to the spine of your album. I added 1/8” of the mirror card-stock between the hinges from the first page to the last!
I matted the front and back covers of the album with the Trick or Treat paper using the scene with the spooky houses and the back of that for the pockets!
For the pockets on the front and back you will need a piece of paper 3 1/2” X 6” scored at 1/2” on the long sides and once at the bottom to create the pocket! I used a circle punch to create the openings!
Okay.. we are looking great! Now, let’s put the pages for the hinges. I started with the first four pages with side pockets. You need four pages measuring 4 3/4” X 7 1/2” scored 1/4" bottom and top on the longest side 1/4”. For the backing of that paper you will have four pages measuring 4 3/4 X 7”. Adhere those together leaving the sides open creating a pocket with two sides open!

To add the pages to the first four hinges, slidie the hinges in the opening of the pocket. Add double-sided tape or liquid glue to both sides of the hinges to make sure the pocket is glued on both sides.
Now for inside the pockets, I added pages and cards! Here are the details...
Single page 4 1/4” X 6 3/4” and 8 1/2” X 6 3/4” for the cards scored at 4 1/4”. Add tabs from the bits and pieces- Halloween, Trunk and Treat, October, and I Heart Candy!
For the fifth page, I used the heavy-weight acetate to make a pocket, 10” X 6 7/8” scored at 4 3/4”, 9 1/2”. The last page has the same measuring as the fifth!
For my interactive elements....
Page 1 - on the top of this page, I added a piece that flips up and down. It measures 4 1/4" x 5', 4 1/2" x 6"scored a 1/2" on the longest side
Page 2 - You need paper measuring 8 1/2" x 6 3/4", scored at 4 1/4"
Page 3 This one is fun! You need a piece of paper measuring 11" x 6 3/4" scored at 4 1/4" and 8 1/2" on the longest side. In the middle you will add a flip up page measuring 4 1/4” X 7 1/4” scored at 6 3/4” adhere it to the back of the page.
Page 4 - You will need two pieces of paper measuring 6 3/4” X 3” and 6 3/4” X 4” scored on the longest side at 1/2" I added magnets to all these pages to keep them closed.
Then I embellished! Forr the cover I kept it pretty simple, bringing the images from the background, the spiders, bats, and ghosts creating little clusters. Sprinkled mini jewels! On the spine I added the just charming charm and some tulle.
Thank you so much for stopping by, I can’t wait to see what you create using Sweet and Spooky Collection!
Sweet & Spooky Collection
Boo-tique Just Charming Clip
Stardust Heavy Weight Acetate
Sweet & Spooky Coordinating Textured Cardstock
Mirror Paper
Tulle
Adhesive
Friday, September 22, 2023
SWEET & SPOOKY TREAT BOXES | with Jen
Who wants candy? Today I have some fun treat boxes for you using the adorable Stardust patterned acetate from the brand new Sweet and Spooky collection.
The boxes measure 3 1/2" on each side and are 6" high. They go together really quickly.
I decorated the front of each box using the two new Doodle Cuts Set from the collection. With the Haunted Manor Doodle Cuts I added a moon die cut from the Odds and Ends pack.
For the Treat Yourself Doodle Cuts I made that into a shaker with the die cut candies inside.
I topped each with a element from the Chit Chat pack and some sprinkles and Doodle-pops.
Full tutorial can be found here.
DOODLEBUG PRODUCTS USED
Sweet and Spooky Collection
Stardust Heavy Acetate
Treat Yourself Doodle Cuts
Haunted Manor Doodle Cuts
Wisteria Doodlebug Textured Cardstock
6x6 Gingham Linen Petite Prints
6x6 Dot/Stripe Petite Prints
Lilac Doodle Twine
OTHER
Vellum


