Showing posts with label Stephanie Isom. Show all posts

Friday, January 22, 2021

VALENTINE MAILBOXES | with Stephanie

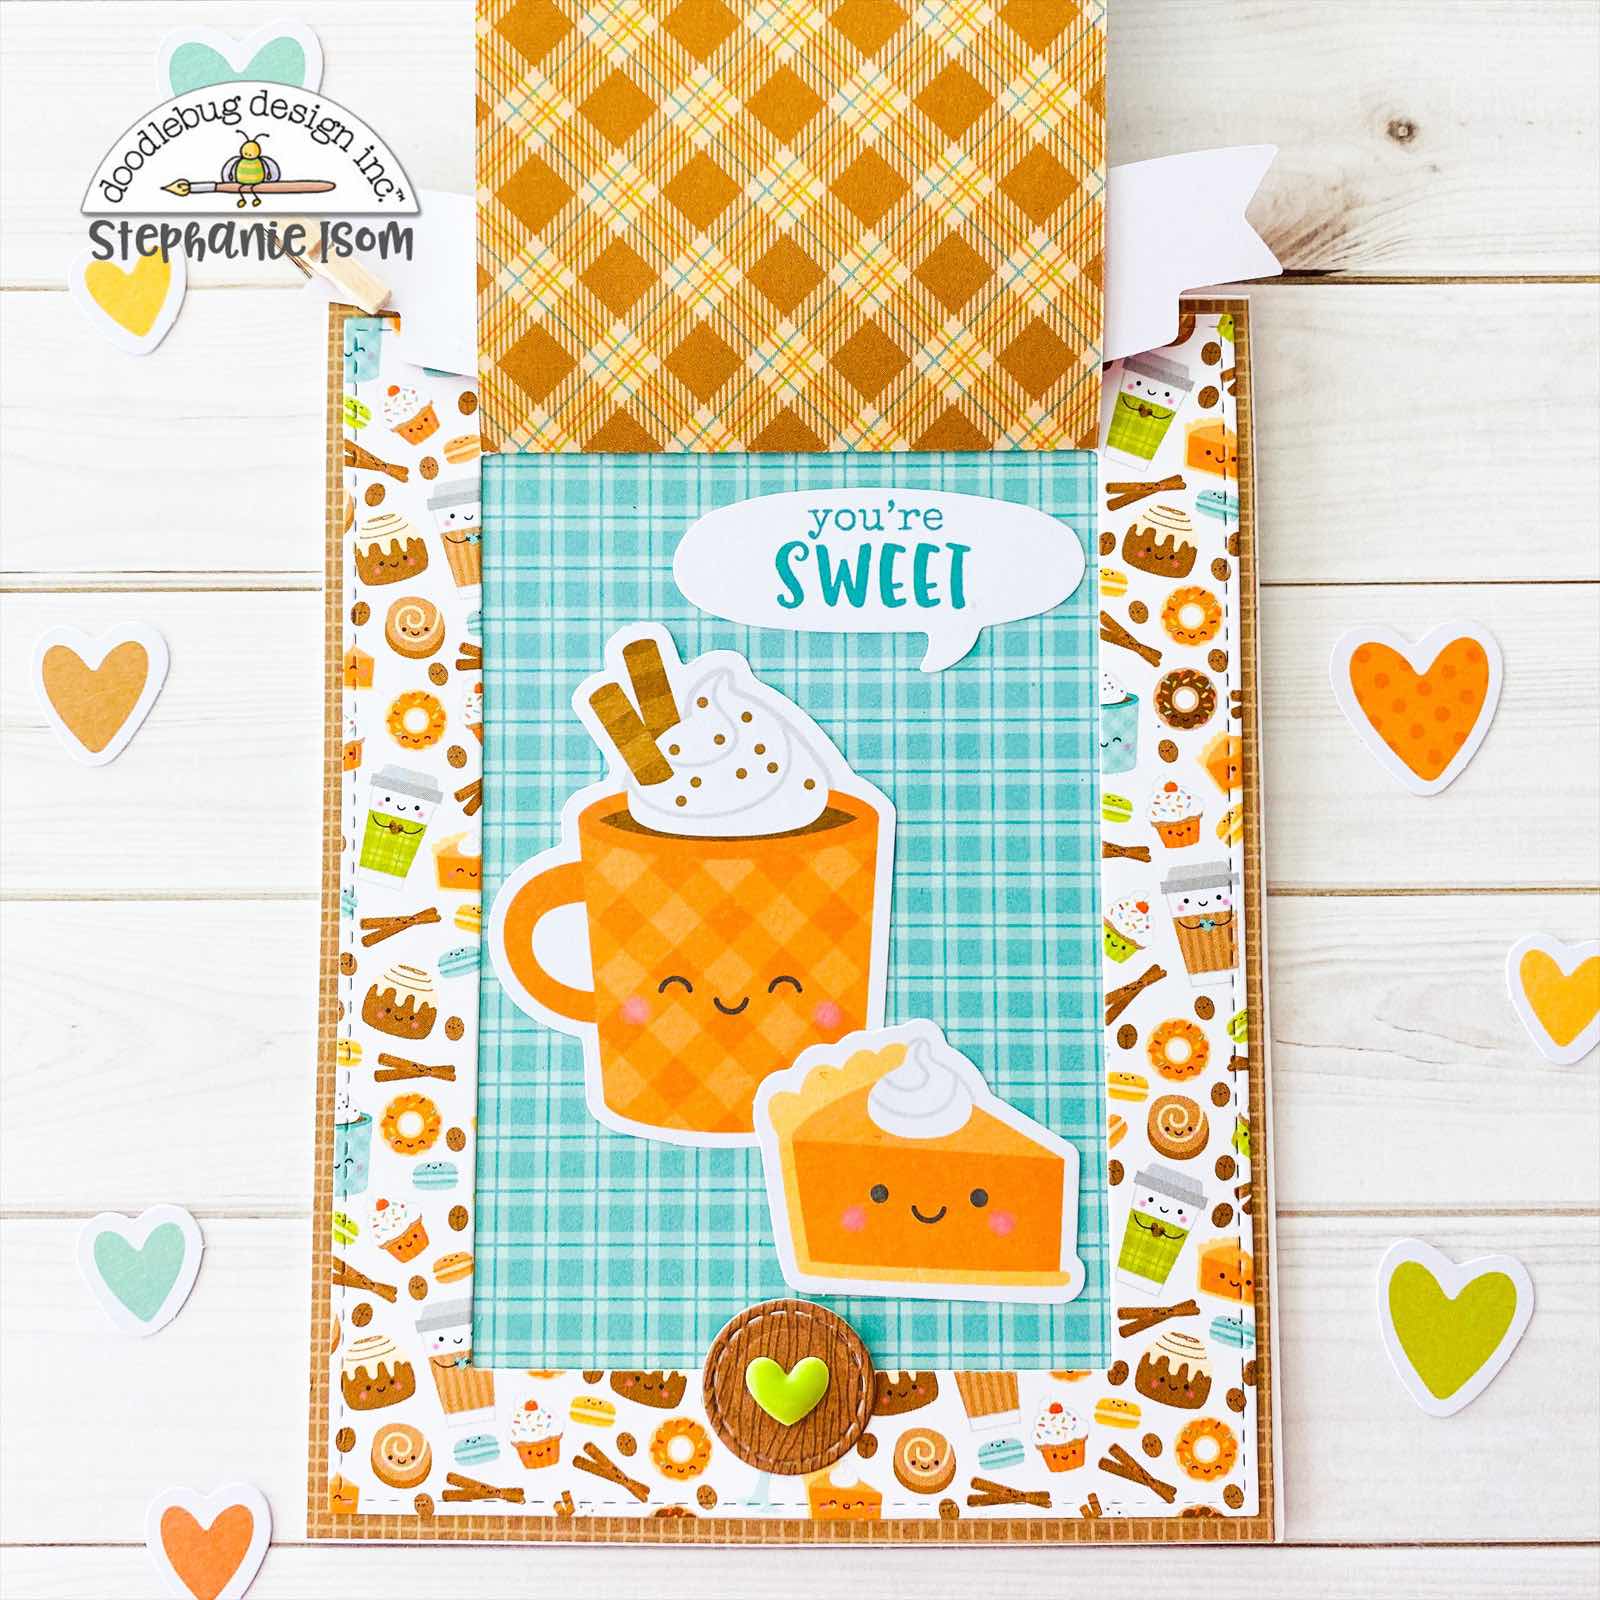
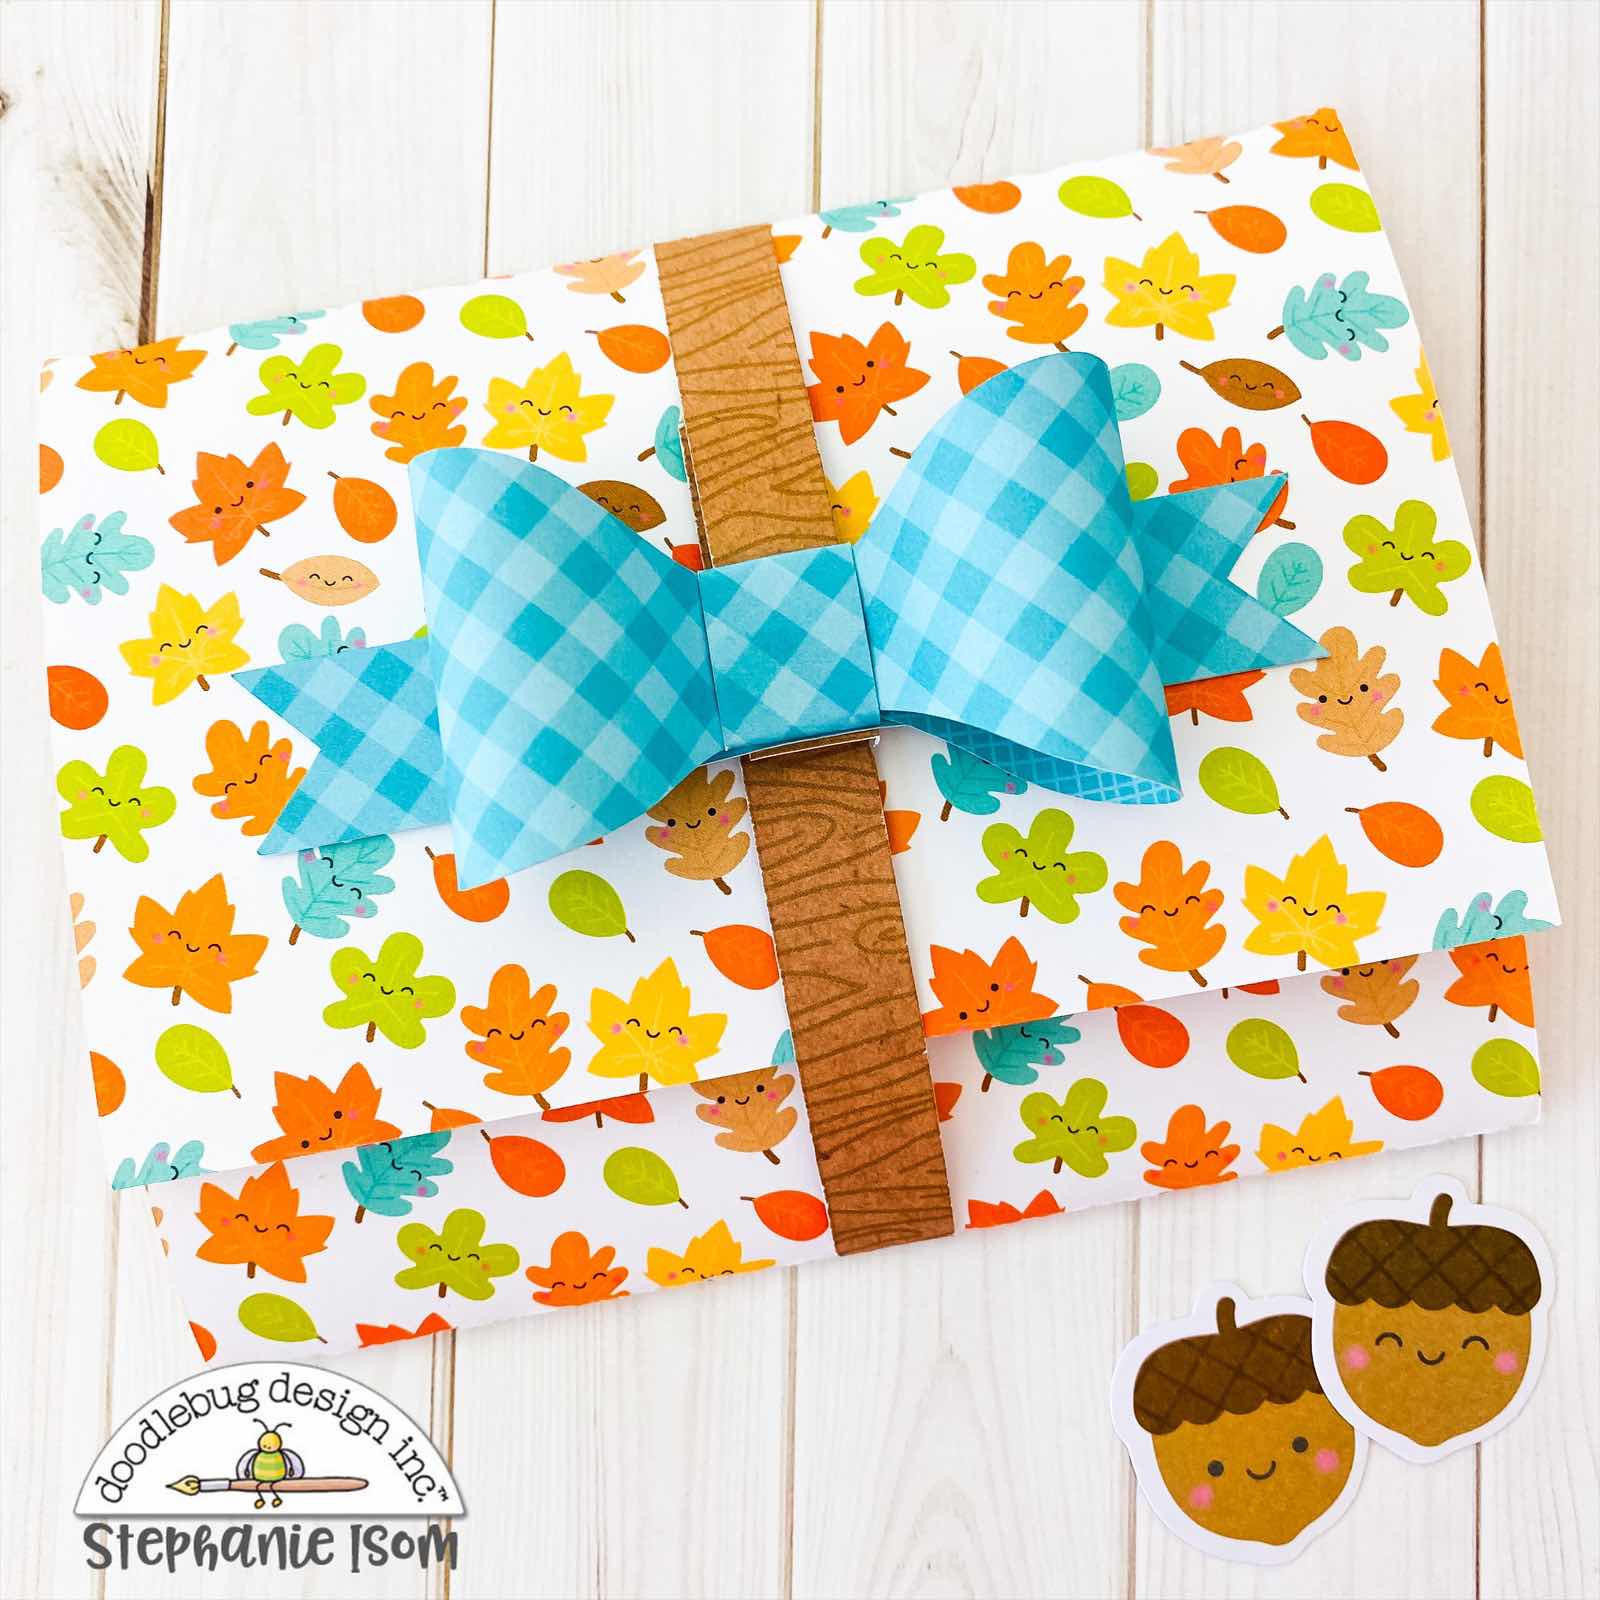
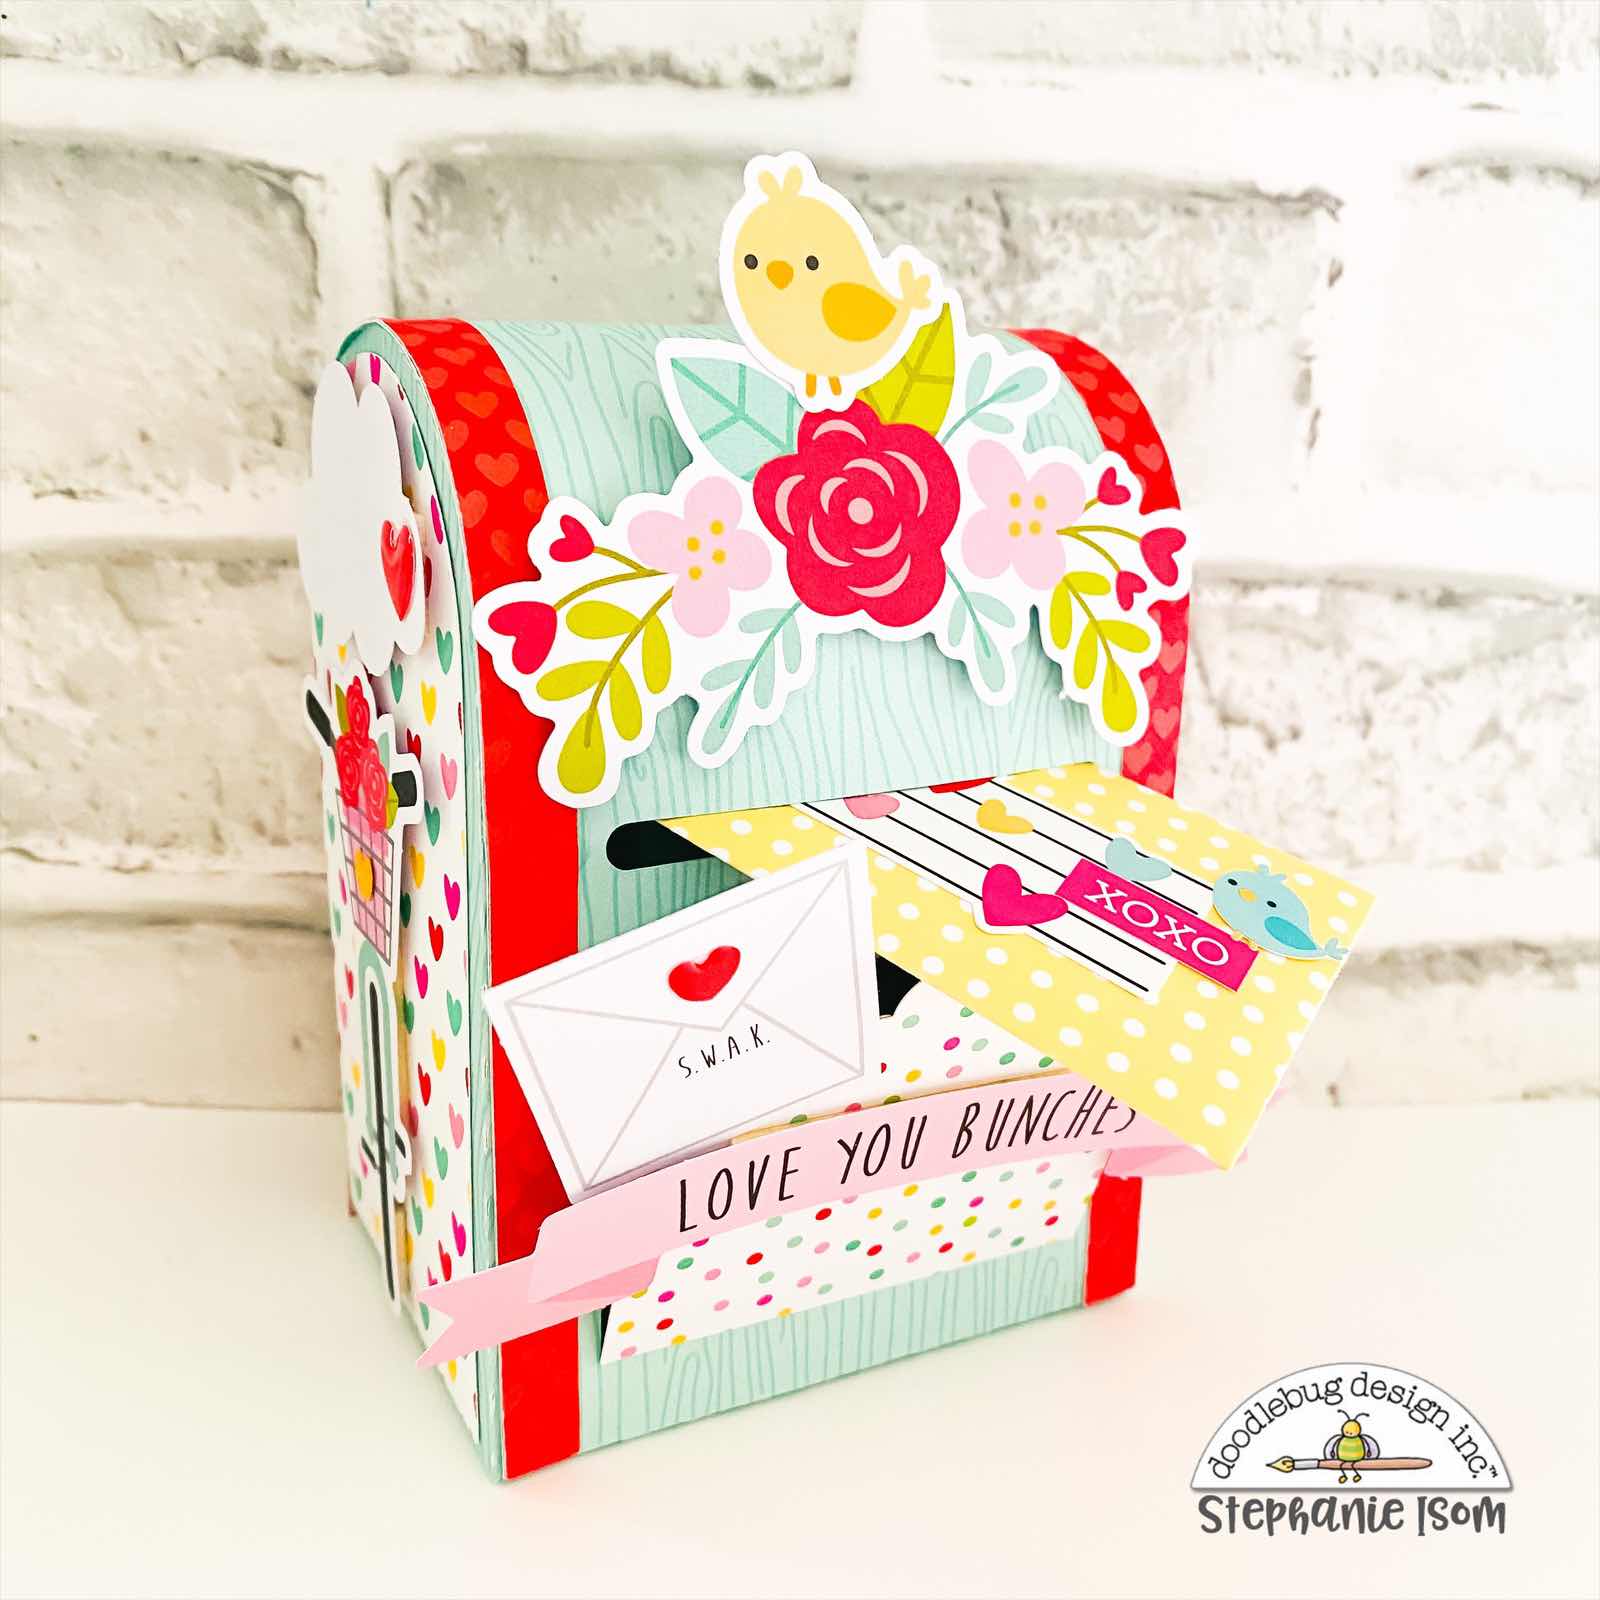
Hello Doodlebug friends! Stephanie here, sharing two little Valentine Mailboxes featuring lots of lovely Doodlebug colors, textures and images! It’s been a few years since my kids have made Valentines for classmates and friends, but I still love creating projects for this fun holiday! Here’s a look at my project for today.   

 
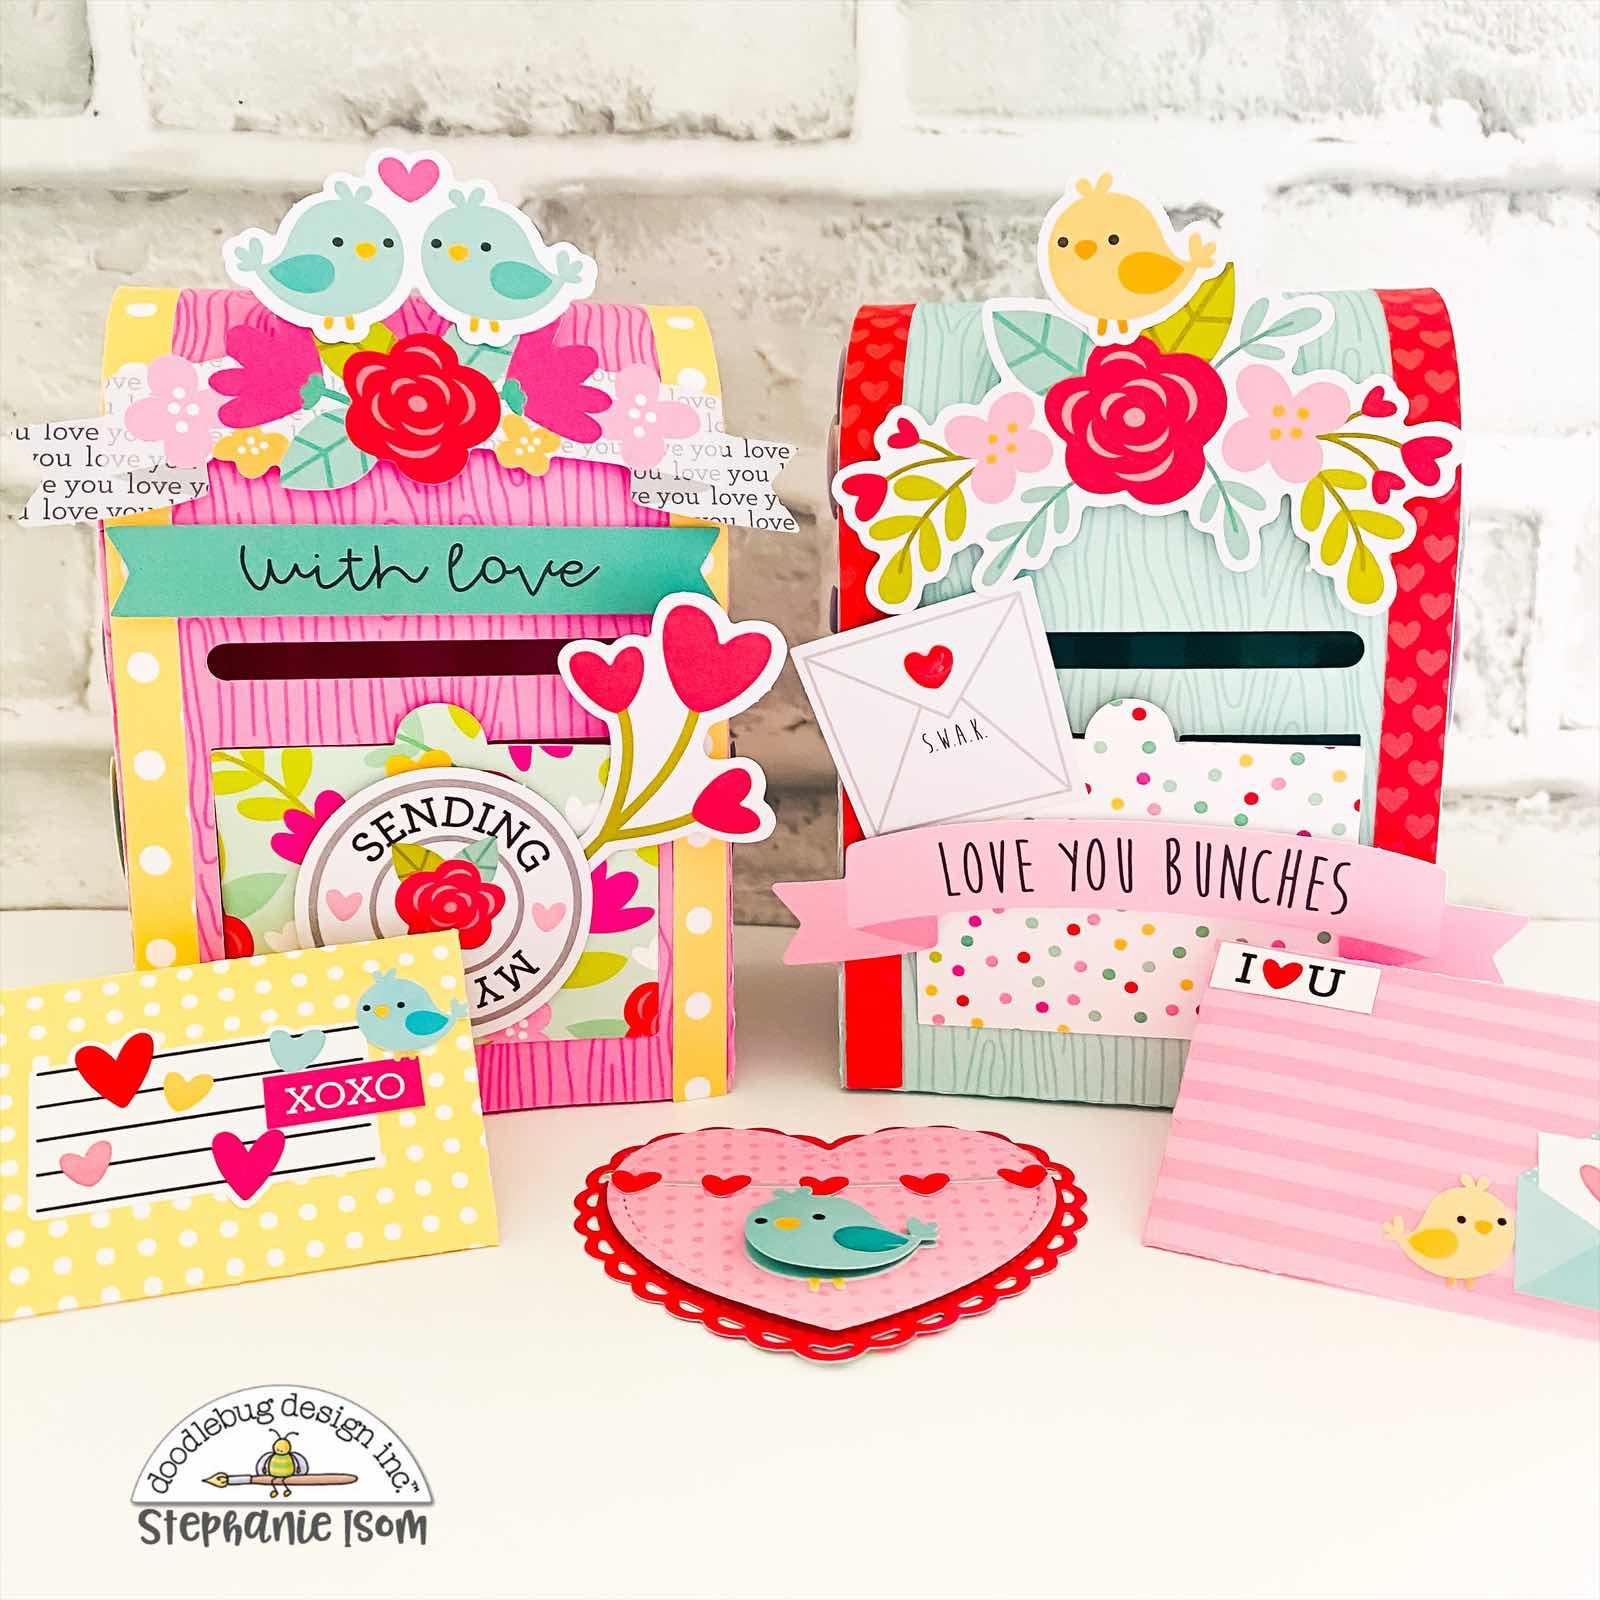
I used my Silhouette machine to cut this mailbox from Lori Whitlock.  For the main part of the boxes I used Wood Grain/Buffalo Check petite prints in Pistachio and Bubblegum. The accent colors and images are all from the Love Notes collection. I added some heart shaped Sprinkles in a few places for a little shine.  
 
 
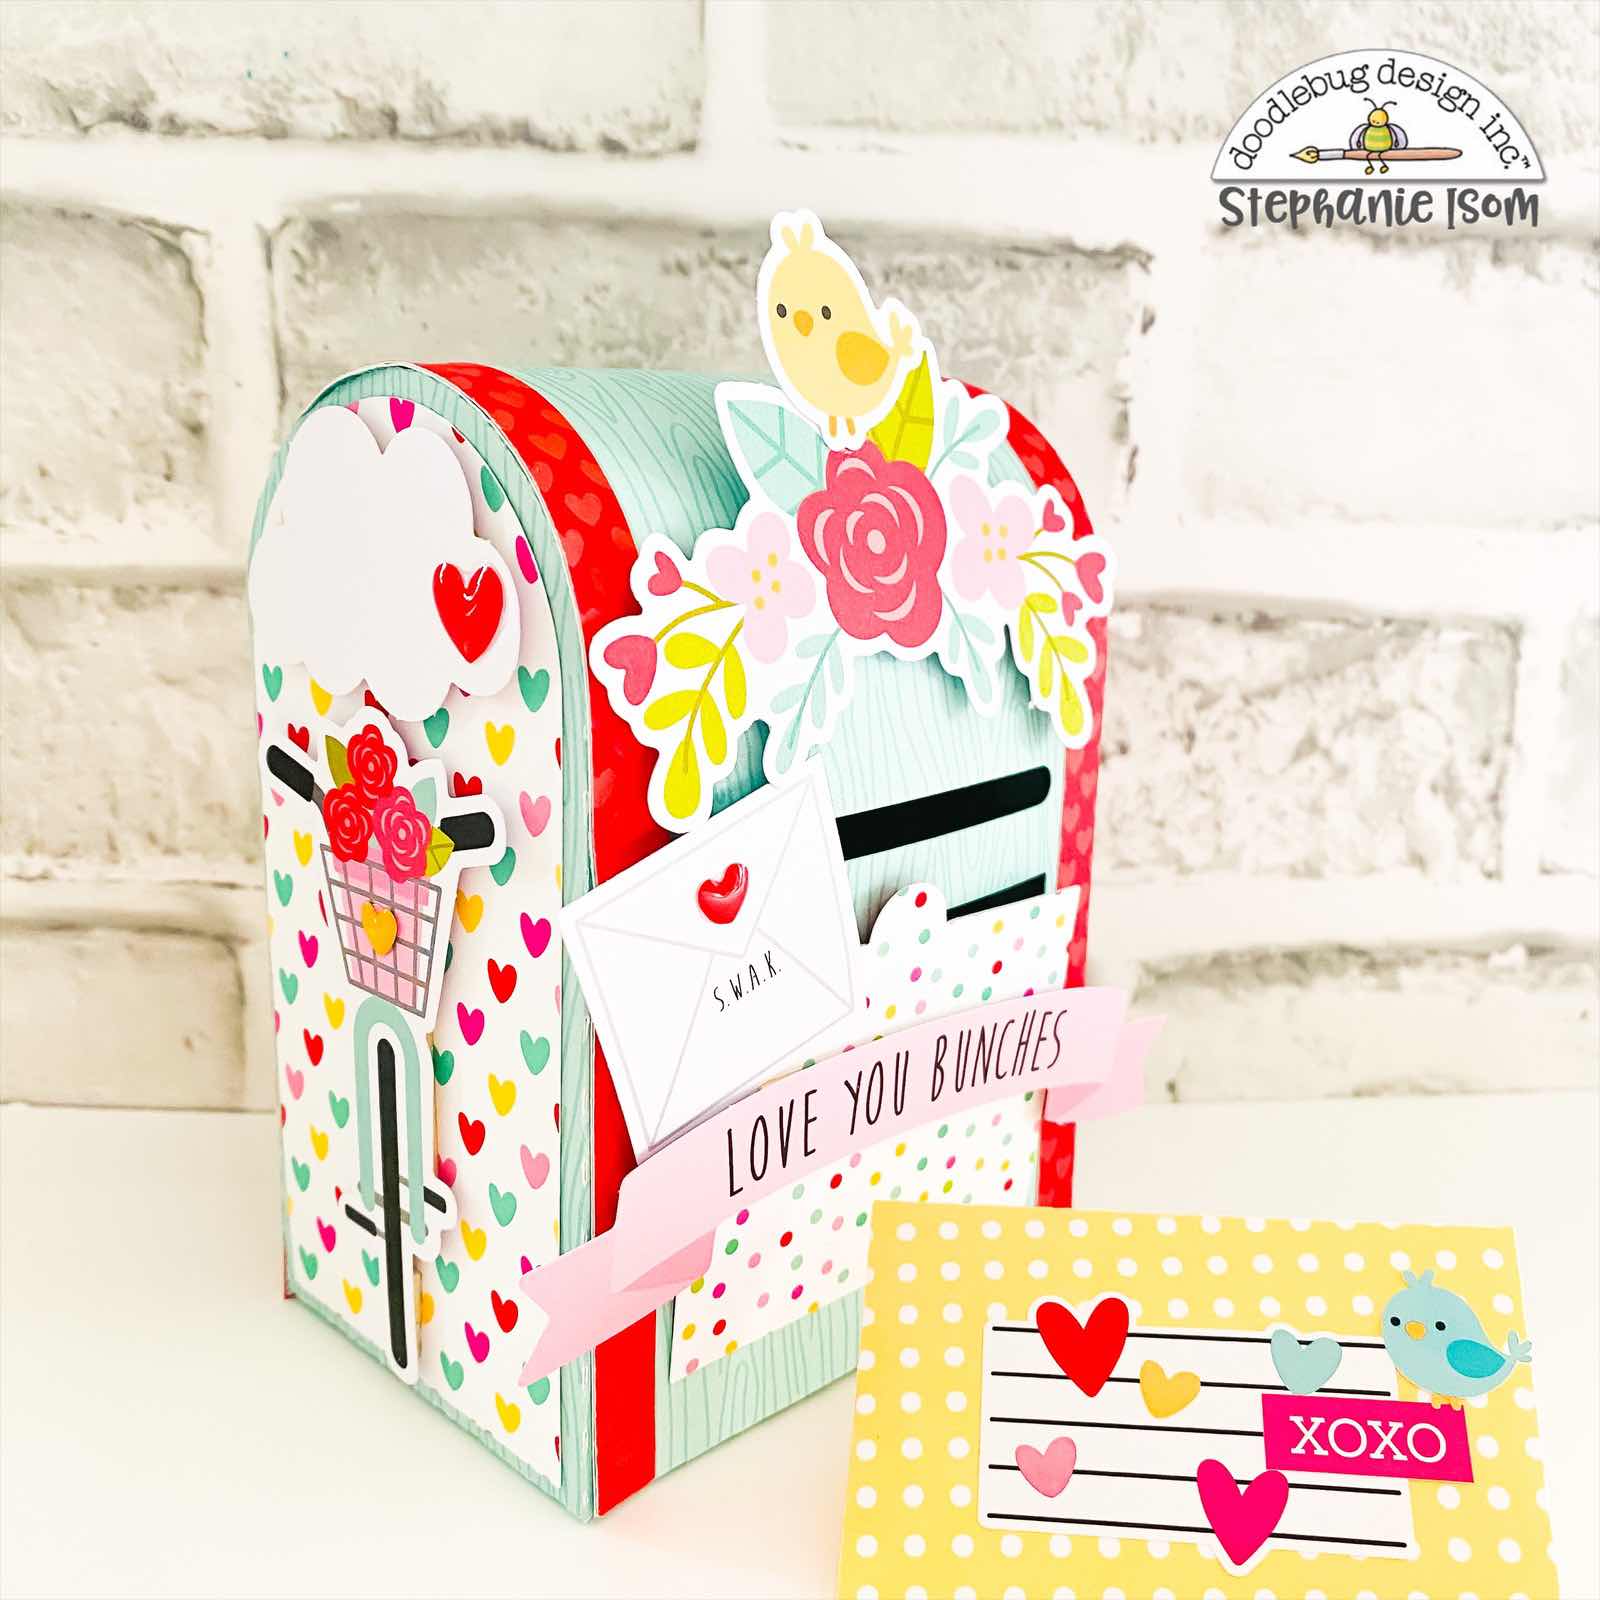
The cut file comes with a tiny envelope that fits into the opening. How cute is that? 
 
 
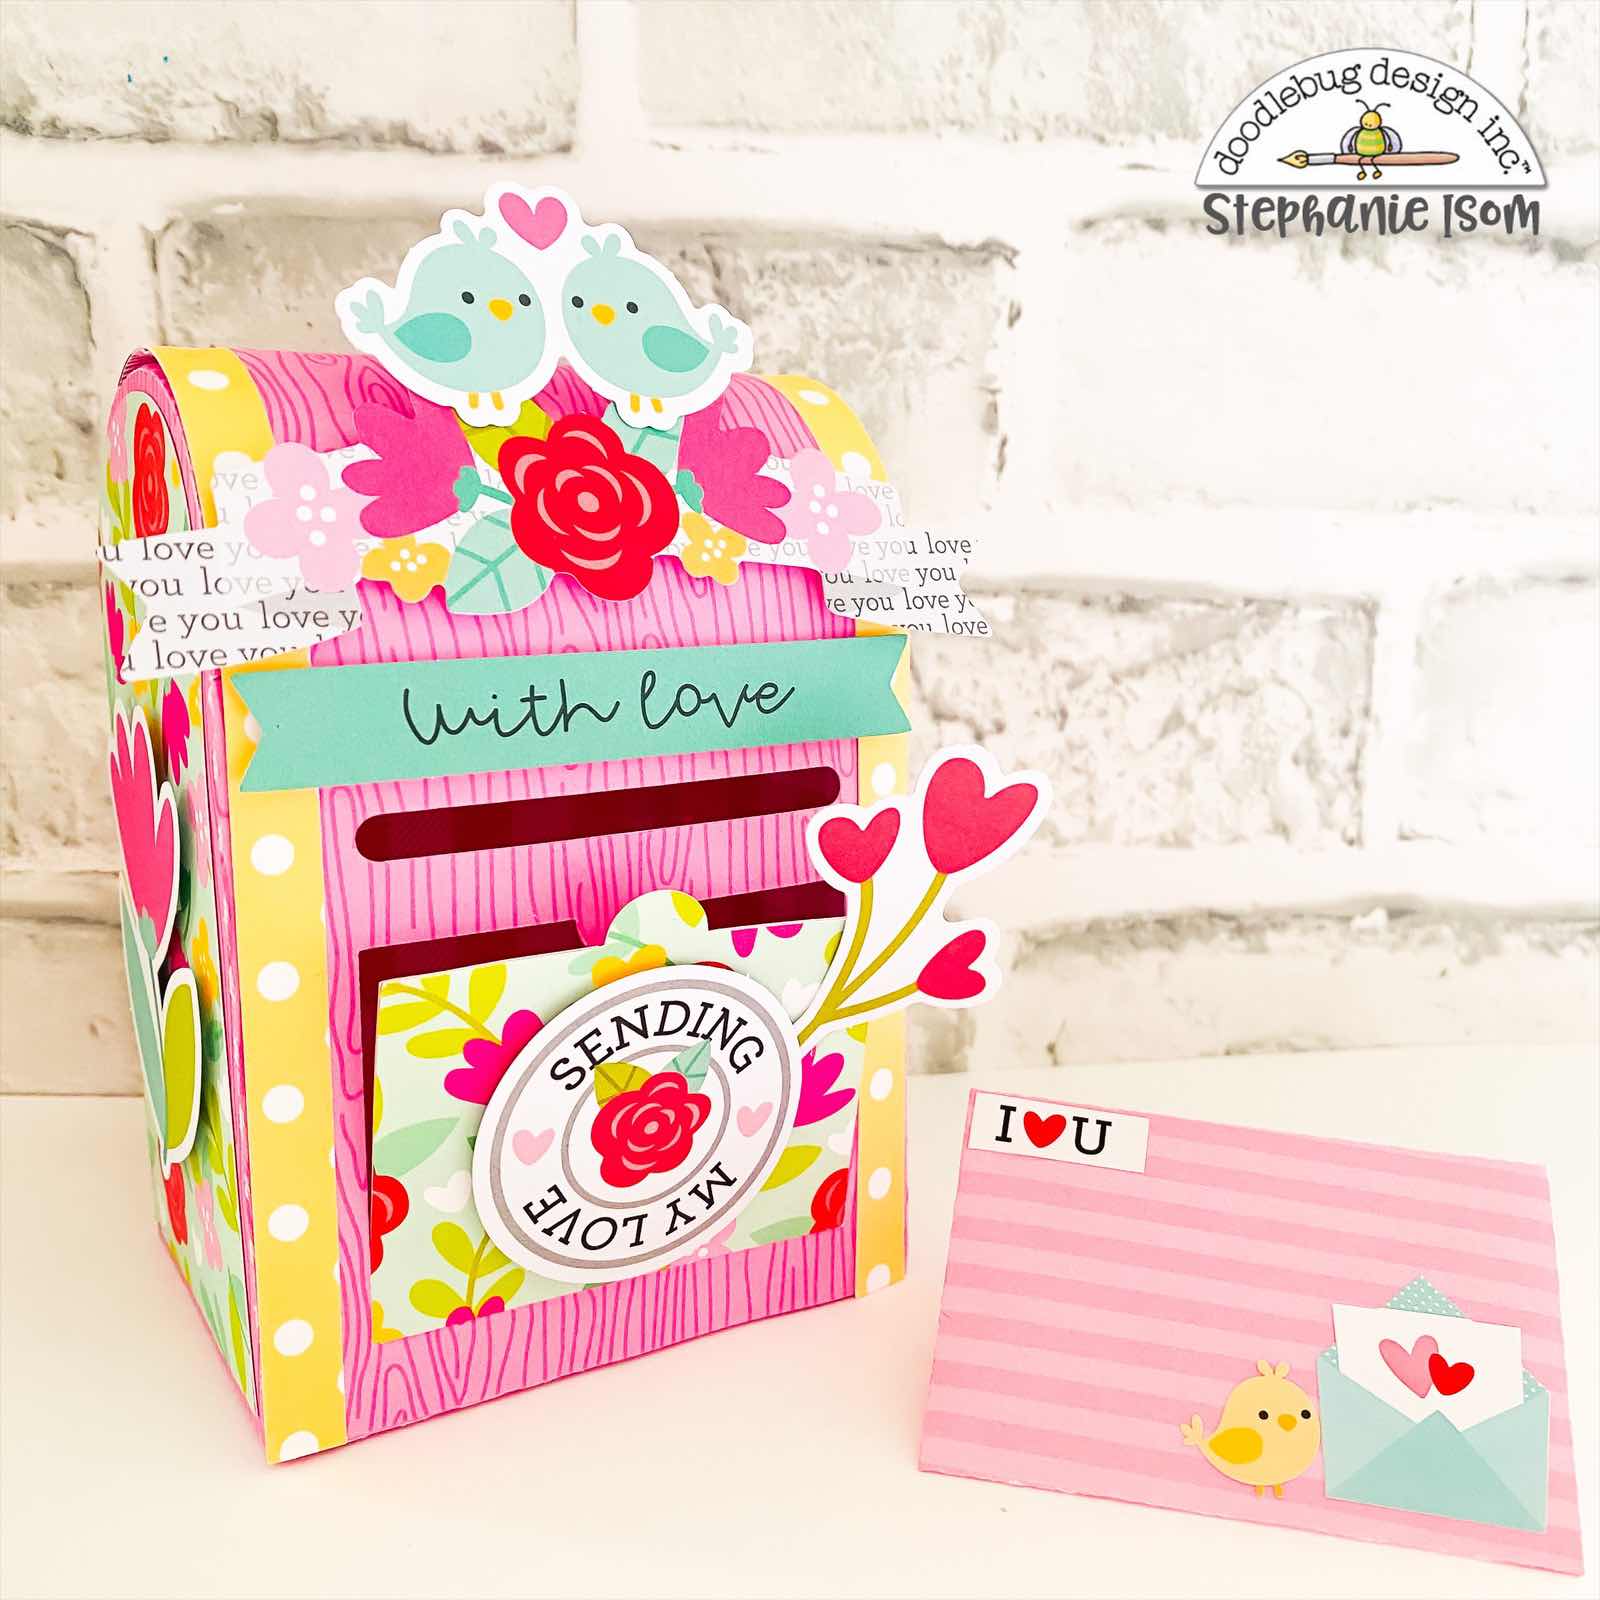
Here’s a look at the second box.  All the images I used to embellish my boxes are die cuts from the Love Notes Chit Chat and Odds and Ends packs.

 
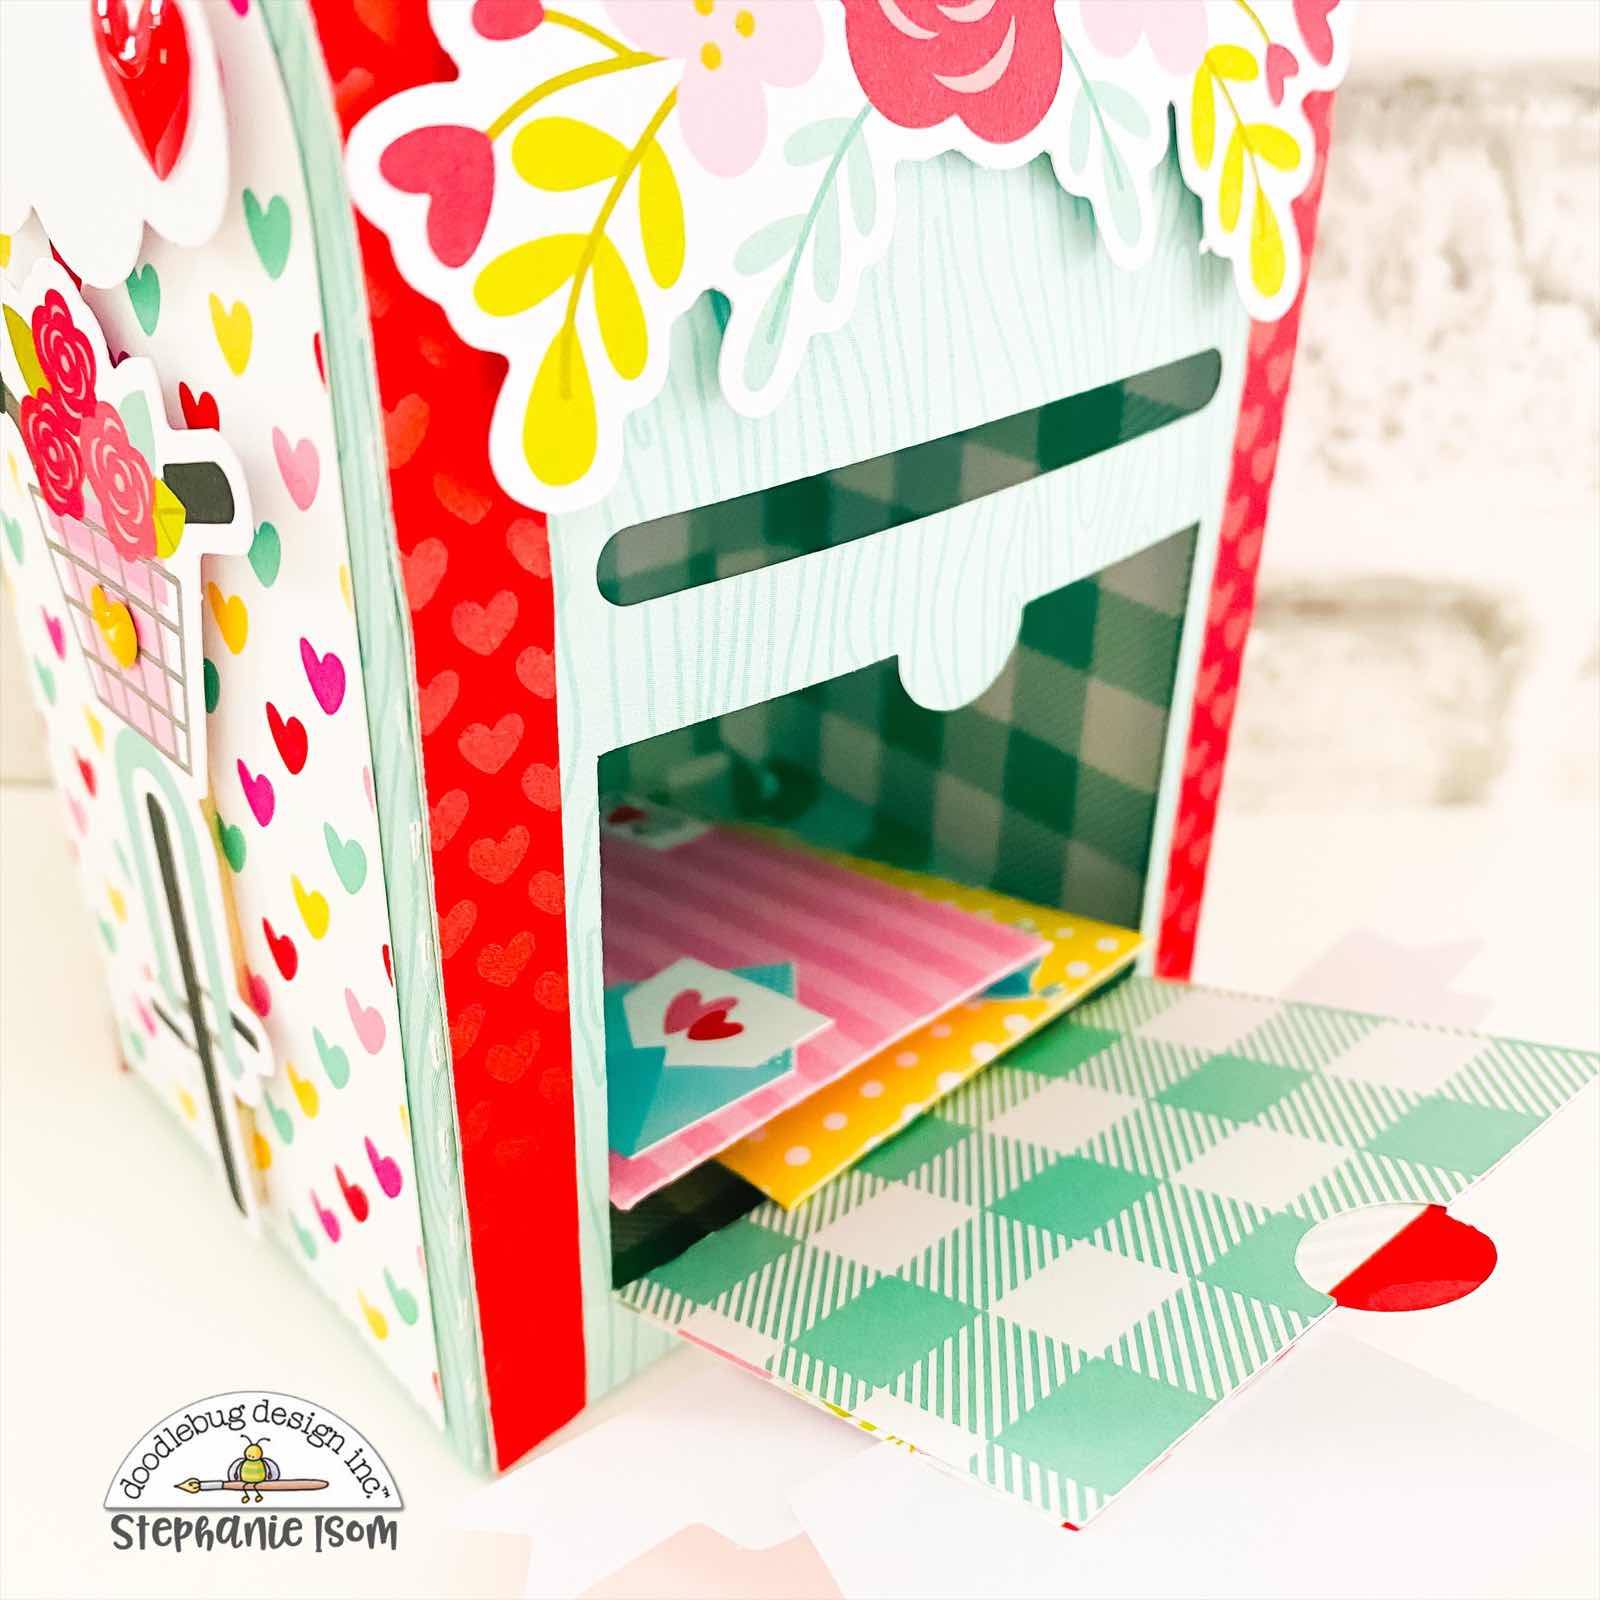
Surprise, the little door opens and you can pull out the notes. 


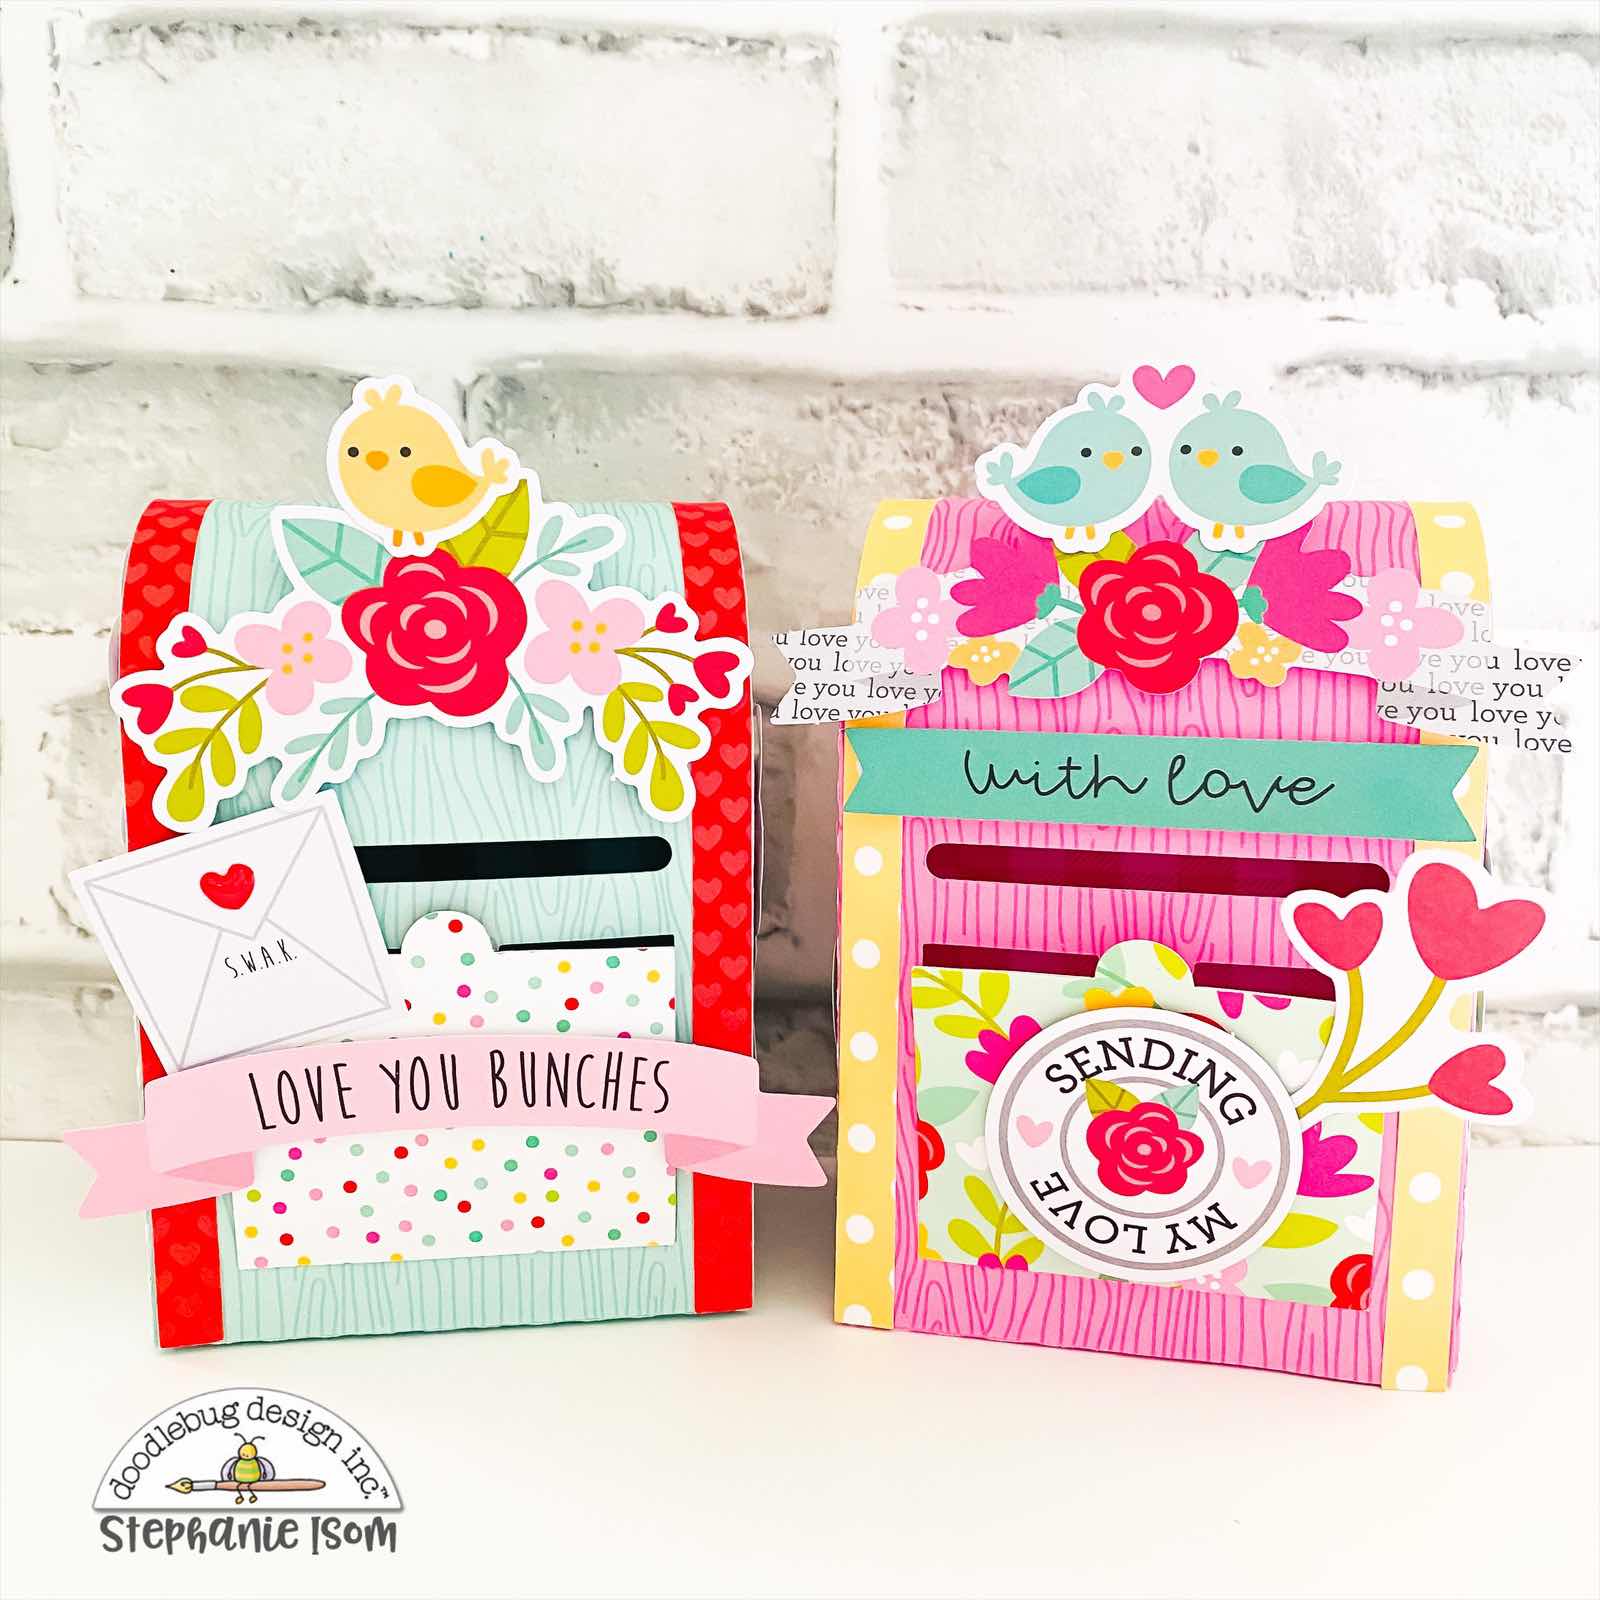
If you are looking for an adorable little box to give or receive some fun Valentine’s, this is it! That’s it for my project share, thanks for stopping by today!


  Doodlebug Products Used:
 
 Petite Prints 12x12 Wood Grain/Buffalo Check Pistachio & Bubblegum
Love Notes Collection 12x12 Paper
Love Notes Chit Chat & Odds and Ends Die Cut Packs
Heart to Heart Shape Sprinkles
 
  Other Products Used: 
 Silhouette Machine
 Liquid Glue and Double Sided Adhesive
 

Wednesday, January 13, 2021

PETITE PRINTS EXPLOSION BOXES | with Stephanie

Hello friends, Stephanie here today sharing two Winter themed Exploding Box cards I made using a few Doodlebug basics.  I used this cut file and my Silhouette machine as well as some Petite Prints and pattern papers to cut the boxes. I used Sunshine Alphabet stickers to create the greetings inside.   


Here is an up close look at the boxes before opening them and revealing what’s inside.  
 
 
For the first box I went with a Birthday theme. I cut a framed scallop circle using Doodlebug’s largest nesting scallop die and a sentiment from the Winter Wonderland Forest Friends stamp set with the cutest Moose (named Bruce) Doodle Pop sticker for the top.  

 
When you remove the lid from the top, the box “explodes” open revealing a Birthday greeting. The digital cut file has four layers to it (plus the lid), so you could go all out decorating each one, but I kept my layers fairly simple. For my first, bottom layer I used a pretty floral pattern from the Winter Wonderland collection with subsequent layers using coordinating petite prints. I wanted my Happy, Happy Birthday message to be part of the main focal point and I used white and pink Sunshine Alphabet stickers for that.   
 
 
Open the tiny blue envelope in the middle to reveal the cute images and final message inside.  

 
The second box features the cutest yeti and 'Sending Love Your Way' and 'Love You Big Time' messages.  


I think these exploding boxes turned out really cute. My daughter suggested putting little treats inside which would be fun too.  Open the box to reveal treats AND happy little greetings. Well, that does it for my project share. As always, thanks for stopping by and happy crafting! 


  Doodlebug Products Used:
Winter Wonderland 12x12 Pattern Paper & Icon Sticker Sheet
 Doodle Pop Stickers
Winter Wonderland Shape Sprinkles
Petite Prints Buffalo Check, Dot & Stripe, Floral & Graph, Swiss Dot
Sunshine Alphabet Stickers Lily White, Cupcake, Blue Jean
All Occasion Nesting Scallop Dies
Forest Friends, Love You & Happy Birthday Stamp Sets
  
  Other Products Used: 
 Silhouette Machine
Liquid Adhesive & Foam Squares

Wednesday, December 30, 2020

NIGHT BEFORE CHRISTMAS STAMPED CARDS & TAG | with Stephanie

Hello friends, it’s still December so I’m still Christmas crafting! Today I thought I would practice my coloring on some cute Doodlebug stamped images from Night Before Christmas.  I created two simple cards and a tag pictured below.   

 
For each card I started with a kraft cardstock base cut to regular A2 size.  I wanted some of the kraft color to be visible so I layered two pieces of pattern paper together so there was about a quarter inch of kraft showing on the top and bottom of the card.  The red dot layer was cut to a height of 3 1/2 and width of 5 1/2 inches. The red and white striped layer is 2 1/4 by 5 1/2 inches. The thin strip in the middle is a border cut out piece from the 6x6 paper pad. I die cut a scalloped stitched rectangle for my scene and blended some blue distress inks onto white cardstock for the background. I used a white shimmer spray on my ink background, though it’s hard to see the shimmer in the photo.  I popped the scene layer and my images up on foam squares. I colored my santa and reindeer images with copic markers and then die cut them with the coordinating Doodle Cuts. I added glitter to the trim and pom of Santa's hat. I die cut a small white banner and stamped the Happy Holidays sentiment and adhered it above the scene. 


For the tag, I die cut a scalloped stitched circle tag out of white cardstock and ink blended the same blue distress inks for the background.  I cut a small strip of white glitter cardstock to create snow at the bottom of the scene. I colored and cut out a Christmas tree and two presents and adhered those with foam squares. I added glitter to my ornaments. I die cut and stamped my banner sentiment and tied it to the tag with ladybug doodle twine.  
 
 
The second card is the same style and pattern as the first with a gingerbread theme. These images are from the Visions of Sugarplums set.  Such a cute little gingerbread house! For this scene I added chunky glitter to the chimney, rooftop and steps for a snowy feel and some glossy accents to the windows and some of the candy on the house.  


That does it for my project today. The stamped images are all a great size to create small scenes especially for someone (like me) who is a little intimidated by all the amazing coloring artists out there. It was fun watching these adorable images come to life using my markers. Thanks for stopping by today! 


  Doodlebug Products Used:
Night Before Christmas Collection
 6x6 Paper Pack
Glitter Shape Sprinkles
Night Before Christmas & Visions of Sugarplums Stamps and Doodle Cuts
  
  Other Products Used: 
White and Kraft Cardstock
White and Chunky Glitter
Glossy Accents & White Shimmer Mist
Copic Markers
Liquid Adhesive & Foam Squares 
Scallop Stitched Rectangle and Circle Tag Dies
 

Thursday, December 10, 2020

NIGHT BEFORE CHRISTMAS DECEMBER MEMORYDEX CARDS | with Stephanie

Hello friends, today I'm sharing some Memorydex cards using a whole lot of Doodlebug Night Before Christmas cuteness! I'm pretty new to the Memorydex system (even though it's been around a while). I thought Doodlebug and December would be the perfect place to start. I'm always up for playing around with new ways to make something fun with pretty paper, stickers, die cuts etc.  I usually do a December memories album, but this might just take the place of that project this year.   


Here's a look at the nine cards I have created so far.  I plan to use the cards to write down short memories and attach 2x3 photos to the back of the cards.  


I cut each card base with different shaped memorydex card dies and several pattern papers. The fun part is all the lovely layering!  
 
 
I used Shaped Sprinkles, Mini Jewels, Doodle Pops, Icon Stickers, Odds and Ends and Chit Chat die cuts as well as sentiments from the This & That sticker sheet. I got a lot of practice with paper piecing and layering lots of elements together. The more dimension the better! 

 
Each card gives me a prompt for memories I want to capture on the back, for example one of our family traditions is wearing new PJ's on Christmas Eve. And even though my kids are older, we still leave cookies and milk out for Santa.  


Ok, I think I'm hooked onto the Memorydex concept!  What a fun way to document stories, hold photos, write quick memories, store Holiday recipes and display the wonderful art of papercrafting!  Thanks for joining me today.  Happy crafting, friends! 


 Doodlebug Products Used:
Night Before Christmas Collection
12x12 & 6x6 Paper Pack
Doodle Pops
Odds and Ends & Chit Chat Die Cuts
This and That Sticker Sheet  & Icon Stickers
Shape Sprinkles 
Mini Jewels 
  
 Other Products Used: 
Memorydex Holder & Dies
Foam & Liquid Adhesive

Wednesday, December 2, 2020

NIGHT BEFORE CHRISTMAS CARDS AND TREAT BOXES | with Stephanie

Hello Doodlebug friends, Stephanie here today to share a little Christmas cheer using the new Night Before Christmas Collection! One of the things I love about Doodlebug is their use of beautiful, vibrant colors in each collection. Hello bright reds, greens, blues and pinks! Here’s a look at 3 treat boxes and mini cards I created using lots of new goodies from Night Before Christmas!  

 
To get into the festive, creative spirit, I turned on some classic Christmas music, cleared my crafty space of anything not Holiday related, and started sorting out the products I wanted to make sure I used. Below are the main elements for my project today.

 
As a side note, I had the mini milk carton boxes in my stash from a few years ago, but I found some on Amazon in case you are looking to recreate something similar.  For the front panel of the boxes and card layers I used several 6x6 pattern papers. I also cut small banner shapes for the boxes from the 6x6 pad.  
 

I used Icon Cardstock stickers popped up on foam squares for the front of each box. The various sentiments came from the Odds and Ends Chit Chat pack and This and That Sticker Sheet.  
 
 
The mini cards are 3x3 made out of white card stock.  I chose I Love Santa, Tinsel Time, and Stocking Stuffer Doodle Pops for the focal point. Probably like many of you, I stash and hoard my Doodle Pop and Shape Sprinkle stickers, but occasionally I will use and share them. :)  My goodness the jolly old santas couldn’t be cuter!  
 
 
I had a few small binder clips in my stash that I used to attach the banners to the top of the boxes and keep them closed. 


And that is all there is to it! One of the best parts of the Holiday season is the crafting right!? Cards and gifts, tags and treats are all the more meaningful when they are handmade…at least I think so anyway! Thanks for stopping by today!


  Doodlebug Products Used:
Night Before Christmas Collection
6x6 Paper Pad
Doodle Pops: I Love Santa, Tinsel Time, Stocking Stuffer
Odds and Ends & Chit Chat Die Cuts
Icon Stickers
Shape Sprinkles: Here Comes Santa Claus, Christmas Wishes, Christmas Assortment
Doodle Twine Ladybug
  
  Other Products Used: 
Mini Milk Carton Boxes
Adhesive Foam Square
Binder Clips

Wednesday, November 18, 2020

PUMPKIN SPICE LIFT THE FLAP CARDS | with Stephanie

Hello friends, Stephanie here to share 3 interactive cards using some of my favorite Doodlebug elements, Doodle Pops!  And I’m sure you would agree, the Pumpkin Spice collection has some of the cutest Doodle pops!  

 
Each card has an A2, top folding card base. Then I layered each card base with a petite print at the bottom, a 6x6 pattern print for the flap layer, (that I die cut) and then one more rectangle layer to frame each Doodle Pop sticker. My sentiment is a Chit Chat die cut.  
 
 
Under the flap I adhered matching Odds and Ends die cuts and one more Chit Chat sentiment.  

 
And when you open the card, there’s one more surprise. I don’t always add sentiments and images to the inside of my cards, but I did on these ones!  I used some of Doodlebug’s All Occasion sentiment stamps and Pumpkin Spice icon stickers.   

 
The next 2 cards are variations to the same pattern.  More happy faces and fun greetings.  


Do you have a favorite?  I think mine is the first one, the cup of hot cocoa with a slice of pumpkin pie.  Maybe I’m just anxious for Thanksgiving! I hope this gives you some inspiration to make some interactive cards too.  Don’t forget to share your projects with us. Thanks for stopping by! 


 Doodlebug Products Used:
Pumpkin Spice Collection
Doodle Pop Beary Cute, Pumpkin Spice & Sunflowers
Odds and Ends & Chit Chat Die Cuts
Petite Prints 12x12 Paper
Icon Stickers
Doodlebug All Occasion Stamp Sets 
Shape Sprinkles
  
 Other Products Used: 
Lift the Flap Metal Die
Double sided Adhesive

Wednesday, November 4, 2020

PUMPKIN SPICE MINI ALBUM | with Stephanie

Hello again Doodlebug friends! I’m happy to be back today to share a fun Envelope Mini Album using the Fall-themed Pumpkin Spice Collection.  In October, I took a day trip to see some Autumn splendor in the mountains, and of course, after taking lots of pictures, I wanted to document it.  I love mini albums, but I need it to be easy and something I can do in one or two sittings, or I don’t finish them. So when I found   this one  by Paige Evans in the Silhouette store, I knew it would be perfect. This first photo shows how the album can be displayed, folded and tucked up in a nice, neat little bow.   

 
When you open the “envelope” you reveal all of your photos and die cuts and fun embellishments inside. If you are like me and could use a little ‘how-to' help, Paige Evans posted a great tutorial on her blog  here, including her process video for the album she created. 
 
 
Here is a look at the unfolded album. I found this project to be very doable in one sitting, and most of the pieces are in the cut file. I need all the help I can get when it comes to measuring and cutting things. The digital cutter cuts all the main pieces, and what is left is the fun part - deciding where you want your photos, stickers, and die cuts to go. 

 
My photos are 2x3 size that I printed on a little Canon Ivy photo printer.  I put my photos on the two side and bottom panels.  The panel on the right has a lift the flap element under the leaf revealing two photos.  I trimmed down the bottom right photo since that space was a small square.  

 
The rest of my photos I tucked into the center envelope pocket with a journaling card. Below is a look at what I put inside the envelope.

 
The little pocket on the left side is holding a stack of 3 photos with a mini paper clip.

 
I thought it might be helpful to show the basic look of the album before I added my photos.  You can see I used several patterns from the 12 x12 paper pack as well as a couple pieces of the new Buffalo Check papers.  I used two Chit Chat die cuts for my title and a few Odds and Ends to decorate.  That long strip on the right, under the album is what you wrap around to hold it all together.  I put a small velcro circle on the underside of the bow as well as where the bow meets that long strip of brown paper so I can open and close the album easily.  


If you are looking for a quick and fun way to document a Fall outing or day with lots of photos I hope you give this mini album a try.  This collection is absolutely perfect for all things Fall. Have fun and happy crafting!   


  Doodlebug Products Used:
Pumpkin Spice Collection
Doodle Pop Beary Cute
Odds and Ends Die Cuts & Chit Chat
Petite Prints Buffalo Check 12x12 Paper
Mini Paper Clips
  
  Other Products Used: 
 Silhouette Cutting Machine
Double Sided Adhesive
Pin It button on image hover