
I have a confession to make - I love making little treat containers. And it's not just because I have an excuse to snack on some chocolate as I craft (because really, do I need an excuse?!) but also because they are a simple little craft that goes a long way to showing someone just how special they are to you, especially when you personalize them with
Abigail letters!

With Easter coming up around then bend, I thought it might be great to make some treat containers that could be used on the dinner table as both a little marker for each guest's spot as well as a little party favor for them to take home (or, well, eat right then and there as I might do...there is no shame in loving chocolate, right?).
These cute little boxes, featuring a "box in box" design and one of my favourite collections -
; Easter Express - pack a little bit of a "wow" punch when you open them up.

And given that Doodlebug collections coordinate so well, if you tend to hoard your patterned papers a bit, you could mix and match with other papers like
Petite Prints or even solid cardstocks!

And can we just talk about these Abigail letters?! They are a perfect addition to these 2"x 2" boxes. In fact, you could even do first and last initials depending on your guests!

I can't wait to have a table full of these cuties (the containers, not the chocolate, although...)
Anyway, just in case you wanted to whip up a few of these for those that you celebrate with, I thought I would put together a step-by-step for you. Measure and cut as precisely as you can so it all comes together well!
OUTER BOX
1. Cut a piece of double sided patterned paper - 6" x 8.5". Place the pattern you would like on the outside of your box facing down (so you are looking and working on the "wrong" side of the pattern).
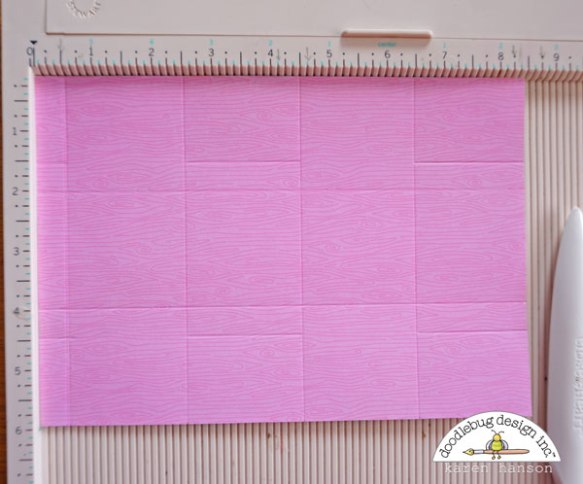
2. With the 8" edge across the top of your scoring board, score at 0.5", 2.5", 4.5" and 6.5".
3. Turn your paper 90 degrees so the 6.5" edge is across the top. Score all the way down the paper at the 2" and 4" marks.
4. Now score at the 1.5" mark, skipping every second section. Repeat at the 4.5" mark. Your paper should look like the one above.

5. With the 8" edge across the top, cut up along the 0.5", 2.5", 4.5" and 6.5" stopping at the score mark that runs all the way across your paper. Turn your paper around 180 degrees and repeat on the other side. The top and bottom edges will now have 4 tabs.

6. Snip off the 3 sections on the top and bottom edges that you created with the interrupted score lines (the ones that did not go all the way across the paper at 1.5" and 4.5"). Your paper will look like the one 7. above.

7.
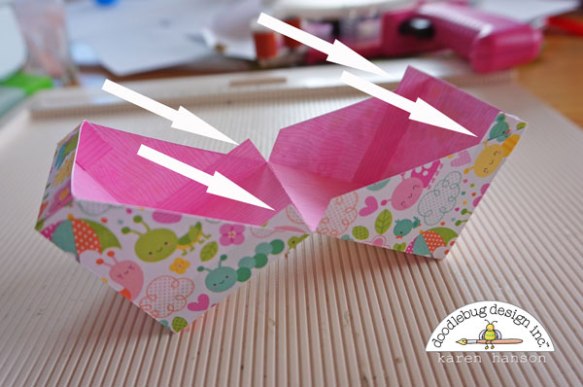
With the smallest section on the left, draw diagonal lines across each of the four sections the extend out on the top and bottom edges. These will form the sides of your box.

8. Snip off these sections that were drawn.

9. Apply your favourite adhesive to each of the 0.5" sections that you have.

10. Starting with the smallest flap, fold it inward, adhering the 0.5" tabs on the inside of the larger diagonal pieces. Take that section and fold it up 90 degrees, adhering these diagonal pieces to the next set of flaps.
11. Repeat this process on the other end of the box (you will have one less flap to work with on this end).
12. Snip off the triangular pieces that stick up with a pair of scissors.

13. You are now finished the outside of the box.
INNER BOX:
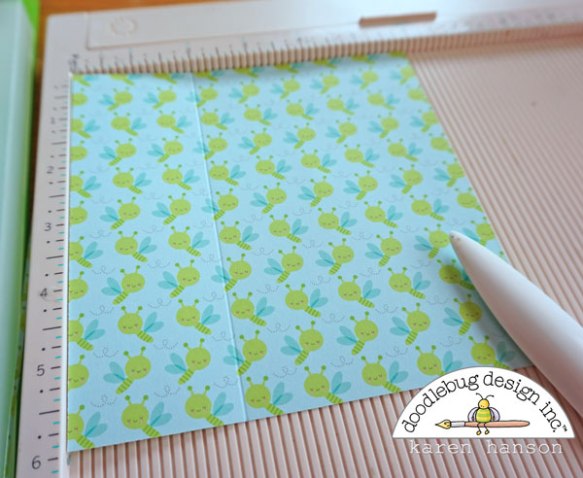
1. Cut a coordinating piece of paper to 5 15/16" x 5 15/16". Place it with the pattern you would like to show on the outside facing down. Score at the 2" mark.

2. Turn the paper 90 degrees and score again at the 2" mark. Repeat on the remaining two sides.

3. Snip up along the score lines stopping at the first score line you come across.

4. On each of the 4 outside tabs, trim off about half of the section and then angle cut each edge. This will remove the bulk of your box as you are folding it.

5. Fold in the tabs that you just cut, and run adhesive along each edge.

6. Fold these adhesive tabs up 90 degree and then pull up the long side to complete your box.

7. Slip the smaller box into the larger one, and you are set to have some fun embellishing, decorating and filling!

So there you have it - a cute little treat box that would be perfect for any dinner table! tell me what you think - would you love these on your table, or would the temptation to empty them before hand be to great?!
Thanks for stopping by! Hugs,
Karen


Such fun little boxes!!! I love the doilies as a backdrop for the Abigail stickers!
ReplyDeleteThanks for the instructions
ReplyDeleteto make these darling boxes!
Too cute.
Carla from
These are ADORABLE Karen! Such a great idea. Thanks for the tutorial. :)
ReplyDelete