Showing posts with label holiday. Show all posts

Thursday, December 7, 2017

Holiday Gifts: Teen Gifts by Anita Bownds

Hi Doodlebug peeps 
Anita here with you today sharing some teen holiday gifts created with the milk and cookies collection . I have 3 daughters who love pink and anything cute...but my oldest daughter mel was a Christmas Eve baby, And is turning 21 ...
So what better way to celebrate with a whole lot of cuteness and give some gifts in some really cute gift packaging. I thought I would start with a banner because who doesn’t love a cute handmade Christmas banner hanging with those cute little gifts.


I started by die cutting out some pendant shapes to add the gold foil letters on
Then I backed them on patterned paper and left a little border around the edges 
I punched a hole on each side at the top to thread the twine trough to hand it up
Then using the holly from the cute cake stand cutfile I added them to each end of the banner 


With the tree cutfile I wanted to make a Little Christmas tree decor 
I cut the tree out 3 times and te same with the little star and folding them in half and adhering them together 
To create a 3d tree then to make the stand I die cut 2 small circles and using a strip  of patterned paper 
I made the strip of paper into a cylinder and adhered the to circles to the top and bottom and add the tree in one end


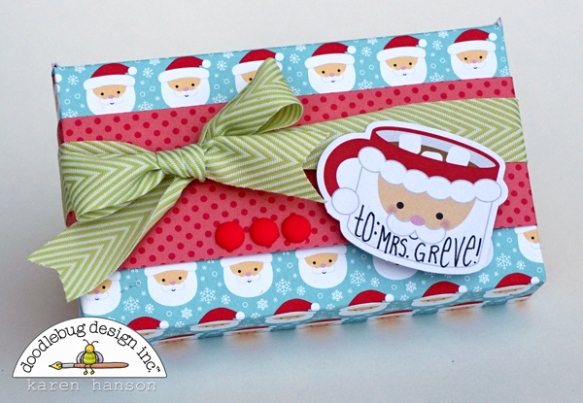
For the gift boxes I used the we are memory keepers 123 punch board to create them
And decorated them with raffer and patterned paper bows also made with the punch board 
And to add a bit more cuteness I added a doily and jewels and to finish them off I needed a few die cut tags ,twine and a cute sticker 


And I thought why stop at boxes when I can add a cute little gif bag using the 123 punch board 
So I add some raffer for the handles some stickers and another cute bow with a jewel in the center and then I created a card using that cute little Christmas tree doodle pop as the center of the card
Layering patterned paper and using a border punch a few doilies and jewels with a popped up sentiment 


Then I decided how cute would it be to add a little tree decor in the mix
Cause maybe one day the will hang it on their tree and remember how fun that Christmas was with family 
So I started with a die cut doily and a strip of patterned paper and using the 123 punch board I scored the paper to fold to create rosette 
Then I adhered it to the diecut doily and added some twine to hand 
Then I added some glitter around the edges of the doily and add a cute little gingerbread man in the center 


Product used
5320: candy canes shape sprinkles
5754: sugarplums shape sprinkles
5762: sweet spruce doodlepops 
5766: milk & cookies odds & ends
5768: milk & cookies mini icons sticker
5776: milk & cookies this & that sticker
5793: jolly gingerbread
5795: holiday cheer 
5797: candy christmas
5798: pastel starlights
5802: milk & cookies 12x12 paper pack
5806: milk & cookies 6x6 paper pad
4451: cupcake doilies
2049: Chunky Sugar Coating Glitter Assortment
3511: lily white jewels 
2987: Doodle Twine - Bubblegum
4815: lily white chunky twine
5822: gold foil abigail CS stickers 
3388: grasshopper textured cardstock 
3370: strawberry textured cardstock


I hope I’ve given you some fun Christmas inspiration..
Thanks for stopping by the blog
Xx

Wednesday, December 6, 2017

Holiday Gifts by Virginia Nebel

December Greetings! Hope you are enjoying all the gift giving inspiration ideas.  Today I'm here on the blog to share with you a cute stocking that I made with some Silhouette cutting files from the Milk & Cookies collection.


In my stocking I have tucked in a little red money envelope called Chinese 'lai see'.  We give out 
these red envelopes during the Holidays, the New Year and other special occasions to wish luck and good fortune. 

Some assembly tips, to make the stocking I cut out two stocking bases and adhered them securely together all along the sides (leaving the top open).  I used a sewing machine to pierce the holes around the cuff. The blue snowflake is also a cutting file from the Milk & Cookies collection and I made a solid red mat under the snowflake by offsetting the snowflake by a 0.100 factor.  Some added details are the enamel dots and a scalloped green border.


Hope you have fun crafting some holiday gift ideas!

Tuesday, December 5, 2017

Holiday Recipe Book by Traci Penrod of ArtsyAlbums.com

Happy Tuesday Doodlebug fans!  It's Traci, back from Artsy Albums, to share my holiday project with you.  I created a little recipe album for my favorite Christmas cookies, cakes, pies, and other yummy sweet treats.
I used a 4x6 binder album by Simple Stories and designed the cover with my favorite paper from the Milk & Cookies collection.  I added some stickers from the This & That sheet, some Chunky twine,  a button, and some cute sprinkle shapes.  I printed the title on my computer ... the font is by Lori Whitlock called LW Cutie Pie.
I love the inside cover.  The 6x6 sheet of brick paper reminds me of a kitchen wall, and the little Odds & Ends furniture piece and kitty are so cute!!
For the inside, I designed some simple tab pages using my Silhouette machine, and covered them with papers from the Milk & Cookies and Petite Print collections.
For the recipe cards, I created a design in my word processing program and left a little space in the lower right corner for some mini icon stickers. I love these little stickers ... two sheets come in a package! This might be one of my favorite details of the project. I hope you are enjoying the design team's holiday projects this year!  I know I've been inspired to make this a very crafty Christmas.  Have fun!

Friday, December 1, 2017

Holiday Gift Idea: CD Desk Calendar by Caroli

Hello there! How are you peeps?! Today I want to share one idea that can make a cute little present for someone you love on this Christmas, a tiny desk calendar.

For making this calendar I recycled a tiny disk case I found in my house, don't know where this came from but it was here and looked cute, so I gave it a chance to shine :)


I cut pieces of white cardstock in the same size as the disk case, and then I decorated them using paper and embellies from Fairy Tales collection, you know, my fave collection on the universe! I'll use it until there is nothing left, LOL!

I decorated each page of the calendar on both sides, thus I optimized the amount of pages. I created a simple cover, printed a calendar from excel and just enjoyed the process.


In the months of birthday of one of the member of my family I used a pic of the birthday girl/boy.


I had a lot of fun using lots of shape sprinkles and doodle pops, they are definitively my favorite kind of embellies from Doodlebug Design.


I only places pages until October because this year I plan to make a special calendar for Christmas Months (november and december).

Here you can see all the pages together, they look ute, don't you think? :)


And if you want to give it an extra detail, you can use some ribbon and put it all together, it looks cute and it makes such a cute gift.


I hope you liked this idea and give it a try, I bet you have some dis cases in your house you can use to create a simple and cute gift for someone this Christmas. Have a lovely day!

Thursday, November 30, 2017

Holiday Gift Card Box by Karen

Hi everyone! It's Karen, and today, I am sharing a little way to personalize one of the most popular/unpopular gifts out there - gift cards! I have to admit that I always feel a bit guilty giving a gift card - almost like I am not being all that thoughtful when I put a gift card under the tree. But the truth is that gift cards can actually be the perfect gift, and with a little Doodlebug paper and goodies, they can be as personalized as gifts can come!
It will probably come as no surprise that the adorable Milk & Cookies was my choice for this holiday project. This collection is way too cute, and given that gift cards from coffee shops often top my list for teacher gifts, it's a perfect fit!
This little pop up box features a cute little slot for the gift card that I wrapped up inside a pretty doilie... ...slightly hidden behind some of the super cute die cuts from the Odds and Ends pack.
Oh, and just in case you are like me and are putting one of these together at the last minute (yes...it's been known to happen more often than not) and you don't have one of Doodlebug's cute doilies, it looks pretty cute without as well! You can even add a little sentiment or a little treat to the bottom section...just remember that this is the spot needed for the die cuts and the gift card to lay flat when the box is closed!
...and a Doodlebug project isn't finished in my house unless I find a spot for a few Sprinkles...and these beautiful matte ones hit the spot!
So there you have it - if you have a loved one that would love to get a gift card this season, here's a little project that you can create so that you will love giving it! Thanks for stopping by!

Hugs, Karen

Wednesday, July 4, 2012

Happy 4th of July

All of us at Doodlebug wanted to take this time to 
wish all of you a Happy Independence Day!

Have a fun

Glitter Graphics | http://www.graphicsgrotto.com/
of July with your 
friends and family!! 

Monday, May 28, 2012

In Honor of Memorial Day


There are only two words that describe the 
meaning of Memorial Day. 
"THANK YOU"


Take a moment with all of us at Doodlebug to remember the real meaning of the holiday and say a prayer for our soldiers (no matter where you live) that are on active duty, far from their families and friends, and also for the countless military families that have sacrificed a loved one.  


With love and appreciation from all of us at 
Doodlebug Design
Pin It button on image hover