Wednesday, May 4, 2016

Planner Love Challenge: Daily Doodles for Mother's Day


Hello Doodlebug Fans!!

Piali here, today I have a Daily Doodles project to share with you all.
In our whom we have lots of reason to celebrate during the month of May & June.
May... my oldest birthday, she turned 15 this year, then Mother's day, and our Anniversary.
June my youngest birthday & Father's day.

Here is our Month of May Celebration calendar...

The Doodlebug clipboards are simply Amazing!
I used them to display my layouts or for calendar pages.

I used Stickers from various Doodlebug collections for this project.
I also used the Sprinkles to embellish.
 Love that Doodlebug makes a wide variety of Alpha stickers and rub ons.
I like mixing different fonts & sizes of alpha for my projects.

Hope you all like this project!

Thanks for stopping by..
Happy Crafting!
Piali.

Tuesday, May 3, 2016

Planner Love Challenge: April Daily Doodle by Mendi

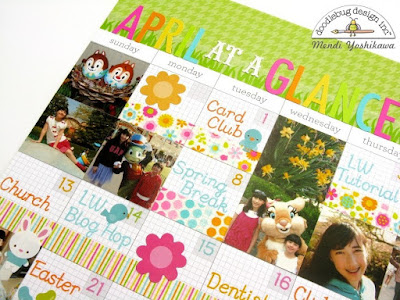
Hello there Doodlebugs!  It's Mendi here today with a calendar page featuring Doodlebug's Daily Doodles and their fun new sweet rolls of icon stickers which are so perfect for planners!
Doodlebug Design Daily Doodles Planner April Calendar Page Layout by Mendi Yoshikawa
To create my title along the top I added a piece of grass washi tape and then alternated colors from my favorite Skinny Cardstock Stickers.  I then continued by alternating rows of different prints of spring washi tape for each week of the month.
Doodlebug Design Daily Doodles Planner April Calendar Page Layout by Mendi Yoshikawa
For my numbers and words I used the Sweet Script stamps by Sunny Studio and alternated them in matching ink colors.   I chose to print (6) 1.75" x 1.75" photos onto 4x6 prints and add them to the days that they were taken on the calendar.  The extra squares in the month, gave me a place to add extras for days when I took several special photos on the same day.
Doodlebug Design Daily Doodles Planner April Calendar Page Layout by Mendi Yoshikawa
As a scrapbooker I actually save all my calendars so I can look back over them to refer to if I ever need to see an important date for a scrapbook layout.  I love how with this idea I can pair photos from the month with important dates so our family can have a cute keepsake to look over at a glance (it's so much prettier than my old marked up calendars).  I hope I've inspired you to take a closer look at the daily doodles and use it as your own version of memory keeping!  :)

Monday, May 2, 2016

Planner Project Challenge by Kimberly Lund

Hi Doodlebug friends! This month's assignment for Doodlebug was a planner project and you know I'm all over that one. I actually keep three planners going (but am woefully behind on my scrappy planner) so creating a planner project isn't difficult. What I did want to do was push myself to go a little outside my box and try using Doodlebug products in my traditional planner, where I usually use products created just for that planner. Here's a little preview of how it looked:

collage

And here's how the week looked:

spread

For my traditional planner, I use inserts I purchased from an Etsy store and they go into my Filofax. I like ring bound planners because I can take out the inserts (for photos, writing ,etc.) and I can also add things to it. It just works for me. I love these particular inserts becasue while there's a lot of room in each day, I've also got that great grid area where I can go crazy decorating or make lists or use it for whatever suits my mood at the time. I used Doodlebug's Under the Sea collection to decorate this spread and love how it turned out.

And the details are here:

detail1

detail2

detail3

detail4

I track dinners, workouts, some tv watching and the weather in my planner. It makes me happy and I think it's going to be so much fun to have these detailed planners for future generations to look through and see what was important to me. Or maybe they'll toss them and think it's silly. They make me happy, and that's what's important.

Hope this inspires you to try a planner project of your own! Kim
Pin It button on image hover