Showing posts with label treat bags. Show all posts

Monday, May 18, 2026

BUTTERFLY KISSES GIFT CARD BAGS | with Kathy

Sometimes I think that spring time is even busier than the holiday season!  With Mother's Day, lots of family birthdays, graduations, end of year activities, it seems like I always need a little gift, and gift cards can be a life saver!  Whenever I give a gift card, I like to package it up in something pretty... so to prepare for this season I created a few gift card bags using the Butterfly Kisses Collection.  Take a peek...


To create the bag shape, I used a goodie bag die from my collection.  I cut them from a few different 12 x 12 papers from the collection.  I then set out to decorate them all using flowers and butterflies from the bits & pieces pack.


For the first bag, I used the bubblegum colored side of the Butterfly Kisses paper for the bag.  In addition to the bits & pieces I also used a butterfly from the bitty bugs shaped sprinkles.  I created a tag using the all occasion large tags doodle cuts and added a puffy word sticker for my sentiment.  I tied it on with some limeade doodle twine.


The base of my second bag was made using the garden gingham as my base.  I added bits & pieces and some flowers from the flower garden shaped sprinkles.  It's tied together with some bubblegum doodle twine.

My last bag was made using the coral side of the mushroom meadows paper.  It's decorated with Bits & pieces and a cute little butterfly from the butterfly kisses shaped sprinkles.  I topped it off with some coral doodle twine.

I love that these bags are a good size to hold a gift card, and a few sweet treats.  They would also make good favor bags for a party!  That's it for me today, thank you for stopping by to peek!


DOODLEBUG PRODUCTS USED

8809 butterfly kisses double-sided cardstock
8817 mushroom meadows double-sided cardstock
8819 garden gingham double-sided cardstock
8772 butterfly kisses shape sprinkles
8773 flower garden shape sprinkles
8774 bitty bugs shape sprinkles
8788 butterfly kisses puffy words stickers
8803 butterfly kisses bits & pieces
6740 large tags doodle cuts
5629 coral doodle twine
2987 bubblegum doodle twine
2990 limeade doodle twine

OTHER

Sizzix Big Shot
Goodie Bag Die
double sided tape
pop dots
adhesive


Tuesday, December 23, 2025

OH WHAT FUN TREAT & GIFT CARD BAGS | with Tya

Hello friends! Happy Holidays! I had so much fun creating these five adorable Christmas treat and gift card bags using the Oh What Fun collection. This collection is bright, cheerful, and full of the sweetest holiday icons, making it absolutely perfect for quick handmade gifts during the busy Christmas season.

Each bag starts with a simple 5x7 colored glassine bag as the base. From there, I dressed each one up with a mix of Petite Prints papers and the border strips from the Christmas Eve patterned paper. I love how those border strips add instant personality and help tie each design together while still keeping everything quick and easy.

In the first photo, you’ll see the full set of five bags together. I chose a different color palette for each one—classic Ladybug, soft Cupcake, sweet Swimming Pool, sunny Bumblebee, and fresh Limeade—so every bag feels unique while still coordinating as a set. To make the pocket, I simply folded about 2 1/2 inches from the bottom of the bag and then cut out some Petite Prints that matched the bag for the base. I added a strip of  Textured Cardstock paper across the front for a cozy, finished look.

Looking closer at the individual bags, you’ll notice how much dimension and charm come from the die cuts. I pulled icons Chit Chat pack, layering them on a scallop paper rosette to create cute focal points. Santa, gingerbread, wreaths, and festive icons really shine against the simple, patterned backgrounds. These little details make the bags feel extra special without adding a lot of time to the process.


Inside each bag, I tucked some small holiday treats along with a gift card. These bags are just the right size to hold a candy cane, a wrapped chocolate, a gift card,  and a yummy Christmas Tree brownie, making them perfect for neighbors, coworkers, teachers, or special friends. It’s such an easy way to turn a simple gift card into something thoughtful and handmade.


Inside the pocket, I added a space for writing a small sentiment for your gift recipient using some Textured Cardstock. For the sentiments, I used the Merry Christmas stamp from the Oh What Fun Doodle Stamps set. I love how clean and classic this sentiment is, and it works beautifully across all five designs. Stamping the greeting at the top of each bag gives them a polished, finished look and ties everything together. A couple of small Oh What Fun Sprinkles were added next to the sentiment for some added shimmer and shine. I added color-coordinating present and heart die cuts from the Odds and Ends to decorate the corner of the card.

What I love most about these treat bags is how quick and easy they are. They come together fast, use minimal supplies, and are easy to customize with different colors or embellishments. When time is short, but you still want to give something heartfelt, projects like these are the perfect solution.

Thank you so much for stopping by today and taking a look at my project. I hope these cute Christmas treat and gift card bags have inspired you to create a few of your own for the special people in your life. Wishing you a very Merry Christmas and a wonderful holiday season! Happy Crafting!


DOODLEBUG PRODUCTS USED

8980 Oh What Fun Odds and Ends
8981 Oh What Fun Chit Chat
8950 Oh What Fun Sprinkles
8975 Oh What Fun Doodle Stamps
8992 Christmas Eve Paper
9001 Oh What Fun Petite Prints
9002 Oh What Fun Textured Cardstock


OTHER PRODUCTS USED

5x7 Colored Glassine Bags
Corner Rounder Punch 
Scalloped Rosette Metal Die
Treats and Gift Card

Thursday, October 9, 2025

SWEET & SPOOKY TREAT CONTAINERS | with Karen

It's the most wonderful time of the year! Nope - not Christmas...it's Halloween. Now, don't get me wrong, I am also a HUGE fan of Christmas, but there is something so fun about crafting at Halloween that it is definitely my favourite crafting season. And with collections like Sweet & Spooky to work with, it's no wonder!

Today I decided to see if I could make some little treat containers with the Sweet & Spooky 6x6 paper. Often when I am making treat containers I use 12x12 paper, but I love the little detailed prints you can find on the 6x6 paper. And given that the treats you can buy this time of year seem to be getting littler and littler, it seemed like it could all be a cute little combination.

Well, what do you think? Cute? Each one of these bags is made out of only one sheet of 6x6 paper and fits two mini treats.

I embellished these with some adorable Doodle-pops and topped them off with a Mini Paperclip and some ribbon from my stash. They were really easy to make too! Want to find out how? It's your lucky day because I took pictures along the way.

Here's how to make them:

  1. If your paper is directional, make sure the pattern is facing up. Score a 6x6 sheet at 2", 2 3/4", 4 3/4" and 5 1/2".
  2. Turn the paper 90 degrees clockwise.
  3. Score at 3/4" and 4 1/2". Turn the paper back to it's original orientation.

4. Take the top edge of the paper and fold it down. This will create the top edge of your bag. Create a wedge cut on the right side on the top tab only.

5. Along the bottom edge, you will see 3 small tabs that have been created by your fold lines. cut up the the 3/4" score line on each tab, creating a wedge cut on each. Completely trim off the one on the right side. The purpose here is just to make the bottom easier to fold together.

6. Use a bone folder to crease all your fold lines.

7. Add some glue to the long tab on the right side. Glue it to the opposite side of the treat bag to form the "cylinder". The little tab at the top that you created in step 4 should not be glued down yet.

8. Working with the little tab now, add some glue to the top of it and tuck it under the longer top edge.

9. Add some glue to the bottom tabs and fold them inwards. Take your bone folder and stick it inside to press down all the tabs.

10. Flip the bag over and pinch in the sides. This will take a bit of effort because there are a few layers of paper here.

Then fill them up and seal them with a Mini Paperclip like the Beetle Black ones I used! I also embellished this one with the cute Hello Sugar Doodle-pop, but there are so many in this collection you can choose from!

Let's see, I teach about 100 students - I wonder if I should make one for each of them?! Oh Halloween - here we come! Thanks for stopping by! Hugs,


BLOG | INSTAGRAM

DOODLEBUG PRODUCTS USED

8261 sweet & spooky 6x6 paper pad
8238 pumpkin pals doodle-pop
8239 october sky doodle-pop
8237 hello sugar doodle-pop
664762 mini paperclips beetle black

OTHER

Adhesive
Ribbon

Thursday, September 25, 2025

FARMHOUSE TREAT BAGS | with Karen

Fall is here! The trees are changing colour, the temperature is cooling down and the pumpkin spice is everywhere! So that means it's time to get some more fall goodies out to the people I love and appreciate. You know what that means - treat containers!

It's probably no secret that one of my favourite things to craft is treat containers. I also loves cards, but there is something about being able to add a few treats to a "thank-you" or a "welcome" that I just love. So these cuties, made from a cut file from Lori Whitlock's store, feature all beauty of the Farmhouse collection.

This Hens and Chicks 12x12 paper is one of my favourites from this collection! I used the Farmhouse 12x12 paper inside the scallop to create a bit more dimension in the design.

If chickens are not your thing (but why wouldn't they be??!!), the Fall Bouquet 12x12 paper is also a beautiful choice for the containers! The bold contrast in colours makes a great statement - perfect for a table setting if you wanted to place one of these for each of your dinner guests.

And then add some layered die cuts from the Odds and Ends pack and top with a few mini jewels! These cuties are all ready to fill.

I think I need to whip up a few more of these for out Thanksgiving table! Who wouldn't want to come to my house with these waiting for them? Thanks for stopping by! Hugs,


BLOG | INSTAGRAM

DOODLEBUG PRODUCTS USED

8650 farmhouse 12x12 patterned paper
8660 hens & chicks 12x12 patterned paper
8653 fall bouquet12x12 patterned paper
8642 farmhouse odds & ends
7851 mini jewels halloween assortment

OTHER

Bag with Circle Scallop - Lori Whitlock
Adhesive
Ribbon

Wednesday, November 27, 2024

FARMHOUSE TREAT BAGS WITH BEE HAPPY TAGS | with Miguel

Making small gifts each season is something I really enjoy and even more so if they are done with beautiful Doodlebug collections. Today I made these little bags filled with pumpkin-flavored sweets to share using the Farmhouse collection and the fun Bee Happy Doodle Cuts!


I decorated each bag with tags I made using the Bee Happy Doodle Cuts.  I filled them with Bumblebee Shaker Balls, and I love the results!


I added some Odds & Ends and Chit Chat to my tags to decorate some more!


I tied my tags with different shades of Doodle Twine, which coordinated perfectly with the colors of the Farmhouse collection.


Thank you! for stopping by here, I say goodbye but not before inviting you to continue creating!

DOODLEBUG PRODUCTS USED

Farmhouse Collection
Bee Happy Doodle Cuts
Doodlebug Shakers
Doodle Twine

Tuesday, October 8, 2024

HEY PUMPKIN MINI TREAT BAGS | with Karen

You know what I love about Halloween? Mini chocolate candy treats! And while the yummy chocolate is definitely a part of the love, it is actually the size I love even more. Because who doesn't love something in miniature?   

Treat-bag-all-three-2

So I decided to use my project this week to create some adorable mini treat bags to fill with miniature goodies! Created with the 12x12 patterned paper simply cut to 7"x6" and scored with a 1" bottom and sides, this little treat bag is as cute as can be!

Closeup-2

And here's the great thing! While the Odds and Ends pack is filled with a variety of adorable of die cut shapes and characters, there are a bunch that are small enough to fit on this treat bags. I picked a few for each bag and just layered them a bit, overhanging the edges to add a bit more interest.

Closeup-1

I then topped each one off with a sentiment for the Chit Chat pack, using some foam adhesive for dimension. I then filled up each one, pinched the sides about 3/4s of the way up and used some ribbon from my stash to tie them up. We wouldn't want any of the treats to escape now, would we?!

Treat-bag-all-three

And that was it! These little containers are going to make a cute addition to a larger treat bag, but could also be used as a place setting or little appreciate gift. They may be mini, but their mini-ness makes them monstrously cute! Thanks for stopping by! Hugs,


BLOG | INSTAGRAM

DOODLEBUG PRODUCTS USED

Hey Pumpkin collection

OTHER

Adhesive
Ribbon

Tuesday, April 4, 2023

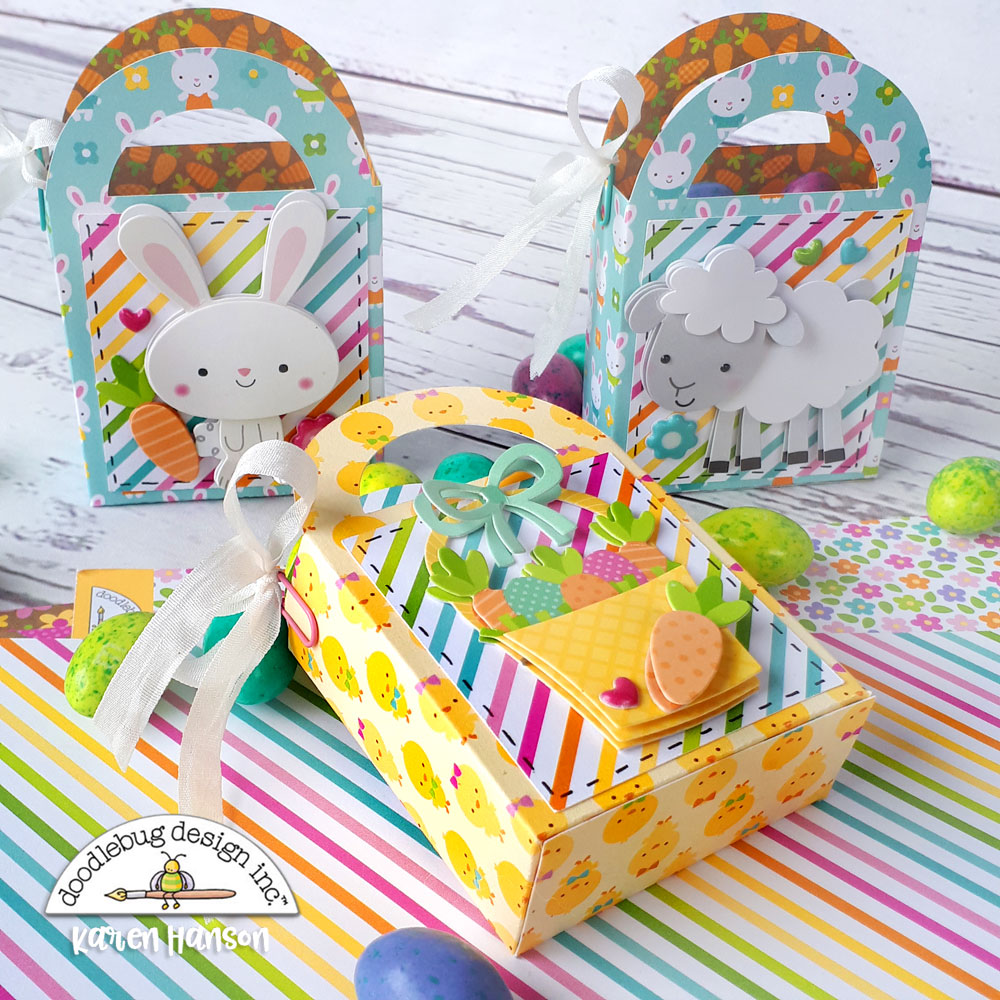
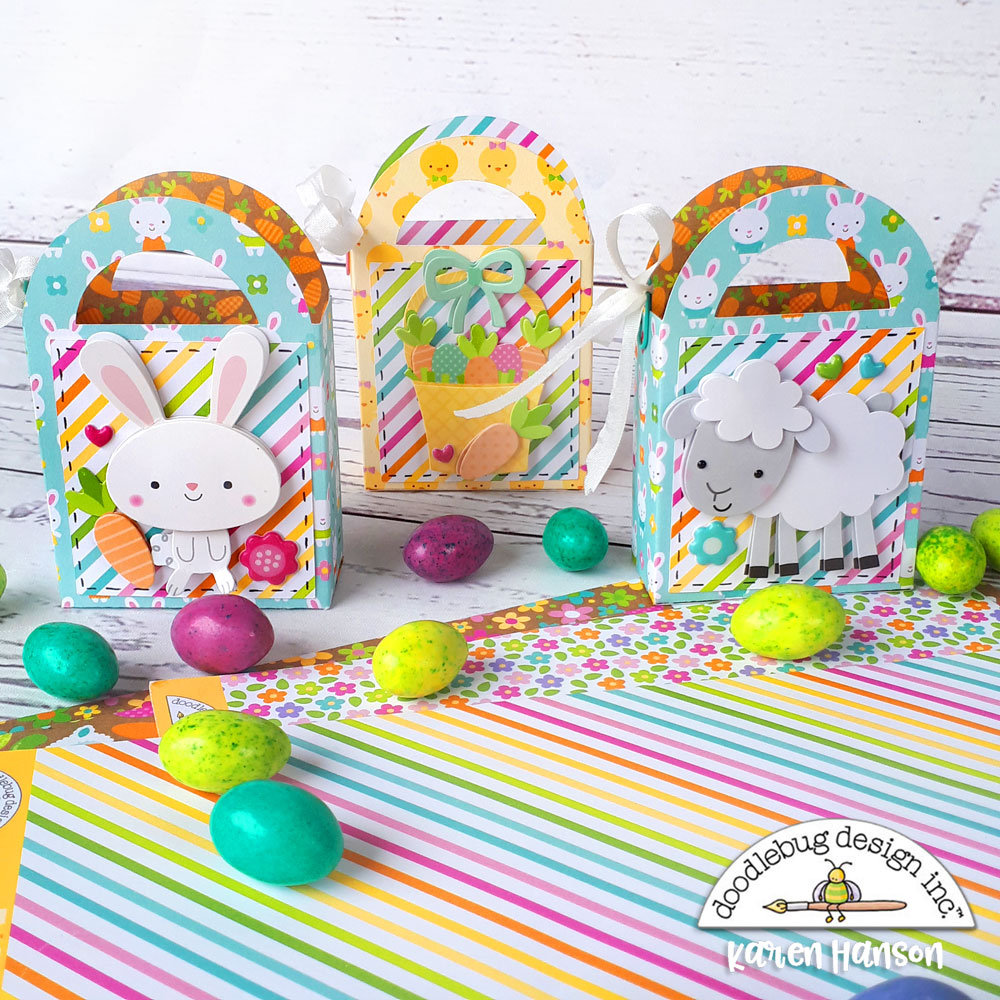
DOODLE POPS & PUFFY STICKERS EASTER TREAT BAGS | with Karen

Given that it is almost Easter, it is almost time for a little bunny to be hopping through my house. So it seems appropriate that I spent some time with the "pops" at my crafty table - you know "hops"..."pops"...okay, I know it was a stretch. But you know what isn't a stretch - that Doodlebug Doodle Pops are really one of the best product out there. They make even the simplest project - well, adorable!

All-3-1

Take for example these simple little treat bags that I created from my crafty stash. I went way back in time to the Easter Parade collection to make some cute containers for chocolate that can sit on my Easter table.

All-3-2

But the real "ace up my sleeve" were the Doodle Pops that I may or may not have been collecting over the last few years!

Closeup-1

Look, don't judge! Doodle Pops are the best. I mean, check out the Easter Basket featured on this treat container. The detail is amazing. I even embellished it a bit more with another small carrot Doodle Pop from Mr. Bunny, and a puffy icon sticker from the Over the Rainbow collection. Yes. that's right - a Doodle Pop on a Doodle Pop!

Closeup-2

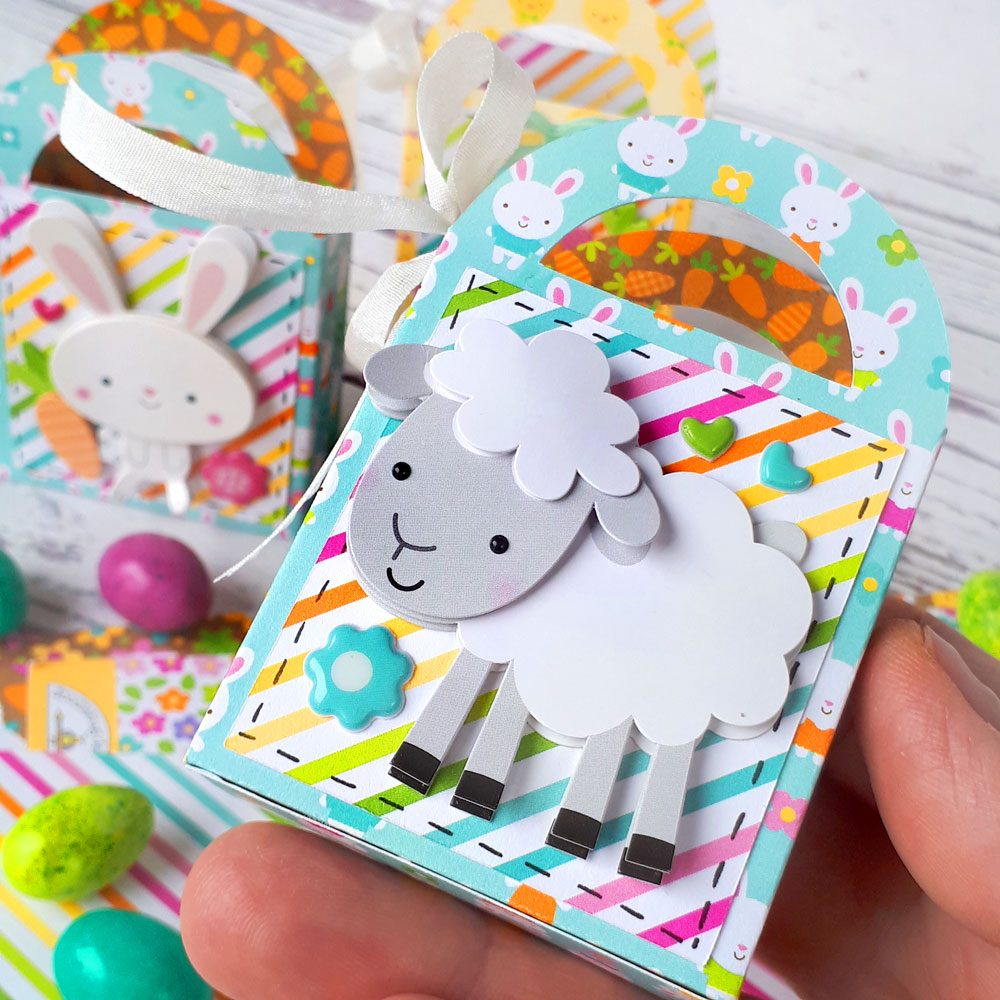
Oh, and here a little tip for you: don't be afraid to fold the top layers of the Doodle Pops up a bit when you have them in place on your project. For Little Lamb, I actually pulled up a bit on his ears and legs to add a bit more dimension (don't worry - no animals were injured in pursuit of this project). I did the same on the Easter Basket bow. it adds just a bit of extra shape to the Doodle Pop and the material it is made out of is strong enough to bend and hold the shape!

All-3-3

And because I love a little bow and Doodlebug's mini paper clips, I decided to embellish the side a bit too. These simple little containers may just steal the show on Easter! in fact, I may even search through the collection to make even more...maybe! :) Thanks for stopping by! Hugs,


BLOG | INSTAGRAM

DOODLEBUG PRODUCTS USED

Easter Parade 12x12 paper
Over the Rainbow puffy icons
Doodle Pops - Easter Basket, Little Lamb, Mr. Bunny
Mini paper clips

OTHER

Cardstock
Adhesive
Ribbon

Sunday, April 21, 2019

HOPPY EASTER | Treat Holders with Tya

Hello everyone and Happy Easter! Today I wanted to share with you some quick and easy Easter treat holders you can whip up in a matter of minutes! Today can be a busy day full of egg hunts, family dinners, and other fun festivities. If you want a quick and easy way to add some Doodlebug cuteness to some treats -I've got 3 treat holders you can whip up lickety-split!
The first treat holder looks harder than it really is - just a few scored lines and some folding and you have a fun container that can hold oodles of treats! Here is the link to the tutorial used to make this holder:  Gift Caddy. I used a  12 x 12-inch piece of Cupcake Textured Cardstock for the base and then decorated each of the panels with  4x4 inch squares of the Jellybean Plaid and some Easter Egg Hunt paper. I decorated the front panel with a tangerine doily, the sentiment is a sticker from the This and That sticker sheet and a banner from the Sunday Dress paper. I added a pink bow sticker from the  Icon Sticker sheet and a few Jellies shaped sprinkles on the front. 
The next holder is a simple berry basket filled with some treats in a cellophane bag. I decorated the front of the basket with the "hoppy easter" sticker which is from the This and That sticker sheet. I  made a quick tag using a flower printed paper from the 6x6 paper pad. I added the Flower Basket Doodlpop to the tag and a small sticker sentiment from the This and That sticker sheet. I added a small purple heart sprinkle to the tag for some added shine. You can make oodles of tags in no time using Doodlepops and a few stickers.
The last is a simple kraft paper sack that I decorated. I added a card from the 3x4 inch card side of the Sunday Dress paper. I backed the card with the grass side of the Easter Egg Hunt paper. I mounted these pieces on a piece of the Jellybean Plaid paper.  I added a few stickers from the Icon Sticker sheet and the This and That sticker sheet. I added an aqua blue Glitter Sprinkle to the center of the bow on the 3x4 card. I added a scallop flower border from the This and That sticker sheet. I punched a couple of holes in the top of the bag and laced some sheer ribbon through the top. It was a quick and easy way to dress up a plain paper bag. 
That's all I have for you today! I hope you all have a wonderful Easter holiday full of family, festivities and a little fun! These cute treat holders are just what you need to add that special little something to your treat bags. Happy Crafting! 

DOODLEBUG SUPPLIES USED:
Hoppy Easter Jellybean Plaid paper
Hoppy Easter Sunday Dress paper
Hoppy Easter Easter Egg Hunt paper
Hoppy Easter This and That Sticker Sheet
Hoppy Easter Icon Sticker Sheet
Hoppy Easter Doodlepop -  Flower Basket
Hoppy Easter Jellies Shaped Sprinkles
Cupcake Textured Cardstock
Tangerine Doily
Rainbow Heart Sprinkles
Birthday Girl Glitter Sprinkles

OTHER SUPPLIES USED:
ScorPal Scoring Board
Sheer Ribbon
Hole Punch 
Small  Kraft paper bag
Berry Basket

Pin It button on image hover