Thursday, April 24, 2025

BUTTERFLY KISSES ABSOLUTELY ADORABLE LAYOUT | with Tya

Hi there, crafty friends! I'm so excited to share my latest design team project! This time around, I decided to do a layout featuring the stunning new Butterfly Kisses collection! The bright, pretty colors and whimsical icons were the perfect match for these sweet photos of my daughter. With bright florals, sunshine, and rainbows galore, this layout came together like a breath of fresh spring air - pure happiness on a page! 

Here's a full look at my layout. I  started with the Garden Gingham paper as my base and then added a small border of Bubblegum Textured Cardstock and white cardstock to build my layout. I also added the soft blue Rainbow Skies paper behind the photos. The bright and cheerful Sunny Days paper, added across the layout, adds the perfect pop of sunshiny yellow. I had so much fun embellishing the layout using lots of ephemera from the Odds and Ends, Chit Chat, and Bits and Pieces packs! 


Just look at this sweet corner of my layout- it's bursting with charm! I layered a mix of die cuts, twine, and Puffy Stickers on this section. For fun, I added a twine trail behind the beautiful butterfly. The "You're so Sweet" speech bubble and a cluster of happy flowers with a cute button center make this so fun! How adorable is the smiling little ladybug? She is from the Puffy Stickers as well. These are all the perfect touches to highlight my photos.


This top right corner is bursting with happiness! I tucked in the sweetest rainbow and sunshine from the Odds and Ends pack, layering them behind the photo for a playful, whimsical vibe. The bright blue button tied with twine adds a soft, handmade touch to the cloud, and a cheerful floral cluster paired with an orange butterfly brings in even more color and joy. I also added a darling little dragonfly Puffy Sticker to pull in some more dimension.. It's like a garden party right on the page! 


This section of my layout brings all the sweetness together with the perfect title and journaling. I used the "absolutely adorable" die cuts from the Chit Chat as my main title - it couldn't be more fitting for these precious photos. Just below, I added some typewritten-style journaling strips to capture the heart of the moment, sharing how this everyday snapshot perfectly showcases my sweet girl. A scalloped floral border sticker from the This and  That Sticker Sheet and a small strip of green Textured Cardstock add playful texture and color, tying everything together with that signature Doodlebug charm!


Thank you so much for stopping by to take a closer look at my layout! I had such a wonderful time creating this page with the Butterfly Kisses collection - it truly is a breath of fresh air with its vibrant colors, happy icons, and sweet sentiments. I hope this project has inspired you to pick up this adorable collection and use it to capture and celebrate your own special memories. Happy Crafting! 


DOODLEBUG PRODUCTS USED

Butterfly Kisses Collection
Butterfly Kisses Textured Cardstock

OTHER

Buttons
Twine

Wednesday, April 23, 2025

BUTTERFLY KISSES HAPPY BIRTHDAY BOX | with Miguel

When I see items that remind me of Doodlebug products, I love to make little boxes to go with them! Today, I made this box using the cardboard technique and decorated it with the Butterfly Kisses collection.  The box holds a fun little gift!

I made a decoration with garden doors and added Odds & Ends to bring my little box to life. I love how the box looks!

I also used Puffy Words, the new Doodlebug product, to place the phrase Happy Birthday on the acetate. I love the result.


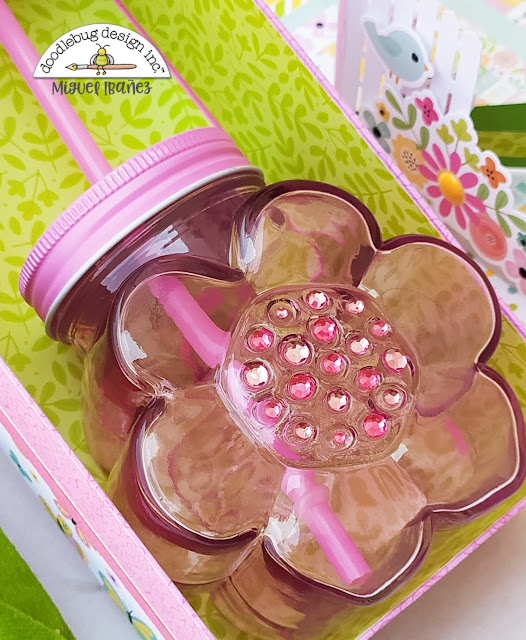
When you open the garden doors, you can see the gift inside the box: a flower-shaped glass
that perfectly matches the collection!. I placed mini jewels in the center of the flower to give it a
special touch.


I'm signing off as always, hoping you enjoy my work and find it inspiring! See you soon.

DOODLEBUG PRODUCTS USED

Butterfly Kisses Collection
Mini Jewels


Tuesday, April 22, 2025

BUTTERFLY KISSES HELLO PRECIOUS GIRL LAYOUT | with Nathalie

The new Butterfly Kisses collection just landed at my doorstep, and I am so excited to use to document some of my most favorite memories.   This collection is bright, fun, and just gorgeous!  Let me show you what I created with it!


I love how this layout came together, it was so easy to mix and match pieces to bring the design to life with a touch of whimsy.


I had this idea of creating a sort of flap for the page.  So, I started by trimming the Rainbow Skies paper by about an inch, then I trimmed a corner of the Garden Gingham paper;  I scored about 1/4" from the long edge to form the triangular flap. I secured the back of the flap to the back of the paper before adhering it to the teal cardstock.


The small scalloped border under the flap helps to soften the edges.  I love the tags in the back of the Happy Thoughts paper, so I am using one of them to house my picture.  I made sure to punch a hole at the corner of the flap so thar I could tie the tag and flap together in place.


I chose to add two floral clusters to the left and right of the top of the tag.  My idea was to have similar elements so that they balance the page.   I also added a few sprinkles and butterfly stickers as if they were creating the bow on the tag.


To finish my page, I combined pieces of Chit Chat with the new Puffy Words to create my title at the bottom of the page.  I added a few stickers to bring the floral cluster look at at smaller scale to this end of the page. 

I hope this inspires you to get creative with the new Butterfly Kisses collection!! XO

DOODLEBUG PRODUCTS USED

Butterfly Kisses Collection
Butterfly Kisses Coordinating Cardstock
Doodle Twine - Cupcake

Monday, April 21, 2025

BUTTERFLY KISSES TAG FLIP MINI ALBUM | with Kathy

Butterfly Kisses just makes me happy.  I have fallen in love with the colors, the icons, the spring patterns... just everything!  I couldn't wait to play with it!  I decided to make a fun Tag Flip Mini Album to celebrate spring.  Take a peek...


I started by making my cover.  I cut 3 pieces of chipboard... 2 pieces  4.25" x 6.75" for the covers, and one 1.25"x 6.75" for the spine.  I arranged and glued them to a piece of the Garden Gingham plaid paper leaving about 0.5" around and wrapped to form my cover.  I covered the inside of the book with a piece of the bubblegum colored side of the Butterfly Kisses paper.  

To decorate my cover, I added a rectangle of the Butterfly Kisses paper to the front, and lots of butterflies and flowers from the Bits & Pieces pack.  I used some Beetle Black Alphabet Soup letters and a Chit Chat piece for my title. 


Inside the front cover I added a photo spot, with some Odds & Ends and a Chit Chat speech bubble.  On the right side, I punched a hole about 0.75" down and in the center to hold my book ring/ tags.


The Happy Thoughts Tag paper is one of my favorites!  I cut all six tags from the paper to use as the pages of my book.  I stitched coordinating papers to the back of each tag using my sewing machine.  I also cut a few smaller tags using a die from my stash to mix it up a little.  Then came the fun part... decorating the pages/tags!


For my photo spots, I used some stitched rectangle and square dies from my stash.  I added some tabs to some of the pages using a tab punch.  It was fun decorating all the pages!  I used Chit Chats, Odds & Ends, This & That Stickers, Icon Stickers, Puffy Icon Stickers and the new Puffy Words!  And let's not forget all the fun shaped sprinkles!


I also traced one of the tags onto the Butterfly Kisses Heavyweight Acetate and cut it to make another fun page.  I added rectangle photo spots to each side and some This & That Sticker words.  I lined them up  so that they matched on both sides!


I love how this turned out!  It's all ready for my spring photos!  I created a video short flip through, I always think it's more fun to see things in action!  


That's it for me today, thank you for stopping by to peek!


BLOG | INSTAGRAM | YOUTUBE

DOODLEBUG PRODUCTS USED

Butterfly Kisses Collection
Butterfly Kisses Petite Prints
Butterfly Kisses Heavyweight Acetate
Alphabet Soup Stickers

OTHER

Chipboard
Stitched Rectangle & Square Dies
Tag Die
Tab Punch
Sewing Machine
Ribbon
Book Ring

Saturday, April 19, 2025

BUTTERFLY KISSES HELLO MINI ACCORDION ALBUM | with Conny

Hello, Crafty Friends! It’s Conny here from The Daily Life of Creativity, and today we’re embracing the beauty of the Butterfly Kisses Collection. We’ll be creating an accordion project using the cards from the Spring Assortment Cards & Envelopes in this collection. 
 Let’s get started! I began with two of the larger card bases, which measure approximately 6 1/4" x 4 1/2". I placed them in a zigzag pattern before joining them. In the middle of these cards, I added a pocket. To create this pocket, I used my 1.5" circle punch to make a hole in the center of the longest side of each card. Instead of gluing the pocket directly to the paper, I cut out two pieces of cardstock, each measuring 4 1/2" x 1". I scored them at 1/2" in the middle of the 1" width and adhered them to the top and bottom of the pocket. Then, I applied glue on three sides of the pocket, leaving the side with the half circle open.
Next, I used two smaller cards measuring about 4 1/2" x 5 1/2". I hand-stitched these into the middle of the larger cards to create extra pages on both sides. For matting on all of the pages, I used the new 6" x 8" paper pad. On the cover, I selected the happy hoppers paper, featuring cute frogs, cut to 6 1/8" x 4 1/4". On top of this, I matted a green coordinating cardstock piece measuring 3" x 5" and centered it on the cover. At the top, I embellished with a beautiful icon cardstock rainbow, Doodle-Pops ("Hoppy to See You"), Butterfly Kisses Bits and Pieces, and Puffy Words ("Hello," "Just a Note"), along with enamel dots to complete the top. At the bottom, I created a closure using a 1.5" circle, Doodle Twine in "Cupcake," and standard eyelets.
Inside the album, you all know how much I love tags! I trimmed some small tags from the 6" x 8" paper pad and used one to create a tuck pocket. I embellished this pocket with icon stickers and added the remaining tags inside, which are perfect for adding photos or journaling. For the smaller pages, I embellished them with puffy stickers, chit-chat pieces, and enamel dots.
On the other side, I created bottom pockets using paper from the 6" x 8" paper pad. For this, I needed a piece of paper measuring 5 1/2" x 3 1/2". I scored it at every 1/2" on three sides. Before attaching the pocket to the page, I matted it with a piece of floral cardstock. Inside that pocket, I added the larger tags from the 12" x 12" happy thoughts - double-sided cardstock. 

I hope you enjoy creating this accordion project! Happy crafting! Xo Conny! Check out my YouTube channel for a quick process Video. 

DOODLEBUG PRODUCTS USED

Butterfly Kisses Collection
Spring Assortment Cards & Envelopes
Doodle Twine - Cupcake 

OTHER

Needle
Embroidery Thread 
Standard Eyelet 

Friday, April 18, 2025

INTRODUCING BERRY SWEET | Win it Before You Can Buy it.

“Berry Sweet” things are coming your way! Our new strawberry mini line is garden fresh and ripe for the picking! This little bushel of cuteness has all of your favorite berry treats as well as popular happy icons! Choose from adorable double- sided cardstock, stickers, sprinkles, ephemera and so much more! Look for us at your local scrapbook supply store and start preserving your sweet memories!

layout created by Tonya Prawitt

ICONS CARDSTOCK STICKERS


PUFFY ICONS STICKERS

THIS & THAT CARDSTOCK STICKERS


ALL THE THINGS
(138 adorable die-cuts!)


SPRINKLES & JEWELS 


WASHI


DOODLE-POPS & SHAKER POPS 


STICKER DOODLES

LIMITED EDITION COLLECTIBLE PINS & LITTLE CHARMERS

JUST CHARMING CLIP


BRADS & BRADDIES


DOODLE STAMPS & DOODLE CUTS


SHADOWBOX INSERT KIT


DIY SNOWGLOBE KIT


SHAKERS


CHIPBOARD ALBUM


ACETATE


berry blossoms
heavyweight acetate

DOUBLE SIDED CARDSTOCK PAPER PACK 12x12

NEW!!! DOUBLE SIDED CARDSTOCK PAPER PAD 6x8


BERRY SWEET
 DOUBLE SIDED CARDSTOCK
berry sweet
double-sided cardstock


berry basket
double-sided cardstock


very berry
double-sided cardstock

strawberry fields
double-sided cardstock

sweet spot
double-sided cardstock

strawberry stripe
double-sided cardstock


TEXTURED CARDSTOCK
ASSORTMENT PACK

PETITE PRINTS
ASSORTMENT PACK

BERRY SWEET
ESSENTIALS KIT

Win it before you can buy it!

Berry Sweet will be shipping to stores in early May!  Would you love to win your very own Berry Sweet prize pack before it hits the stores? Leave a comment to enter. Good luck!

For further entries leave a comment on our Facebook and Instagram posts!
Pin It button on image hover