Thursday, January 30, 2020

LOVE NOTES LAYOUT | with Maryám

Have you ever used stamps on layouts? Most people think stamps are for cards but I personally think that you can use them in all kinds of projects including scrapbook layouts. In today's post, I am going to be sharing with you some ideas on how you can incorporate stamped images into your layouts.
The stamp sets from the Doodlebug Design Love Notes collection are adorable and my favorite one is the I Pick You Set because of all the flowers that you can create. Another thing that I like about this stamp set is that you can build your own flower and combine different layers with endless possibilities. 
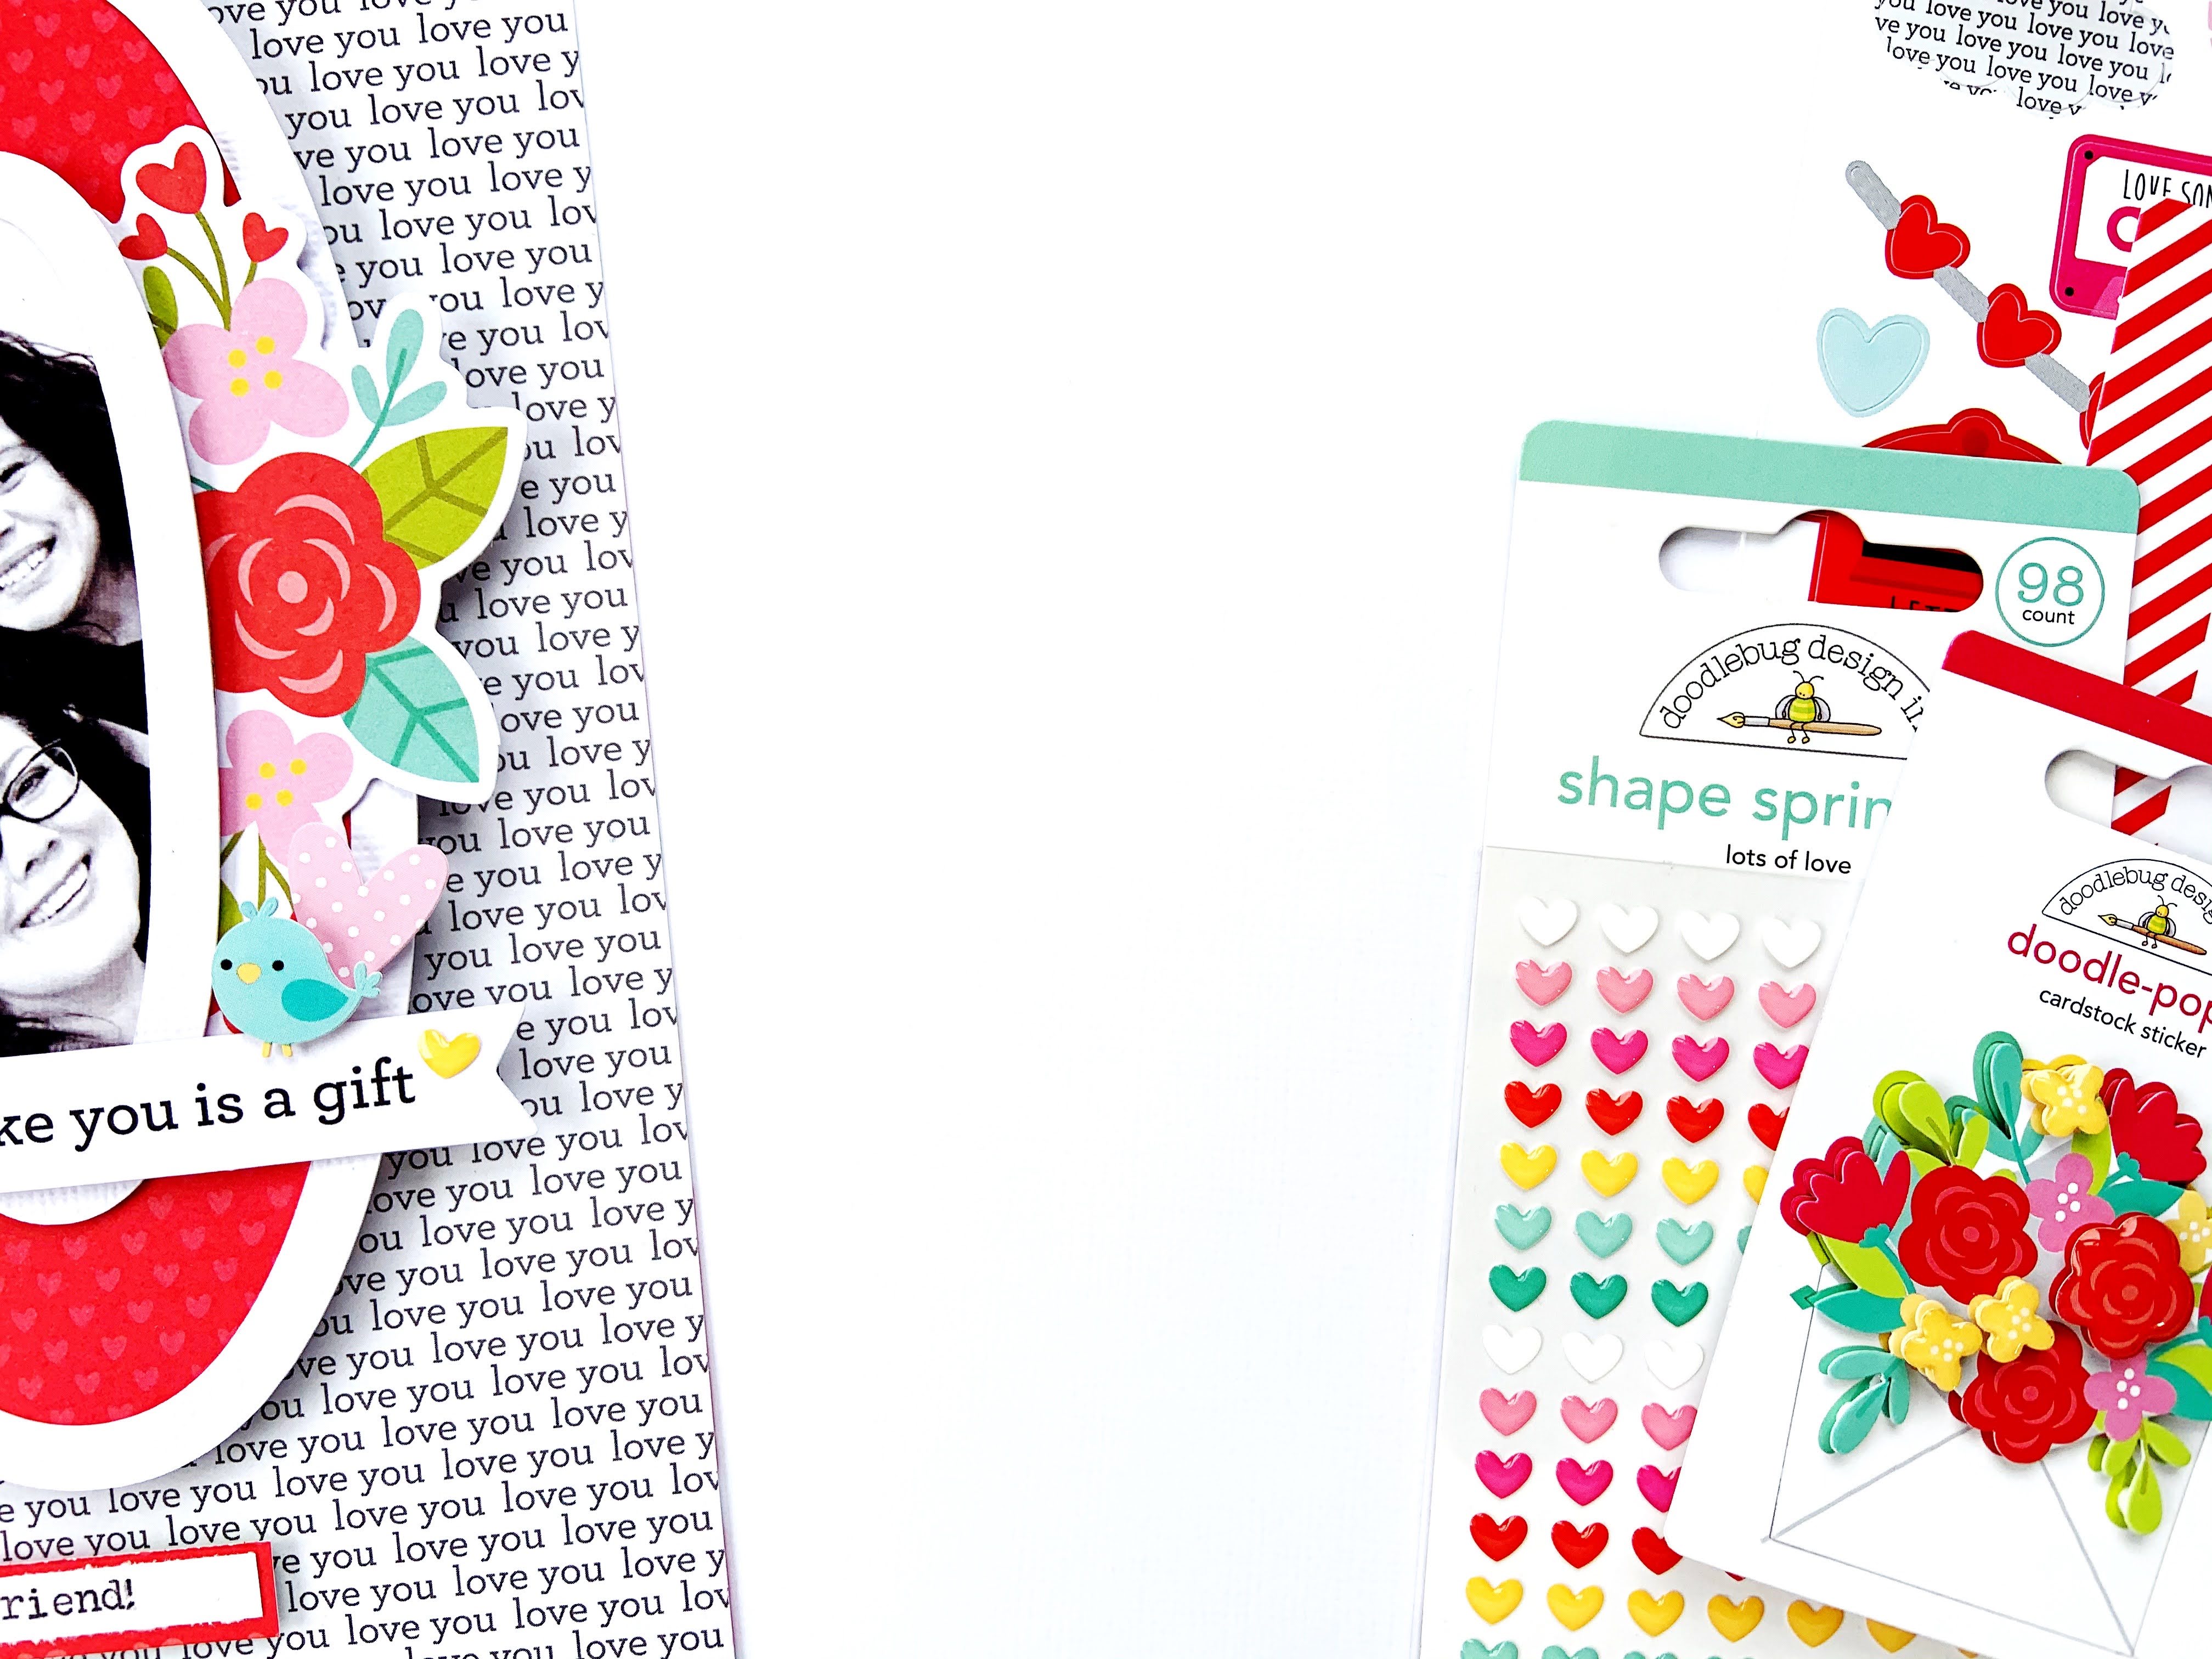
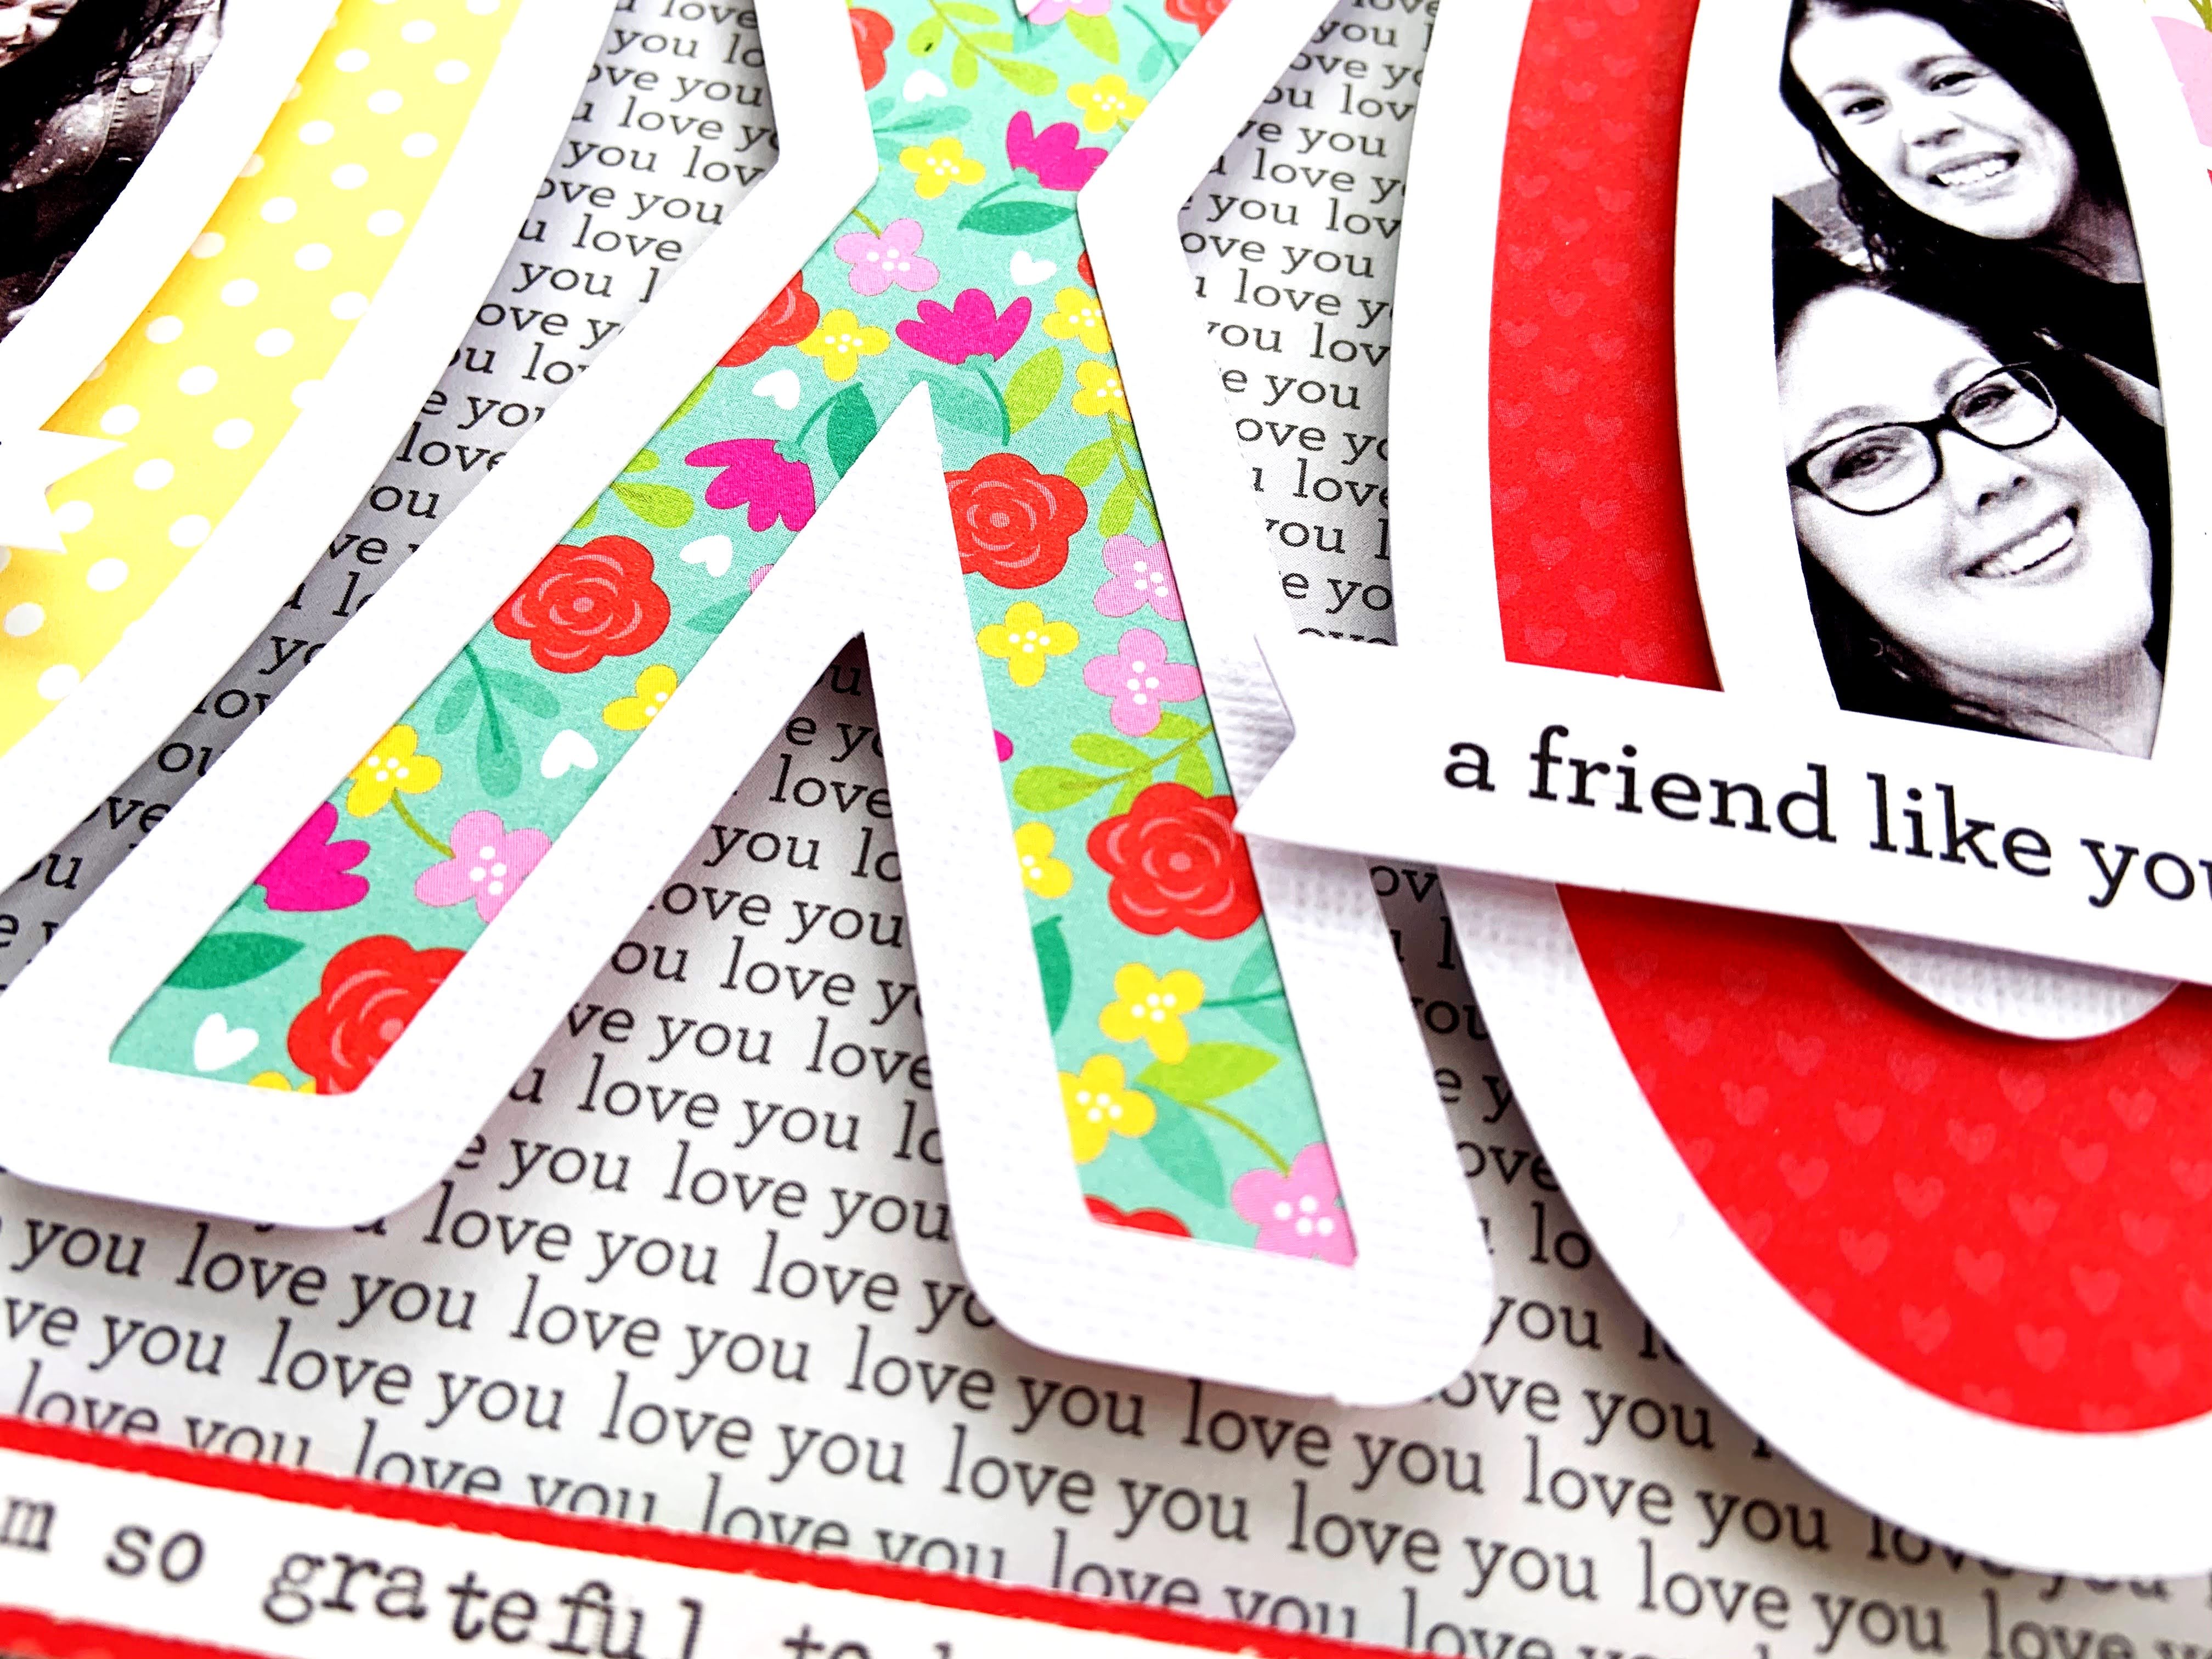
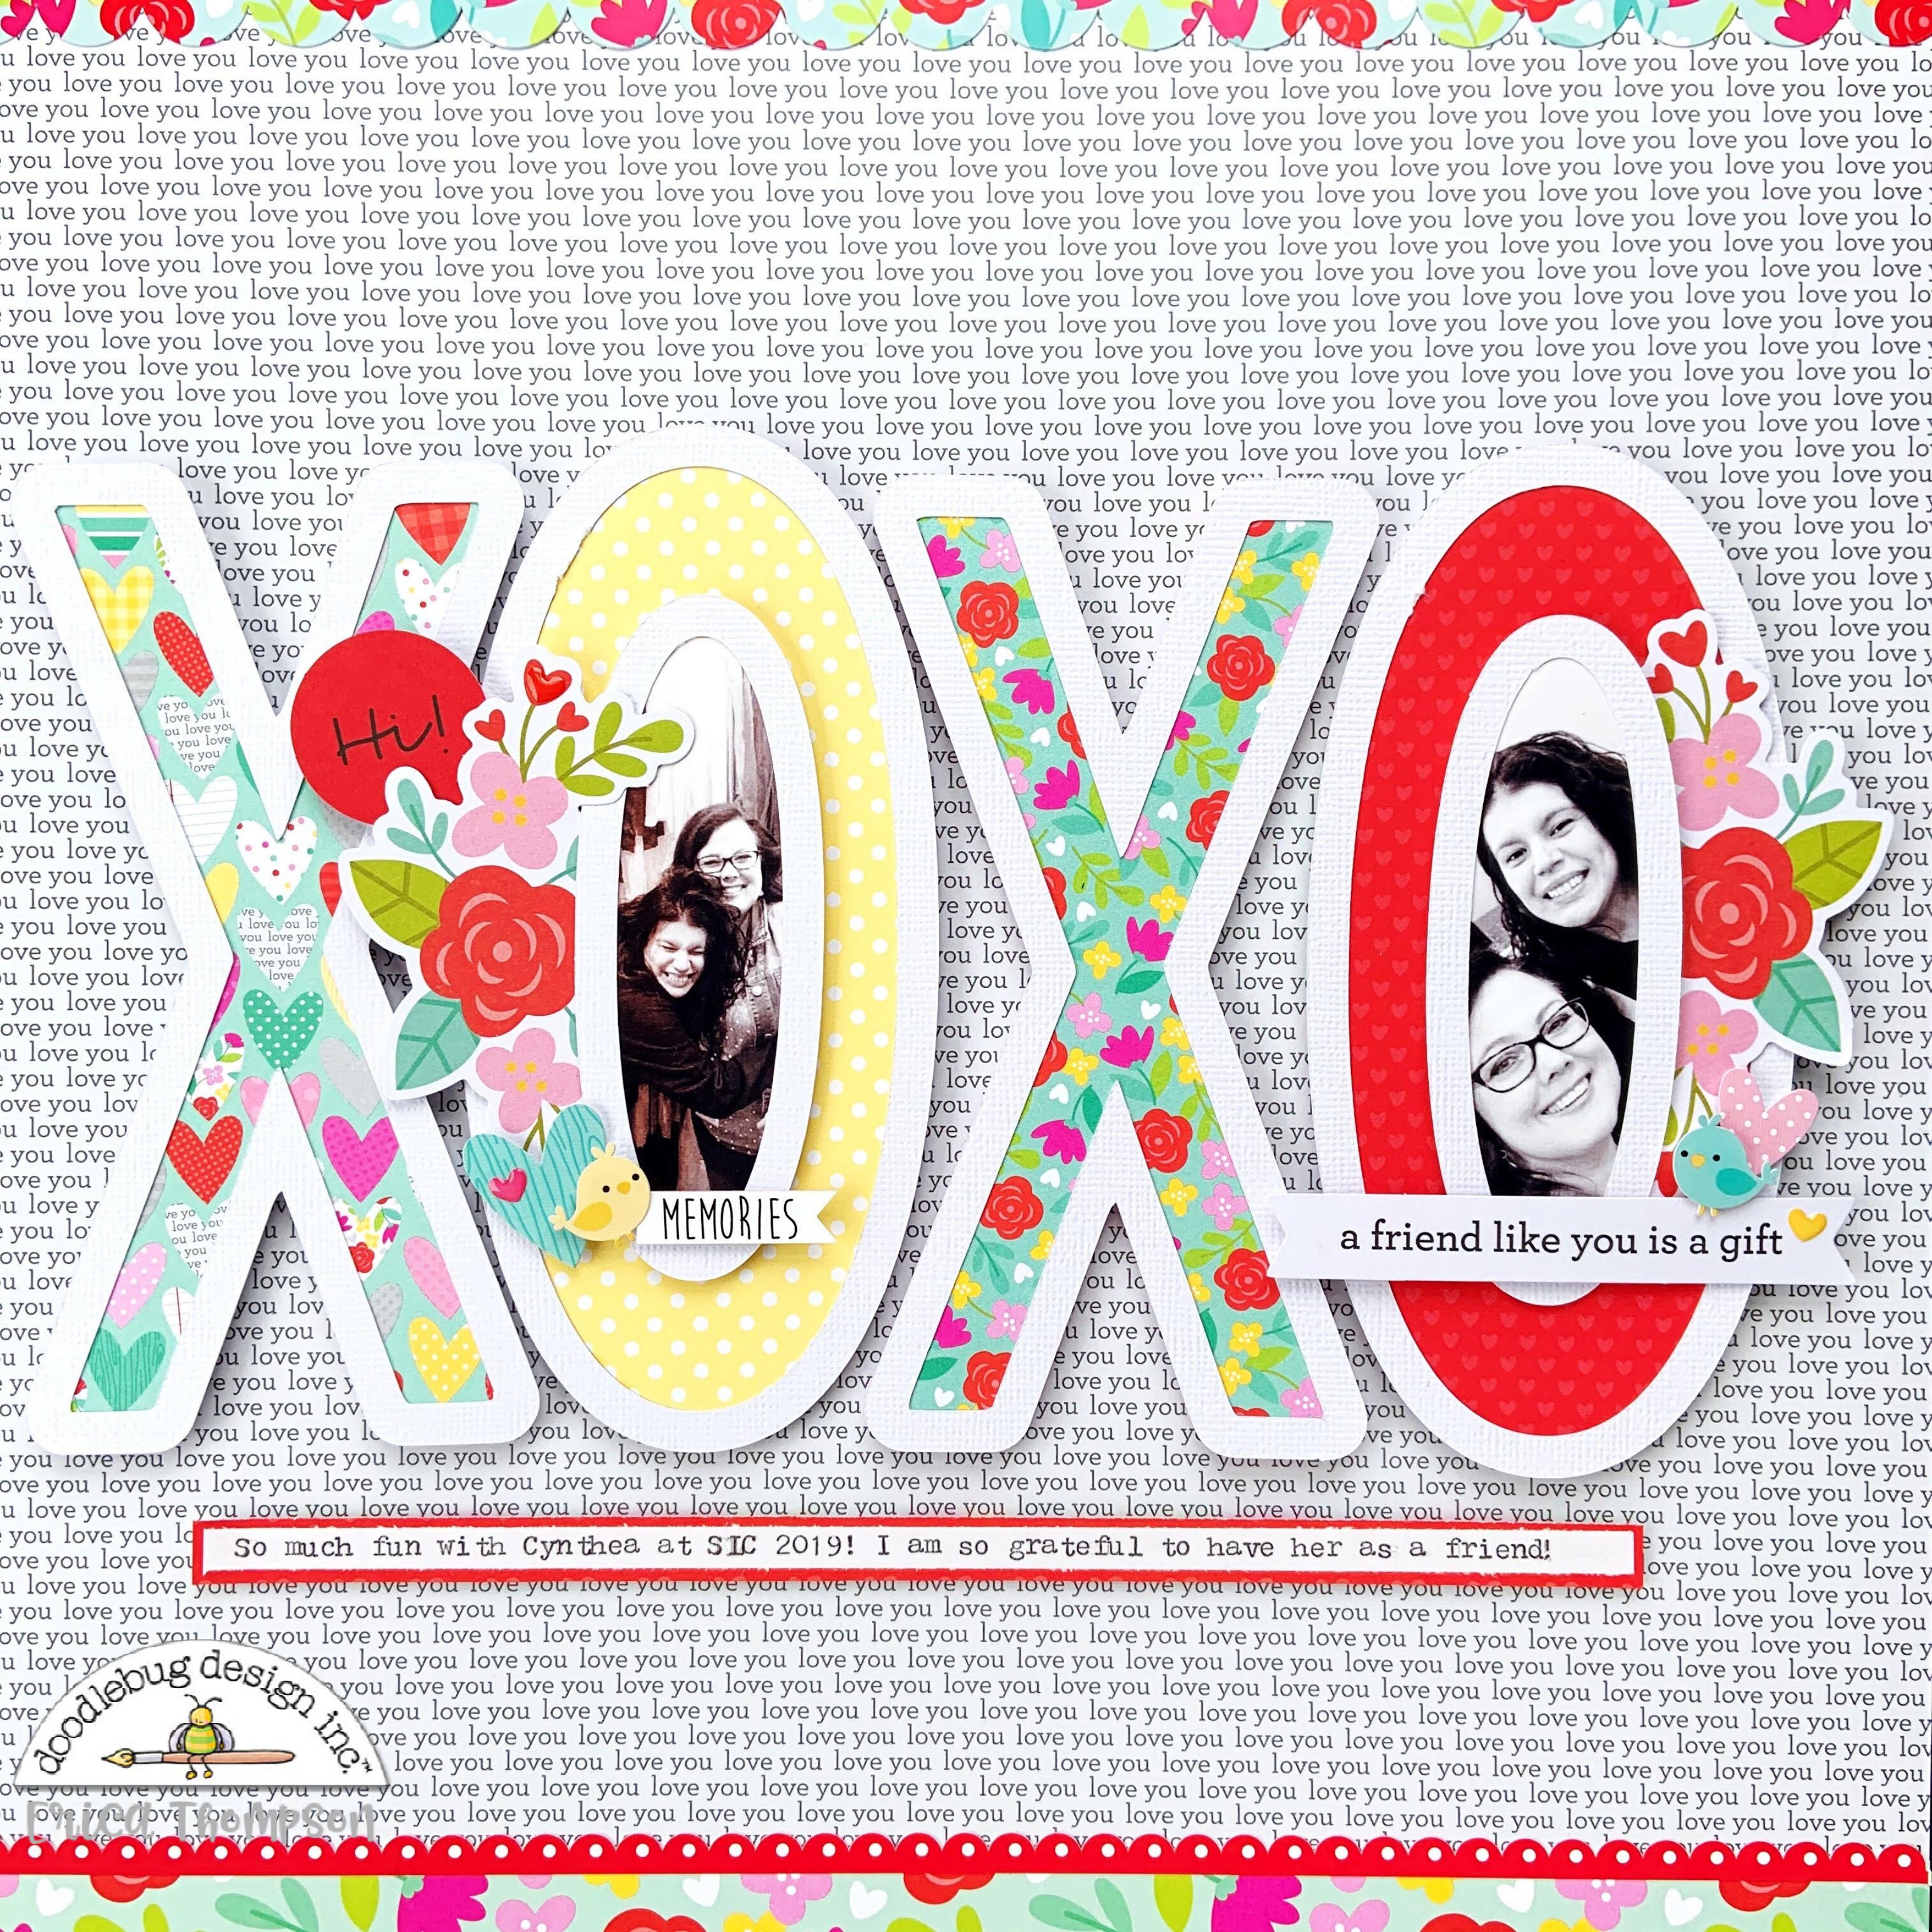
For my layout, I stamped several images from the set onto white cardstock. Next, I fussy cut the images but you can totally use the coordinating dies to save time. Continuing this, I created a cluster of elements on the right side of my page including embellishments from the mini iconsTM stickers and Chit ChatTM set.
To include some photos in my layout, I decided to try something different and use three the polaroid frames from the Odds&EndsTM Set and put photos behind each of them. The result was perfect and I think they look so cute in the layout.
Last but not least, for the title, I used the Abigail Black Cardstock Stickers to spell out the word "family".

And that is it for today! I hope you enjoyed the layout and inspired you to create something new. 
Thanks for stopping by and see you soon!


Doodlebug Products Used: 
Love Notes Collection
Doodle Twine - Gray
Washi Tape - Candy Stripe
Abigail Black Cardstock Stickers

Wednesday, January 29, 2020

LOVE NOTES PLANNER PAGES | with Anabelle

Planning in my spiral planner is always fun. But, planning when it's been decorated with the beautiful Love Notes collection is EXTRA special. I really loved using this collection to design my Valentine's Day week in my planner. Doesn't it look pretty?
I started off by adding the perforated washi tape along the bottom and the floral tape along the top. I decided I wanted to trim some of the papers from the 6 by 6 pad to make boxes for my vetical planner. Box shaped planner stickers are some of my favorites to use. So, I thought I'd make some to fit the 1.5" wide boxes on my pages. Well, wasn't I pleasantly surprised to find that the journaling tags paper in the pad had boxes that were exactly that size! I trimmed them apart and added them to the pages.
Since I use this planner for school, I don't plan on the weekend sections. Instead, I added a few die cuts and Tiny Type stickers to make my To Do section.  I added a few more stickers from the Icon and Small Icon sets to finish off the design.
I never seem to have enough space to write my lists, so I created a pocket which I inserted into this week's spread.
I used a card from one of the Card packs. I used a planner punch to punch the left side and added a strip of washi to the other. Then, I cut one of the journaling cards to fit. The floral Chit Chats provide a decorative look. I only adhered them to the actual card, so the journaling tag can still slide out.
Finally, I added the number stickers from the Tiny Type and created some adorable planner clips from the coordinating Doodle Pops. To do so, I simply adhered them to the paper clips with some hot glue. You can adhere a punched paper circle to the back, to finish it off.
As you can see, my planner is ready to go for Valentine's Day. I love how bright and fun it looks!

Doodlebug Supplies:
Love Notes Collection
Swimming Pool, Lady Bug, Bubble Gum and Limeade 
Teeny Type Stickers
Card Variety Pack

Other Supplies:
Mommy Lhey Large Ringbound Planner 
from Paperhouse Productions

Tuesday, January 28, 2020

LOVE NOTES EXPLOSION BOX + Process Video | with Traci

Almost February? Wow! Are you ready to show some love to your favorite people in a few weeks? This cute project would be an adorable gift for anyone who deserves a little surprise on Valentine's Day. It's a pocket explosion box that you can fill with pictures, gift cards, love notes, and candy! When the box is closed, it looks like this ...  
but when you pull off the lid, all of these cute little pockets and tags open up!
Aren't the colors in the Love Notes collection pretty?!  The project is as fun to make as it will be seeing the receiver's expression when they pull off the top! So much cuteness pours out!
For the top of the box I used chunky twine, Love Notes icon stickers, odds & ends, and a darling boutique button.
The pages inside were cut from cherry petite prints ... one of my favorite papers to use instead of plain card stock.  Can you also tell I love the enamel hearts? ❤️ To make this project, I used a cutting file by Lori Whitlock that you can find in her svg shop here There are quite a few pieces to this project, so to make the cutting easier, I created a quick video about the pieces...  
Lori also has a more in-depth tutorial for the basic project here. I hope I've given you some cute Valentine's inspiration today!  We'd love to see what you're creating with Love Notes, so post and tag us over on Facebook and Instagram (oh, and we like pins too)!
Blog | Facebook | Instagram | Shop

Monday, January 27, 2020

LOVE NOTES BOX CARD | with Kathy

Valentine's crafting is some of my favorite crafting and I'm having so much fun playing with the new Love Notes Collection.  The little icons are just the cutest!  I especially loved the love letter piece from the Odds & Ends and decided to turn it into a Box Card.  Take a peek...


As soon as I saw the I Love You print on the Secret Admirer paper I knew I had to use it!  I combined it with the hearts side of the Rose Garden paper and some Cherry Petite Prints to make my envelope. 


The Heart to Heart shaped sprinkles are awesome, I love their slightly wonky shapes!


I finished the card with some pieces from the Odds and Ends.  The little birdies are adorable!  Now for the fun part!  I created an SVG for this file and it is available exclusively in the Lori Whitlock SVG Shop here!


Here is a tutorial showing how to assemble the card... it's really easy!

1.  Start by adding the decorative layers to the main body pieces of the envelope and the letter as shown.
2.  Add the triangle piece to the "V" piece to form the front of the envelope.
3.  Attach the sides to the front of the card, gluing the tabs inside, then attach to the back piece of the card.  The bottoms of the sides should be flush with the bottoms of the front and back pieces.
4. Fold the tabs on the insert back, add adhesive to the outside of the tabs.  Slide it into the envelope "box" and press to the sides.  I made the tabs flush with the back of the card.
5. This is the finished card.  There is also a print and cut sentiment piece that says Happy Valentine's Day. (see my finished card)

If you make one of these cards be sure to tag Doodlebug Design on Facebook and Instagram, we always love to see your creations!  That's it for me today, thanks for stopping by to peek!


DOODLEBUG PRODUCTS USED
Love Notes Collection
Dot Stripe Petite Prints Collection


Friday, January 24, 2020

LOVE NOTES CHOCOLATE BAR SLIDERS | with Karen

Officially, winter started here in Canada only about a month ago. But I have to say that I am already over it! Sledding and skating are fun, but I am ready for some colour! It's a good thing I can count on my crafty stash to bring some spring colour into my life, even in the middle of winter. And Doodlebug's Love Notes collection is right on the money!
I decided to create one of my all time favourite projects - chocolate bar sliders. These little card/treats all wrapped together into one are a perfect winter pick-me-up! 
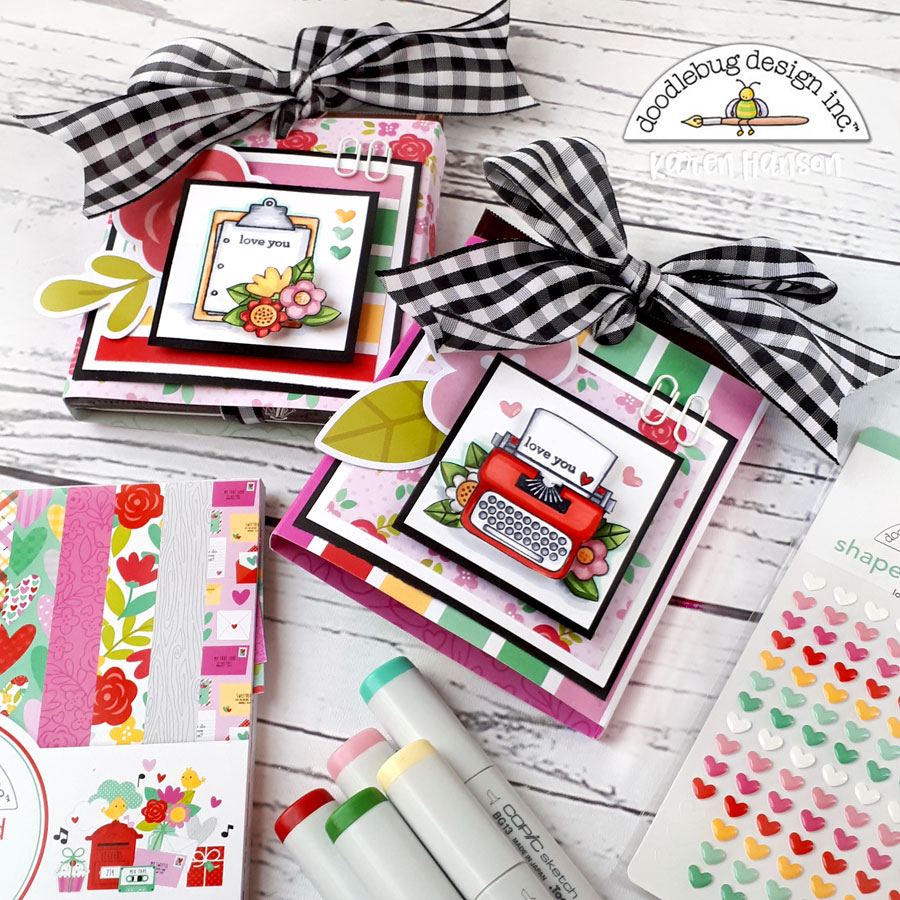
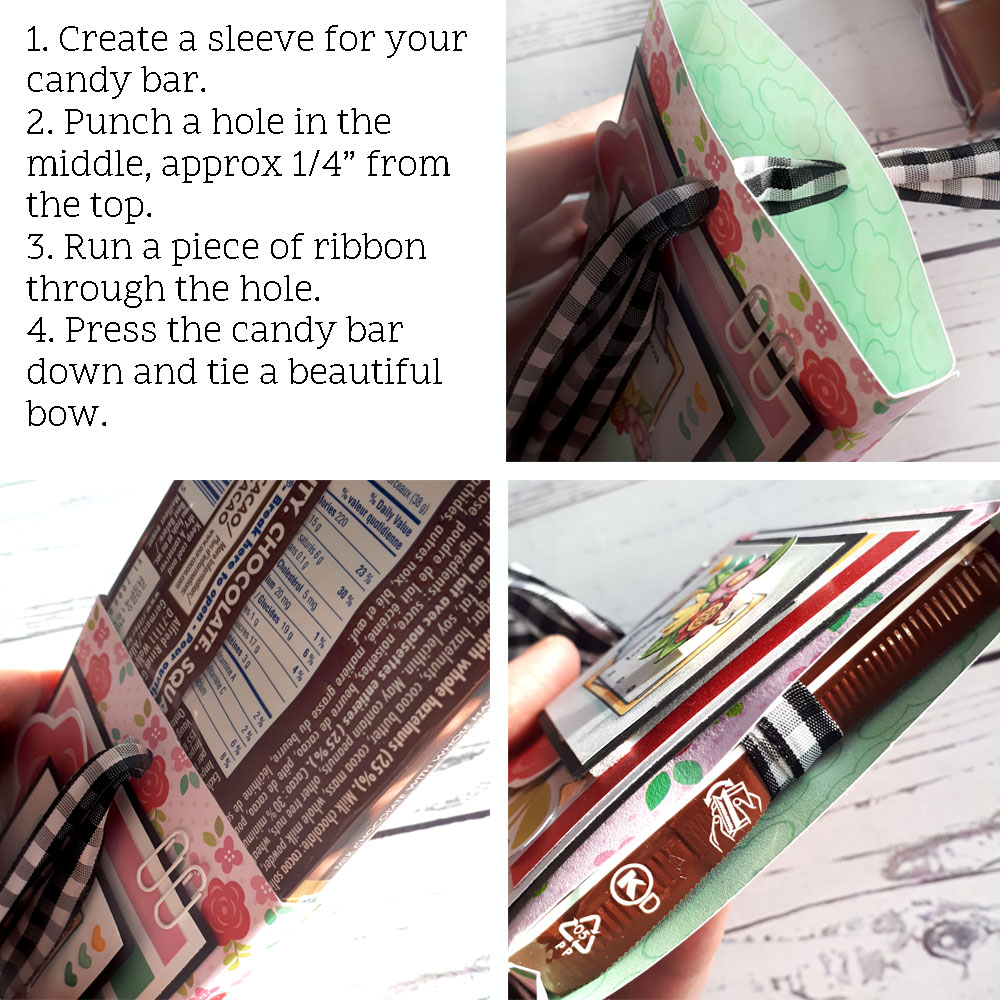
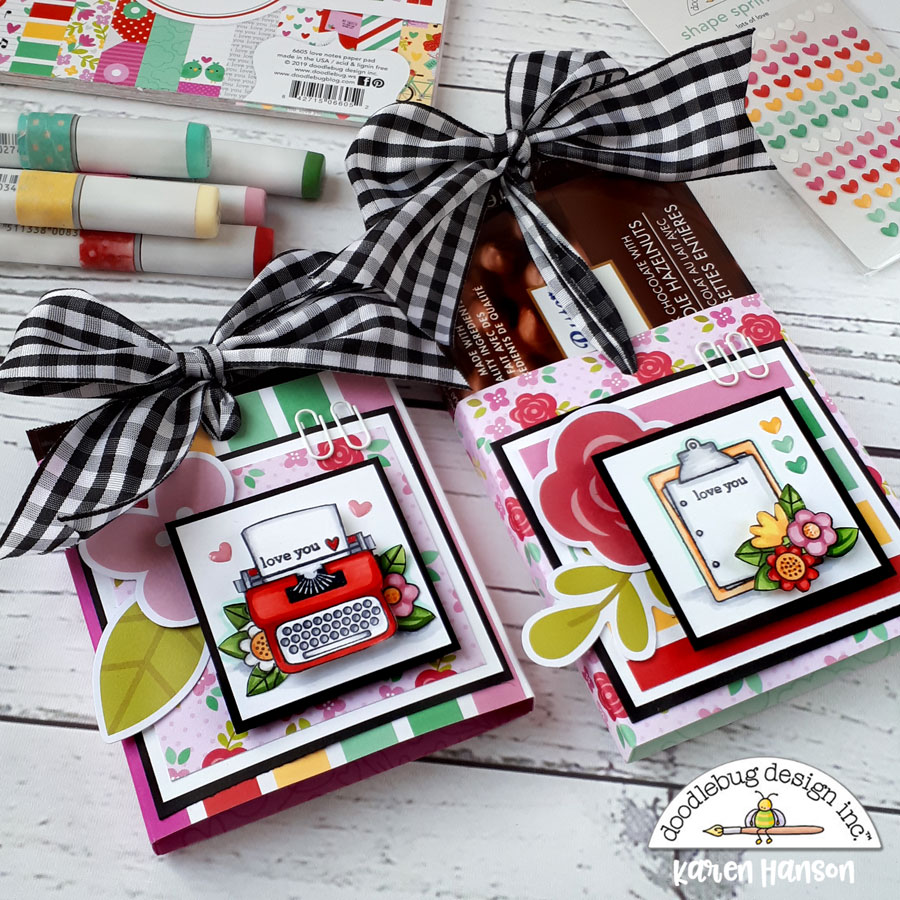
And with Doodlebug's Love Notes collection as the wrapper, you can use them for Valentine's day, birthdays or even Mother's Day in a few months. 
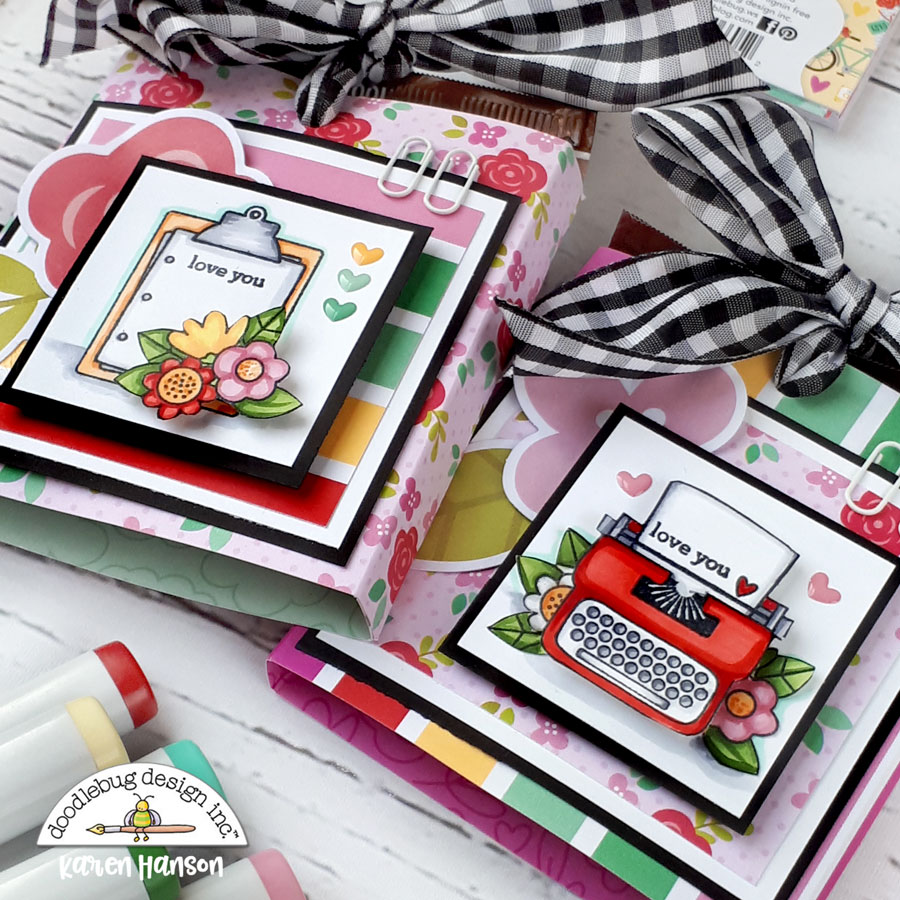
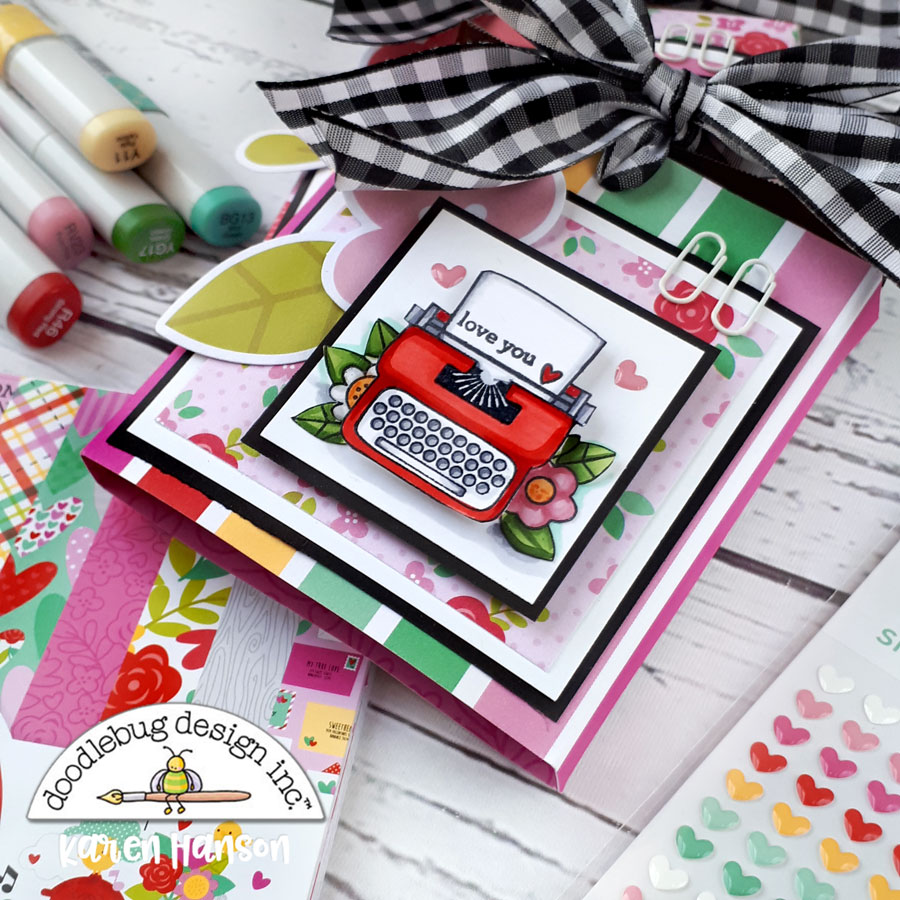
These versions feature the Love Notes Doodle Stamps that I happen to colour up with Doodle Stamps. I fussy cut the stamped images and then layered them on top of each other for some added dimension, adhering them with some foam squares. And with some cute die cuts from the coordinating Odds and Ends pack behind the matted stamped images, there are a lot of fun elements to look at on these cute treats! And while these project look like they are difficult to create, these beauties are a few simple steps away:
  1. Start by creating a wrap of paper for the candy bar of your choice.Simply measure across the front, down the side, double the amount and add 1/4" for a seam. Decorate to your hearts content.
  2. Punch a hole in the middle of both the front and the back of your sleeve, 1/4" down from the top edge.
  3. Run a ribbon through both holes. Make sure you have the same length of ribbon in the front as in the back. I usually cut my ribbon 4x the height of my candy bar.
  4. Place the candy bar in the sleeve on top of the ribbon and then gently push down until the candy bar is completely in the sleeve. This will wrap the bar in ribbon and hold it in place so it doesn't fall out the bottom. Tie a big beautiful bow!

So there you have it - bring some brightness to a dreary day by wrapping some chocolate with some Doodlebug cuteness! They will chase the winter blues away!
Thanks for stopping by!
;
Doodlebug Design Product:
Love Notes Collection
Love Notes Doodle Stamps
Mini paper clips
Other Products:
White cardstock
 Alcohol markers
Ink
Ribbon

Thursday, January 23, 2020

LOVE NOTES SCRAPBOOK LAYOUT | with Tegan

I am in love with the beautiful new Love Notes collection! The mix of colors, floral patterns, and hearts has me swooning! It was just perfect for documenting a recent picture of my sweetheart. And I had fun using a Doodlebug Design cut file to create a fun heart background!

I started by using the heart cut file (which is actually part of the Doodlebug Simply Spring Butterfly Cut File) to create my own heart chevron design. I made each heart about .75 inches tall and each row of hearts measures about 10" wide. After I used my electronic die cut machine to cut out the hearts, I backed the design with some of the more solid colored Love Notes patterned papers to make the hearts really stand out. I used the adorable little teal Lots of Love Shape Sprinkles to embellish the heart design. 

I added a strip of the rainbow ticket patterned paper to the top and bottom of the white cardstock for a fun pop of color. I embellished the top with This & That Stickers. I then embellished my photo with Odds & Ends pieces, This & That Stickers, and the super cute Doodle-Pops Love Story typewriter.  
I used the 'my' and 'SWEET' Odds & Ends pieces to start my title. I love that the Odds & Ends packs contain amazing die cut words that can be used to easily create an awesome title! I then finished the title with the Teensy Type alphabet stickers in Swimming Pool. An adorable Doodle-Pops bird sits at the bottom of the page.
I hope I have inspired you to grab the Love Notes collection and create a fun heart background on your next layout! If you don't have an electronic die cut machine, a heart shaped paper punch would work well too!
​ Thanks for stopping in! Hope you have an amazing day! 


​   Doodlebug Products Used:
​ Love Notes Collection


Wednesday, January 22, 2020

LOVE NOTES HOME DECOR | with Shellye

Love is in the air!  I decorate with clusters of seasonal vignettes throughout my home, so when I spied this cute wooden truck, I had to have it for a Valentine display.


I purchased this pre-cut wooden truck shape from Dollar General:

Next, I traced the various sections of the image (hearts, truck) onto patterned paper and trimmed out.   I used tacky glue when attaching the paper to the wood. 

After die-cutting the wheels from grey cardstock, I accented the centers with a smaller circle and enamel dot. For the hub-cabs, I cut one circle from a 6X6 paper and then cut in half.  I used foam adhesive to attach the hub-cubs over the tires.  Next, I finished off the bottom of the truck with a scalloped sticker strip for the "step rail" :)


The truck also came with a wooden easel so that it could stand.  I simply cut patterned paper strips to cover the top and small strips of green cardstock for the edges.  For the grass I used another strip of green cardstock and cut into it randomly, creating a fringed look.  Next, I glued the strip of grass into the groove on top of the easel and then glued the truck in behind.

Finally, I used various stickers, die-cuts, doodle pops and sprinkle shapes to decorate!


I can't wait to find the perfect spot for my "lovely" truck! With so many wooden shapes available, I hope that you're able to find something similar to decorate...so much fun!


Doodlebug Products:
Love Notes Collections
Chunky Doodle Twine
Doodle Pops
Sprinkle Shapes
Cardstock
Boutique Buttons

Tuesday, January 21, 2020

LOVE NOTES LAYOUT & PROCESS VIDEO | with Erica

I love using cut files as my title and today I want to share how I made my own in Silhouette Studio! It was really easy to do and I love how it turned out! I started by opening up my Silhouette Studio. I wanted to type out the letters X and O so I selected the text tool (Letter A) on the left panel. Move the cursor to the grid and type out your letters. Next open up the Text Style window on the right hand side panel and pick your font. You can also adjust the size here as well. Next I wanted to created an offset so that I could back this cut file. I highlighted the letters and then clicked on the Offset window on the top tool panel. I knew I wanted two of each letter so I highlighted them again and hit Ctrl+Right Arrow to duplicate the letters to the right. Now you are ready to send it to the machine to cut! I cut my letters out on some white textured out cardstock.
I backed the file with some beautiful papers from the Love Notes 6x6 paper pad and added foam squares to the back of the file. I picked out the Secret Admirer 12x12 paper as my background. I placed the cut file down to the center of the page. I added my two photos to the inside of the O's and love how it turned out! To embellish my layout I used some of the pretty floral odds & ends and also added some chit chat pieces. Here is a look at my completed layout using the new Love Notes collection. Check out my process video down below or; CLICK HERE to view it on my YouTube channel.
 Thank you so much for stopping by.

 Doodlebug Products Used:
 Love Notes Collection

 Other Products Used:
 Silhouette Cameo
 Therm O Web
 Adhesive  
Pin It button on image hover