Showing posts with label Box Card. Show all posts

Monday, September 8, 2025

FARMERS MARKET TRUCK BOX CARD | with Kathy

I will miss summertime, but I really believe that Fall is the best season!  The colors, the cooler temps, the apple cider donuts.... it is my favorite time of year!  And Farmers Market is one of my all time favorite collections!  I decided I wanted to play with the So Thankful Doodle Cuts and turn them into a 3D box card.   Take a peek...


How cute is that little truck??  I pieced the truck "sides" together using papers from the 6x6 pad, the coordinating textured cardstock pack and some petite prints.  I created a second, mirror image of the truck side by cutting the die pieces from the opposite side of my patterned papers.  I added some Fall assortment sprinkles to my tires for a little dimension and shine.

To attach the sides of my truck together to form my box, I cut two pieces of paper, each 1 1/4" w x 3/4"h.  (one from the bon bon cardstock, one from the orange plaid paper from the 6x6 pad)  I scored each paper at 1/8" and 1 1/8" along the long side.  I glued the tabs to each end of the truck, approximately 3 1/16" apart. (see below).  I then added the other side of the truck to complete my "box."

To add my puppy and veggies to the inside of the truck, I created an insert strip using our heavyweight clear acetate.  It measured 3 9/16" w x 3/4"h.  I scored each end 1/4" in, and glued it to my front and back truck sides, centered inside the box.  I added  stickers from the Farmers Market and Veggie Garden Puffy stickers to create my little "scene." Here are some close ups...


A hint when working with stickers... I use a powder tool to "de-stick" my stickers first.  I add adhesive where needed and insert them into my card.  This prevents the card from sticking together when folding into an envelope.  I finished my card by hand cutting a little speech bubble, and stamping the HELLO sentiment from the It's Fall Y'all Doodle Stamps.

If you're using Farmers Market to scrap your fall memories, be sure to tag @doodlebugdesign on socials.  We love to see your creations.  That's it for me, thanks for stopping by to peek!


DOODLEBUG PRODUCTS USED

7796 fall assortment sprinkles
7813 so thankful doodle cuts
7820 farmers market 6x6 paper pad
7837 farmers market textured cardstock assortment pack
7842 farmers market puffy icons stickers
7869 veggie garden puffy icons stickers
7470 it's fall y'all doodle stamps
5061 lemon swiss dots petite prints
5442 kraft gingham-linen petite prints
8090 stone gray candy stripe - sprinkles petite prints
5429 mandarin gingham-linen petite prints
8378 Acetate Paper - Clear

OTHER

Foam Dots
Sizzix Big Shot
Black Ink
powder tool

Monday, June 23, 2025

BEE HAPPY BUSY BEE DOODLECUTS BOXCARD | with Kathy

I'm pretty sure I've said this before (and probably will again...) but the Bee Happy is one of my all-time favorite Doodlebug collections!  I adore the color palette, and the little bees are just the cutest!  I immediately fell in love with the Busy Bee Doodle Cuts and decided to create a fun box card with them.  Take a peek....


How cute are those bees??!!  To create my card, I started by cutting two of the bee hive pieces from papers from the 6x8 pad using the Busy Bee Doodle Cuts.  I also traced the same die on some Bumblebee Gingham Linen Petite prints and cut them out to back the die cut pieces.  This gave the sides of my card more stability.


I die cut some bees and flowers, all from the Busy Bee Doodle Cuts.  Using some heavyweight acetate I created a flying bee and also made the speech bubble from the This and That sheet look like it was floating.


I finished the front of the card with some die cut flowers & a mushroom.  I added some coordinating sprinkles to the flower centers and some grass clumps from the All the Things pack.


Even better, this fun little card folds flat and fits in a standard A2 envelope for mailing!  I created a quick video tutorial showing how I put this card together on my YouTube Channel here.


If you make one, be sure to tag me, and Doodlebug Design on socials, we always love to see your creations!  That's it for me today, thank you for stopping by to peek!


DOODLEBUG PRODUCTS USED

Bee Happy Collection
Busy Bee Doodle Cuts
Bee Happy Coordinating Textured Cardstock
Bumblebee Gingham Linen Petite Prints
Pistachio Candy Stripe Sprinkles Petite Prints
Heavyweight Clear Acetate

OTHER

Sizzix Big Shot
Pop Dots
Adhesive


Monday, May 26, 2025

BERRY SWEET BIRTHDAY BOX CARD | with Kathy

Have you seen the new Berry Sweet Treats Doodle Cuts?  I fell in love with them as soon as I saw them!  I knew exactly what I wanted to make as soon as I got my hands on them!  Take a peek....


I think that 3D cards are so fun to receive and they look so cute on display.  My box card was created using the dies in the set, along with the 6x8 Pad, some coordinating cardstock and petite prints.  I added a sentiment from the "All the Things" pack as a finishing touch.


I created some dimension by adding strawberries on both the front piece and the insert.  How cute is that mouse??!! 


I just love how he peeks out over the pile of berries!  This card was really easy to make, and it fits into a standard A2 envelope.  If you'd like to make your own, I created a quick tutorial video.


If you make one, please be sure to tag me (@kathy_skou) and @doodlebugdesign!  We love to see your creations.  That's it for me today, thank you for stopping by to peek.


DOODLEBUG PRODUCTS USED

Berry Sweet Collection
Berry Sweet Treats Doodle Cuts
Berry Sweet Coordinating Textured Cardstock
Petite Prints

OTHER

Sizzix Big Shot

Sunday, October 1, 2023

SWEET & SPOOKY POP UP CARD | with Guest Designer Wanda Guess

Hi friends! It's Wanda Guess here! How have you been? I've missed being here with you on the Doodlebug Blog - and I'm so happy to be back as a guest designer! I love Halloween, and the only thing better than Halloween is....Doodlebug Halloween! I look forward to the new collection every Fall! Today, I'm sharing a project I made with the new Sweet and Spooky Collection. It's fantastic! I love how Doodlebug incorporated some aqua and pink in with all the other traditional Halloween colors. It's fresh and cute with just the right amount of spooky!

My card today is a pop up card! I made a little street scene for Halloween night - with trick or treaters, a haunted house, and some adorable ghosties! I used a die set that makes a pop up card - there are many on the market, or you can make your own too! I love that Doodlebug papers are double sided, so the front is just as cute as the back!! This card folds into an A2 envelope, and I used the awesome Cards and Envelopes Sweet and Spooky pack for the envelope.

DOODLEBUG BLOG 1

I assembled my card from 12x12 Spooky and Sweet paper using the aqua spiderwebs paper as a nice neutral background. I used lots of icon stickers and Odds & Ends die cut pieces to decorate everything! When I first started paper crafting it was a 'thing' to make cards entirely from stickers! And it's so easy with the gorgeous stickers from Doodlebug! I put the haunted house in the background and the cute trick or treaters.... And then I glued the ghosties to the top to make it look like they're flying around.

DOODLEBUG BLOG 2

Those big cardstock stickers from the This & That Stickers are perfect for sentiments! I used the Happy Halloween banner sticker across the bottom of my card and decorated with a few shape sprinkles.

DOODLEBUG BLOG 3

I used the orange envelope from the Cards and Envelopes pack and decorated the front of it with matching stickers. I also splattered on a bit of black paint for good measure.

DOODLEBUG BLOG 4


DOODLEBUG BLOG 4

Here is the back of my card - again, the double sided papers make any project just that much cuter!!

DOODLEBUG BLOG 4

That's it for me for today! My supplies for today are listed below. I hope you have a very Sweet and Spooky Halloween! All treats and NO tricks! It's been my pleasure to hang out with you on the Doodlebug Blog.  Have a great day, and Happy Crafting!


DOODLEBUG PRODUCTS USED

Sweet and Spooky Collection
Sweet and Spooky Cards and Envelopes

OTHER

Pop Up Card Dies Set
Glue and Tape Runner

Monday, July 11, 2022

MY HAPPY PLACE SUCCULENT BOX CARDS | with Kathy

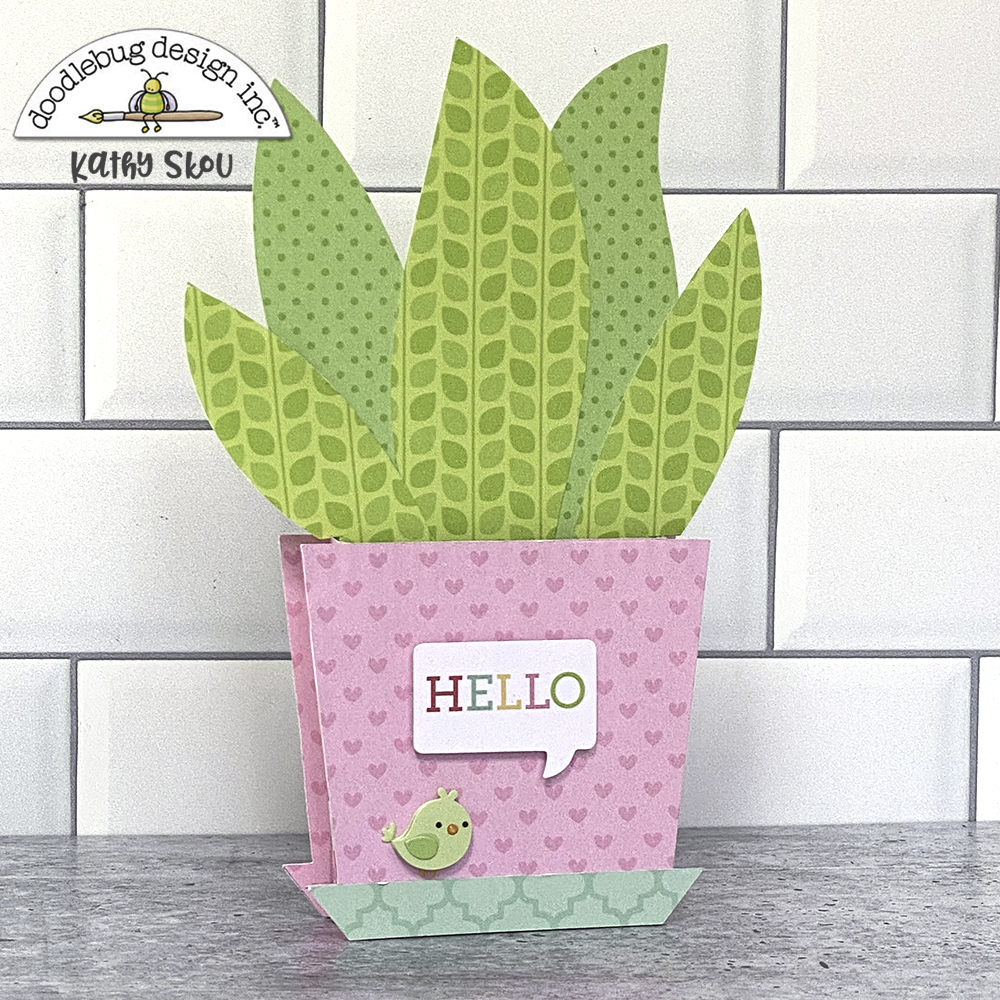
I'm in love with so many icons in the My Happy Place Collection.  Some of my most favorites are the adorable little succulent plants.  They just make me happy!  I decided to turn a couple of them into 3D Box cards.  Take a peek...


I started with the My Happy Place Pot of Succulents SVG from the Lori Whitlock SVG shop.  I thought they would be so cute as cards!  For my first card I used the Love This and Enjoy the Ride papers for my pot.  I pieced together my plant from the Love Grows Here paper and a Petite print from the coordinating petite prints pack.


To complete the card, I added the sweet little birdie from the Home Tweet Home Doodlepop and the Hello speech bubble from the Chit Chat pieces.  I just LOVE that cute bird!


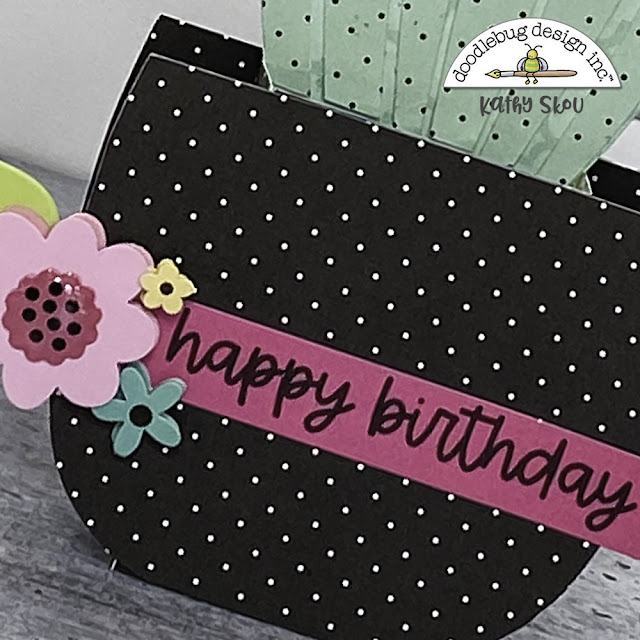
For my next card I used the Cozy Spot cardstock for my pot.  I love the pops of black in this collection, it really makes the other colors shine even brighter!  For my cactus I combined the Enjoy the Ride paper with the Mint to Be paper... again.. the pops of black are fabulous!  I cut the hearts from some papers from the 6x6 pad and a coordinating Petite print.


To finish the card I added the Happy Birthday Banner from the Chit Chat pack and some of the flowers from the Flower Garden Doodle Pop... I know it's a miracle, I actually used 2 Doodlepops!!


These cards are now ready to be mailed off!  Have you created any projects with the My Happy Place Collection or cut files?  Be sure to tag Doodlebug Design on Facebook and Instagram... we love to see what you create!  That's it for me today, thanks for stopping by to peek!


DOODLEBUG PRODUCTS USED

My Happy Place Collection
My Happy Place Pot of Succulents SVG

OTHER

Silhouette Cameo
Adhesive/pop dots


Monday, June 13, 2022

MY HAPPY PLACE BIRTHDAY CARD | with Kathy

The new My Happy Place Collection is so much fun!  The colors, the icons.... and the cut files!  If you know me, you know I love Doodlebug's cut files, and When I saw the Bird in Cage file I immediately had an idea for a fun box card.  Take a peek.... 

I turned the flat birdcage into a 3D shape, where the little birdie hangs down!  In addition to using some papers from the collection, I also added some of the flowers from the Bits & Pieces pack.  These flowers are perfect to embellish just about anything!  I also used the perfectly punny sentiment from the Chit Chat pack.


To make the cage stand up, I added 2 thin strips of cardstock, folded into a box shape to the top and bottom of the cage pieces, then I layered the back piece of the cage so they were centered. To attach the bird, I glued a strip the same thickness as the top and bottom boxes and about 1" wider than the folded box.  I scored glued the bird and his perch to the center, then folded back about 1/2" on each side of the strip and glued the folded sections to the side of the box on the top.  This way he hangs freely.

Since the top and bottom "box strips" are centered and the same size, the card can fold flat for mailing.  I thought this would also make a darling anniversary or wedding card.  You could create another birdie, mirror image and add it to the perch with his friend!

Have you created any projects using the My Happy Place Collection or cut files?  Be sure to tag Doodlebug Design on Facebook & Instagram.  We love to see what you create!  That's it for me today, thanks for stopping by to peek!


DOODLEBUG PRODUCTS USED

My Happy Place Collection
My Happy Place Coordinating Petite Prints
Buffalo Check/Woodgrain Petite Prints (Cherry, Gray)
My Happy Place - Bird in Cage SVG

OTHER

Silhouette Cameo
Adhesive/Pop Dots

Monday, May 9, 2022

DOWN ON THE FARM BOX CARD | with Wanda

Howdy everyone! Wanda here, with another fun project made with the Down on the Farm Collection! Have you enjoyed all the farm projects? It's really great to work with an older collection and bring it back with some fresh and new ideas. All the elements and images in this collection are so happy and fun. Today I decided to make a Pop-Up Birthday card with that adorable barn and a cute cow and some chickens! Happy Birthday to MOOOOOO! This card came together easily with a Pop-Up card die, and the Chit Chat and Odds & Ends packs. I custom made an envelope, and this card fits flat for mailing or giving. 

50

Here's a top down view of the card so you can see all the different papers and elements. I used green gingham for the 'ground' pieces and that pretty buffalo check for the outer shell of the card. I placed the barn in the back first, then the fence in front. Then I mixed and matched pieces until I got just the right look! 

50

 One tip - use a white gel pen on your design pieces to add a bit of a highlight!

50

 This is the back of the card - with that sweet sentiment!

50

The whole card folds flat! You can put it right into an envelope. In this case, the barn and sun extend over the back of the card base. Because of that, I needed a bigger envelope. If you keep the elements inside the outer area of the card die then it would fit into an A2 envelope. It's fine with me, because I love to make custom, matching envelopes with the same papers from my cards. 

50

Here is my fun envelope! It's a 6" x 6" square envelope. There's extra room so it doesn't get squished! I used the same cow and chickens on the envelope so it is totally custom.

50

 I made a little envelope seal too!

50


50

As always, it's lovely to spend a little time with you here on the Doodlebug Blog! I'll be back soon! Until then, keep on crafting! 


50

MY BLOG | MY INSTAGRAM

DOODLEBUG SUPPLIES:

Down on the Farm Collection
12x12 Gingham Collection
12x12 Buffalo Check Collection

OTHER SUPPLIES:

Envelope Punch Board
Pop Up Card Dies
White Gel Pen
Adhesives and glue

Monday, March 14, 2022

CUTE & CRAFTY BOX CARD | with Wanda

Hi everyone! Wanda here on the blog to share a fun pop-up card made with the Cute & Crafty Collection! I just absolutely love this collection full of artsy, crafty things! And the rainbow colors make the collection just that much more fun. Pencils, Markers, Paints and more.... I used lots of elements from the Cute & Crafty Collection to make my super crafty pop up! Let's Craft! This card would be perfect to send to your crafty friends!

1

 Here's a side view of the pop up card - showing all the elements I put in there! I made the pop up card from 12x12 Gingham Linen Petite Prints. I used 12x12 Textured Cardstock for the inside bars that hold all of the elements. The pop up box is a die cut set. The fun part was adding things!

1

 Live. Love. Create. Yes, that's a good motto! I used the School Supplies Sprinkles here on the front and added a pencil and a paint brush. I used a white gel pen to add white accents to the different Chit Chat elements.

1

 When you close the card, it folds flat and fits into an A2 envelope! A sweet rainbow heart is on the front!

1

 Here is the matching envelope that I made using stickers! I also added dots with a white gel pen onto the pretty aqua envelope! I almost always use some tiny hearts sprinkles too!

1


1


1

That's my project for today! I hope you're inspired to get crafty! Until I see you again, happy creating! 


1

MY BLOG | MY INSTAGRAM


DOODLEBUG SUPPLIES:

Cute & Crafty Collection
12x12 Gingham Linen Petite Prints
12x12 Textured Cardstock
Mini Jewels
Tiny Heart Sprinkles
School Supplies Sprinkles

OTHER SUPPLIES:

White Cardstock
White Gel Pen
Pop Up Box Dies
Glue and Adhesives

Monday, June 28, 2021

LAND THAT I LOVE BOX CARD | with Kathy

I love the 4th of July.  We usually get together with friends to celebrate and watch the fireworks on our boat.  It's always such a great time !  So of when I got a chance to play with some Land That I Love collection I thought it would be fun to create a fireworks card.  Take a peek...

For the base of my card I altered one of Lori Whitlock's Envelope Box Card Files.   I made the base from some of the Hip Hop Hooray and the graph side of the America the Beautiful papers. Then I started to work decorating it!


For the fireworks I combined stickers from both the Icon and Mini Icon sheets.  I love that they are different sizes!  The flags are from the Odds & Ends Pack.


And of course I had to have someone setting off the fireworks!  I love the little Sammy eagle DoodlePop... I thought he added the perfect amount of dimension and his little beak is adorable..  I have him holding one of the fireworks from the Firecrackers DoodlePops.  Yes, I used DoodlePops!  Usually I just like to hoard them!

For my sentiment I combined the July 4th from the Mini Icon Stickers and the happy sticker from the This and That Sheet.

Now if I remember to mail the card I'll be in good shape!  In celebration of the 4th of July, I'm having a fun Doodlebug Giveaway over on my Instagram account... @ekskou.  Head on over to enter to win a Land that I love prize!  If you've created any projects with Land that I Love, be sure to tag Doodlebug Design on Facebook and Instagram, we love to see what you make!  That's it for me today, thanks for stopping by to peek!


DOODLEBUG PRODUCTS USED
Land That I Love Collection

OTHER
Envelope Box Card SVG
Silhouette


Pin It button on image hover