Thursday, November 30, 2017

Holiday Gift Card Box by Karen

Hi everyone! It's Karen, and today, I am sharing a little way to personalize one of the most popular/unpopular gifts out there - gift cards! I have to admit that I always feel a bit guilty giving a gift card - almost like I am not being all that thoughtful when I put a gift card under the tree. But the truth is that gift cards can actually be the perfect gift, and with a little Doodlebug paper and goodies, they can be as personalized as gifts can come!
It will probably come as no surprise that the adorable Milk & Cookies was my choice for this holiday project. This collection is way too cute, and given that gift cards from coffee shops often top my list for teacher gifts, it's a perfect fit!
This little pop up box features a cute little slot for the gift card that I wrapped up inside a pretty doilie... 
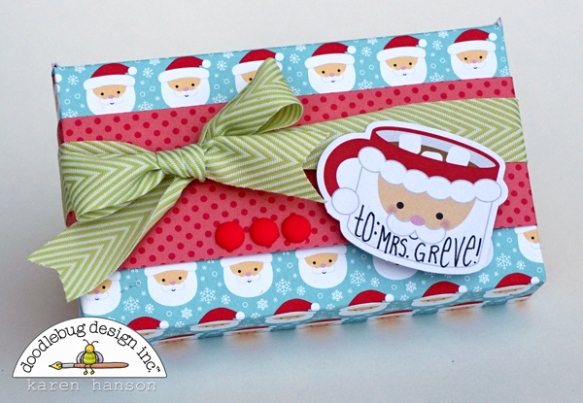
...slightly hidden behind some of the super cute die cuts from the Odds and Ends pack.
Oh, and just in case you are like me and are putting one of these together at the last minute (yes...it's been known to happen more often than not) and you don't have one of Doodlebug's cute doilies, it looks pretty cute without as well! You can even add a little sentiment or a little treat to the bottom section...just remember that this is the spot needed for the die cuts and the gift card to lay flat when the box is closed!
...and a Doodlebug project isn't finished in my house unless I find a spot for a few Sprinkles...and these beautiful matte ones hit the spot!
So there you have it - if you have a loved one that would love to get a gift card this season, here's a little project that you can create so that you will love giving it! Thanks for stopping by!

Hugs, Karen

Wednesday, November 29, 2017

Twas the Night Before Christmas by Mendi

Hello Doodlebugs!  It's Mendi here today with a fun layout mixing a variety of cut files and cute embellishments from the darling Milk & Cookies collection.
I was so happy when I stumbled across these photos of my daughter getting ready for Santa a few year's back because they are a perfect compliment to these adorable papers!  I started by opening up each of the cut files in my Silhouette software and then setting my screen to view them at 100%.  I then could hold up my various die-cuts and stickers to decide on sizing and see how everything would fit together.
When all my pieces were cut and assembled, I added touches of stitching using my sewing machine and embellished my scene with various sprinkles to help the scene come alive!  As a final finishing touch, I paired the Christmas word die-cut from the odds & ends pack with the Love Letter alphabet stickers to complete my title. I just love how it all came together and the over-sized 12x12 clipboard is the perfect frame to display my finished work of art.
To create my scene today, I used the following cut files:
  • Milk & Cookies Fireplace- available HERE or HERE
  • Milk & Cookies Santa In Chair- available HERE or HERE
  • Milk & Cookies Tree- available HERE
I hope I've inspired you to mix some cut files with your other embellishments on a future project.  It's seriously so much fun!  ;)

Tuesday, November 28, 2017

Christmas Gift Bags with Kathy


Hi Everyone!  It's Kathy today with some Holiday Gift Wrap ideas!  I do love a gift bag, they make life so easy,  I thought it would be fun to dress up some plain bags a little with Doodlebug Cut Files and Odds & Ends pieces. 


I started by making a couple of gift bags using Lori Whitlock's Gift Bag SVG file (here in the Silhouette Store) I used papers from the Milk & Cookies Collection for the bag body and trim.  For the handles I used some Doodlebug Washi Tape in coordinating colors.  To make the handles, I folded the tape onto itself so the sticky sides were together.  I then cut it into lengths for the handles.  I added cute die cuts from the Milk and Cookies Odds and Ends which I embellished with some Christmas Assortment Glitter Sprinkles and some Holly Berry Sprinkles to finish the bags.  Here are some close-ups:


For the other three bags, I purchased plain bags at my local Paper Store.  They were great because they came with the backgrounds already!  I then went to work adding different cut files.  To get the sizing correct, I first measured the colored area of my bag, then I drew a rectangle shape in Silhouette to those dimensions.  This made it easy to plan my "scenes" and get the cut file sizing correct.


I then set to cutting the files and decorating the bags.  Here are some close ups and the files and supplies I used:


For the large snowman bag, I used a mix of collections including Doodlebug Textured Cardstock, Gingham Linen Petite Prints and patterned papers from both the Milk & Cookies and Santa Express Collections.  I added Stickles to the Snowman hat and snowflakes.  Here are the cut files I used. 

 Snowman- Here Comes Santa SVG  (here in the Silhouette Store)
Milk & Cookies Snowflakes SVG   (here in the Silhouette Store)
Birds - Here Comes Santa SVG  (here in the Silhouette Store)


For the Kitty Tree Bag I used Gingham Linen Petite Prints, and patterned papers from the Milk & Cookies, Santa Express and Here Comes Santa Collections.  I also added some Christmas Assortment Glitter Sprinkles.  Here are the cut files I used:
Milk and Cookies Tree SVG  (here in the Silhouette Store) 
Milk and Cookies Kitty SVG  (here in the Silhouette Store)
Gifts - Here Comes Santa SVG (here in Silhouette Store)


Finally for my ornament bag I used the Pastel Starlights Double Sided Cardstock from the Milk and Cookies Collection.  I embellished the shapes with some Stickles to add a little shape.  The cut file is the Ornaments - Here Comes Santa SVG  (here in the Silhouette Store)

I think they will look wonderful under the tree this year, now if I could only get my act together to purchase gifts to fill them!  Make sure to stop by all this week and next for more Holiday Gift Ideas from the design team!  That's it for me today, thanks for stopping by to peek!


Monday, November 27, 2017

Santa Treat Box by Brigit Mann

Hello Doodlebug Fans, it's Brigit, I have a Santa Treat Box to share with you today using the Milk & Cookies collection. It's so fun to make treat boxes that can also be used as a holiday decor piece, makes the gift all the more special!


I used the santa chimney cut file sizing it to fit the front of the bunny box, both of these are from Lori Whitlock's shop. I didn't need the top of the box so I used the knife tool in Silhouette Studio and cut it off. After assembling the Santa I glued him to the inside front of the box.


The ho ho ho is from the this & that sticker sheet and the holly from the holly berries shape sprinkles pack, so cute!! For Santa's hat and jacket I used ruby textured cardstock and on the muslin bag I replaced the string with some ladybug chunky twine.


I created layer panels for each side of the box and cut them out using dear santa paper. The tree, gingerbread and hearts are all from the icon sticker sheet, I added some Christmas assortment glitter sprinkles over the ornaments on the tree. The cute little candy cane is from the candy cane shape sprinkles pack and the sentiment from the this & that sheet is matted on a strip of merry berry paper.


To add a little more detail I printed some of the gumdrops on t-shirt transfer paper and used my easy press to iron them onto the bag, adds a fun touch!

Hope you've enjoyed this project, thanks for stopping by and have a wonderful day!

Sunday, November 26, 2017

Partying It Up : Show 'n' Tell Treat Bags with Melinda

My youngest son has his class 'Show 'n' Tell' roster pinned to my desk calendar so I don't forget when it's his turn. This week the theme is 'Favourite food to make in the kitchen' so he let me know in advance that he wanted to make 'rumballs aka truffles'. The next step was to work out a fun way to package the rumballs and we thought about doing Reindeer noses but one thing led to another and we decided on 'Zoo Poo', much to my son's delight.


Fortunately I still had two full sheets of icon stickers from the 'At the Zoo' collection to use on the front of this sweet little Treat Bag Topper SVG cut file from Lori Whitlock. I made the topper 6" in width which was perfect for snack size zip-lock bags to hold four rumballs for each student.


I also used three different leaf SVG cut files from the Doodlebug 'At The Zoo' collection to create more layers to the front embellishments and give that jungle feel behind each zoo animal.


Just loving the brand new 'Abigail' font stickers that come in all the Doodlebug colours including a gorgeous silver metallic foil.


So, I have made seven bags so far and have seven to go... half way there! I must admit they are fairly quick to make once I worked out the first design and cut out all my leaves and base plates. And believe me, I have one very excited little boy who cannot wait to have his 'Show 'n' Tell'.


Melinda Spinks

Saturday, November 25, 2017

Partying It Up: Party Bag Tutorial with Tya

Hello everyone! Tya here - and I wanted to share with you all an easy tutorial on how to make your own gift party bags.These are so quick and easy to put together and are the perfect size to add a little gift or treat to the inside. They are my go-to bag when I want to make my own bags and  they are so fun to personalize to match your party theme.
These boxes measure 4.25 x 4 x 1.5 when completed. I used a scoring board to make the boxes. Here is the tutorial-

Step 1
Cut a piece of pattern paper to 6 x 12 inches.  I used the Animal Crackers paper. Lay this paper on a scoring board or trimmer the long way.

Step 2
Score your paper  on the LONG side at 1.5, 5.75, 7.25, 11.5″ 

Step 3
Turn your paper.  If your paper has a pattern that needs to face up and  down - double check that to make sure you have it going the correct way like on my paper above. Score on the SHORT side at 1.5, 5.5″

Step 4
Trim the paper along the bottom score mark as shown. Completely trim away the far right small rectangle piece.

Step 5
Fold and burnish on all of the scored lines.

Step 6-
Add adhesive as shown


 Add adhesive as shown.
Here is the completed box. Super quick and easy! Here are a few close ups of my bags. I love the adorable At the Zoo collection and so that is the collection I decided to use. I filled the bags with some yummy animal crackers.  These bags make perfect treat bags too! The tags are made from some Kraft Gingham/Linen paper and then I layered a cardstock circle, a Doodlepop, a leaf sticker, a matte sprinkle, a  For You Doodles sticker and a Chunky Twine bow.
 I also added a Cute Clip to the top edge of the bag. Love using  these to add little touches here and  there.


That's all there is to them! I think its so fun to be able to make my own gift bags that match the theme of my party. Plus these bags are so quick and easy to put together, you can whip up a bunch for your party in no time! Thank you for stopping by today! Happy Crafting!

Friday, November 24, 2017

Partying It Up: Children's Book Birthday Party with Courtney

My youngest (Lilibeth) is turning 2 the day after Christmas. And as I wasn't done (and wont be for years) with doodlebug's milk and cookies collection I thought it would be fun to turn it into a book theme for our little bookworm!

I chose the books, "If You Give A Mouse A Cookie" and "If You Give A Cat A Cupcake" as the theme books for the party. 

First of all one needs an invitation. I have found that invitations with a lot of parts can be frustrating to put together. So instead of doing that this time I used my print and cut feature and doodlebug cut files to create this invitation. I embellished it with paper from the milk and cookies line as well as glitter sprinkles to give it some pop and liveliness! The details will go on the reverse side, but this is a quick way to make a lot of invitations as well as to embellish them for character.

Next I made this cute t-shirt that says, "Our little cookie is turning two". This is gold glitter iron on material and printable iron on for light fabrics. I printed and cut out the cookies and left spaces for the text in order to get this look. It is sooo much cuter in person!

None of my kid's birthday parties would be complete without a banner! I once again used the book and added some of the Odds and Ends from the Milk and Cookies line. The papers are swiss dots, milk and cookies, booville, petite prints, and some sugar coated cardstock. It was really fun to look through my whole collection and just grab papers that were perfect from all different lines!


Here are a few more close ups of the parts of the banner. These pieces are about 6" high so they are a really good size. I used the doodlebug cut files for milk and cookies as well as one from flea market (the mouse).

For small details of the party I added these cute odds and ends from the milk and cookies line. PERFECT for extra party decor!

Treat boxes are clearly necessary for any party table. I cut these popcorn boxes and then simply used foam dimensional squares to stick the odds and ends onto the front of the boxes. Easy peasy and as my daughter LOOOOOOOVES popcorn I knew I had to get it incorporated into her party.

This is going to be such a fun set up when it is all said and done and this will definitely jump start my progress for her party! I hope you have been enjoying our party feature and that you had a wonderful Thanksgiving!

Pin It button on image hover