Showing posts with label Gift Card Holder. Show all posts

Thursday, August 28, 2025

SUMMER FUN GIFT CARD HOLDERS | with Karen

Good morning Doodlebug fans! I have some more Summer Fun inspiration for you today. Today's project was actually inspired by a video that came across my social media feed about a pretty way to wrap a box. I just loved the way the top of the box looked in the video and wanted to see if I could recreate the style for a little gift card holder made with Doodlebug paper.

These little pockets could hold anything from a gift card to stationary to thin treats! I am actually planning on using these to hold some thank-you notes and a gift card tucked into the pockets. Overlapping Water Babies, Seashells by the Seashore, Gull Friends and Beach Towel 12x12 papers form the base of the pockets.

And then to embellish the pockets, I used a variety of die Cuts from the Summer Fun Chit Chat, Odds & Ends and Bits & Pieces packs tucked into each layer and then glued in place.

Some adorable Doodle Twine in Limeade, Swimming Pool and Bubblegum were wrapped and tied for some texture, and then I added a couple of Mini Doilies back-to back in the back pocket to create a little shape on the top.

Finally, I added a few Sprinkles from the Summer Assortment and a couple of Mini Paperclips in Tangerine and Blue Jean. I just love that you can fill each section to your hearts content - love all the die cuts?! Tuck them in! A fan of all the tags? Use them up! The more you add, the more textured and interesting the pockets become! I think I will be making different versions of these in the future!

Oh, and you can too because there is nothing hard about this project at all! Check it out:

  1. Start with two strips of paper 4" x 12". Score both along the long edge at the 4" and 8" mark.
  2. Take the outside top corners and fold them down. use a bone folder if you have one to get a tight fold. Repeat with your second strip.
  3. Using one strip of paper, fold in the two sides and then place it down on top of the second strip about 1/2" from the bottom.
  4. Fold the sides from strip 2 over top and then glue along the bottom edge to hold everything in place. Embellish them up to your heart's content.

    That's it! Really!

I love that you could alter the dimensions on these and end up with a different look. Or if you are a fan of showing off all the Doodlebug patterns, add another layer! these would look really cute on a scrapbook paper to to hold a little keepsake! I can only imagine all the creative things you will do with the idea and we can't wait to see them! Thanks for stopping by! Hugs,


BLOG | INSTAGRAM

DOODLEBUG PRODUCTS USED

8936 seashells by the seashore 12x12 patterned paper
8932 water babies12x12 patterned paper
8940 gull friends 12x12 patterned paper
8939 beach towel 12x12 patterned paper
8891 summer assortment sprinkles
4502 mini paper clips blue jean
4498 mini paper clips tangerine
4597 mini doilies bubblegum
4602 mini doilies swimming pool
2991 doodle twine swimming pool
2987 doodle twine bubblegum
8921 odds & ends summer fun
8922 chit chat summer fun
8923 bits & pieces summer fun

OTHER

Adhesive
Monday, April 7, 2025

BUNNY HOP FLIP FLAP GIFT CARD HOLDER | with Kathy

Easter is almost here!!  I used to love creating and filling fun Easter Baskets for my daughter.  She is an adult now, and won't be home for the holiday, but I still wanted to do a little something special for her.  I decided to create a fun, interactive gift card holder!  

I was at a crop recently and found a very cool Flip Flap Pocket Card Kit in one of the shops.  I put the base together and decorated it with lots of goodies from the Bunny Hop Collection.  The result is just plain cute!  Take a peek...


For the front of my card, I started with the Bunny & Friends Doodle Cuts.  I created the bunnies using some coordinating textured cardstock and papers from the 6x6 pad and Petite Prints.  I added some Colored Eggs Shape Sprinkles and a the little basket from the Honey Bunny Doodle-pop.  I also added some grass stickers from the Icon Sticker Sheet.


To create a pull tab for my card, I glued two Easter eggs from the Odds & Ends pack back to back to the part of the card that is pulled. I used a strong liquid adhesive so that it could withstand lots of use.  


This flip flap card pulls down in two stages.  On the first part, I added some Just My Type Alpha Stickers to write Hippity Hoppity.  I added more Colored Egg Sprinkles and Icon Stickers to keep with the theme.


When you pull once more, the card piece flips up and you get the the second stage of the card.  I used a Chit Chat Easter piece and more Just My Type alphas to create "Easter is on it's way!"  Again, I added more Sprinkle Eggs and grass.  There's a little pocket on the bottom of the card, perfect to hold a gift card!

As always, I think it is more fun to see an interactive card in action.  I made a quick video of my card here.


That's it for me today, thank you for stopping by to peek!


DOODLEBUG PRODUCTS USED

Bunny Hop Collection
Bunny & Friends Doodle Cuts
Petite Prints
Just My Type Alpha Stickers

OTHER

Flip Flap Pocket Card Kit
Grass Border Die


Monday, May 13, 2024

HAPPY HEALING GIFT CARD HOLDER | with Kathy

In our town we have a few groups that help out families in the area when someone is sick or recovering from an injury.  They help with meals, sometimes with gift cards to favorite restaurants, local cleaning service, grocery delivery and the like.  I thought it would be fun to put together a little get well gift card holder for all the items gathered.  This would also be a great get well gift to a friend after surgery or illness.  Happy Healing is the perfect collection to use for this, take a peek...


The front of my gift card holder is a shaker, made to look like the little pill bottle in the collection.  I filled it with the Pill Better, Limeade, Ladybug, Bumblebee and Swimming Pool Shakers.  I added some pills from the Odds & Ends as well as a sentiment from the Chit Chat pieces.


Inside, it holds 6 little gift card sized envelopes.  The envelopes are from a cut file, but you could create your own, they measure 3.625" x 2.5".  

For the holder wrap, I cut a strip of cardstock 2.75"x12".  I scored it at 1.25", 3.25", 7.25" and 9.25".  I folded all the scores in the same direction to form the outside of the holder.  I added patterned papers to the inside and outside sections, for color and a little extra strength. My Shaker is glued to the front, bottom section (larger of the two).  The top folds in behind the shaker and I added a little piece of Velcro to keep it closed.

The gift cards envelopes are attached using a hidden binding.  To create it I started with a 2.5" x 4.75" piece of cardstock.  I scored it every .25".  The diagram below shows how I put it together.  I folded the areas under the blue sections into a peak,  and glue them together so they stick up.  The end result is you would have 6 sections that stick up with two "flaps" on the outside edges.  I glued this to the bottom section of my wrap, and then glued each envelope to one of the sections that stick up.


This photo shows how the envelopes are attached to the hidden binding.


Now for the fun part, decorating!  I used a little bit of everything to decorate the individual gift card holders including Bits & Pieces, Odds & Ends, Chit Chat pieces, Puffy Icons, Icon stickers, shaped sprinkles and the dies Happy Healing Doodle Cuts (the ones that coordinate with the Stamp Set) for the Get Well Sentiment.


My first envelope holds a tag from the Bits & Pieces with a little sentiment.  I tied it with some Limeade Doodle Twine.


The rest of the envelopes are ready for gift cards!  


I completed the inside of my wrap using the cutest sticker of the bunch... the little get well bear!  I love how this turned out, and I think it would also be a fun idea for a birthday or Christmas gift!  That's it for me today, thank you for stopping by to peek!


DOODLEBUG PRODUCTS USED

Happy Healing Collection
Doodle Twine
Happy Healing Doodle Cuts
Clear Heavyweight Acetate
Doodlebug Shakers
Pill Better Shakers
Textured Cardstock

OTHER

Gift Card Holder SVG
Velcro Dots
Foam Tape
Silhouette
Scoreboard
Adhesive


Monday, December 18, 2023

GINGERBREAD KISSES TRUFFLE BOXES & GIFT CARD TAGS | with Kathy

I can't believe that Christmas is one week from today!  I think I am almost done shopping... well maybe... This year I am giving a few gift cards, and I wanted to make them a little more personal so I made some chocolate truffles and packaged them up with cute gift card tags using the Gingerbread Kisses collection.  Take a peek...

I started with the box cut file I found in the Silhouette Store that was designed to be cut from acetate, it is a "no-glue" box.  I cut it from the Sugar Sprinkles Heavy Acetate. The little boxes were the perfect size to hold 2 truffles, and I just love the colorful dots on the acetate!


To dress the boxes up a little I made a belly band and cut a bow using another cut file. 


Next I created the gift card "tags" that I tied to the bows on the box with some Doodle Twine.  I started with a couple of tags from the Bits & Pieces pack.  I embellished them with some Odds & Ends, chit chat pieces and some sprinkles.  I glued them to a small envelope sized just right to hold a gift card.


I love how it all turned out!  These would also make fun teacher or neighbor gifts.  The hardest part of this whole project was to not eat the truffles!  That's it for me today, I will be back in the new year with some more Doodlebug Fun!  I wish all of our Doodlebug Friends a very Merry Christmas and a Happy and Healthy New Year!


DOODLEBUG PRODUCTS USED

Gingerbread Kisses Collection
Sugar Sprinkles Heavyweight Acetate
Doodle Twine

OTHER

Silhouette Cameo
Acetate Box (no glue) Cut File  (Silhouette Design ID 423268)
Bow Cut File (Silhouette Design ID 25162)
Tuck- In Envelope Cut File  (Silhouette Design ID 441630)


Thursday, December 7, 2023

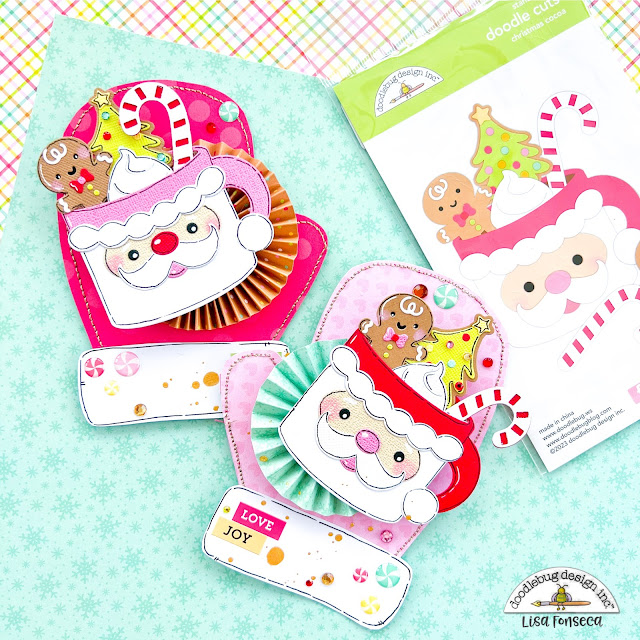
GINGERBREAD KISSES CHRISTMAS COCOA DOODLECUTS GIFT CARD HOLDERS | with Lisa

This week I was in the mood for a different kind of crafting. My favorite thing to make are layouts, but sometimes you just want to switch things up. When I saw the cute Christmas Cocoa Doodle Cuts from the Gingerbread Kisses collection, I knew I wanted to create some kind of little pockets or gift card holders, so that's what I did!


I made these during a workshop day at my house. While the attendees, were occupied creating their first layout, I started cutting out all of the pieces. There are quite a few pieces in this die set, but it's relaxing choosing colors and preparing all of the parts!  I made one traditional Santa and one Santa in pink. I LOVE this color combo and I think it just looks so cool. I really love this die set.


When I was done with all the pieces, I glued everything together and added a black border, white highlights and pink cheeks to the Santas and gingerbread men.  I drew a mitten shape and cut it out of four different patterned papers. The pink and red ones, called Berry Floral and Christmas Jammies and for the back sides, I used the brown side of Baking Spirits Bright and the back side of Berry Floral.

I stitched both sides together and added the white furry part on the bottom. Before I adhered the mugs to the mittens, I created two rosettes out of Sugarplums and Holiday Sprinkles papers. I don't particularly like the process of creating rosettes, but I LOVE the end result and I love adding them to layered crafts.


For some more decoration, I added shaped sprinkles, jewels and some word stickers from the This & That Cardstock Stickers. I also sprinkled gold ink on both of the mittens.


I just love this mug full of happiness and I'm sure I will create more of these... ;) The bottom part of the mittens is open, so you add money, a gift card or a letter! I hope you are inspired to create your own little gifts using this die set. See you soon...


DOODLEBUG PRODUCTS USED

Gingerbread Kisses collection
Textured Cardstock
Christmas Cocoa Doodle Cuts

OTHER

Black pen
White pen
Gold thread
Distress Oxide in pink

Friday, October 13, 2023

SWEET & SPOOKY FOLDER GIFT CARD HOLDERS | with Niella

Hi BOO crew! Come one, come all! With just over two weeks to go until Halloween; we have officially gone into countdown mode! Eeeek, SO hex-citing! So gather around sweet witches, crafty ghoulfriends, darling wizards and cute ghosties whilst we take a look at what I've created this week :-)

I'm currently making up candy gift baskets for my friends to gift on Halloween and as an added treat; I've made these mini file folders to pop in a sweet Starbucks gift card and a spooky note! I'll be using four of these; wonder which ones I should!


I've used a folder die, but you can make your own mini file folders by folding a piece of cardstock in half and adding a piece of extra card as the tab! Doubled sided paper is always a treat like these ones are from the Sweet & Spooky collection! If you only have single sided paper, simply glue back to back.


For these file folders I reached into the Odds & Ends and Chit Chat ephemera packs! You get so much variety and each piece is adorably sweet & spooky! There was also room for the Icon stickers and this & that sticker sheet.


Look how stinkin' cute that sweet pumpkin face is...and the candy jars and ghosties!
BOO-tiful! I adore the double sided patterned papers for their colors and designs especially the B Side of the papers, every matches perfectly :-)


A word here, a speech bubble there and I loved dotting the Sweet & Spooky Assorted Sprinkles around and adding in darling puffy stickers and popping the ephemera on pop dots to give extra dimension as well.


Thank you spook-tacular crafty crew for popping around today! Hope you've gained some pastel-o-ween inspiration today! Please remember to tag us in on your socials whenever you create with Doodlebug Designs, we LOVE seeing your crafty creations! Until next time; doodle BOO!


DOODLEBUG PRODUCTS USED

Sweet & Spooky Collection
Doodle Cuts Treat Yourself


OTHER

mini file folder die
foam dots


Monday, September 26, 2022

PUMPKIN SPICE CARDS | with Wanda

Hi Doodle friends! Fall has officially arrived and I am here for it! Fall is my very favorite time of year and I love Fall crafting!! Today I'm featuring some cute coffee cards made with one of my all time favorite Doodlebug Collections - Pumpkin Spice. This collection has a special place in my heart... The colors, the critters, and of course coffee! Such great themes for this time of year. To share with you today I made two coffee cards and a smaller latte notecard. All made with the Pumpkin Spice Doodlebug suite of products!

1

I used the 12x12 Pumpkin Spice papers to die cut two large folding coffee cards using a die. I added corrugated paper for the sleeve and decorated them with The Rocky Doodle Pop and the Fox and Friends Doodle Pop! I added accents with the accompanying sprinkles for the collection. The sentiments are from the Chit Chat and Odds and Ends packages.

1

 I also wrapped some twine around the sleeve part of the card and added some Fall Jewels... 

1

I splattered on some white paint over the coffee cup part. A coffee gift card would fit inside the card along with your message. The double sided Doodlebug Papers are perfect here so that the inside is cute too!

1

 Here is the opened card... The sleeve slides right off.

1


1

I also made a sweet little latte notecard. I die cut the notecard from woodgrain cardstock and embellished with the Chit Chat and Odds and Ends from the Pumpkin Spice Collection. This is the perfect size to tuck into a lunch or in a gift bag!

1

There's my projects for today! Love you a latte! I'll be back soon with something else to share. Until then, happy crafting!


Wanda Signature

BLOG | INSTAGRAM


DOODLEBUG PRODUCTS USED

Pumpkin Spice Collection|
Bon Bon Twine
Fall Assortment Jewels

OTHER

Woodgrain and Corrugated Paper
Stitched Circle Dies
White Paint
Coffee Cup Dies
Notecard Dies

Pin It button on image hover