Showing posts with label Easter Crafts. Show all posts

Monday, April 7, 2025

BUNNY HOP FLIP FLAP GIFT CARD HOLDER | with Kathy

Easter is almost here!!  I used to love creating and filling fun Easter Baskets for my daughter.  She is an adult now, and won't be home for the holiday, but I still wanted to do a little something special for her.  I decided to create a fun, interactive gift card holder!  

I was at a crop recently and found a very cool Flip Flap Pocket Card Kit in one of the shops.  I put the base together and decorated it with lots of goodies from the Bunny Hop Collection.  The result is just plain cute!  Take a peek...


For the front of my card, I started with the Bunny & Friends Doodle Cuts.  I created the bunnies using some coordinating textured cardstock and papers from the 6x6 pad and Petite Prints.  I added some Colored Eggs Shape Sprinkles and a the little basket from the Honey Bunny Doodle-pop.  I also added some grass stickers from the Icon Sticker Sheet.


To create a pull tab for my card, I glued two Easter eggs from the Odds & Ends pack back to back to the part of the card that is pulled. I used a strong liquid adhesive so that it could withstand lots of use.  


This flip flap card pulls down in two stages.  On the first part, I added some Just My Type Alpha Stickers to write Hippity Hoppity.  I added more Colored Egg Sprinkles and Icon Stickers to keep with the theme.


When you pull once more, the card piece flips up and you get the the second stage of the card.  I used a Chit Chat Easter piece and more Just My Type alphas to create "Easter is on it's way!"  Again, I added more Sprinkle Eggs and grass.  There's a little pocket on the bottom of the card, perfect to hold a gift card!

As always, I think it is more fun to see an interactive card in action.  I made a quick video of my card here.


That's it for me today, thank you for stopping by to peek!


DOODLEBUG PRODUCTS USED

Bunny Hop Collection
Bunny & Friends Doodle Cuts
Petite Prints
Just My Type Alpha Stickers

OTHER

Flip Flap Pocket Card Kit
Grass Border Die


Saturday, April 5, 2025

BUNNY HOP PAPER CLIP EMBELLISHMENTS | with Conny

Hello, my crafty friends! It’s Conny here, and today I’m excited to share some delightful paper clip embellishments with you! These charming 4-inch paper clips are perfect for adding a touch of whimsy to your projects. I chose clips that match the color palette, beautifully complementing the enchanting Bunny Hop collection.
Let's get started! First, I began with the Shakers - Bunnies & Chicks sprinkles. I also added round sequins in cupcake and bumblebee for extra pops of color. Once my shaker mix was ready, I cut a piece of clear acetate measuring 3 1/4 inches wide by 8 1/2 inches long.

Next, I slid the acetate through the paper clip and folded it in half. Using my sewing machine, I added stitching starting at the top near the paper clip and sewed all around, leaving a small opening to add the sprinkle mix. After I filled it with the sprinkle mix, I returned to the sewing machine to sewed it shut.
To complete my project, I added Doodle-pops, flowers from the Puffy Icons stickers, Mini Icon stickers, and Chit Chats to embellish the top of the shaker clip. The Chit Chat was added on top of double-sided foam adhesive.  They turned out really cute! I can't wait to see your shaker paper clips using the Bunny Hop collection. Xo, Conny


DOODLEBUG PRODUCTS USED

Bunny Hop Collection
Clear Heavyweight Acetate
Bunny & Chicks Shakers
Doodlebug Sequins

OTHER

Paper Clips 
Sewing Machine

Friday, April 4, 2025

BUNNY HOP ACETATE TREAT BOXES | with Jen

Easter is late this year which gives you plenty of time to make some cute Easter treats! Today I have a pair of fun treat boxes using the Doodlebug Easter Dots Heavyweight Acetate and the Bunny Hop Collection

I used a milk carton treat box die from my stash to cut the boxes from the Easter Dots Acetate. I added some Odds and Ends on two sides to cover up the adhesive used to assemble the boxes.


On the top,  I tied them shut with some Bubblegum and Swimming Pool Chunky Doodle Twine. I added little tent tags to the top using the Bunny Hop 6x6 paper pad and the coordinating Puffy Icons and Mini Icons stickers.


On each box, I used the same Mini Icon as the tiny cut apart on the opposite side of the tag. I also added Puffy Icons to create some dimension.


Now they're all ready for the special little people in my life!

DOODLEBUG PRODUCTS USED

Easter Dots Heavyweight Acetate
Bunny Hop Collection
Swimming Pool Chunky Doodle Twine
Bubblegum Chunky Doodle Twine

OTHER

Milk Carton Treat Die


Sunday, March 31, 2024

BUNNY HOP SNOWGLOBE WITH SHAKERS | with Guest Designer Lisa Fonseca

Hey lovely scrappy peeps, today I'm sharing my last post for Doodlebug... for now... we'll see what the future brings :) I want to thank Doodlebug again and all the people in the team for these amazing three years, I have loved it :) For this project I created a snow globe using the new amazingly cute DIY Snow Globes. They are ready to fill and decorate, wooden Snow Globes ...just a such a cool idea.


I wanted to build a few layers with the Bunny Hop papers inside the globe. I ripped the papers and used foam tape to attach them together and create a dimensional scene. Then I added Doodle Pops and stickers.  I love the Doodle Pops since they are also dimensional a gave the whole scene a very cool look. I also added some shaped sprinkles and jewels.


For the filling and shaker part, I used the new super amazing Shakers. They come in all the Doodlebug colors and there are also shapes for different Doodlebug Themes. I used a few colors and put them into the globe, then closed it up from behind.


To add even more dimension, I added a few stickers on top of the glass and a few shaped sprinkle flowers on top of the globe, on the wooden frame. I think it's just so cute. The cool part is that you can always switch out the inside and create a new scene for any chosen theme.


I really recommend trying out the shakers, they are super fun to use. Thank you for stopping by and reading my posts from time to time. It's farewell for now, I hope you'll follow along my future adventures on my Instagram. See you... ;)

DOODLEBUG PRODUCTS USED

Bunny Hop Collection
Doodlebug DIY Snow Globe
Shakers

Wednesday, March 20, 2024

BUNNY HOP EASTER HOUSE | with Miguel

I love giving new life to wooden pieces and this time I used the beautiful Bunny Hop Collection to decorate this darling little house.

I started by painting with white paint and then I covered it with the papers from the collection.  I embellished with the Bits & Pieces  and Odds & Ends since they are perfect for creating cute scenes, below I will show you.


For the front of my piece I decided to use the Bunny & Friends Doodle Cuts, which are the most beautiful thing in the world haha. I cut several layers of foam and cardstock, then spliced and lined all around. This technique allows me to give the pieces a 3D effect,


This piece is perfect for decorating your home this Easter season, 


I say goodbye as always hoping that my work inspires you to continue creating!

DOODLEBUG PRODUCTS USED

Bunny Hop Collection
Bunny Hop Coordinating Textured Cardstock
Bunny & Friends Doodle Cuts

OTHER

Paint
Wood House

Friday, March 8, 2024

BUNNY HOP TREAT BASKETS | with Niella

Hi crafty crew, we're hopping straight into March with another sweet and adorable collection for Spring and Easter: Bunny Hop! There are so many fun and super charming characters in this collection and the patterns are all so darling! Cuteness overload guaranteed! Let's get into my first project with Bunny Hop - good ol' goodie baskets!


For these baskets I've used the 12x12 patterned papers top left clockwise: bunny hop, bunnies & beans and everything Easter. And that wee baby basket is from the 6x6 paper pad called carrot patch! Hi there little cutie!
Each basket is filled with shredded pastel tissue paper which serves as a great filler with mini chocolate eggs.


To create the front pouch, I've just made it the same as the main basket, just cut it smaller by using the 6x6 patterned pad because this pad is scaled down and perfect for wee projects. Stitched paper strips make easy handles and I love using the contrasting patterns. To close the bottom, I've added machine stitching straight across. These baskets can lay flat as well. Perfect for sending as happymail.


I loved putting these together! Truth be told I could make dozens of these to gift! I loved decorating each basket with the icon and mini icon stickers and the collection's puffy stickers! It's all so super adorable. The bits n pieces ephemera cemented how sweet this collection is. It's one thing to see it, but holding it is something else!


Thank you for popping by today! I hope you've had a crafty hit of inspo! Don't forget to tag us in on your socials - we're looking forward to seeing your next Doodlebug Design project! Until next time; doodle dee!


DOODLEBUG PRODUCTS USED

Bunny Hop collection


OTHER

paper shred
machine stitching
foam dots

Monday, April 11, 2022

HIPPITY HOPPITY CARROT TREAT HOLDERS | with Wanda

Hi Doodlebug friends! Wanda here on the blog today to share some cute Easter carrots I made with the Hippity Hoppity Collection! Just in time for some Spring and Easter crafting. These fun paper carrots would be great at each place setting for your table, or little gifts for friends and co-workers. They are super easy to make and fun too! I filled my treat carrots with chocolate eggs and can't wait to give them away! CLICK HERE for the simple directions to make the shape/template. This would also be a really fun project to do with the kids!

I used orange and green papers from the Doodlebug Floral Graph 6x6 Paper Pad and the Swiss Dot 6x6 Paper Pad. I used a carrot die cut from another company to make the greens on top. I glued the greens inside before I sealed up the top end of the carrots. 

50

I used pieces from the Hippity Hoppity Collection Chit Chat pack to decorate the front of the carrots. I used some Chunky Twine, Bunny Sprinkles, and small green clothespins to add at the top for more decorations. 

50

 I added stickers to the front and a few mini jewels too, for a little bit of shine!

50

I used my paper crimper to crimp the top and bottom of the carrots and add a decorative element. Crimping also secures the tape holding them together. Here is the carrot in my hand to show you the size and scale. I used the full 6x6 sheet of paper for each one. 

50

 Here's a close up of the top portion!

50


50

If you don't want to put them at each place on the table, I think they would be cute in a basket with some Easter grass as a cute decoration.

50

Wishing you a happy Spring and a happy Easter! I will see you back here soon, but until then, happy crafting! 


50MY BLOG | MY INSTAGRAM

 DOODLEBUG SUPPLIES:

Hippity Hoppity Collection Chit Chat
Swiss Dot 6x6 Paper Pad
Floral Graph 6x6 Paper Pad
Chunky Twine
Mini Jewels
Mini Clothespins
Hippity Hoppity Sprinkles

 OTHER SUPPLIES:

Scallop Circles Dies
Carrot Tops Dies
Paper Crimper
Adhesives


Wednesday, March 23, 2022

HIPPITY HOPPITY EASTER SURPRISE | with Miguel

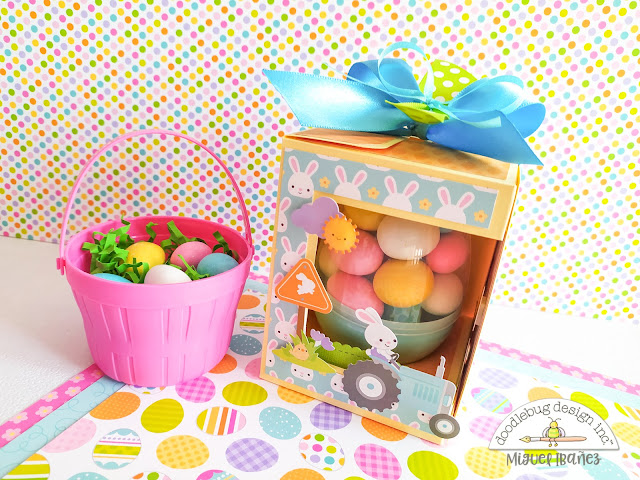
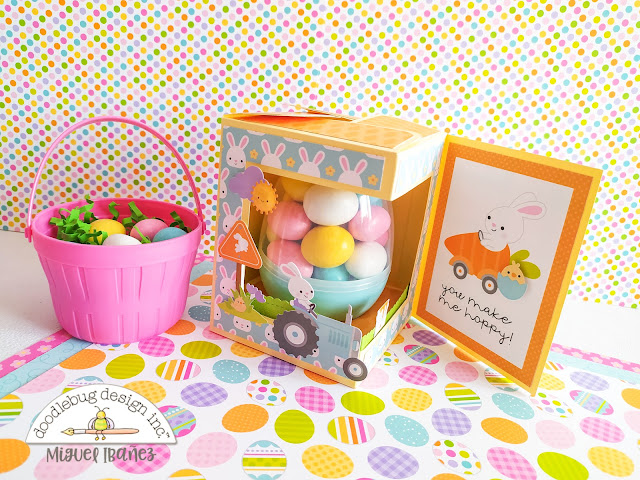
The Easter season is undoubtedly one of my favorite seasons. Rabbits, eggs and colors fascinate and inspire me a lot when creating, so I used Doodlebug's Hippity Hoppity Collection to make this beautiful little box.


I made this with my scoring board, I love this tool, since it allows you to create your own custom box designs.  I created my box to fit some plastic eggs, then added some fun details! 


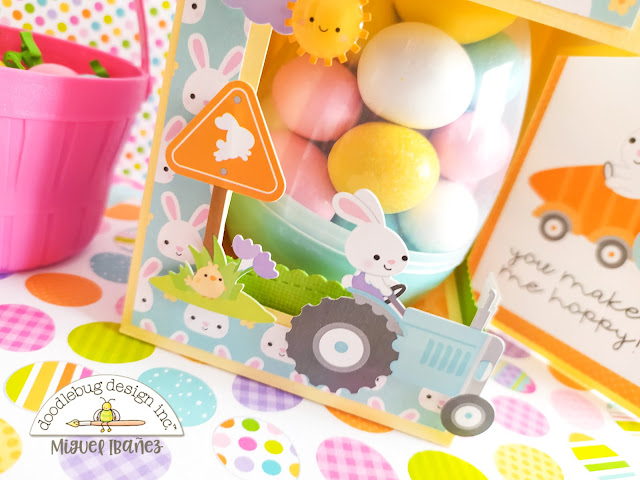
I decorated the box with some stickers from the Hippity Hoppity Icon Sticker sheet.  I also created a fun little card to go with my box... so fun!


I finished my project with some shaped sprinkles.  Then I filled my egg with some yummy chocolate and added it into my box!  


See you soon and thank you very much for stopping by.


DOODLEBUG PRODUCTS USED
Hippity Hoppity Collection

Pin It button on image hover