Showing posts with label Treat Holder. Show all posts

Tuesday, December 23, 2025

OH WHAT FUN TREAT & GIFT CARD BAGS | with Tya

Hello friends! Happy Holidays! I had so much fun creating these five adorable Christmas treat and gift card bags using the Oh What Fun collection. This collection is bright, cheerful, and full of the sweetest holiday icons, making it absolutely perfect for quick handmade gifts during the busy Christmas season.

Each bag starts with a simple 5x7 colored glassine bag as the base. From there, I dressed each one up with a mix of Petite Prints papers and the border strips from the Christmas Eve patterned paper. I love how those border strips add instant personality and help tie each design together while still keeping everything quick and easy.

In the first photo, you’ll see the full set of five bags together. I chose a different color palette for each one—classic Ladybug, soft Cupcake, sweet Swimming Pool, sunny Bumblebee, and fresh Limeade—so every bag feels unique while still coordinating as a set. To make the pocket, I simply folded about 2 1/2 inches from the bottom of the bag and then cut out some Petite Prints that matched the bag for the base. I added a strip of  Textured Cardstock paper across the front for a cozy, finished look.

Looking closer at the individual bags, you’ll notice how much dimension and charm come from the die cuts. I pulled icons Chit Chat pack, layering them on a scallop paper rosette to create cute focal points. Santa, gingerbread, wreaths, and festive icons really shine against the simple, patterned backgrounds. These little details make the bags feel extra special without adding a lot of time to the process.


Inside each bag, I tucked some small holiday treats along with a gift card. These bags are just the right size to hold a candy cane, a wrapped chocolate, a gift card,  and a yummy Christmas Tree brownie, making them perfect for neighbors, coworkers, teachers, or special friends. It’s such an easy way to turn a simple gift card into something thoughtful and handmade.


Inside the pocket, I added a space for writing a small sentiment for your gift recipient using some Textured Cardstock. For the sentiments, I used the Merry Christmas stamp from the Oh What Fun Doodle Stamps set. I love how clean and classic this sentiment is, and it works beautifully across all five designs. Stamping the greeting at the top of each bag gives them a polished, finished look and ties everything together. A couple of small Oh What Fun Sprinkles were added next to the sentiment for some added shimmer and shine. I added color-coordinating present and heart die cuts from the Odds and Ends to decorate the corner of the card.

What I love most about these treat bags is how quick and easy they are. They come together fast, use minimal supplies, and are easy to customize with different colors or embellishments. When time is short, but you still want to give something heartfelt, projects like these are the perfect solution.

Thank you so much for stopping by today and taking a look at my project. I hope these cute Christmas treat and gift card bags have inspired you to create a few of your own for the special people in your life. Wishing you a very Merry Christmas and a wonderful holiday season! Happy Crafting!


DOODLEBUG PRODUCTS USED

8980 Oh What Fun Odds and Ends
8981 Oh What Fun Chit Chat
8950 Oh What Fun Sprinkles
8975 Oh What Fun Doodle Stamps
8992 Christmas Eve Paper
9001 Oh What Fun Petite Prints
9002 Oh What Fun Textured Cardstock


OTHER PRODUCTS USED

5x7 Colored Glassine Bags
Corner Rounder Punch 
Scalloped Rosette Metal Die
Treats and Gift Card

Thursday, August 28, 2025

SUMMER FUN GIFT CARD HOLDERS | with Karen

Good morning Doodlebug fans! I have some more Summer Fun inspiration for you today. Today's project was actually inspired by a video that came across my social media feed about a pretty way to wrap a box. I just loved the way the top of the box looked in the video and wanted to see if I could recreate the style for a little gift card holder made with Doodlebug paper.

These little pockets could hold anything from a gift card to stationary to thin treats! I am actually planning on using these to hold some thank-you notes and a gift card tucked into the pockets. Overlapping Water Babies, Seashells by the Seashore, Gull Friends and Beach Towel 12x12 papers form the base of the pockets.

And then to embellish the pockets, I used a variety of die Cuts from the Summer Fun Chit Chat, Odds & Ends and Bits & Pieces packs tucked into each layer and then glued in place.

Some adorable Doodle Twine in Limeade, Swimming Pool and Bubblegum were wrapped and tied for some texture, and then I added a couple of Mini Doilies back-to back in the back pocket to create a little shape on the top.

Finally, I added a few Sprinkles from the Summer Assortment and a couple of Mini Paperclips in Tangerine and Blue Jean. I just love that you can fill each section to your hearts content - love all the die cuts?! Tuck them in! A fan of all the tags? Use them up! The more you add, the more textured and interesting the pockets become! I think I will be making different versions of these in the future!

Oh, and you can too because there is nothing hard about this project at all! Check it out:

  1. Start with two strips of paper 4" x 12". Score both along the long edge at the 4" and 8" mark.
  2. Take the outside top corners and fold them down. use a bone folder if you have one to get a tight fold. Repeat with your second strip.
  3. Using one strip of paper, fold in the two sides and then place it down on top of the second strip about 1/2" from the bottom.
  4. Fold the sides from strip 2 over top and then glue along the bottom edge to hold everything in place. Embellish them up to your heart's content.

    That's it! Really!

I love that you could alter the dimensions on these and end up with a different look. Or if you are a fan of showing off all the Doodlebug patterns, add another layer! these would look really cute on a scrapbook paper to to hold a little keepsake! I can only imagine all the creative things you will do with the idea and we can't wait to see them! Thanks for stopping by! Hugs,


BLOG | INSTAGRAM

DOODLEBUG PRODUCTS USED

8936 seashells by the seashore 12x12 patterned paper
8932 water babies12x12 patterned paper
8940 gull friends 12x12 patterned paper
8939 beach towel 12x12 patterned paper
8891 summer assortment sprinkles
4502 mini paper clips blue jean
4498 mini paper clips tangerine
4597 mini doilies bubblegum
4602 mini doilies swimming pool
2991 doodle twine swimming pool
2987 doodle twine bubblegum
8921 odds & ends summer fun
8922 chit chat summer fun
8923 bits & pieces summer fun

OTHER

Adhesive

Friday, August 9, 2024

AT THE ZOO BIRTHDAY EXPLOSION BOX | with Jen

When my son was tiny we went to the zoo a lot! In fact his very first trip to the zoo was for his first birthday. So I thought what better project for the adorbs At The Zoo paper than a birthday explosion box!

The overall dimensions on the box are 5 1/2" x 5 1/2". On the top I trimmed down the 6x6 version of the large picture page and popped it up. I added the Happy Birthday sticker from the This and That sticker sheet and some leaves from the Jungle Leaves Shape Sprinkles.

There are three layers inside the box. I left the inside flap decorations fairly sparse so that pictures could be added later.

In the center I used some acetate and part of a paper towel tube to make a little tower than can be filled with candies or some other small treat. Around the base I added the Happy Birthday to You cut apart strip.

On the small center flaps I used an assortment of Doodle Pops to really add some more fun animal elements.  I hope you've enjoyed today's project, have a great day!


YOUTUBE | FACEBOOK | INSTAGRAM

DOODLEBUG PRODUCTS USED

At the Zoo Collection

OTHER

Green Cardstock
Acetate

Sunday, December 17, 2023

GINGERBREAD KISSES TREAT HOLDERS & ORNAMENTS | with Tya

Hello there! Are you all surviving the hustle and bustle of the holidays? It gets a little tricky this time of year to squeeze in some crafty time, but I made It happen this year by golly! I have adored working with the Gingerbread Kisses collection so much! I wanted to share a fun little treat holder with you today with a super fun pocket that holds a handmade ornament to give to all of those special someones on your list this year!

I followed this blog post to create the boxes. I used some 110-weight Kraft cardstock to construct my boxes. I did deviate slightly from the original and did not punch the hole to make it a door hanger. I simply added a 1/2 inch score mark at the top of the bag and adhered it to the top fold-over flap on a bag of these yummy Gingerbread Ghirardelli Chocolates. I decorated the bag with the "Cookies for Santa" pattern paper and some Pistachio Swiss Dot Petite Prints. Such fun colors in this collection!


I also made my own little gingerbread-themed ornaments that were so easy to make and SO fun to decorate with all sorts of little bits! I love how this simple little ornament was made with some chalk paint and one of these plastic art palettes from the dollar store! They look just like a little muffin or cupcake tin and I loved how it went along with the whole baking theme of the Gingerbread Kisses collection.


Here are a few close-ups of the ornaments:


These were decorated with some die cuts from the Odds and Ends and Chit Chat ephemera packs. I also added a clay ornament from my stash. I added some peppermint enamel dots from the Peppermint Place Shape Sprinkles to the clay ornaments to match the collection a little better. I found these itty bitty cookie cutters at the craft store, so I added some hot glue to the cup, added a few cookie sprinkles, and then placed my little ornament in the cup. Such a fun little addition! I also added some plastic peppermint candies to the cups. The gingerbread friends are hot glued to a cinnamon stick and some pretty greenery. I added a candy cane from the Icon Sticker sheet to the gingerbread friends. I also added a little bit of Stickles for some sparkle to the buttons and bows on the gingerbread. The ornaments are finished off with a festive striped bow and then some twine hot glued to the back to act as a holder for the ornament. I just had the BEST time making these! Kids would LOVE to make these too! Just be careful with the hot glue! :)

After the ornaments had all been put together, I added them to the front pocket along with some paper shreds. I decorated the front pockets of the holders with some more die cuts from the Odds and Ends, Chit Chat, Bits and Pieces, Warm Wishes Shape Sprinkles, and Enamel Dots. I added a small Lily White Mini Doily over the top flap and then glued the holder right to the flap of the bag of chocolates.


A little group shot action! :)


I hope these treat and ornament holders have inspired you to create your own fun and festive gifts! The "Gingerbread Kisses" collection was perfect for this gingerbread-themed project, and I had so much fun making them! Have a wonderful Holiday Season and we will see you next time! Happy crafting!


DOODLEBUG PRODUCTS USED

Gingerbread Kisses Collection
Lily White Mini Doily
Pistachio Swiss Dots Petite Prints


OTHER PRODUCTS USED

Art Palette
Chalk paint
twine
greenery
cinnamon stick
hot glue
110 # Kraft Cardstock
Scoring Tool
Various decorations for cups (Clay Ornament, Plastic Peppermint candies, Mini Cookie Cutters, sprinkles)
Striped ribbon

Friday, February 17, 2023

LOTS OF LOVE BACKPACK TUTORIAL | with Niella

Hi crafty crew! It's my first ever Doodlebug Design DT post with a fun tutorial! Thank you for popping by! As love is still in the air in February let's create something so cute using the Lots of Love Collection, although you could adapt to any Doodlebug collection :-) All you'll need to start is a 12x12 sheet of Doodlebug Design cardstock and any ephemera you'd like to add! 

Firstly, I've selected a gingham-linen Petite Prints cardstock print and measured 3.5" wide x 10" strip. This will be your post bag piece. The other pieces you'd need are straps that are 3/4" wide x 6" (x2 pieces). For the side gussets of the post bag you'll need x2 of 2 1/8" x 4" (x2 pieces) as below.

For the bag, turn length wise so 10" is across on your scoreboard. Score at 2.5" (front of bag once opened), 3 1/4" bottom of bag), 7" (back of bag), 7 1/4" (top of bag) and then you are left with remainder of piece that is your front flap of bag.

Set aside. Next for your side gussets, length wise you'll score at 1/2 intervals. Set aside. Next, I've stitched each panel or piece for extra texture and dimension but this is an option only, it'll still be just as cute without it!

Adhere all pieces with liquid adhesive, I like to use tacky glue and hold down for a few seconds to secure before I move onto the next piece to adhere.

If you'd like to add extra elements like I have, do these before adhering the gussets and straps. For example I added a pocket by directly using my sewing machine to stitch in the pocket!


Once every piece is assembled, adhered in place add velcro dots so you can have a closure. Now you can have fun decorating!  I used lots of goodies from the Odds & Ends and Icon Stickers to decorate my bag!


Remember to keep this post handy because you'll want to make these super cute bags over and over again plus you could adjust the measurements to your specific needs and theme :-) Endless possibilities my friends!


Thanks for stopping by crafty crew! Until next time, doodle-dee!


DOODLEBUG PRODUCTS USED

Lots of Love Collection

OTHER

heart charm
Velcro dots


Monday, March 7, 2022

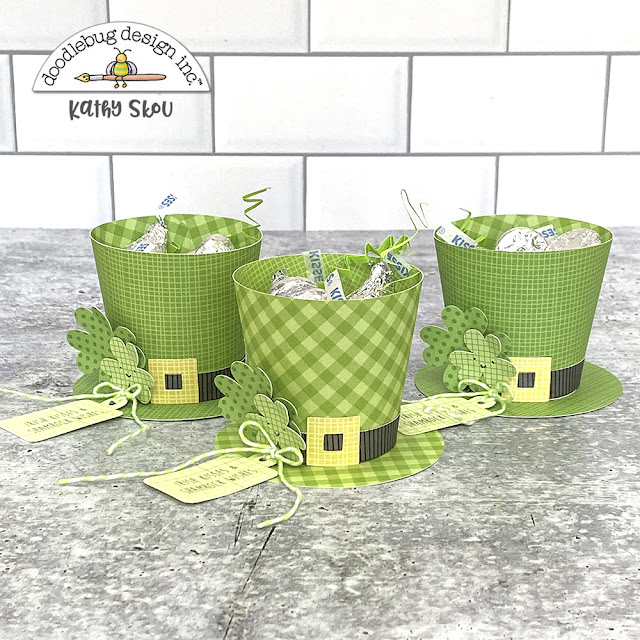
PETITE PRINTS LEPRECHAUN HATS | with Kathy

With St. Patrick's Day right around the corner, I was curious... what do you call a group of leprechauns?  Is it a pack, like wolves?  Or maybe a murder, like crows?  I did finally google this question and though there is no official name, one person suggested that they be called a "Luck" of leprechauns, which I thought was perfect!  

I'm attending an in-person crop which starts on St. Patrick's Day, and wanted to make a little something special for my friends.  I came up with these cute little Leprechaun hat treat holders.  I got the original idea from a cut file I saw that was a wrap used to decorate a little paper cup.  I didn't have any paper cups so I decided to make my own.  Take a peek...


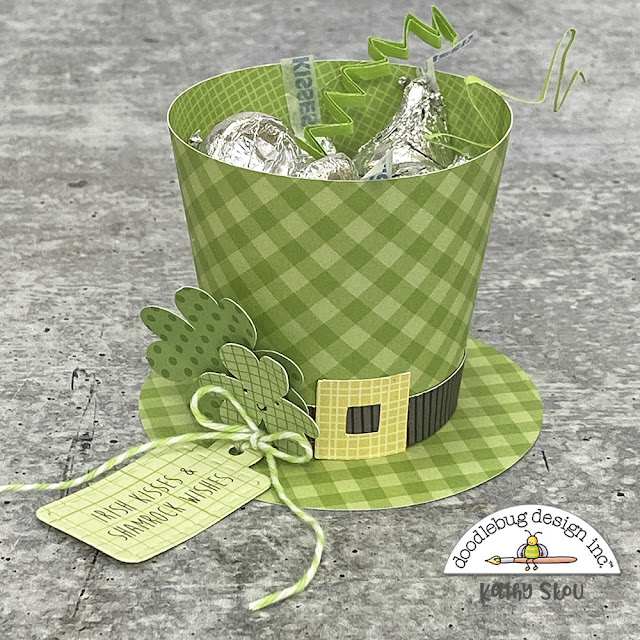
To make the hats, I started with this Coffee Cup SVG file from Lori Whitlock.  I deleted the cover and wrap pieces.  I then resized the body of the cup to be 3.25" high.  I pieced together the cup using some Gingham Linen Limeade Petite Prints. For the hat base I cut a circle about 3.125" in diameter.  For the black band I cut a strip Beetle Black Daisy Stripe Petite Prints approx. 0.5" x 6.5" and wrapped it around the bottom of the hat.  To finish I used the buckle piece from the Happy Go Lucky Leprechaun Hat SVG.


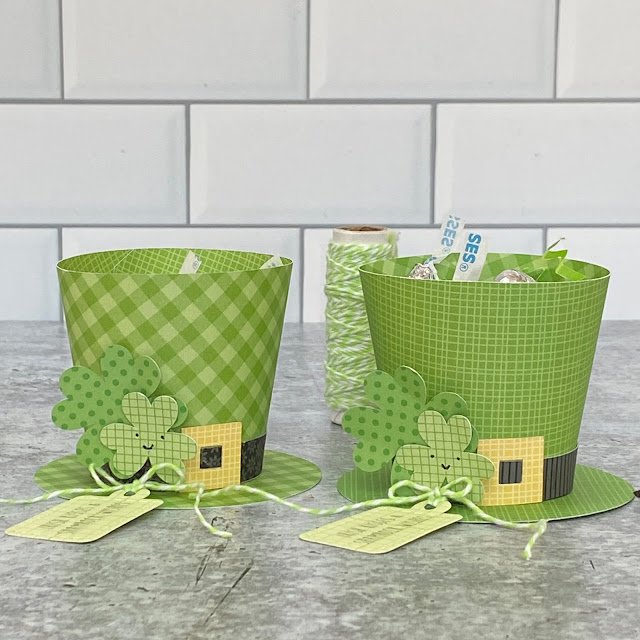
I love the Petite prints, not only because they match all of Doodlebug's Collections, but you can get a different look by just flipping the paper over!  The two hats below were made from the same exact papers, just the opposite sides!


The fun part was decorating the hats with cute little shamrocks from the Happy Go Lucky Shamrocks SVG.  For the little tag, I printed out Irish Kisses & Shamrock Wishes on some Limeade Floral Graph Petite Prints, sized to fit on the tag from the Tiny Tags Doodle Cuts, cut them out and finished them with some Doodle Twine.   (the inside area of the tag is approx .75" x 1.25")


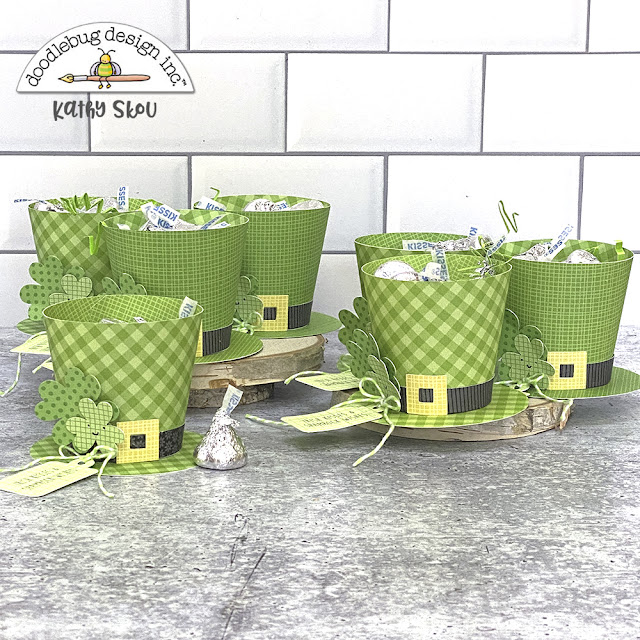
Now for the reason behind my first question about naming a group of Leprechauns... I created a bunch of these little hats, and just needed to know!


Wishing you all a little Luck O' the Irish this St. Patrick's Day!  That's it for me today, thanks for stopping by to peek!


DOODLEBUG PRODUCTS USED
Gingham Linen Petite Prints
Graph Floral Petite Prints
Daisy Stripe Petite Prints
Dot Grid Petite Prints
Tiny Tags Doodle Cuts
Doodle Twine

OTHER
Silhouette Cameo
Sizzix Big Shot
Moonflower Font


Thursday, October 21, 2021

HAPPY HAUNTING HALLOWEEN TREAT PROJECT | with Miguel

The Halloween season is one of my favorite seasons, the costumes, the fun and the sweets... I wouldn't want to miss it!

Today I created this wonderful project that would make a fun gift for a family member or a special person.

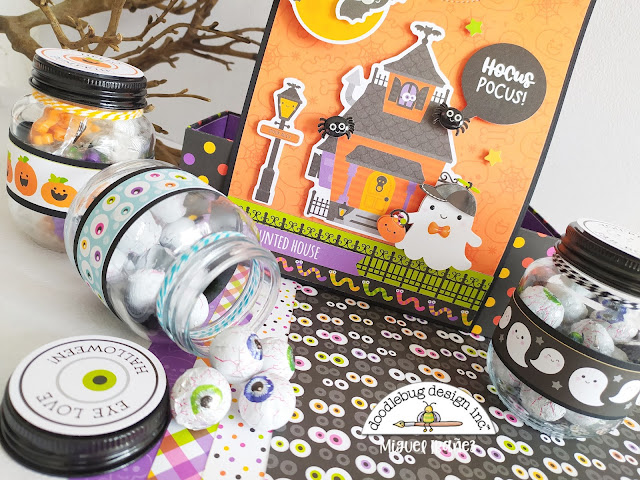
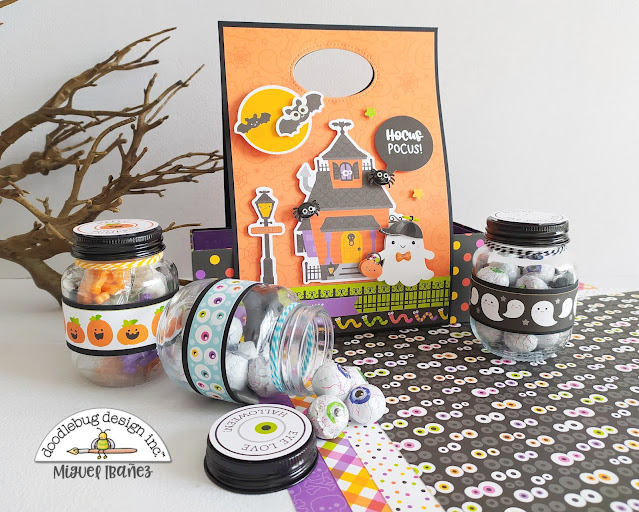
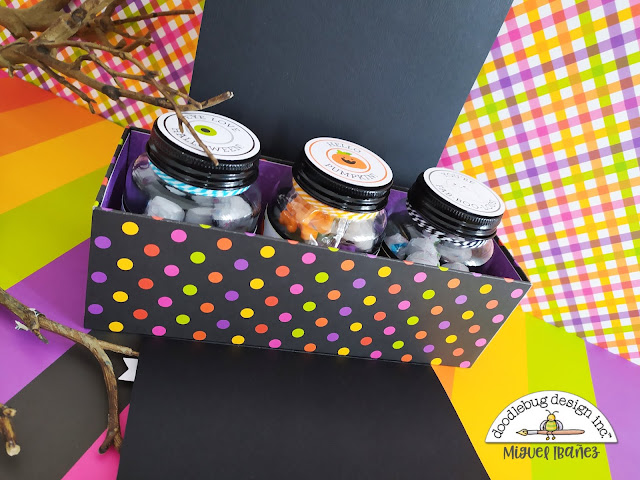
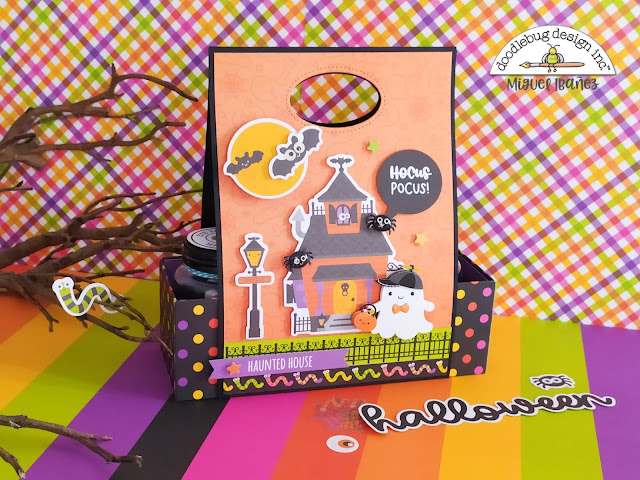
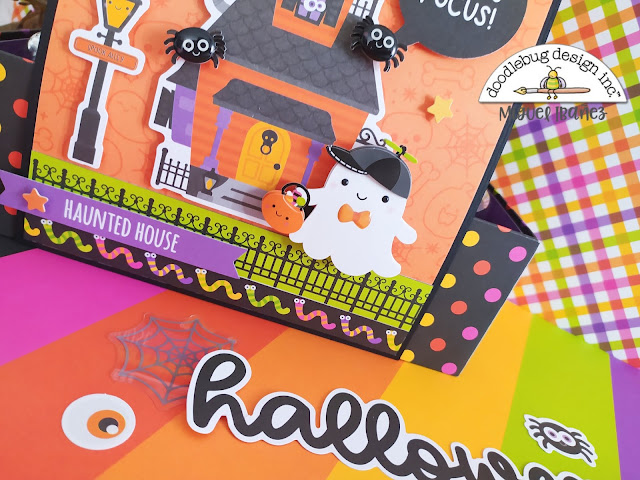
I made the box from scratch with my cardboard technique since I needed a firm and solid structure. The box is covered with the beautiful Happy Haunting collection.  Inside, there is a place for three glass jars to which I added fun borders and covers.

I painted the caps black with a spray, filled the jars with sweets and decorated the tops with some labels from the Chit Chat Pack. I love the result! I added some Doodle Twine to the jars for a fun detail.

On the front of the box I created a scene with the Odds & Ends and this beautiful ghost Doodle Pop.

I say goodbye wishing that my work will fill you with a lot of inspiration!  I wish you a wonderful Halloween!


Doodlebug Products Used

Happy Haunting Collection

Pin It button on image hover