Showing posts with label family scrapbook page. Show all posts

Monday, May 11, 2026

BUTTERFLY KISSES THE GOOD LIFE PAGE | with Brianna

Hey friends! Brianna here today sharing another layout using the Butterfly Kisses collection. While on a mini vacation last week, I was at a nursery with my daughter and she was all about the beautiful flowers and of course, the water fountains. She absolutely loves flowers and will stop to smell each and every bloom. I snapped a photo of her and couldn’t wait to document it with this collection. Here’s my page:

To start, I decided to switch things up and opted for a colored cardstock as my base. I ended up choosing the pink Cupcake cardstock from the coordinating 12x12 Solid Assortment pack and I love how everything on top of it really pops!  Since my photo is of my girl looking at all of the flowers, I thought having a bunch of them on my page would be perfect. I pulled out the Bits and Pieces pack and selected quite a few of them. I arranged them in sort of a crescent shape with my intention of tucking my photo into it. 

I popped a few florals up on foam tape and then tucked the rest into each other. I also made sure to pull a few greenery pieces to tuck into them as well. Next, I matted my photo using one of the 6x8 papers and nestled it into the curve shape of my flowers. It's such a cute design!

From that same Bits and Pieces pack, I pulled out the two banner die cuts and arranged them in the top right corner of my page. I then chose my title from the Chit Chat pack and adhered it in the blank space between the banners and my photo. I absolutely love the fonts in this collection, they're so unique and fun!!!

Next, I wanted to add a few more embellishments so I scattered in a few Puffy Icons stickers like the bees and the blue birds. I also tucked in a few little critters into my florals from the Icons stickers sheet. I thought they went perfectly with this playful page!

Here's one last look at this cute and colorful page that was so easy to put together:

Thanks so much for stopping by today, I hope that I've inspired you in some way! If you have a bunch of floral die cuts, this would be a perfect design to try, especially if you're short on time but still want to sit down and create a page. I'll see you in my next post friends!



BLOG INSTAGRAM | YOUTUBE

DOODLEBUG PRODUCTS USED

8823 butterfly kisses textured cardstock assortment
8805 butterfly kisses 6x8 paper pad
8803 butterfly kisses bits & pieces
8787 butterfly kisses puffy icons stickers
8806 butterfly kisses icons stickers
8802 butterfly kisses chit chat

Monday, March 2, 2026

LUCKY ME HAPPY LIFE LAYOUT | with Brianna

Hey friends! Brianna back again sharing a new layout using the Lucky Me collection. This collection is just so happy and fun to work with. I thought it would be perfect to document a few photos of our everyday life. Sunny and I walk to the park daily and it's honestly my favorite part of our day. It gets us out of the house and who doesn't love to feel sunshine on their face? The best! Here's my page: 

Let's talk about Doodlebug's cardstock for a second.. Vibrant, thick and textured.. The best!! It's honestly my favorite and I thought it would be fun to highlight the coordinating set on this page. I pulled out the cardstock pack and trimmed all of the colors down to 1/2x10 inch strips. I chose the white cardstock as my main base and then matted it with the black cardstock. I knew it would allow the cardstock strips to pop off of the page even more!

I then took all of my strips and arranged them in rainbow order on a diagonal. Just seeing them lined up like that made me already love the page haha! I needed a little bit of pattern, so I matted my photo using one of the 6x8 papers and popped my photos up on foam tape. The matching diagonals and all of the bright colors really make this page so happy.

In going with the happy theme, I chose 'Happy Life' for my title and adhered the pieces under my photos. The boldness of the black 'happy' pairs nicely with that black cardstock base and I love it. I then went through the Puffy Icons and chose a subtitle to go under my title and it couldn't have been more true. My girl really does have a heart of gold!


I started working on building the rest of my page with some embellishments. I pulled out the adorable Lucky Charm Shaker-Pop and adhered it towards the left side of my larger photo. It went perfectly with my cardstock rainbow and it's adorable! The little charms hanging from the cloud..! Next, I pulled out a few die cuts from the All The Things pack and then sprinkled in a few of the Icons and Mini Icons stickers. I liked the idea of having a lot of smaller elements on this page. I didn't want to take too much away from the cardstock strips.


For some final touches, I added in some of the Sprinkles and a few ladybugs from the Puffy Icons sticker sheet. Here's one last look: 

Thanks so much for stopping by today, I hope that I've inspired you in some way! I'll see you in my next post friends!


BLOG INSTAGRAM | YOUTUBE

DOODLEBUG PRODUCTS USED

9047 lucky me petite prints assortment pack
9043 lucky me all the things
9036 lucky me paper pad
9024 lucky me mini icon stickers
9025 lucky me puffy icon stickers
9037 lucky me icons stickers
9015 lucky me sprinkles
9019 lucky charm shaker-pop


Wednesday, July 24, 2024

FUN AT THE PARK HAPPY MEMORIES LAYOUT | with Erica

Hey friends! Erica here with you today to share a 12x12 scrapbook layout using the Fun at the Park collection.

I decided to use this collection to document photos that are not from "the park" and just some photos of my daughter and her boyfriend in front of the Ferris wheel!

I started by picking out some basic papers from the Fun at the Park collection and trimmed down five of them to 2" x 9" strips and adhered them to a piece of 12x12 Lily White cardstock. Next I pulled out some non themed embellishments and then die cut some stitched hearts! I knew I wanted to add a line of embellishments going down the left side of the page.

I started by adding the largest hearts first and then filling in with odds & ends, fussy cut elements, icon stickers and sprinkles!

I matted my photos onto some pattern paper from the 6x6 Fun at the Park paper pad and adhered down to the page. I used two chit chat pieces for my title and placed them under the photo.

This layout was really fun to put together using it for a different theme than being at the park! I love all the bold black elements in this collection and I think they pop with the black and white photos! I have a lot of stitched hearts left so I am going to challenge myself to create another non themed layout!

Thanks so much for stopping by the Doodlebug Blog today! I hope you are inspired to give this collection a different look at use it for non themed photos!


DOODLEBUG PRODUCTS USED

Fun at the Park Collection


Monday, February 26, 2024

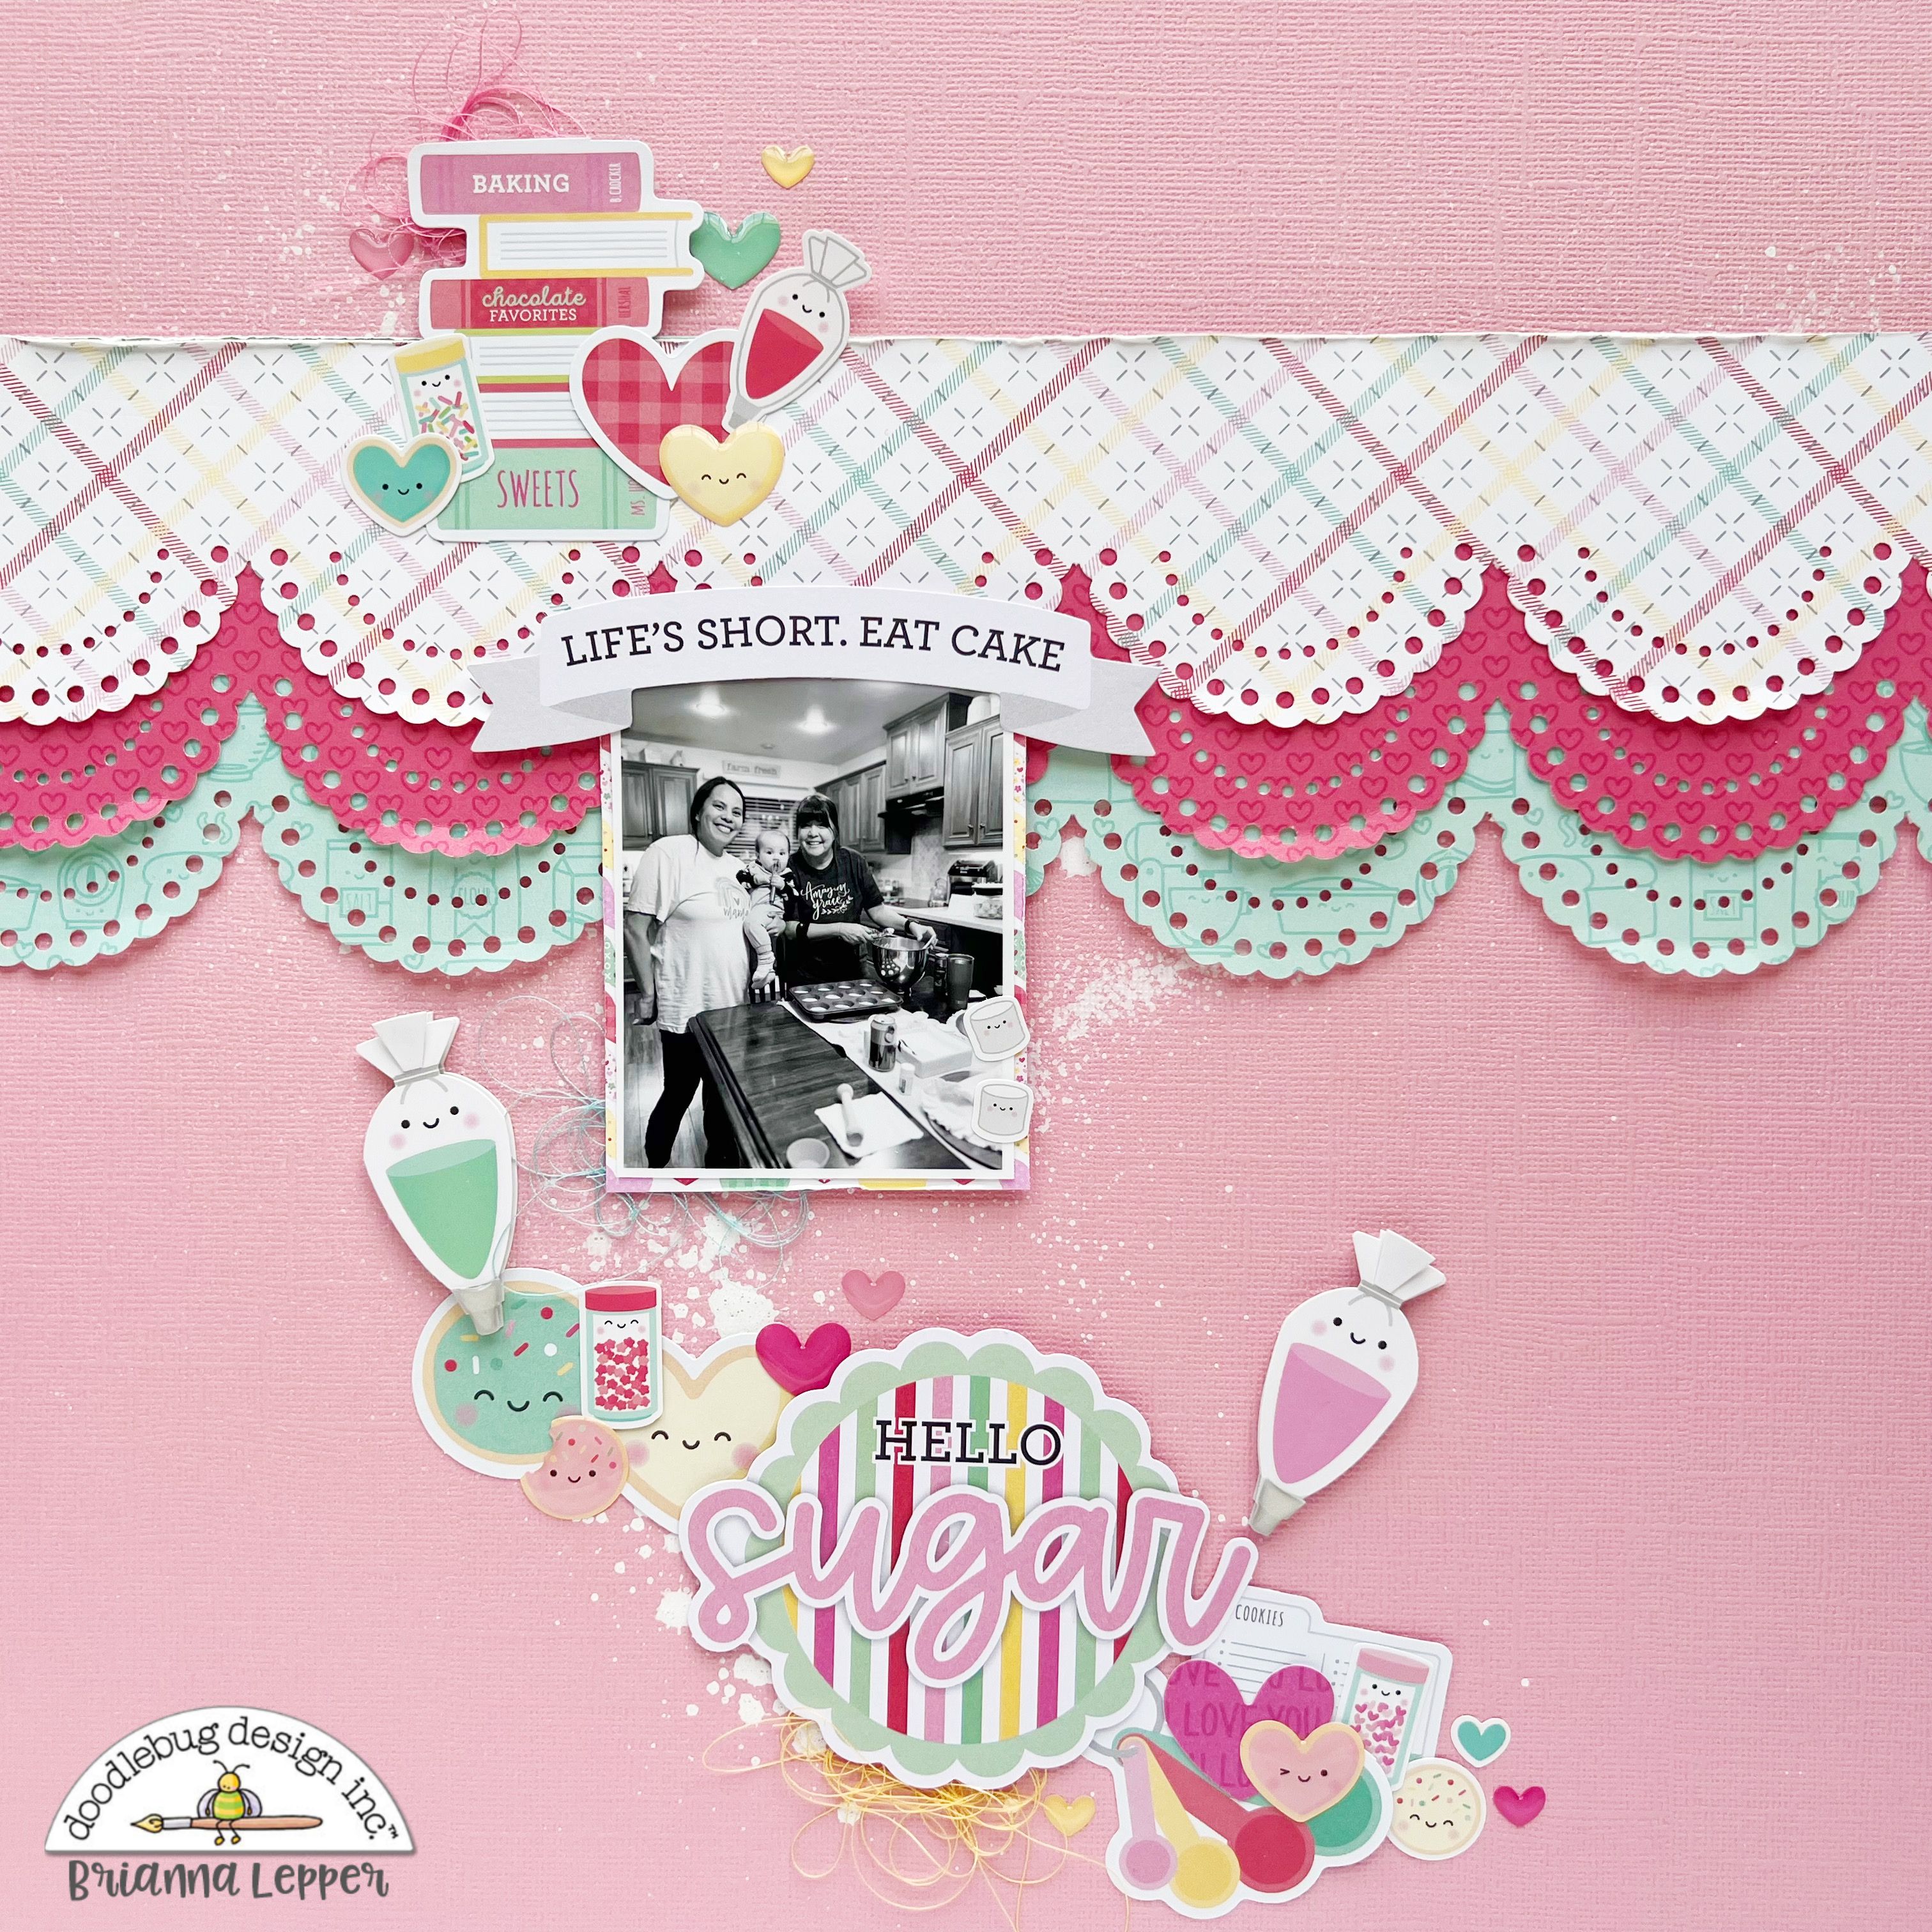
MADE WITH LOVE LIFE'S SHORT. EAT CAKE LAYOUT | with Brianna

Happy Monday friends! I'm here today sharing a new layout featuring the Made With Love collection. In our family, we love to cook and bake. It's a way for us to spend quality time together, making delicious food from our hearts. We love to gather around the table and talk about anything and everything. Being back in our home state has allowed us to reconnect with our families more than just one time a year. We've really been enjoying it! Here's my page that documents a recent photo of one of our trips to my Moms house. This collection was absolutely perfect for this photo!

This collection is soft and pretty, so I thought I would pull out my large doily punch and punch some pretty edges into a few of the 12x12 patterned papers. I layered them together and popped them up on foam tape and set them aside to work on my background.

I went through the Made With Love coordinating cardstock pack and chose the Cupcake paper as my base. I thought it would make a pretty background! Before I adhered all of my punched papers down, I sprayed some white paint across my background for some extra interest and because I love the look of white paint on colored cardstock! Next, I matted my photo using the 6x6 Paper Pad and stuck it down towards the center of my page.

For my title, I chose a phrase from the Chit Chat pack and adhered it down where it would create a diagonal design across my layout. The Icing On The Cake Doodle-Pop was the perfect embellishment next to my title. I made the pink one look like it wrote the 'sugar' part of my title. How cute is that?!


Next, I took the other frosting bag and layered it on a cute cookie of the same color. I embellished using the Odds & Ends pack as well as the Mini Icons Stickers. Those little sprinkle bottles are so cute!!!!


I wanted to include a few smaller elements in my embellishment clusters, so I used the Bake Me Happy and With All My Heart Shape Sprinkles.


Here's one last look at this sweet page:


Thanks so much for stopping by today, I hope that I've inspired you in some way. I'll see you in my next post friends!


DOODLEBUG PRODUCTS USED
Made With Love Collection
Made With Love Coordinating Cardstock


OTHER
White Acrylic Paint
Sewing Thread


Monday, September 4, 2023

HELLO AGAIN LET'S STAY HOME LAYOUT | with Brianna

Hey friends! Brianna Lepper here with y'all today sharing another layout using the Hello Again collection. I"m so excited to share it!! I had this photo of my three kids that I've been wanting to document and I knew this collection would be the perfect one for it. Here's my page:

I decided to print my photo a littler bigger than I usually do since it's currently one of my favorites. I printed it at 4x4 when I usually print them at 2x3. I thought it would be fun to put it right in the center of my layout and embellish around the borders. So, I took a piece of white cardstock and trimmed it down to an 11x11. I then matted it using the 12x12 Butterfly Garden paper and then ran it through my sewing machine using pink thread and a zig zag stitch. I love the pops of black from the floral centers and the butterflies!

Next, I pulled out several floral pieces from the Bits & Pieces pack and popped them all up on foam tape. I arranged them on the four corners of the white cardstock and adhered them down. I also added a few cute houses from the Puffy Icons sticker sheet. They look so cute on top of the florals!

Next, I matted my photo with one of the 6x6 patterned papers and centered it on the page. I did move it up just a bit so that I could add my title from the Chit Chat pack as well as a larger floral piece from the Bits & Pieces pack right under it. I popped my title up on foam so that it would stand out even more. I'm loving the large photo and large title on this page!


I wanted to add some shine and bits of color so I pulled out the All Aflutter and Hello Again Shape Sprinkles and added them in here and there. I love that they're smaller elements and look so cute tucked into different spots. I also pulled in a few phrase stickers from the Cardstock Sticker sheet and popped them up on foam tape for some dimension.


Lastly, I added in a few of the super cute cake plate stickers from the Icons Sticker sheet and tucked them under my title. They filled in that space so nicely and it really brought everything together.


Here's one last look at this beautiful page. I LOVE all of the pops of black and gold in this collection!!


Thank you so much for stopping by today, I hope that I inspired you in some way! Have you tried scrapping a different size photo than your usual go to size? It's fun to change things up, especially when the photo is one of your favorites and you want it front and center! I'll see you in my next post friends!


DOODLEBUG PRODUCTS USED
Hello Again Collection


OTHER
Sewing Machine
White Cardstock


Thursday, August 24, 2023

HELLO AGAIN USING 6x6 PAPER ON 12x12 LAYOUTS | With Traci

Hi everyone! Traci here and today I have two colorful 12x12 scrapbook layouts to share with you. My focus was to use paper from the Hello Again 6x6 paper pad in a creative way so that they'd coordinate and each have a unique design. Take a look ...

12x12 Hello Again Scrapbook Layouts by Artsy Albums

For both layouts, I used the 12x12 Patchwork Plaid print as the base. It has all the gorgeous Hello Again colors and the geometric pattern makes for a great background.

12x12 Hello Again Scrapbook Layout with a patchwork heart

On this first page, I added a sheet of lily white card stock. Next, I cut the 6x6 paper into squares (2 3/4"x 2 3/4") and then cut them in half diagonally. I arranged the pieces in a heart shape ... like a quilt pattern!

For embellishments, I added the super cute Bit of Happiness Doodle-pops. I'm loving the metallic gold! I also used some die cuts from the Odds & Ends, Chit Chat, and a few word stickers from the This and That sheet. Finally, I sprinkled around a few gold hearts from the puffy shapes and ... she was complete! 

12x12 Hello Again Scrapbook Layout with a grid pattern, butterflies, flowers, and gold hearts

For the second page, I added the petite prints candy stripe & sprinkles in bubblegum and another piece of lily white card stock. I created my favorite grid layout and used the 6x6 pattern paper for my nine 3 1/4 x 3 1/4" squares.

12x12 Hello Again Scrapbook Layout with butterflies, books, and gold hearts

I used lots of goodies on this layout. The books in the photo above are from the icon stickers. The butterflies are from the Odds & Ends. Then, I added the gold puffy hearts and a beautiful gold enamel dot sprinkle.

12x12 Hello Again Scrapbook Layout with globe, jar of hearts, and a butterfly

In another square, I used the globe from the Odds & Ends and added the Love You piece from the Chit Chat on top. And ... more gold enamel dot sprinkles, of course!

I love creating different projects with the Hello Again collection. Such pretty colors, icons, and touches of gold. I hope this collection and these pages inspire you to use your 6x6 paper pads on 12x12 layouts! Happy scrappin'!


DOODLEBUG PRODUCTS USED
Hello Again Collection
Petite Prints Candy Stripe & Sprinkles
Lily White Card Stock

Saturday, August 19, 2023

HELLO AGAIN YOU MAKE ME SMILE LAYOUT | with Tarrah

Have you seen the super cute camera elements in the Hello Again collection?! I just love them and knew I wanted to create a project to feature them! I chose the Hello Again camera cut file and cut each piece from the Hello Again Coordinating Textured Cardstock pack using my Silhouette Cameo machine. I added my photo to the centre of the photo, I love how this looks!

Once the large cut file camera was all pieced together, I adhered it to a plain piece of white cardstock using craft foam underneath. I trimmed down the white cardstock to measure approximately 11' x 11' and adhered it to the 'B' side of the 12' x 12' Green Thumb paper. I also adhered a piece of the Green Thumb paper from the 6' x 6' paper pad underneath the camera, I like the pop of green.


At the top of the layout I placed one of the scalloped border stickers from the This and That cardstock sticker sheet. I also chose some of the smaller stickers from the same sheet to add to the top of the camera and I added the pink tab sticker on the left hand side.

I absolutely LOVE the Little Charmers and could not resist adding the camera from the Pretty Picture set, I threaded it on to some of the new mini twine color in Mint. I added a yellow die-cut butterfly to the left of the photo and also added one of the gorgeous Gold Enamel Dot Sprinkles on top of the camera. I chose my title to be the 'You Make Me Smile' die-cut piece and adhered this below the camera using a mixture of craft foam and regular adhesive.


I tucked in lots of the gorgeous floral die-cuts from the Bits and Pieces pack both top and bottom of the camera and also could not resist adding the Pretty Picture Doodle-Pop to the right of the cut file camera. I also tucked one of the scallop circle die-cuts and the gold rectangle journal spot both from the Bits and Pieces pack too. Lastly I stamped the date stamp of when the photo was taken.

I love how my layout turned out and I hope you enjoyed reading about how I created it?! Thanks so much for stopping by today! Happy creating!


DOODLEBUG PRODUCTS USED

Hello Again collection
Hello Again Textured cardstock
Mini Twine in Mint

OTHER

White cardstock
Date stamp
Black ink
Silhouette Cameo machine

Sunday, August 13, 2023

HELLO AGAIN JUST BE YOU LAYOUT | with Tya

Looking for a fun way to add lots of embellishments to your layouts? Try making a circle grid layout! I am back today sharing another layout featuring the simply lovely "Hello Again" collection! I have mentioned before that Doodlebug really knows how to do embellishments right!! The array offered makes creating layouts so much fun because of the endless possibilities! You can mix and match all different types of embellishments! I am showcasing this design type here with my layout today


To create this layout I started with the Black Floral side of the Cute Calico paper. I then took an 11 3/4 x 11 3/4 inch piece of white cardstock and cut 9 circles out of the paper using my Silhouette. The circles measure 3.75 inches. 

Next, I selected 6 different pattern papers from the 6x6 paper pad and cut them to a little bit under 4x4 inches each. I then chose my 3 photos. I arranged my photos and pattern papers in the order I wanted to and then glued them to the background paper. I then added foam tape to the back of the white cardstock paper with all the circles cut out of it on top of the photos and pattern paper.

And then the fun part- decorating each of the circles!

I loved the "Just Be You" cut out from the Chit Chat ephemera so that became my title. It fits perfectly with these fun pics of my daughter playing at the park.


As you can see, I used lots of layers of different embellishments. I mostly stuck to the Odds and Ends for the bigger pieces and then added other pieces to accent. Here is a cute Polaroid-style camera with a fun sentiment from the Chit Chat.


Here on the top circle, I used a cute yellow check circle label from the Bits and Pieces. I added some foam tape behind 2 beautiful butterflies from the Odds and Ends. I also added a sprinkle of the stunning Mini Jewels for some sparkle and shine.
The bottom circle features this cute hanger cut out from the Odds and Ends. I want one of these in real life! Too cute!


It wouldn't be a Doodlebug layout without a rainbow on there somewhere - so I added the rainbow, sun, and clouds to this circle. All of these are from the Odds and Ends. Look how cute the little jewel sits on that cloud! I also added a cute phrase sticker to my photo on the bottom circle. This time I used the This and That cardstock sticker sheet.


And as a lover of all things floral - I had to add some flowers from the Bits and Pieces here and there on the layout. This cluster fits great at the bottom edge of one of my photos!


Here's one more look at this fun page. I love how it all came together in the end!


Thank you so much for stopping by today! I hope I have inspired you to give a circle grid layout a try!
Happy Crafting friends!


DOODLEBUG PRODUCTS USED

Hello Again collection

OTHER

Silhouette Cameo
White Cardstock
Pin It button on image hover