Showing posts with label Craft Room. Show all posts

Wednesday, July 1, 2026

COLOR ME CRAFTY - CRAFT ORGANIZER BOX | with Miguel

Color Me Crafty is undoubtedly a favorite collection among scrapbookers!  Today I created this box using the *cartonnage* technique— something I truly love and enjoy doing. I used the Color Me Crafty Solid Assortment to create contrast against the patterned paper and incorporated a shadow box as the focal point and closure for the box.

For the shadow box, I used small scraps of paper to add life and color to the project, and I decorated this lovely cover using Chit Chat and Odds and Ends pieces, adding buttons and puffy icon stickers to brighten it!


The box is constructed with several flaps, The shadow box I created serves as the closure; the entire interior is lined with designs from the Color Me Crafty collection.

I designed this box to organize small scrapbooking tools, and it also serves as decor for my workspace. Thanks for stopping by; I hope you enjoy my work, as always. See you soon!


DOODLEBUG PRODUCTS USED

9094 color me crafty 6x8 paper pad
9112 color me crafty solid assortment pack
9077 color me crafty puffy icons
9091 color me crafty chit chat
9090 color me crafty odds & ends

OTHER

Chipboard

Thursday, August 31, 2017

Anita Bownd's Creative Craft Space

Hi there ,
Anita here with you today sharing sharing how I stored my doodlebug 
Products.... my scrap studio is not very big


I keep most of my product on this pegboard so I can see what I want to use
And right beside that I have a cubed shelf that I keep a few things on to make it pretty..


Beside that on the wall is a big chicken wire heart made of chipboard 
that I keep cards I've made 


On the top 2 shelves I have washi tape in little boxes 
I made and covered in gift paper 


Here I keep my Jewels ,twine and sprinkles 
In these cute tin baskets 


I also have a little space on my desk on one side of the room 
Just playing with doodlebug product .. my desk goes around 3 walls of my studio 


And on the other side of my room on my desk is where I film 
My creative process videos .. you may notice I like plants the humidity in my studio seems to help strike cuttings.. 


I have a shelf above my desk for filming where I keep all my 
Cardstock , albums and stencils ..

thanks for checking out my scrap studio
crafty hugs,,xx

Thursday, April 6, 2017

Craft Room Tour with Traci Penrod

Hi everyone!  It's Traci, and I'm up on the blog today to share my craft space with you.  I'm blessed to have recently moved into a new home with a large basement. Since my scrapbook kit business, Artsy Albums,  requires a lot of space for storage, and tables for kits and packaging,  I turned a large room into a fun work space.
I have four Ikea tables, and one Martha Stewart project desk, in the center of my space.  This lets me easily spread out kit materials, and have friends over to scrapbook.  I tend to work standing up, so the taller project desk works well for me.  I was thrilled to get the large chalkboard on the far wall from my local Archivers store just before they closed.  I worked there for several years, so it's like a big souvenir from happy times.
On one side of the room, I have some storage space and my desk.  The door in the middle leads to my shipping room and extra storage for kits that are ready to mail out.
I love my desk area.  I have some of my favorite layouts displayed on Doodlebug clipboards, my wall calendar (see post about the calendar here), my Doodlebug pin collection, and my computer.  
I have 3 more Martha Stewart project tables on another wall.  This space has my CAMEO machine, ribbon wall, lots of storage as you can see below, and a long space for packaging up my kits.
On the back wall I have two large shelving units from Ikea.  They hold everything from extra adhesive, albums, and bins of sprinkles, stickers, doilies, gems, 6x6 paper pads, extra tools, etc.  I love clear glass jars so I keep washi tape, twine, and buttons in those.

My card stock is in crates and all of my paper collections are organized in bins in my closet.  My wonderful husband built the shelves on both walls in my closet to hold the bins.  
Finally, in the center of my closet is a small table for my Sizzix big shot and die storage.  
This was a fun assignment and it helped me organize a few things that were still in boxes from the recent move.  I hope you've enjoyed a peek into Artsy Albums work zone ... my happy place! 
Thanks for stopping by!

Wednesday, April 5, 2017

Craft Room Organization: Washi Tape Organization by Brigit Mann

Hello Doodlebug Fans, it's Brigit here with you today to share how I like to store my Doodlebug washi tape and more.  I mostly use these three storage solutions for my Doodlebug accessories.  But my main excitement is how I now store my washi tape.


I found this storage organizer from CraftStack at Michaels and boy do I love it!!  This thing can hold a ton of washi tape and it's stackable.


As you can see I have more than just washi tape inside, you can use it for other craft accessories.  I like keeping all my Doodlebug stuff together so this works well for me.


It's so nice to be able see and get to my washi so easily now, I didn't use it much before because it was all stuff in a drawer not easy to see what I had.


I was actually going to buy some empty spice jars to fill with my doodlebug buttons, clips, brads and clothespins but these washi containers fit in there beautifully, love to reuse what I have and I like them so much better then the jars.


I also use it for my doodlebug sequins, beads and glitter, love all those pretty colors.  Those clear containers I found at the Dollar Tree, two fit the back row nicely, they came 10 to a pack.  I added the memento dew drop ink pads just so you can see how they fit in there, I'll be picking up another organizer just for them since I have a bunch.  It's awesome how the draws pull out and tip down so if you have it on a little higher shelf you can still see everything in there.


My doodlebug twine, sprinkles, bag, etc I keep in this Recollections Carousel from Michaels.  I'm not sure if they still carry the clip and spin that fits it but I really like it for my twine.  I don't use the second ring except sometimes I'll clip a card on it if it needs to dry.


All my doodlebug doilies are kept on this Clip Carousel from Tim Holtz, it's not really big but it fits a lot, I have plenty of room on this to fit much more.

Well I hope you've enjoyed some of my doodlebug craft storage ideas, thanks for stopping by and have a wonderful day!

Tuesday, April 4, 2017

Craft Room Tour with Aita Bownds

Hi there ,
Anita here with you today sharing sharing how I stored my Doodlebug 
Products.... my scrap studio is not very big so I have to be creative in how I store all my supplies.


I keep most of my product on this pegboard so I can see what I want to use
And right beside that I have a cubed shelf that I keep a few things on to make it pretty..


Beside that on the wall is a big chicken wire heart made of chipboard 
that I keep cards I've made 


On the top 2 shelves I have washi tape in little boxes 
I made and covered in gift paper 


Here I keep my Jewels ,twine and sprinkles 
In these cute tin baskets 


I also have a little space on my desk on one side of the room 
Just playing with doodlebug product .. my desk goes around 3 walls of my studio 


And on the other side of my room on my desk is where I film 
My creative process videos .. you may notice I like plants the humidity in my studio seems to help strike cuttings.. 


I have a shelf above my desk for filming where I keep all my 
Cardstock , albums and stencils ..

thanks for checking out my scrap studio
crafty hugs,,xx

Monday, April 3, 2017

Ktchen Table Crafter: Organization Tips & Tour with Karen Hanson

Hi everyone! It's Karen, and today I get to share with you a little inside information! The design team has been having fun sharing some crafty space ideas, so today I get share the inside workings of mine!
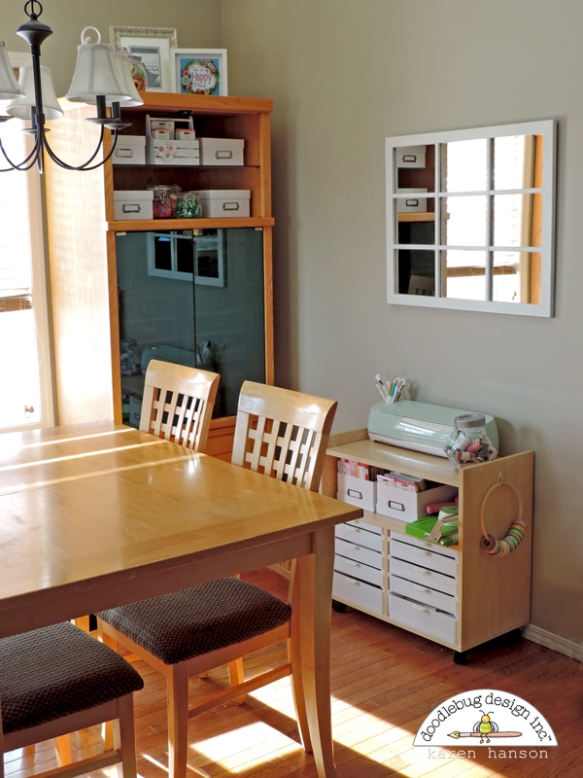
Okay, now I know you are probably thinking - "Um, Karen, that looks an awful lot like a kitchen table." And the truth is - you are right! It is my kitchen table. In fact, my kitchen counter starts just to the right of this picture, and I actually took this picture while precariously perched on top of my breakfast bar. That's right. I am a kitchen table crafter! Now, for those of you who also create right in the centre of it all, you will know that crafting on a kitchen table is a juggling act all of it's own (sometimes an act that requires me to exclaim with enthusiasm at meal time - "Today, let's have a picnic in the living room!" to the giggles of my children and the patient grimace of the hubby). But as the years have gone on, this little corner has evolved from piles of semi organized collections...um...I mean, supplies...to a mobile working space that I can tuck away when needed. So, while it isn't a whole room of crafty goodness, today I thought I would share some of my ways of making this space work.
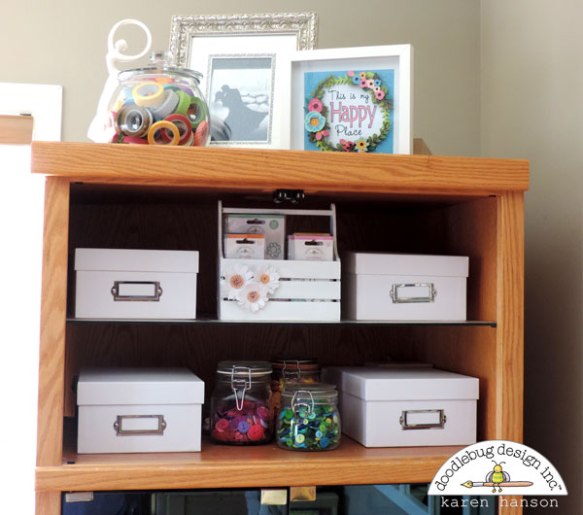
One of my favourite and most economical organizing purchases has been my white photo boxes. You can pick up these boxes for a couple of dollars and the are the perfect size for many different spaces...shelves, cupboards, drawers - you name it! Besides photos, my boxes hold extra adhesive, ink pads, stamp collections...
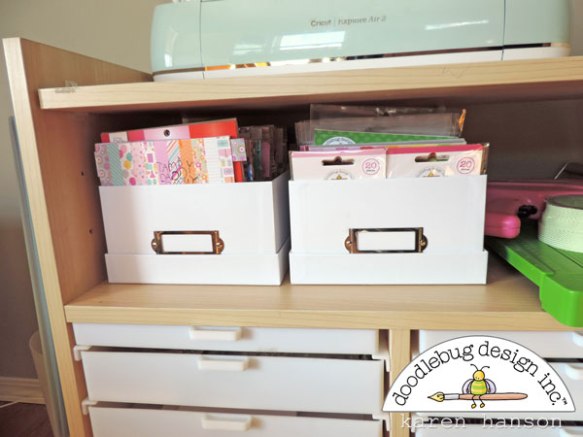
...and when open, are even the perfect size for 6x6 paper pads, packages of odds and ends, buttons and even doilies!
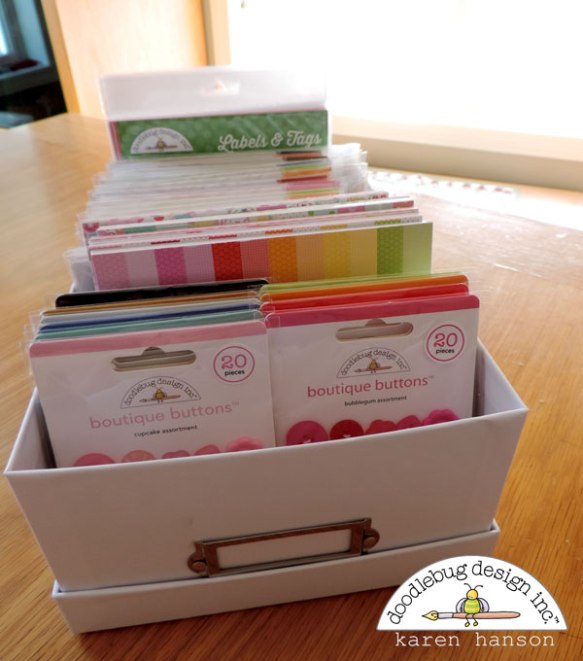
And if you are worried about how sturdy they are, simply place the lid on the bottom for extra stability! These boxes come right out onto my table when I am creating, and then tuck away beautifully when I clean up (that's actually my criteria for all storage I use...can I pull it out easily onto the table and throw everything back in easily when I am done). Oh, and while my boxes are all white, they come in a million colours and patterns and you can even personalize them with some pretty paper!
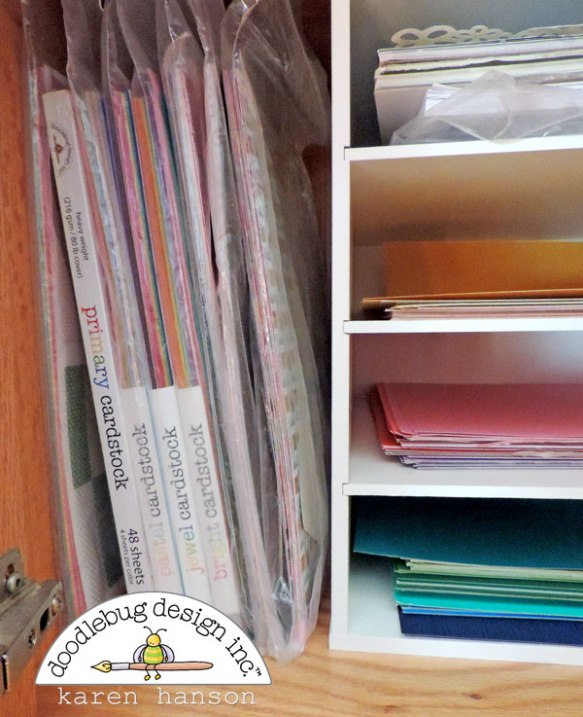
Speaking of paper, I keep all of my paper collections together in separate extra large zipper bags. When I first get them, I actually keep embellishments in there too. When I want to work with a collection, I simply pull the bag out on to the table and pull out what I need. When it's time to clean up, all the pieces slide right back into the bag - even my little tiny pieces (it's hard to get rid of them). It's a super quick cleanup! Now, I have to admit that I did buy a storage unit on wheels last year that has really changed things for me. There is room on the top for my cutting machine, and a great set of drawers of different sizes. If you are on a tight budget like me, do not count out this option. These types of units can be pricey, but I bought mine second hand for a fraction of the price. In the end, I actually sold off some crafting supplies to pay for it to make myself feel even better about the purchase - I was cleaning out to make use of it anyway so it was the perfect time to purge! This new unit has given me the perfect opportunity to organize...
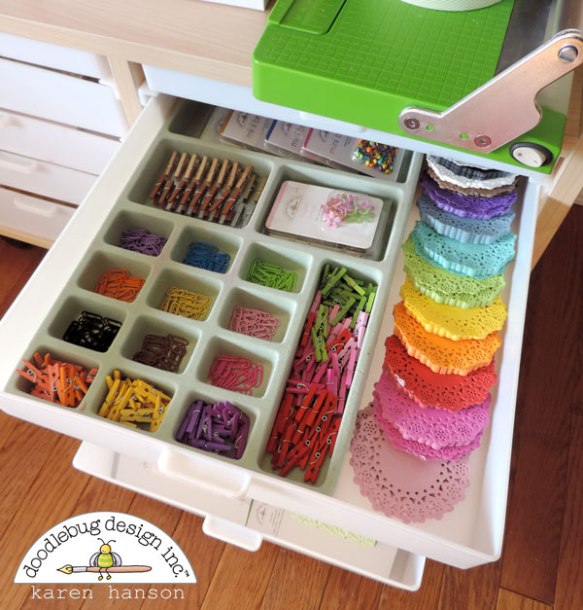
...small odds and ends like mini clips and doilies (in a tray that I re-purposed to fit this drawer well)...
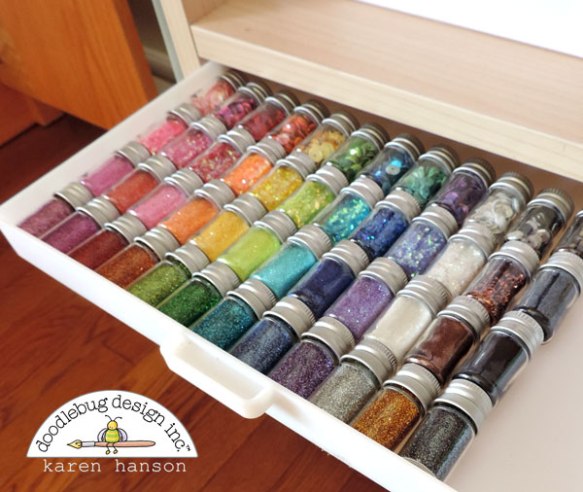
...small, narrow supplies like my glitter... .
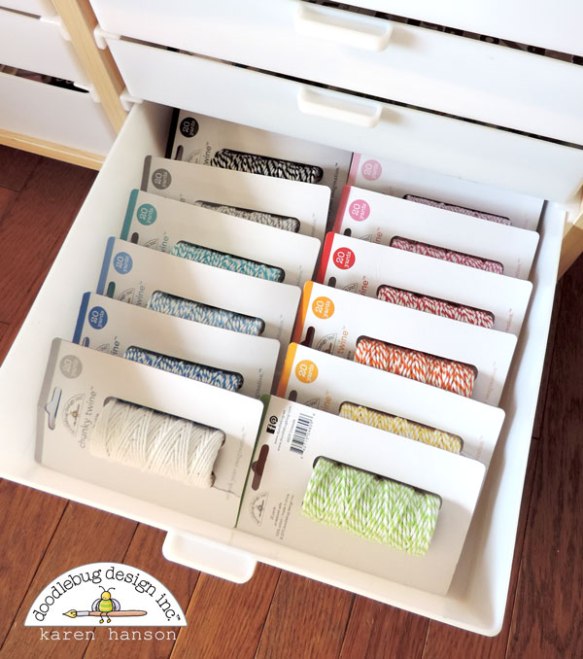
..and even some of my twine.
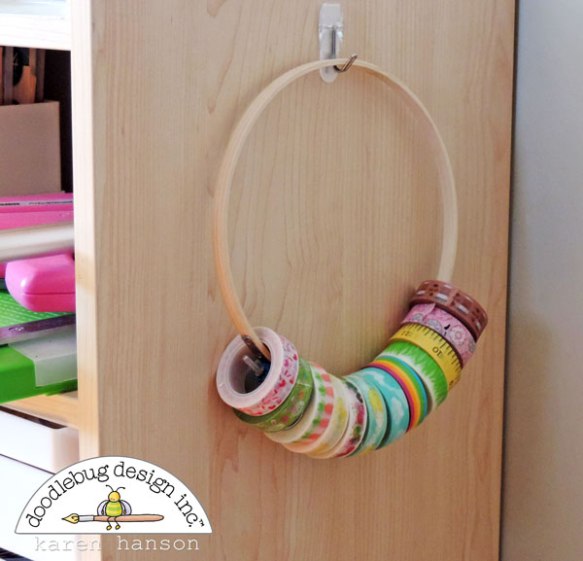
But the best part was attaching some temporary 3M hoops to the side to store my washi tape embroidery hoop and, on the other side, to hold my cutting mats. And when we have guests over for dinner, I can roll the whole unit away into another room or just move my Cricut off of the top and have a "mini buffet" to store some of our meal items. You know, I have to admit that there are days when I look at pictures of beautiful craft rooms and drool! But I really do love crafting and creating in the middle of my family home and watching my girls (and even sometimes my hubby) just pull up a chair and join in. I also think there are things we can learn in terms of organization and decluttering from those that craft in the heart of it all! So while perhaps one day down the road one of the rooms in my house may look so lonely and empty that my craft supplies sneak in, today I am going to put my feet up, enjoy this sunny crafting space in what happens to be the sunniest city in Canada, toasting all of those that call the kitchen table crafting "home base"!
Pin It button on image hover