Showing posts with label Christmas Decor. Show all posts

Saturday, December 20, 2025

OH WHAT FUN FESTIVE CHRISTMAS TREE | with Tarrah

Looking for a festive and colorful holiday craft to decorate your home with? This cute Christmas Tree project is the perfect way to add a pop of cheer to your seasonal décor! Using the vibrant and gorgeous Oh What Fun collection, I created a whimsical tree that’s full of bright colors, personality and charm.


Step by step Instructions:

Prepare Your Base
Start with a foam cone shape as your tree base. This will give your project structure and make layering easy.

Create Colorful Layers
Punch or cut scalloped strips from the patterned papers in the 6' x 8' paper pad in the Oh What Fun collection. These bright, playful designs are perfect for creating a rainbow effect!
Begin at the bottom of the cone and work your way up, overlapping each layer slightly for a full, textured look. I used 2 different size and shaped scalloped border punches to create mine and I adhered the paper strips to the cone using a mix of double sided tape and wet glue. 


Add Festive Details
Once your tree is covered in scalloped layers, decorate with die-cut ornaments, stickers, and sprinkles from the collection. Mix and match shapes and colors for a fun, eclectic vibe. I used pieces from the Bits and Pieces, Odds and Ends, Chit Chat pack, Doodle-pops and the This and That sticker sheet. I used foam tape on some of the embellishments to help make them pop off the tree!

Top It Off
Finish your tree with a star or a standout embellishment at the top. A glittery star sticker or a layered paper star works beautifully! I used 2 of the transparent star pieces from the Odds and Ends pack and layered a star sticker over the top.


Personalize It
Add a sentiment like “Merry Christmas” around the base using the collection’s word stickers or cut-apart pieces. This adds a sweet finishing touch. I chose the red and white Merry Christmas banner from the Chit Chat pack.
Gift puffy stickers were placed at the bottom of the tree and once I was happy with how the tree looked, I added some glitter glue (Kindyglitz) to the edges of the scallop paper pieces for a touch of sparkle!


This foam Christmas tree was not only easy to make but also a great way to showcase the playful patterns and colors of the gorgeous Oh What Fun collection. It’s perfect for:
  • Holiday table centrepieces
  • Mantel or home décor
  • A handmade gift for someone special

Thank you so much for stopping by the Doodlebug blog today and for your support all year! I wish you and your family a safe, healthy and Merry Christmas. Happy crafting!


DOODLEBUG PRODUCTS USED

8981 Oh What Fun Chit Chat pack
8982 Oh What Fun Bits & Pieces pack
8980 Oh What Fun Odds & Ends pack
8986 Oh What Fun This & That Sticker Sheet
8966 Oh What Fun Puffy Stickers Icons
8984 Oh What Fun 6' x 8' paper pad
8954 Oh What Fun Christmas Eve Shape Sprinkles
8961 Oh What Fun Doodle-Pop Deer Friends

OTHER

Foam cone shape
Scalloped border punches
Kindyglitz

Wednesday, December 3, 2025

OH WHAT FUN ADVENT CALENDAR | with Miguel

The Advent calendar is a beautiful tradition, as it can be made from various materials or, in some cases, sold ready-made. But today I created my own version with the Oh What Fun collection, and I love the result!

This time I cut 24 boxes with cardstock of various colors using the coordinating textured cardstock assortment and the countdown squares on the b-side of the festive flannel cardstock.  Each Box was then attached with some doodle twine.

I also used other materials such as petite prints and chit chats for decoration. 

In each little box, you can put a lovely surprise for each day, making the arrival of Christmas Day very exciting and fun!  

Thanks for reading, see you soon.


DOODLEBUG PRODUCTS USED

8981 oh what fun chit chat
8996 festive flannel double-sided cardstock
9001 oh what fun petite prints assortment pack
9002 oh what fun textured assortment pack
2988 ladybug doodle twine

Wednesday, November 19, 2025

OH WHAT FUN CHRISTMAS ORNAMENTS | with Miguel

It's incredible how time flies, and now we're already in the best season of the year,  Christmas! So, let's get to work on some beautiful projects! Today I made these ornaments to hang on our Christmas tree or a Christmas garland.


I worked with the Doodlebug Oh What Fun 6x8 Pad because of the smaller designs. They  look perfect with these pine trees that I die-cut with doodle cuts on paper and foam to give them volume.


Once I cut out my pine trees, I placed them on a wooden spool, wrapped in coordinating Doodle Twine  and I love the result! I decorated the trees with the gingerbread Doodle Pops, and added designs with puffy icons to make them even cuter.


Once finished, I tied on tags with twine. You can find these tags in the Chit Chat pack. Thanks for stopping by! I hope you like this idea as much as I do. See you soon


FACEBOOK | INSTAGRAM

DOODLEBUG PRODUCTS USED

8984 oh what fun 6x8 paper pad
8978 merry christmas doodle cuts
8966 oh what fun puffy icons stickers
8956 jolly gingers doodle-pops
8981 oh what fun chit chat
2991 swimming pool doodle twine
2988 ladybug doodle twine
3208 bumblebee doodle twine
2990 limeade doodle twine

OTHER

Wood Spools
Foam Board
Beads

Thursday, November 6, 2025

OH WHAT FUN SNEAK PEEKS - CHRISTMAS WALL HANGING | with Cynthea

We have a treat for you today!  Cynthea created this amazing Christmas wall hanging using the new Oh What Fun Collection! What a fabulous way to decorate for the season!


Cynthea used so many goodies from the collection to create her little scenes including our Odds & Ends, Bits & Pieces, Chit Chats,  and sprinkles!!

We just love all the dimension on her page... it makes the cute little icons pop even more!  How cute would this look hanging on your wall?  SO CUTE!

Oh What Fun is shipping to stores now, so be sure to get yours!  We will be back tomorrow with another fabulous peek!


DOODLEBUG PRODUCTS USED

9001 oh what fun petite prints assortment pack
9002 oh what fun textured assortment pack
9000 oh what fun 12x12 paper pack
8950 oh what fun assortment sprinkles
8980 oh what fun odds & ends
8981 oh what fun chit chat


Tuesday, November 4, 2025

OH WHAT FUN SNEAK PEEKS - SHADOW BOX INSERT | with Cynthea

Want an easy and fun way to decorate for the season?  Our Oh What Fun Shadow Box Insert Kit is the perfect solution!  Its full of adorable icons and fabulous holiday colors!


Our Shadow Box Insert Kits come with everything you need to create the fun little collage including vellum, icon stickers, sprinkles and an easy to follow pattern!  These kits are great to do with the kids or even a girls craft night. and they look perfect in our 8x8 shadow box frames!

Oh What Fun will be shipping to stores any day now, so be sure to be on the look out!  Check back tomorrow for more sneak peeks!


DOODLEBUG PRODCUTS USED

9004 oh what fun shadow box kit insert
2217 8x8 white shadow box

Wednesday, December 20, 2023

GINGERBREAD KISSES LETTER TO SANTA | with Miguel

The arrival of Santa Claus is approaching and what better way to greet him than with a very special letter!  I made this cardboard box, covered it with red cardstock and decorated it with the Gingerbread Kisses collection!

I made my box in an envelope shape, then got to work decorating it with some DoodlePops, Odds & Ends and Chit Chat Pieces.


On the front I added a beautiful sleigh with Santa, this gives a 3D effect to the project making it look even more fun, don't you think?


I take this opportunity to thank you for all  of  your support during  2023! And for all of your wonderful comments on my Doodlebug projects! I wish you a Merry Christmas and I hope that Santa brings lots of health, blessings and gifts to your home.


DOODLEBUG PRODUCTS USED

Gingerbread Kisses Collection


Monday, December 4, 2023

GINGERBREAD KISSES TABLE CENTERPIECE | with Kathy

 Hi Everyone!  I'm finally finding some time to decorate for the holidays!  I usually throw a couple of family parties this time of year, and wanted to have something fun to put on my table.  I used the Gingerbread Kisses Collection and a cut file from Lori Whitlock to create this fun ornament snow globe.  Take a peek...

I started with this ornament SVG from Lori Whitlock.  I enlarged the file to 180% and cut the pieces from white cardstock.  I cut doubles and glued them together for a little more strength.  Instead of cutting paper for the panels, I cut acetate.

I then started to put together my scene.  I started with the fun Gingerbread Lane Doodle Cuts.  I cut all of the pieces from a combination of Gingerbread Kisses 6x6 papers and some Candy Stripe-Sprinkles Petite prints.


I added some fun sprinkles for color and dimension. I stuck 2 hearts from the Warm Wishes Shaped Sprinkles on either side of a piece of acetate to make it look like it was floating from the chimney. Since you can see my little scene from all directions, I made sure to create a "back" for all of my pieces.  I even added some windows and shaped sprinkles to the back of the house!  

I wanted the ornament to stand straight, so I created a base.  I cut 2, 2" strips from the Snowflake side of the Sugar plums paper and combined them to make a circle that was 16" circumference.  I rested the ornament in it, and marked with a pencil where the white "ribs" of the ornament hit the paper.  I then cut small slits in those spots so that the ornament would sit flat in the base.


Here is a close up of the cute little gingerbread people!  I also added some fake snow to the bottom to cover up the "bases" I created so everything would stand up straight.


It's all set up on my table, now I just have to get cooking!  Have you created any fun projects with the Gingerbread Kisses Collection or doodle cuts?  Be sure to tag us on socials, we always love to see your creations!  That's it for me today, thanks for stopping by to peek.


DOODLEBUG PRODUCTS USED

Gingerbread Kisses Collection
Gingerbread Lane Doodle Cuts
Candy Stripe-Sprinkles Petite Prints

OTHER

White Cardstock
3D Christmas Ornament Solid Panels SVG
Silver Cardstock
Ribbon
Fake Snow Sprinkles
Acetate
Silhouette Cameo

Sunday, December 3, 2023

GINGERBREAD KISSES WREATH | with Tya


Hello there friends! Welcome to December! Wow - has this year just flown by! For my post today, I am sharing a fun and festive home decor piece with you! It's just in time to add to your decorations this year! I love making all sorts of wreaths and knew when I saw the Gingerbread Kisses collection, I wanted to make one of these candy cane wreaths! I knew it would be a great way to showcase all the yummy candy in the collection.! I also repurposed the "Shadow Box Insert Kit" to be the decoration in the center of the wreath! You don't always have to put those in Shadow Boxes!

So to make my wreath I used the following products:

-Gingerbread Kisses Shadow Box Insert Kit

-Candy Canes- these are the "Elf" Movie-themed ones that are out in stores now. I loved how the candy cane colors are perfect matches for the Gingerbread Kisses collection!

-an 8 inch foam wreath form - picked this up at the Dollar Store

-(2) 10 inch circle canvases

-Buttons and white twine

-Red Dot Ribbon- 2 spools

-For the decorative tag on the left side of the wreath, I layered a flower, some mesh ribbon, a fun cookie decoration, some greenery, a button, and twine and the cute "Merry Christmas" banner is from the Chit Chat.

-burlap twine

- Hot glue

To start I laid out one of the circle canvases and then arranged my candy canes around the circle. I used hot glue to glue the bottom points onto the canvas and then glued the top corners of the candy canes to the one next to them.

I then added some white twine to some 1-inch buttons and hot glued them to the centers where the two candy canes meet.

Next, I assembled the Shadow Box kit as shown in their instructions, but used the second circle canvas as my background instead of a piece of paper. I centered the vellum sheet onto the center of the circle canvas and glued that to the top of the candy cane layer, which I previously did.  I then covered my foam wreath form with the red dot ribbon and hot glued that on top of my Shadow Box sticker layer.

I wanted to add a little bit more decoration to my wreath so I took a large kraft tag and layered it up with a striped flower, some mesh ribbon, a cute realistic looking cookie ornament, some greenery, a button tied with twine and the "Merry Christmas" banner which is from the Chit Chat die cuts. I had a sparkly red glitter bow in my stash that added to the left edge of the wreath. I glued the tag and all it's fun bits to the top of the glitter bow.

Finally I wrapped some burlap twine to two of the top candy cane bundles. I hot glued that really well and then made a loopy bow and hot glued that to the top of the twine I just wrapped. This serves as my hanger for the wreath.

I hope this wreath has inspired you to create your own fun and festive holiday decor piece! The "Gingerbread Kisses" collection was perfect for this candy-themed project, and I had so much fun making it. I encourage you to get creative and use your favorite holiday collection to put your own spin on this wreath. It's a great way to showcase your favorite holiday treats and add some cheer to your home this season. Happy crafting!


DOODLEBUG PRODUCTS USED

Gingerbread Kisses Shadow Box Insert Kit
Gingerbread Kisses Chit Chat Die Cuts

OTHER

Candy canes
2 Circle Canvases
Foam Wreath Form
Ribbon & Twine
Buttons
Hot Glue
Decorations for the tag

Tuesday, November 14, 2023

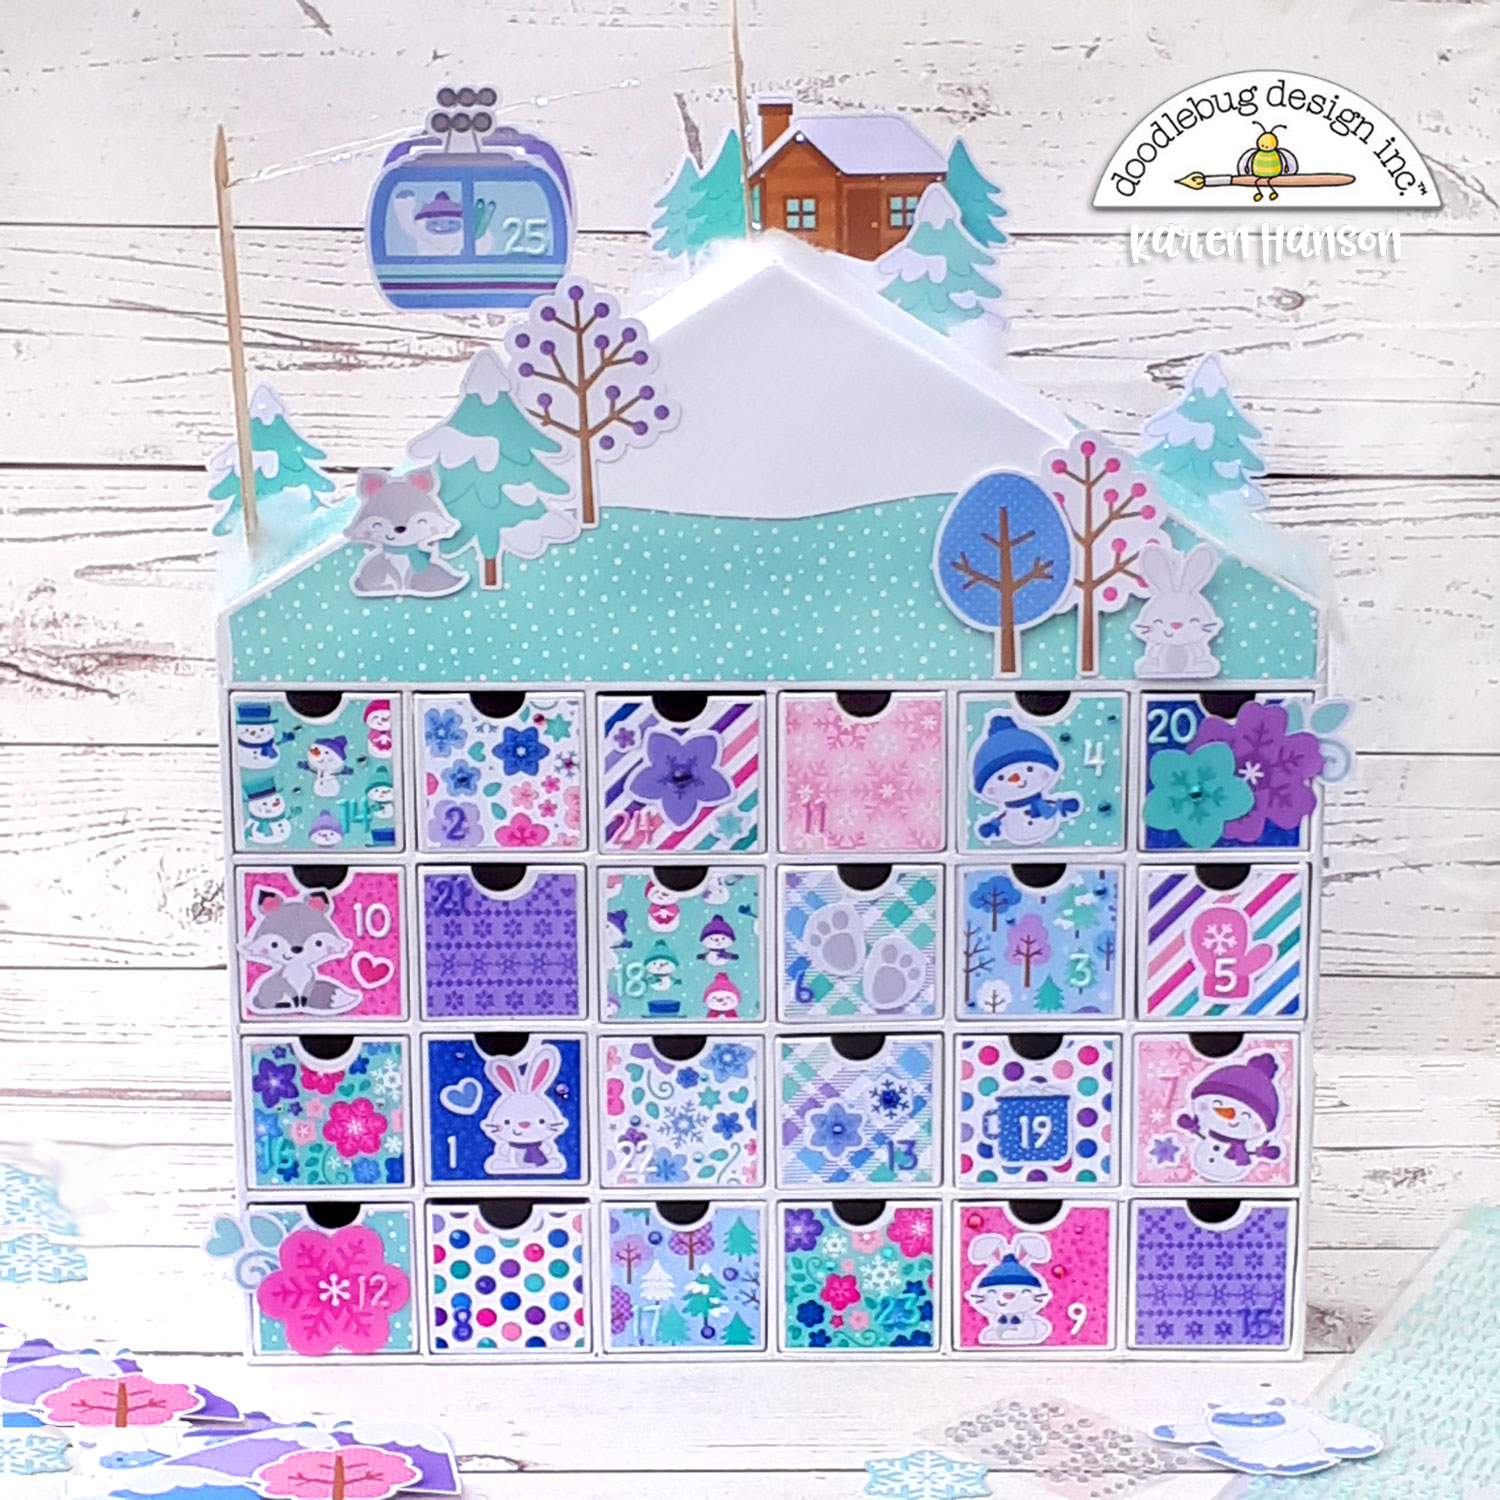
ADVENT CALENDAR HOUSE - WINTER WONDERLAND | with Karen

When my girls were smaller, one of our favourite traditions during the Christmas season was spending a few minutes together on the couch in the morning with our Advent calendars. Their favourite calendars were the ones that made it a little bit hard to find the actual day, hidden in pictures or patterns. They would get so excited when they finally found the date. So I knew when Doodlebug released an Advent calendar, I wanted to try to capture that "hide and seek" feel.

  Full-Calendar 

 I also knew that I wanted to see if I could incorporate one of the most elusive "hiding" characters (and my personal favourite Doodlebug character of all time) - the YETI! But we will get to him later! 

  Drawers 

For this calendar, I used the Winter Wonderland collection. The papers and patterns in this collection are spectacular - no dull winter scenes here. I mixed and matched the patterns, cutting each door at 2 1/4" x2 1/4" each with about 2 doors for each pattern. I then grabbed the Alphabet Soup Puffy stickers for the numbering. On some of the doors, I used contrasting number so they would stick out and be easy to find (like #1 in the photo). But for other doors, I decided to hide the numbers a bit more by using a matching colour and disguising it in the pattern (like door #22 beside door #1). I really love the way the doors turned out. The patterns are amazing and I love that you really need to look to find some of the dates! Mission accomplished.

  Top-Scene-2 

And the best part of this calendar is that you don't have to have any fancy tools to decorate. The scene at the top and embellishments on some of the doors were simply created with the die cuts in the Odds and Ends pack - both the regular Winter Wonderland pack and the Snowflakes pack. Just use some adhesive and you are all set!

  Tree

I did jazz up some of the die cuts by poking holes in them and stringing some small LED light behind the holes. You can see this feature on a couple of trees and along the cabin.

  Top-Scene1b 
 
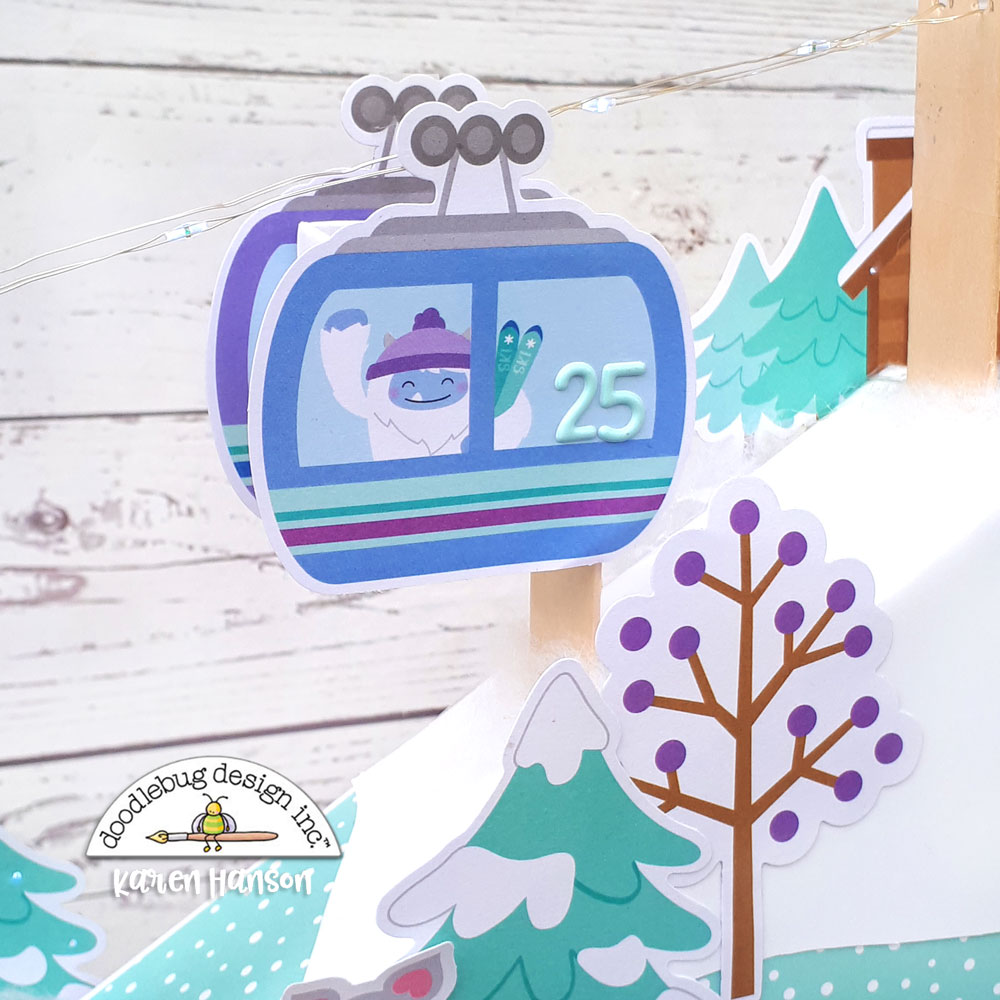
And then of course, the Yeti! Harry gets to make an appearance here to riding a little gondola to the top of the calendar. I actually took the chimney feature off of the calendar and used it to combine two gondola die cuts (front and back), creating a little box in a rather unusual location for one last special treat. This also gave me a really sturdy way to attach the gondola with a hidden craft stick. I took the picture from this angle so you could see the stick (it pokes down right into the top part of the calendar)...

  Top-Scene-1a 

 ...but from the front, with a special placement of some die cut trees, it looks like it is suspended above the mountain. Some more of the LED string complete the look of the cables. While not your traditional advent calendar, I am in love with this version. If you have a favourite Doodlebug collection, don't be afraid to use it on a project like this. There is no wrong collection to use! And trust me, this will not be the last time you see Harry on one of my projects! Thanks for stopping by! Hugs,


BLOG | INSTAGRAM

DOODLEBUG PRODUCTS USED

Advent Calendar House
 Winter Wonderland collection
Mini jewels - variety of colours
Alphabet Soup Puffy Sticker

OTHER

Adhesive
Craft Sticks
Mini LED lights
Cotton stuffing

Monday, November 13, 2023

ADVENT CALENDAR HOUSE - GINGERBREAD KISSES | with Brianna

Hey friends!! I am so excited that it's my turn to share how I decorated my Advent Calendar House! I love seeing how everyone is decorating theirs and it's so fun to see different collections and themes being used. You can get so creative with these!! I decided to use the Gingerbread Kisses collection since I have my sweet girl this year and we will be continuing on with all of the fun traditions each day in December. Here's my calendar:


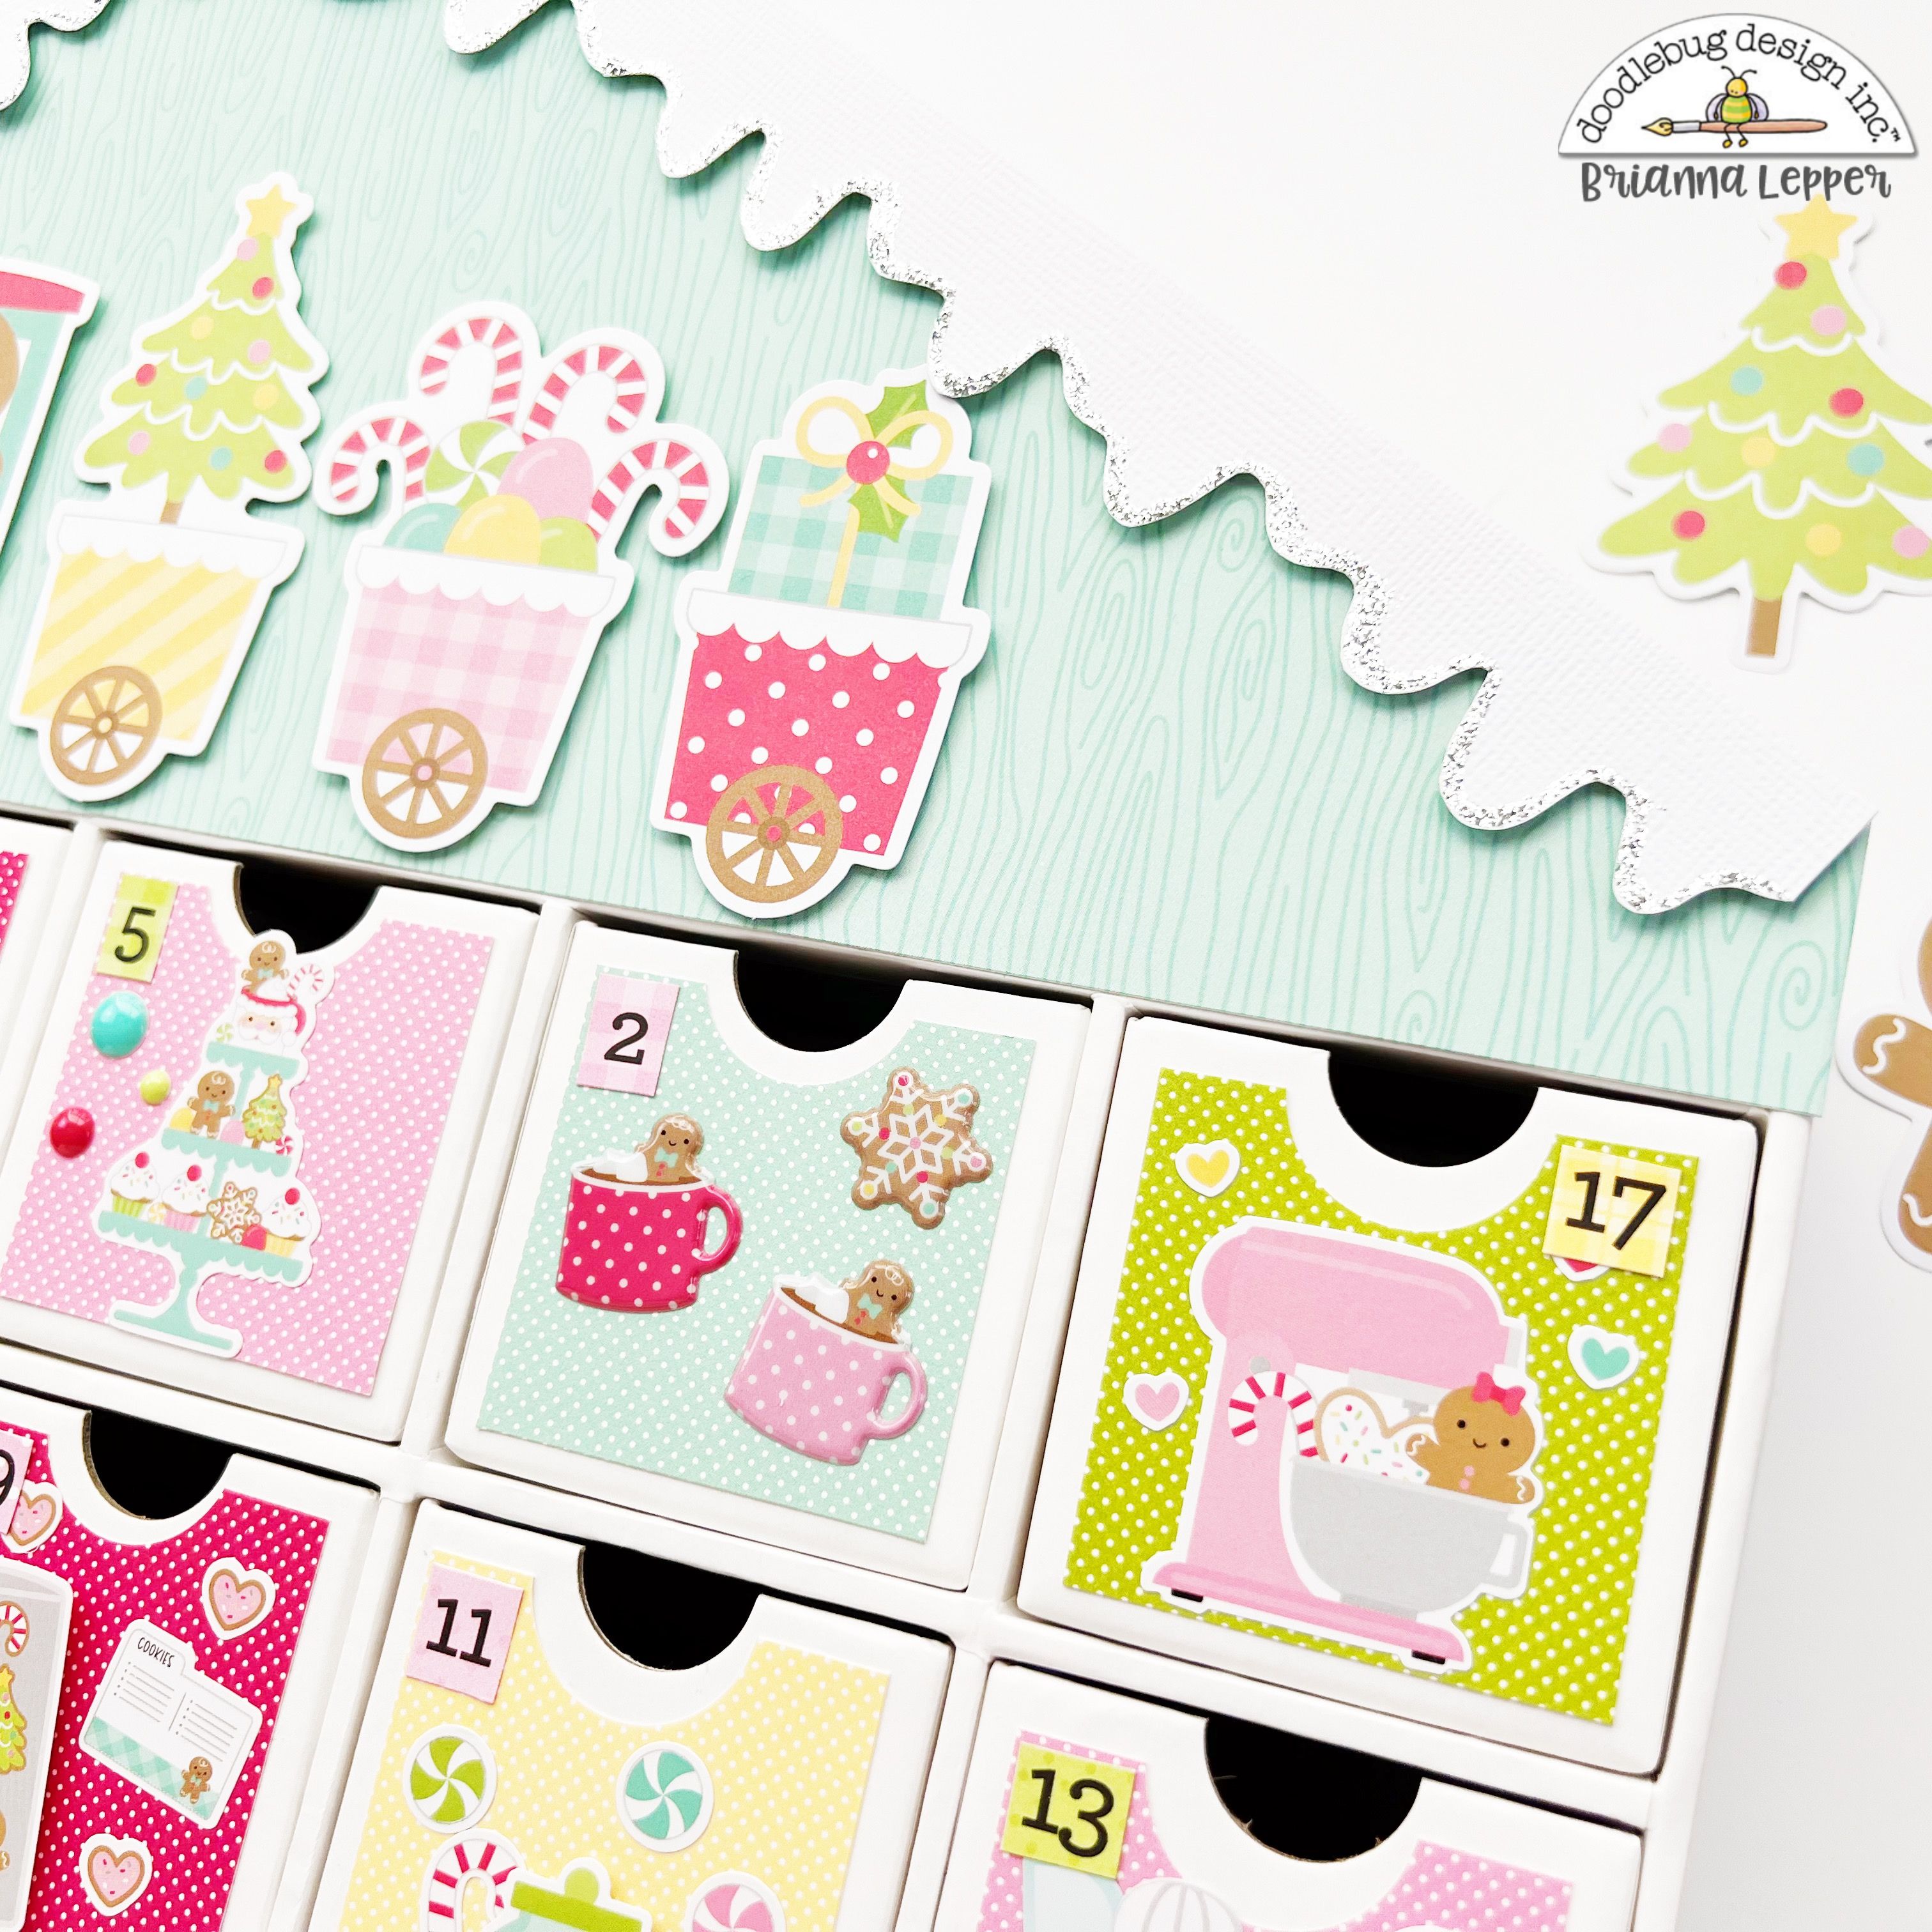
I decided to work on the top of my calendar first, so I measured and cut two pieces of the Pistachio Buffalo Check -Wood Grain paper. Since the front part of the roof is a bit of a unique shape, I measured the bottom (largest straight edge) and cut it into two. Next, I put each piece up against the shape and sort of pushed it against the long diagonal shape of the roof to make an imprint on the paper. Totally not a fancy technique, but it worked just fine! After carefully cutting along that line, I then adhered both pieces down with the wood grain side facing up.


Next, I measured and trimmed out some white cardstock that I planned to adhere to the eaves portion of my roof. I wanted that fun frosting/icing look so I cut into each strip creating a wavy look. Then I added some silver Stickles to the edges for a bit of sparkle. I popped them up on foam tape and adhered it to the edges of my roof. I thought it would be fun to add the train from the Odds & Ends pack and I love how cute it looks!


Next, I got to work on the drawers and cut 2"x2" inch squares using the Swiss Dot Rainbow Petite Prints 6x6 paper pad. I used a 1" inch circle punch to create the notch in the top of each one. After I adhered each one down, I trimmed out the numbers from the Christmas Jammies 12x12 paper and added them to each drawer.


Now it was time for my favorite part... embellishing all of the cute drawers!!! I used the Mini Icons stickers, Puffy Icon stickers and Enamel Dots to embellish. The Mini Icons were the perfect size.


I loved being able to display each sticker/icon and I popped some up on foam tape for a bit of interest. There are so many adorable elements in this collection and this project was definitely perfect to highlight a lot of them.


Here's one last look at this festive advent calendar. I can't wait to fill each drawer up with fun activities to do with my kiddos year after year! I can't wait to see how you decorate yours, please tag me on social media!


Thank you so much for stopping by today, I hope that I've inspired you in some way! See you in my next post friends!


DOODLEBUG PRODUCTS USED

Gingerbread Kisses Collection
Swiss Dot Rainbow Petite Prints
Buffalo Check - Wood Grain Petite Prints


OTHER
White Cardstock
Silver Stickles
Pin It button on image hover