Showing posts with label Advent Calendar House. Show all posts

Tuesday, November 14, 2023

ADVENT CALENDAR HOUSE - WINTER WONDERLAND | with Karen

When my girls were smaller, one of our favourite traditions during the Christmas season was spending a few minutes together on the couch in the morning with our Advent calendars. Their favourite calendars were the ones that made it a little bit hard to find the actual day, hidden in pictures or patterns. They would get so excited when they finally found the date. So I knew when Doodlebug released an Advent calendar, I wanted to try to capture that "hide and seek" feel.

  Full-Calendar 

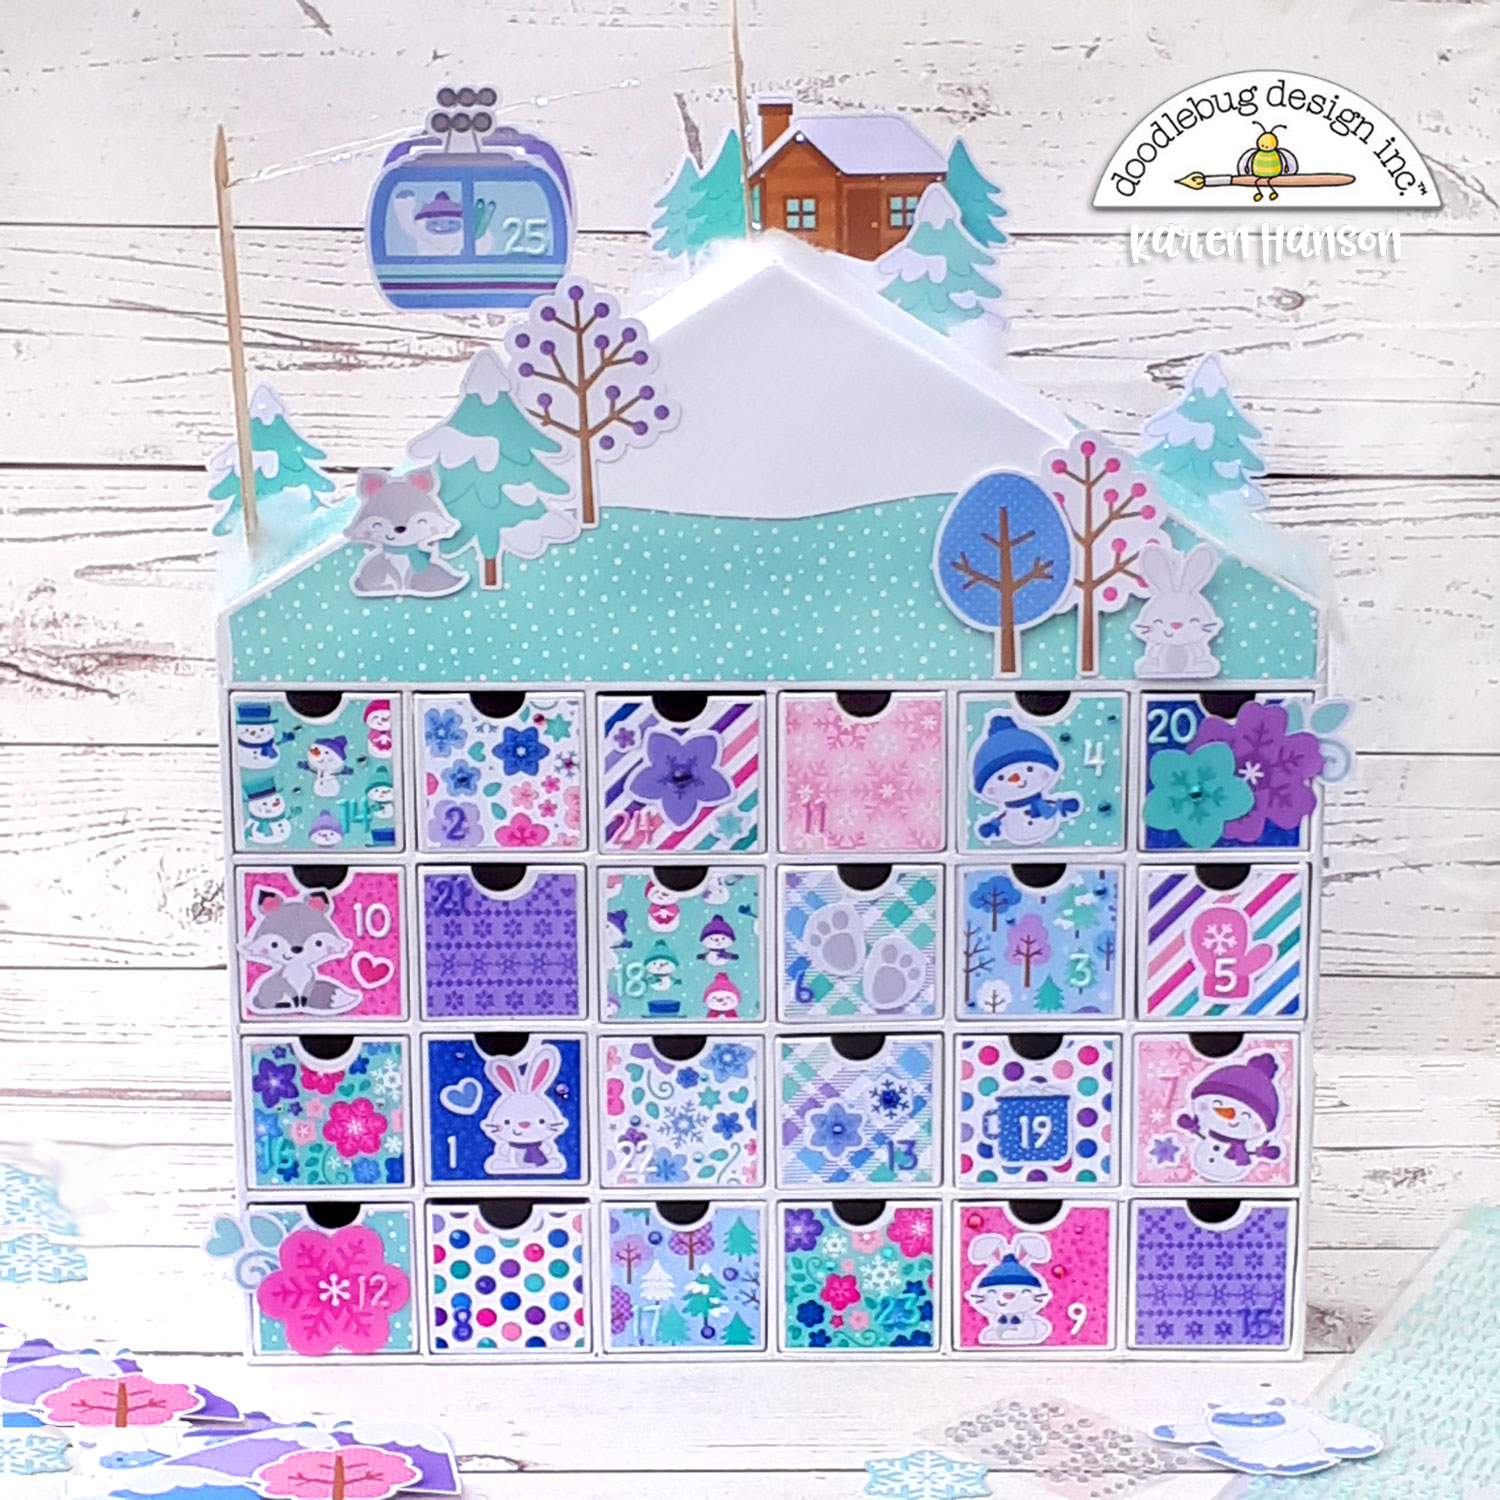
 I also knew that I wanted to see if I could incorporate one of the most elusive "hiding" characters (and my personal favourite Doodlebug character of all time) - the YETI! But we will get to him later! 

  Drawers 

For this calendar, I used the Winter Wonderland collection. The papers and patterns in this collection are spectacular - no dull winter scenes here. I mixed and matched the patterns, cutting each door at 2 1/4" x2 1/4" each with about 2 doors for each pattern. I then grabbed the Alphabet Soup Puffy stickers for the numbering. On some of the doors, I used contrasting number so they would stick out and be easy to find (like #1 in the photo). But for other doors, I decided to hide the numbers a bit more by using a matching colour and disguising it in the pattern (like door #22 beside door #1). I really love the way the doors turned out. The patterns are amazing and I love that you really need to look to find some of the dates! Mission accomplished.

  Top-Scene-2 

And the best part of this calendar is that you don't have to have any fancy tools to decorate. The scene at the top and embellishments on some of the doors were simply created with the die cuts in the Odds and Ends pack - both the regular Winter Wonderland pack and the Snowflakes pack. Just use some adhesive and you are all set!

  Tree

I did jazz up some of the die cuts by poking holes in them and stringing some small LED light behind the holes. You can see this feature on a couple of trees and along the cabin.

  Top-Scene1b 
 
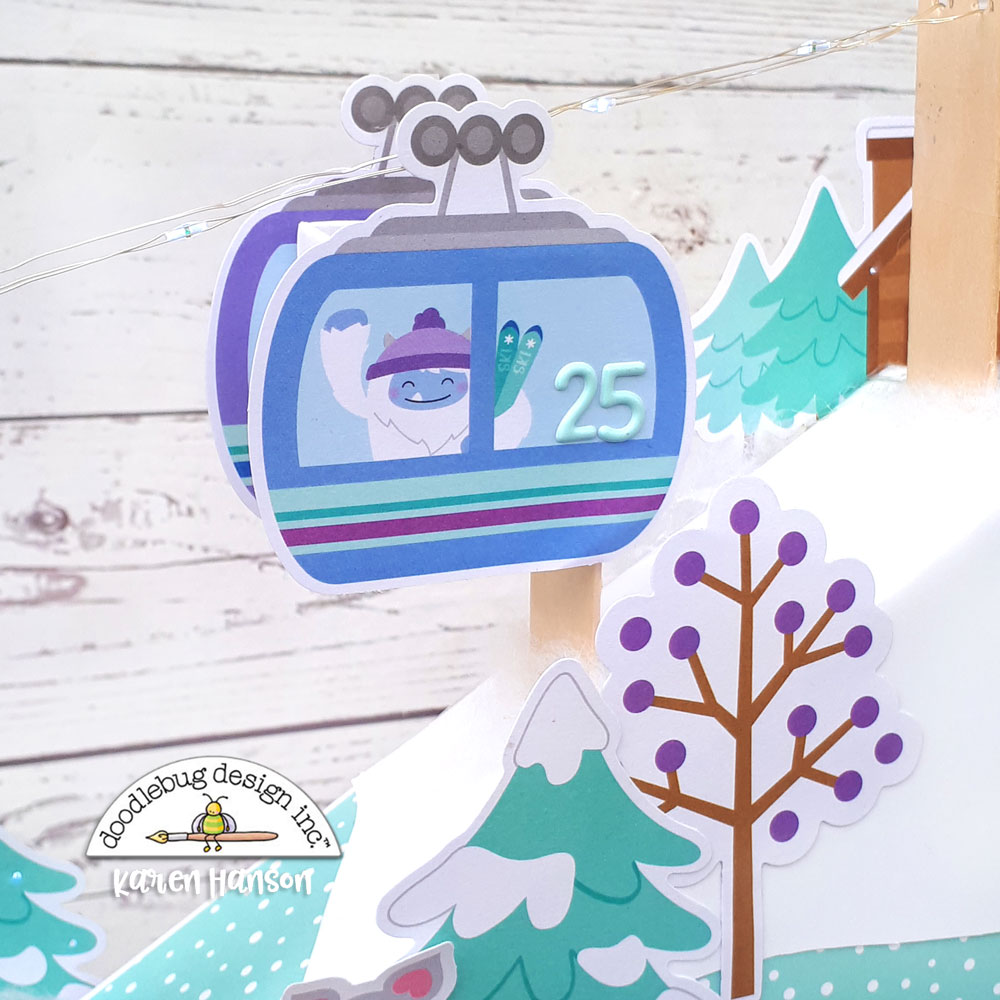
And then of course, the Yeti! Harry gets to make an appearance here to riding a little gondola to the top of the calendar. I actually took the chimney feature off of the calendar and used it to combine two gondola die cuts (front and back), creating a little box in a rather unusual location for one last special treat. This also gave me a really sturdy way to attach the gondola with a hidden craft stick. I took the picture from this angle so you could see the stick (it pokes down right into the top part of the calendar)...

  Top-Scene-1a 

 ...but from the front, with a special placement of some die cut trees, it looks like it is suspended above the mountain. Some more of the LED string complete the look of the cables. While not your traditional advent calendar, I am in love with this version. If you have a favourite Doodlebug collection, don't be afraid to use it on a project like this. There is no wrong collection to use! And trust me, this will not be the last time you see Harry on one of my projects! Thanks for stopping by! Hugs,


BLOG | INSTAGRAM

DOODLEBUG PRODUCTS USED

Advent Calendar House
 Winter Wonderland collection
Mini jewels - variety of colours
Alphabet Soup Puffy Sticker

OTHER

Adhesive
Craft Sticks
Mini LED lights
Cotton stuffing

Monday, November 13, 2023

ADVENT CALENDAR HOUSE - GINGERBREAD KISSES | with Brianna

Hey friends!! I am so excited that it's my turn to share how I decorated my Advent Calendar House! I love seeing how everyone is decorating theirs and it's so fun to see different collections and themes being used. You can get so creative with these!! I decided to use the Gingerbread Kisses collection since I have my sweet girl this year and we will be continuing on with all of the fun traditions each day in December. Here's my calendar:


I decided to work on the top of my calendar first, so I measured and cut two pieces of the Pistachio Buffalo Check -Wood Grain paper. Since the front part of the roof is a bit of a unique shape, I measured the bottom (largest straight edge) and cut it into two. Next, I put each piece up against the shape and sort of pushed it against the long diagonal shape of the roof to make an imprint on the paper. Totally not a fancy technique, but it worked just fine! After carefully cutting along that line, I then adhered both pieces down with the wood grain side facing up.


Next, I measured and trimmed out some white cardstock that I planned to adhere to the eaves portion of my roof. I wanted that fun frosting/icing look so I cut into each strip creating a wavy look. Then I added some silver Stickles to the edges for a bit of sparkle. I popped them up on foam tape and adhered it to the edges of my roof. I thought it would be fun to add the train from the Odds & Ends pack and I love how cute it looks!


Next, I got to work on the drawers and cut 2"x2" inch squares using the Swiss Dot Rainbow Petite Prints 6x6 paper pad. I used a 1" inch circle punch to create the notch in the top of each one. After I adhered each one down, I trimmed out the numbers from the Christmas Jammies 12x12 paper and added them to each drawer.


Now it was time for my favorite part... embellishing all of the cute drawers!!! I used the Mini Icons stickers, Puffy Icon stickers and Enamel Dots to embellish. The Mini Icons were the perfect size.


I loved being able to display each sticker/icon and I popped some up on foam tape for a bit of interest. There are so many adorable elements in this collection and this project was definitely perfect to highlight a lot of them.


Here's one last look at this festive advent calendar. I can't wait to fill each drawer up with fun activities to do with my kiddos year after year! I can't wait to see how you decorate yours, please tag me on social media!


Thank you so much for stopping by today, I hope that I've inspired you in some way! See you in my next post friends!


DOODLEBUG PRODUCTS USED

Gingerbread Kisses Collection
Swiss Dot Rainbow Petite Prints
Buffalo Check - Wood Grain Petite Prints


OTHER
White Cardstock
Silver Stickles

Sunday, November 12, 2023

ADVENT CALENDAR HOUSE | with Cynthea

For the past couple of weeks, we've challenged our Design Team to create their own unique versions of our new Advent Calendar House.  But did you know the the Gingerbread Kisses Collection has papers made specifically to embellish the calendar?  All you need to decorate it is a few sheets of paper!


This Gingerbread Kisses - Christmas Jammies paper comes with the 24 boxes, as well as some elements you can use to decorate the "attic" of the Advent Calendar.  You just need to cut the boxes apart,  punch the half circle  using a 1" circle punch and glue them directly to the front of each drawer!  Cynthea used the "b" side of the Christmas jammies paper to cover the attic part of the house, and cut the window pieces to embellish.


You can also dress the Advent Calendar up even more like Cynthea did, just add a few extra embellishments.  She added some other elements from the Gingerbread Kisses collection including the Icon Stickers, Sprinkles & Shaped Sprinkles and some Doodle Pops to the existing designs, popping some up to add dimension!


These few additions make a big impact!  Here are some close-ups!


So whether you use just the Christmas Jammies paper or decide to embellish a bit more, you will get  fabulous results!  This would be a great weekend project with the kiddos, or friends!  Have a great day!


DOODLEBUG PRODUCTS USED

Advent Calendar House
Gingerbread Kisses - Christmas Jammies Double Sided Cardstock (3)
Gingerbread Kisses - Icon Stickers
Gingerbread Kisses Assorted Sprinkles
Peppermint Place Shaped Sprinkles
Gingerbread Kisses Shaped Sprinkles
Gingerbread Trimmings Shaped Sprinkles
An Eye for an Eye Shaped Sprinkles
Deck the Halls DoodlePop
Hello Santa DoodlePop
Christmas Cookies DoodlePop

Saturday, November 11, 2023

ADVENT CALENDAR HOUSE GINGERBREAD KISSES ADVENT CALENDAR | with Tarrah

Are you getting excited for Christmas?! I know I am! What better way to start getting excited than to count down the days with one of the gorgeous new  Advent Calendar Houses! 


With 24 little drawers in the calendar, there are plenty of options to add cute little trinket gifts for each day counting down! I decided to cut into the attic of the house using my craft knife and metal ruler to create some little scenes in the attic. I just love all the gorgeous embellishments in the Gingerbread Kisses collection and used quite a few just in the attic space! I lined the back wall of the attic with the 'Merry and Bright' patterned paper and then added lots of embellishments. I added 3 of the adorable Doodle-Pops including the Candy Cottage one, the Deck the Halls one, the Holiday Treats one and also the Gingerbread Kisses one too! I also added a few die-cut pieces from the Odds and Ends pack. To add some more dimension, I added some of the sprinkles to the tops of the cupcakes etc.


For the chimney, I added some of the 'Gift Wrap' patterned paper around the outside and then added the Hello Santa Doodle-Pop inside the chimney! I also added some of the die-cuts to toothpicks and stuck those in too. On the outside of the chimney, I added a die-cut heart and a puffy Gingerbread man. I covered the outside edges of the house/calendar with the 'Holiday Sprinkles' patterned paper and then added some of the puffy shapes to the joins in the calendar. Around the outside edges I took the pink cardstock and punched some scallops to create a decorative edge. I then added the gorgeous puffy heart shapes to the centres of the scallops. I added the die-cut wreath at the top for some more interest.


For the front of each drawer, I took cardstock in dark pink, lime, aqua and yellow and had my Silhouette Cameo cut out 6 squares of each colour, I then punched a half circle at the top of each square and adhered these on. Next I took the Cookies for Santa paper and punched out 24 scalloped hearts and added craft foam behind them all. I then took the Alphabet Soup Alphabet stickers and added numbers 1 - 24 on each drawer. I did have to improvise for these as I ran out of number 1 and 2! These were all glued on and then I added a small embellishment to each drawer. For the very edge of the house, I glued a paper straw to each side from my stash and glued in candy cane die-cuts at the top of each straw.


I absolutely LOVE how my house/advent calendar turned out and hope I have inspired you with an idea of what to do with your Advent Calendar! Thanks for stopping by today! Happy creating!


DOODLEBUG PRODUCTS USED

Advent Calendar
Gingerbread Kisses collection
Gingerbread Kisses Cardstock Assortment pack
Alphabet Soup stickers in Bon Bon
Puffy Hearts in variety of colours

OTHER

Scallop border punch
Scallop heart punch
1" circle punch
Paper straws
Toothpicks

Friday, November 10, 2023

ADVENT CALENDAR HOUSE HELLO AGAIN STORAGE BOX | with Niella

Hello Again crafty crew! I've got a twist on the Advent Calendar House so let's jump straight into my latest project that I've loved creating! It's an amazing size at 15 x 16" and houses 24,  2.25" inch drawers, so there's plenty of room to play.  And because it's shaped like a house, it's super delightful! I decided to add my own spin to this and created a storage unit AND cut windows and added acetate to 12 drawers so you can see what's housed! So yay; surprise :-) And using the Hello Again collection was a perfect fit.


I started to decorate each drawer by using the enclosed template to cut 24 2" squared patterned papers; these ones here are from top left: Holiday Sprinkles (brown paper), Berry Floral (pink paper b-side), Cookies for Santa (white paper) from Gingerbread Kisses and bubblegum dot-stripe (pink stripe paper) from the Rainbow Petites pack. Then I laid down the roof background patterned paper with Butterfly Garden from Hello Again. So darling right - I adore the mix of papers and colors!


Once all the foundation papers were set on each drawer, I decorated each with the ephemera, icons stickers, sprinkles and the mini icon stickers, so many cute things in the Hello Again collection to use! And I love how all Doodlebug Design collections coordinate so fabulously!


Using pop dots and foam tape behind the ephemera pieces gives depth and texture to the house. I Love that stack of books and sprinkling around the epoxy flowers and see that cute tea bag! Swoon!


I was so pleased with the result of cutting windows!   Decorating with a general themed collection means I can display this beauty in my craftroom all year round! It serves such a great function for storage for mini ribbon spools, bottled sequins, pom poms, buttons and in the non window drawers I can stash candy and chocolate which is such a necessity when crafting... heehee.


Thanks so much for popping by my crafty crew - it's always so nice to see you! Remember to tag us in on your Socials so we can see all your Doodlebug Design projects. Until next time, doodle doo!


DOODLEBUG PRODUCTS USED

Hello Again collection
Gingerbread Kisses collection

OTHER

acetate
foam dots/squares


Thursday, November 9, 2023

ADVENT CALENDAR HOUSE SANTA & REINDEER COUNTDOWN | with Lisa

After Halloween, I'm happy to go right into the Halloween-Christmas transition phase. I'm not the Christmas-starts-on-November-first-kinda-lady, but I'm always happy to start creating with a new collection! This time, we got the amazingly cool Advent Calendar House and I tried to embellish mine as cute as I possibly could... :)


To start  I used acrylic paint to paint the whole thing in Christmas colors with an ombre effect. I let that dry and in the meantime, I machine cut the parts for the Christmas Magic Santa on Reindeer SVG.

When they were done, I assembled them and added details, like cheeks, highlights, scribbled borders... The reindeer also got a gold bow and Santa got some cute little hanging legs, which I made with paper beads.


I added gold glitter paper around the chimney and also added white and gold splatters to the house.

For my drawers, I wanted to add knobs, rather than use the half circle to open.  I cut squares from 4 colors of Sprinkles Petite Prints and adhered them to the drawers, covering the hole. For the draw pulls,  I used different beads and adhered them with hot glue.


I used Abigail, Alphabet Soup and Sunshine Alpha stickers for my box numbers. Then I added two Doodle Pops, enamel stickers, enamel dots and jewels to the drawers.


I hand-cut letters in white cardstock to spell NOEL and added it to the roof.  I also die-cut  big stars in gold to add to the roof as well. The last thing I added is a scalloped  border, using the same gold glitter paper. I also added smoke coming out of the chimney with some fiberfill! Cute!


Now, I only need to fill my house with the cutest little things from Doodlebug and it's ready to go! I hope you have fun decorating your own Advent calendar! :)

DOODLEBUG PRODUCTS USED

Advent Calendar House
Gingerbread Kisses Collection
Gold enamel dots from Hello Again
Sprinkles Petite Prints in Cupcake, Swimming Pool, Pistachio and Coral|
Textured Cardstock
Sunshine, Abigail and Alphabet Soup Alphas in Gold

OTHER

Beads
Gold Alphas
Gold glitter paper
Fiberfill

Wednesday, November 8, 2023

ADVENT CALENDAR HOUSE - GINGERBREAD KISSES CHRISTMAS COUNTDOWN | with Miguel

The advent calendar is something very exciting for children and adults, it is the countdown to Christmas Eve and the arrival of Santa Claus!  Doodlebug surprised us with this new Advent Calendar House blank to decorate for the season!

My calendar is decorated with the beautiful Gingerbread kisses collection which consists of a sheet included with the numbered boxes from one to twenty-four to decorate our project.


I cut each square from the sheet and backed it on red cardstock to give it a little more color and then punch with a 1" hole punch to make the half circle at the top, matching each drawer of the calendar.


The top and sides are decorated with papers from the same collection and in the center place this beautiful window with Santa Claus and a very sweet garland, use chit chat and some borders for more decoration.


Thank you for stopping by, I invite you to create your own version of the advent calendar and wait for the arrival of such a beautiful date together with the family. See you soon!


DOODLEBUG PRODUCTS USED

Advent Calendar House
Gingerbread Kisses Collection

Tuesday, November 7, 2023

ADVENT CALENDAR HOUSE - HELLO AGAIN STORAGE | with Nathalie

Today, I want to show you a little twist for your Advent Calendars. Maybe is the fact that we have adult children, and that we live in an apartment, that pushed me to look at this project as a storage case that can live in my common area throughout the year... Let me show you what I have created:

As you can see I went with a design that can easily fit in any room of my apartment where we need storage for little items (my daughter is already thinking about a second one for her earrings and make up)

I used the 6x6 Dot/Stripe Petite Print pad and the12x12 Dot/Stripe papers to cut the covers for each box. My inspiration for the colors was one of my favorite collections of this year, HELLO AGAIN. I also used the Butterfly Wishes Doodle cuts to create matching butterfly die cuts and attached them to the front of each box.


For the top of the calendar, I used patterned paper from the Hello Again collection to cover the top and the roof of the house. I used a die to create the window and shutters and added that to the top of the house. I added a bit of pom pom trim to the edge of the house to mark the roof of the house. Then continued the butterfly theme to the top of the window and shutters..

Once it was all ready, I filled the little boxes with my Doodle pins and a few favorite little trinkets. Like I said, it is the perfect place for some extra storage.

I hope this gives you a new idea for your Advent Calendars. Remember to share with us what you create!  XO

.

DOODLEBUG PRODUCTS USED

Advent Calendar House
Doodle Cuts Butterfly Wishes
Hello Again collection
Dots & Stripes Petite Prints
Dots & Stripes 6x6 paper pad
Smooth Cardstock

OTHER

Window Die
Pom-Pom Trim

Pin It button on image hover