Showing posts with label Paper Flowers. Show all posts

Tuesday, April 9, 2024

DOODLEBUG SHAKERS FLORAL SNOW GLOBE | with Karen

Sometimes a product comes along that you didn't know you needed in your crafty life until it is in your hands. You stare it down, put it to work and then quickly realize...there is no going back. That, my crafty friends, happens to be the exact experience I had with Doodlebug's new Shakers. These amazing little spheres have me going gaga! I had no idea I was going to love them as much as I do.

   Shakers-2 

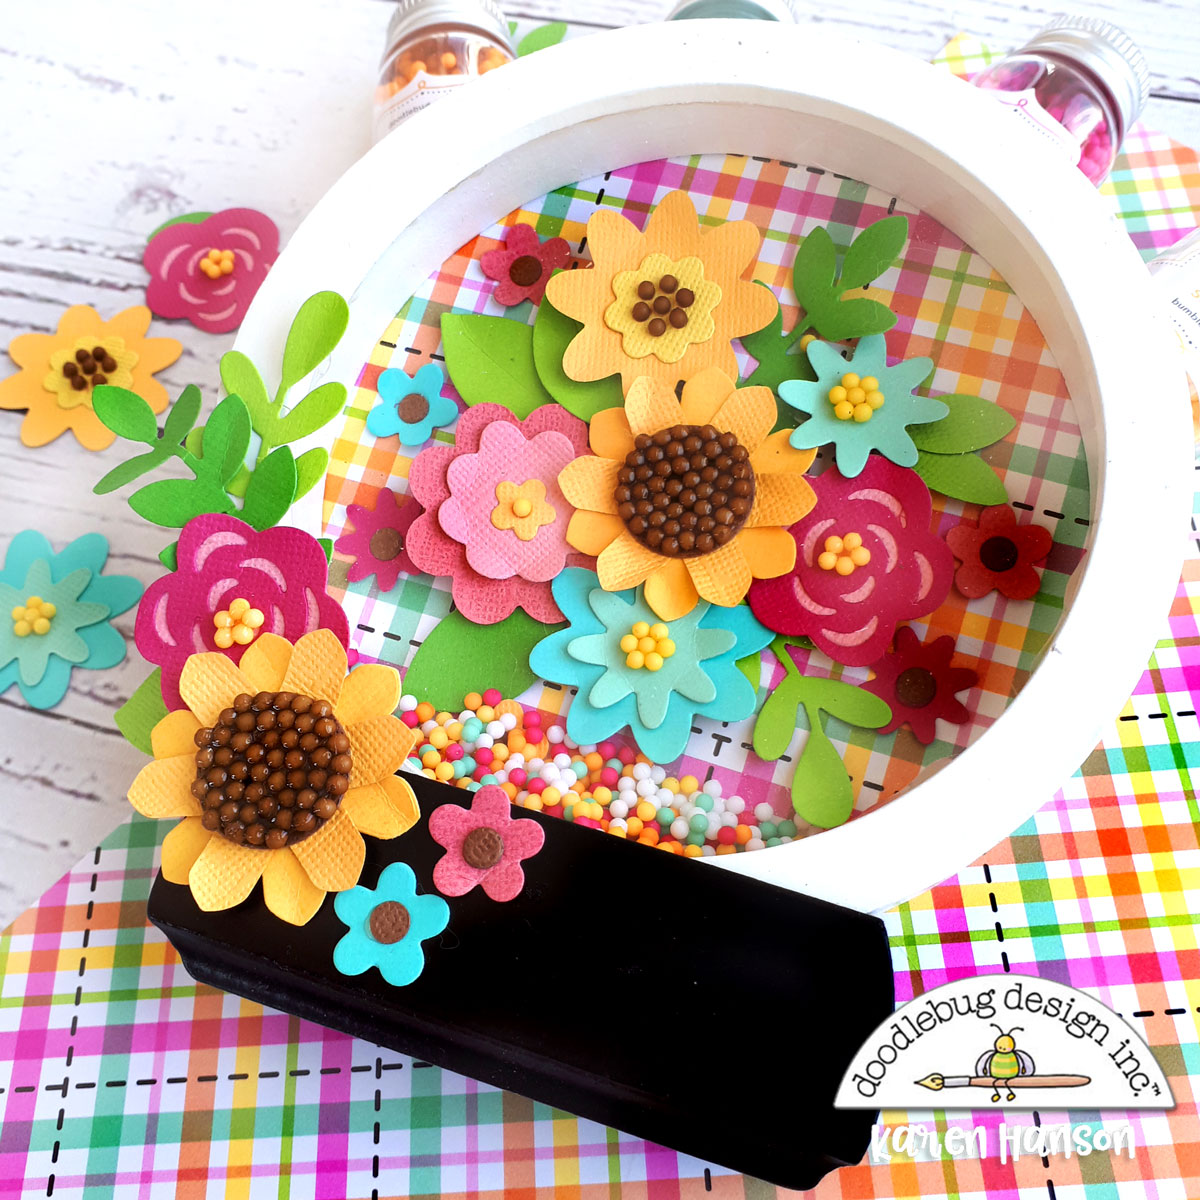
You see, I love to make paper flowers. And I am always looking for ways to add definition and texture to the flowers. Take this set of flowers that I created with Doodlebug's Thanks a Bunch and Hello Fall Doodle Cuts and some textured cardstock. I wanted to create a little floral scene inside the adorable new DIY Kit - Snow Globe. So I whipped up a few flowers to team up with the Shakers inside the snow globe. But as I was sitting at the crafty table, I realized that not only will the shakers be adorable inside the snow globe, but they could make the most amazing centres for my flowers.

  Shakers-closeup-2 

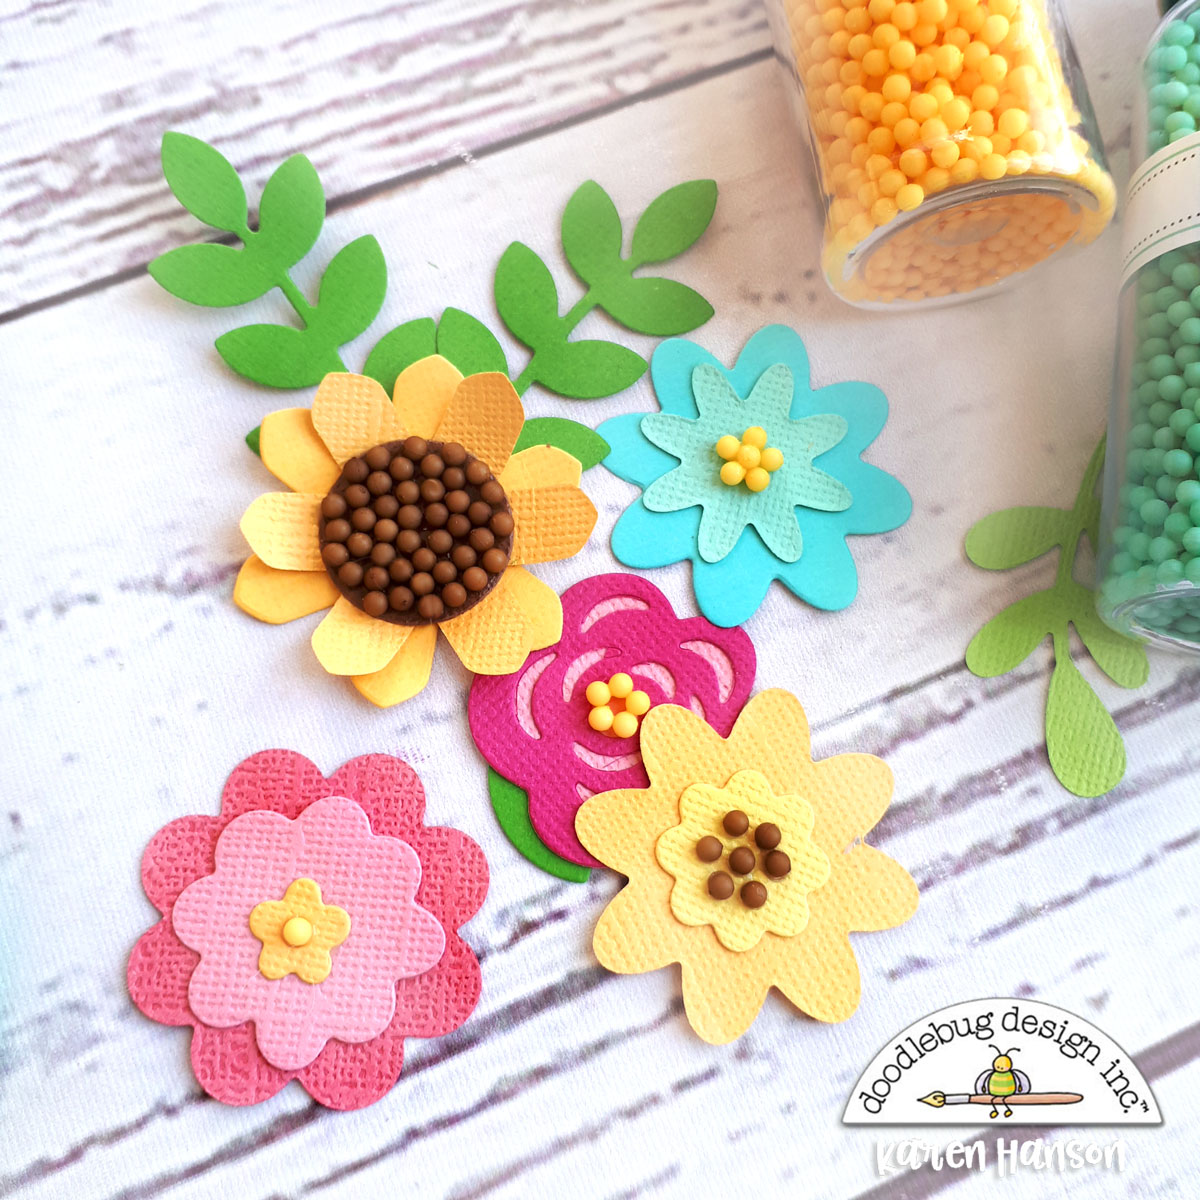
So I got out some liquid adhesive and my tweezers and voila! In fact, not only did they work, but they were the perfect size! I played around with different placements and had a blast adding that little bit of extra to each flower.

  Shakers-closeup-1 

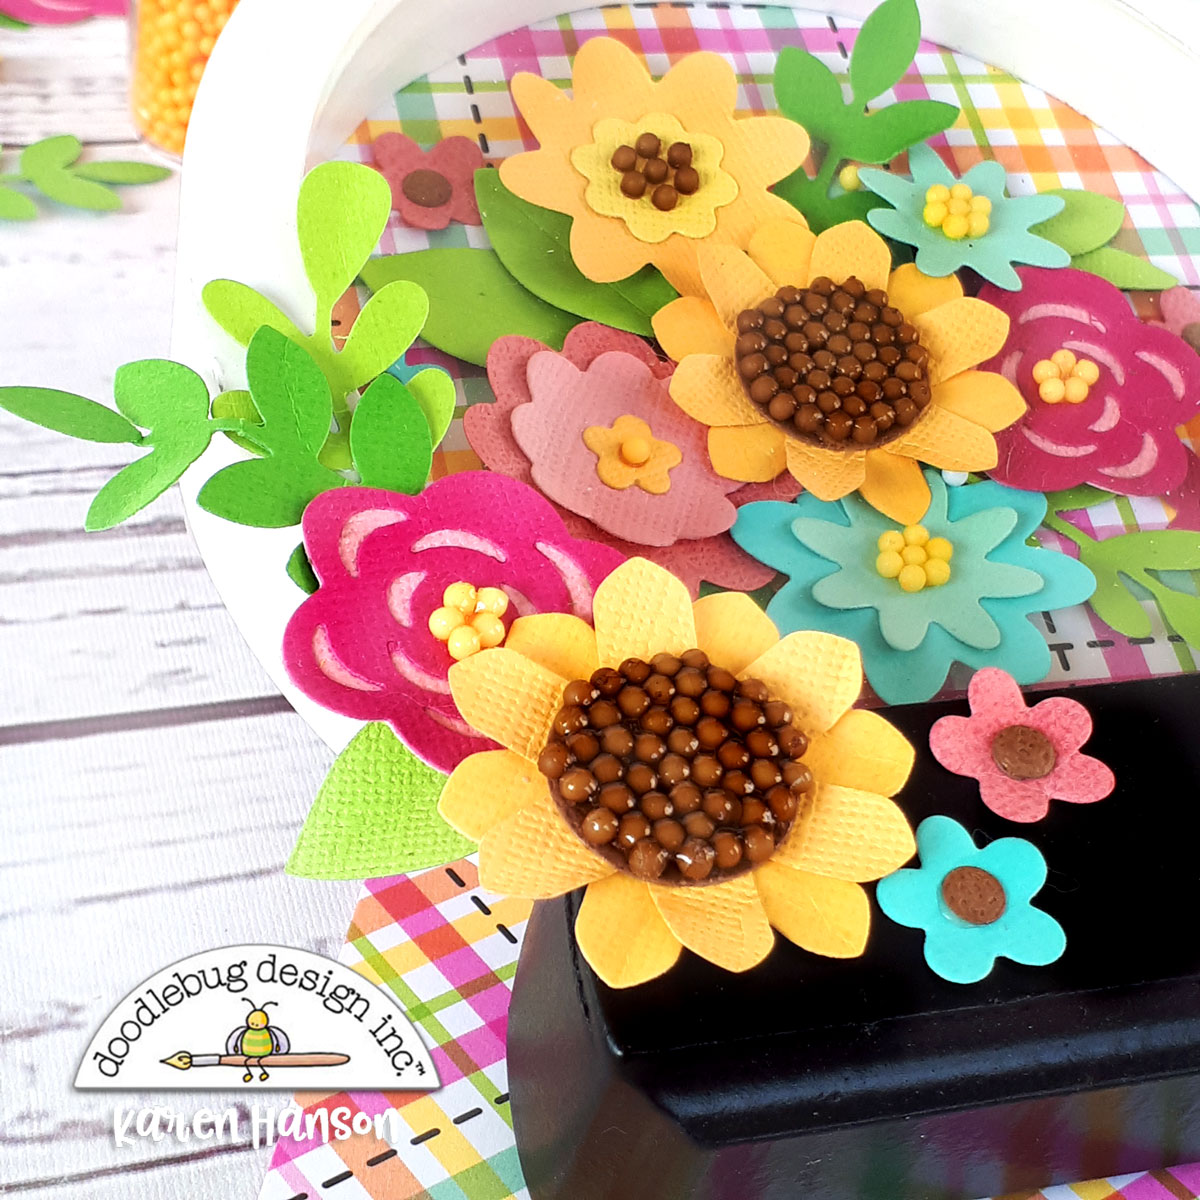
Now, before I go on, I do have to say that this is not for the faint of heart. It is a bit tedious, but if you love fiddly work (think - diamond painting tedious), you are going to love this! For the two sunflower florals, I added a layer of Glossy Accents on the top too...I actually really loved it without but I wanted to make sure they stayed in place in case this décor piece gets moved around or bumped here and there.

  Shakers-1 

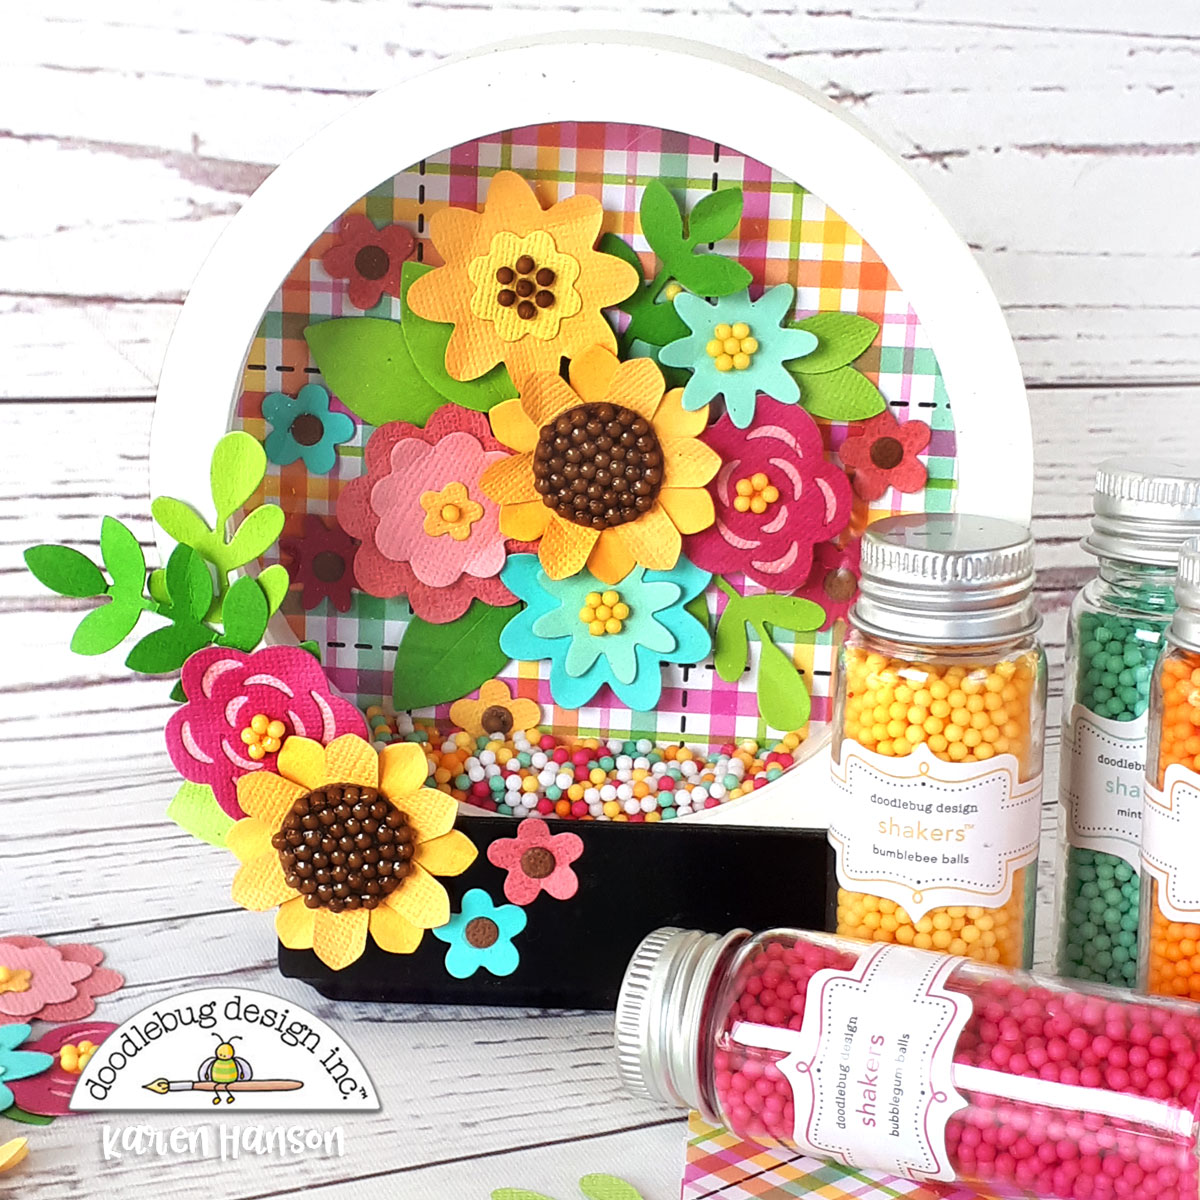
I love the way this piece turned out - and it wouldn't be nearly as amazing without those Shakers! It's like the sprinkles on top of a cupcake - delightful without, but something extra "yummy" with them on. I have a feeling that Shakers are going to become a new obsession for me! Doodlebug, why do you have to do this to me??!!! Thanks for stopping by! Hugs,

DOODLEBUG PRODUCTS USED

Hello Again collection - Patchwork Plaid Patterned Paper
 Hello Fall Doodle Cuts
 Thanks a Bunch Doodle Cuts
 Textured Cardstock
 DIY Kit - Snow Globe

OTHER

Liquid Adhesive
Glossy Accents

Saturday, September 2, 2023

HELLO AGAIN GOOD TIMES LAYOUT | with Tarrah

You can't go past a pretty round design on a scrapbook layout right? Especially when it comes to using the gorgeous Hello Again collection!  All the florals and butterflies are so gorgeous! I just love them! The photo that I am documenting suited this collection perfectly!


I took 2 sheets of the Forever Flowers paper and completely fussy cut the scalloped circle. I then cut this piece in half and set it aside. I took the other sheet and using my craft knife, I carefully and partially cut the scallops out on the top only. I trimmed this whole piece to measure 11' x 11' and adhered it to the Pink Poppies paper. I then bent back the scallops that I had cut out to reveal some of the pink in the background paper. I then took the half piece I cut first, flipped it over and adhered this piece using craft foam, to the bottom half of the scalloped circle, I placed craft foam adhesive to the bottom parts of the circle only so that I could create a sort of pocket to tuck items in.


I took one of the scalloped border stickers from the This and That Cardstock Stickers and placed it along the straight edge of the pocket. I placed my photo on the left side of the page, layering a few Bits and Pieces cardstock pieces behind. I adhered a sun cardstock die-cut piece and a puffy sun on top in the top right corner of my photo. I adhered my title to the right of my photo using craft foam pieces to add some dimension to my page. I tucked in one of the round die-cuts and also placed a rainbow puffy heart. I love the small flowers that I added to the holes in the O's in the word 'Good'.


In the bottom corner of my photo, I layered one of the yellow die-cut flowers and added a small yellow puffy flower to the centre. I love how this looks here at it appears to be a continuation of the yellow flowers from the photo. I took a few more of the word and phrase stickers from the This and That Cardstock stickers and placed them around my layout to help tell the story.


On the flowers and butterflies in the wreath at the top, I layered each with a coordinating puffy shape suited to what was printed on the paper. I love how this just adds some more interest, texture and dimension to my layout. If you look closely at these close-up pictures, you can see where I have cut the scallops and folded them back to reveal the pink paper underneath. Lastly I stamped the date stamp and my layout was finished.

I love how my layout turned out and I hope you enjoyed reading about how I created it?! Thanks so much for stopping by today! Happy creating!


DOODLEBUG PRODUCTS USED

Hello Again collection

OTHER

Date stamp
Black ink

Monday, August 28, 2023

HELLO AGAIN STAY COOL LAYOUT | with Guest Designer Ali Skifton

I am so happy to be sharing my third layout as Guest Designer this month using the fantastic Hello Again collection.   

I used a 12x12 white cardstock as my base. The mixed media was created with two different stamps from my stash, and I used a pretty blue ink to match the blue in the Hello Again collection. 

 
The hexagons were cut out of the 6x6 paper pad, and I used 8 different cute patterns for this page.  

I created three flower clusters for my page.  I used the flower die cuts from the Bits & Pieces and added some flower sprinkles from the Hello Beautiful set on top of them.  I just love how the sprinkle flowers shine.  Foam tape was added behind the die cut to add dimension to the page and I also went underneath to add some gold leaves and dots.  You can never have enough gold bling.  Don’t forget to add cute butterflies from the All Aflutter Sprinkles when you have flower embellishments, I added one to each flower cluster.


Two more flower clusters were added to the page for a triangle effect, which is very appeasing to the eye.  Thanks for joining me today and I hope you have a wonderful day!


DOODLEBUG PRODUCTS USED

Hello Again Collection

OTHER

Hexagon Die
Blue Ink
Stamps

Monday, August 14, 2023

HELLO AGAIN GUEST DESIGNER ALI SKIFTON

We are so excited to have a guest designer for our Hello Again collection!  Please give a warm welcome to Ali Skifton!

I am so excited to be the Guest Designer for Doodlebug Design and I get to play with the new Hello Again collection!   I am drooling over the gold foil that is sprinkled everywhere you look. 


I used a 12x12 white cardstock as my base.  I pulled  two 6X6 sheets out of the paper pad and I selected a 12x12 sheet of swimming pool petite print, which I cut down to 6x6.  I handstitched the pink and blue 6x6 paper blocks onto the white cardstock with white thread.  I went with the pink thread to sew around the 6x6 heart paper. 

I double matted my photo from Barbie Café and added foam tape behind it to pop off the stitched heart paper.  The die cut; You Make the World a Better Place was a perfect title to document my trip to Barbie Café in Chicago. 

These flowers in this collection are my favorite!   I layered a bunch of them around both sides of my picture, so they are wrapping around it.  On the right side of my picture, I added a butterfly doodle-pops that is floating around the pretty flowers.  

The sprinkles were perfect to add to the center of the flowers to make them pop even more.  I used foam tape behind some of the Bits & Pieces to give the page a garden feel.   I sprinkled gold hearts and gold enamel dots around the flower clusters.

Thanks for stopping by!  I am sure you want to pick up this collection if you haven’t already! 


 DOODLEBUG PRODUCTS USED

Hello Again Collection
Gingham Linen Petite Prints

OTHER

Sewing Machine/ Thread

Thursday, August 10, 2023

HELLO AGAIN ENVELOPE ALBUM | With Traci

Hey guys! Traci here and today, I'm sharing a flower-filled "Friends" mini album. I made it with the beautiful Hello Again Collection and some simple white envelopes. I love, love, love this new collection. It has so many gorgeous embellishments to choose from, so ... I just packed a little bit of everything into this mini!🌸

I used five 6.5"x 5" envelopes, all facing pocket side up. Since I wanted to fill the cover with these colorful flower die cuts, I knew I would lose the first pocket. But this cover is so pretty ... it was totally worth it! 

At the bottom, I added the "friends" title from the Chit Chat, gold foil scalloped washi tape from the original Hello Collection, and a pink border sticker from the This & That.

The Bits and Pieces include such pretty flowers, leaves, and shapes AND some have gold foil on them! I layered them at the top and added lots of shiny enamel sprinkles. I added the year with metallic gold Alphabet Soup puffy stickers and finished it off with the Fancy Flutters butterfly Doodle-pops. I love it all!

Inside, I covered each page with a different 12x12 print. Here, I used the Butterfly Garden paper and added back-to-back matching die cuts at the top. I included another butterfly Doodle-pops, some tiny metallic gold hearts from the Hello Love shape sprinkles, and the "best friends forever" sticker from the This & That.


The love the smaller sized prints in the 6x6 paper pad. I used one of the journaling cards from it on the page above. The pretty butterfly is from the Odds & Ends and I added a gold enamel dot on the butterfly for more shine. 

On this page, I chose a fabulous tag and more flowers from the Bits & Pieces, some twine, and a few gold hearts and dots. Like I said, I added a little bit of everything and it was so much fun!

I lined the inside of the pockets with beautiful pattern papers and included a card for photos, journaling, or memorabilia. Here, I added a cute "memories" sticker (This & That sheet) to a tab from the bits & pieces and a pink border sticker from the same sticker sheet

On this pocket, I created a little neighborhood scene. To make it a bit more to scale, I mixed pieces from the Odds & Ends and mini icons stickers. So cute!

I hope my Friends envelope mini album inspires a cute project idea for you. The Hello Again Collection is just amazing and I love all the gold foil accents. Happy crafting everyone! 😊

 
DOODLEBUG PRODUCTS USED

Hello Again Collection
Twine in Pistachio
 Gold Scallop Washi Tape from Hello Collection
Alphabet Soup Stickers in Gold

Wednesday, August 9, 2023

HELLO AGAIN LOVE LAYOUT | with Erica

Looking for an easy layout design that will help you photo shine! Try a horizonal design and pull out those gorgeous die cuts!

I am using the beautiful new Hello Again collection and started my layout with a white textured cardstock cut down to 10.75x10.75. I love this size because you can add some beautiful pattern papers to mat the base. I used the 12x12 Dainty Dots behind the white cardstock and it helps make all the colors pop. Next I went in with some Doodlebug Design textured cardstock in Raspberry. For the final layer I used the beautiful Butterfly Garden paper.

I added some layers behind my photo and adhered it the center of my layout. Next I created a shelf of beautiful embellishments starting with three floral clusters from the Bits & Pieces. I added some butterfly Odds & Ends popped up on foam adhesive to give them some dimension.

The Aflutter Sprinkles look adorable around all the pretty die cuts! I used one of the Hello Again chit chat pieces for my title and then created a cluster in the bottom right corner of my layout.

I love how this layout turned out and the photo of my niece is one of my favorites! This sweet little girl having the best time on her dads skateboard!


Thanks so much for stopping by the Doodlebug Design Blog today! If you would like to see the process video you can head on over to my YouTube channel HERE of click the video below! Have a great day!

Hello Again Collection

Tuesday, August 8, 2023

HELLO AGAIN FLORAL CARDS | with Karen

Summer is full of beautiful flowers, and I am not talking about the ones that are our in our gardens! I am talking about the ones you can find in the new Hello Again collection from Doodlebug. If you love florals as much as I do, this collection is needs to find it's way to your crafty space. And if not, I have a feeling you will be jumping on the floral train soon!


For my first project, I decided to feature the floral die cuts that you can find in the Bits and Pieces pack as part of this collection. I love these packs because you don't have to have fancy cutting machines to make beautiful crafts. I also love these packs when I craft with kids because there is no fussy cutting. Everything is cut, there are a variety of shapes and sizes to work from, and all the pieces layer and coordinate perfectly! It really makes card making a breeze!


In this particular collection, there are some fun paper tags in the Bits and Pieces pack too. I layered some of the florals on top of those pieces with some foam adhesive for some dimension and interested. And what makes for an even more beautiful layer? A doily, of course. I have loved Doodlebug doilies for crating since I found the company and I am so glad to see them featured in this collection again. They come in all the amazing Doodlebug colours and in two different sizes.


Finally, one of reason this collection packs a punch is because of the gold foil accents. You will find the foil on different elements throughout this collection and it really does add a little "something". My favourite are the Gold Sprinkles - the shine on these is amazing. I wanted to use the whole pack on these cards!


While I do love my garden this time of year, I also love that I can have a craft garden in my craft space too! I know you will love this collection as much as I do. Thanks for stopping by! Hugs,

DOODLEBUG PRODUCTS USED

Hello Again collection

OTHER

adhesive 

Tuesday, August 1, 2023

HELLO AGAIN GOOD TIMES LAYOUT | with Lisa

OH, MY!!! I'm in LOVE with this new Doodlebug collection!!! Hello  Again is an adorable collection with the cutest gold details everywhere,  I just love it! For my first layout I decided to show a bit of (almost) everything, by creating a wreath layout.


This new coral color is to die for and I wanted to use it as my background. I used the tone on tone side of the Bitty Butterflies paper.  I was inspired to make a wreath by the Forever Flowers paper in the collection. It has this cute scalloped pistachio circle with flowers on it and I cut that out as my base for the wreath.  I used a photo I took in 2019, when I visited the Harry Potter park in Orlando. I matted it with four different patterned papers from the 6x6 paper pad. Then I placed it by the wreath and adhered it.  I added foam squares to the whole thing and added it to the background paper.


Then I used some flower die cuts from the Bits & Pieces around the photo and on the opposite side of the photo to create three clusters. I had SO MUCH fun adding the little embellishments. I used two Doodle Pop Fancy Flutters butterflies and bent up the wings. I added the GORGEOUS gold Sprinkles, which look like gold half pearls(...so pretty!) to the center of some flowers.


I added Puffy Icon Stickers and Jewels.  For my title, I used a die cut form the Chit Chat pack and gold Alphabet Soup stickers. Yes!!! Gold ones... Awwwwww, so beautiful!!  To create dimension, I added some of the embellishments underneath the wreath and some on top. I love how this looks.


To finish, I splattered some white paint, as almost always...;)  Can't wait to sue this gorgeous collection again and excited to see what I can come up with! Thanks for stopping by!


DOODLEBUG PRODUCTS USED

Hello Again Collection
Alphabet Soup Stickers 

OTHER

White acrylic marker

Monday, July 17, 2023

PETITE PRINTS TIME WELL SPENT LAYOUT | with Lisa

This week I have a fun layout for you, created with the wonderful Petite Prints. I was in the mood for an artsy, mixed-media layout, full of color.


To start, I cut out a lot of circles from both sides of the Candy Stripe-Sprinkles and Plaid-Polka Dot Petite Prints. I mainly used Cupcake, Bubblegum, Coral, Bubble Blue, Pistachio and Lemon. 


Then I placed them aside and created my mixed media background. To do that, I ripped random pieces of the 12x12 petite prints papers and placed them on the layout, creating this random, whimsical composition. I adhered them to a sheet of white cardstock and then came in with some white gesso and a dry brush and created a few white spots here and there. I added some color and white gesso until I was happy and then I let it dry.


I added a few strips of the thin gingham washi tapes here and there. I also drew a few crosses with my pencil and splattered some gold paint all over the page. Then it was time to add the flowers. I added them in a diagonal pattern and layered some of them. I added the photo that I matted with a piece of patterned paper and placed it on the layout. I also wanted to add a few green leaves, so I cut some out and adhered those too.


For the centers of the flowers, I addded a bit of liquid glue to each of them and then sprinkled Sugar Coating glitter on top. Love how that looks :) I created my title using Abigail and Skinny alphas. To finish the layout, I added some jewels, I love how this turned out! Thank you for stopping by, see you again soon!.

DOODLEBUG PRODUCTS USED

Candy Stripe-Sprinkles Petite Prints
Plaid-Polka Dot Petite Prints
Jewels
Sugar Coated Glitter
Gingham Washi Tape
Skinny Alpha Stickers
Abigail Alpha Stickers

Pin It button on image hover